
.NET Core + K8S + Apollo 玩轉配置中心
1.引言
Apollo(阿波羅)是攜程框架部門研發(fā)的分布式配置中心,能夠集中化管理應用不同環(huán)境、不同集群的配置,配置修改后能夠實時推送到應用端,并且具備規(guī)范的權限、流程治理等特性,適用于微服務配置管理場景。
如官網(wǎng)所述:Apollo 是攜程打造的開源配置中心,GitHub的星星也快點滿22K,因此足見它的成熟度和社區(qū)活躍度。因此最近在做配置中心選型的時候,經過一番預演,最終敲定Apollo。
Apollo作為微服務體系中必不可少的基礎服務,其架構設計和基本使用我們不得不有所了解。
因此本文接下來將主要來介紹如何基于Helm快速部署Apollo集群至K8S,并與.NET Core應用進行集成,同時介紹下如何平滑遷移配置到Apollo。
本文具有詳細的部署步驟,建議動手實操。
部署Chart包和Demo已上傳至GitHub:K8S.NET.Apollo,可收藏備用。
2. Apollo 架構一覽
在部署之前,需要了解Apollo的基礎架構,以便在后續(xù)部署工作的展開。
關于其的解讀,我這里就不再詳細展開,但以下幾點還是要有所了解,感興趣的可以直接看官網(wǎng)詳細介紹:Apollo配置中心設計。
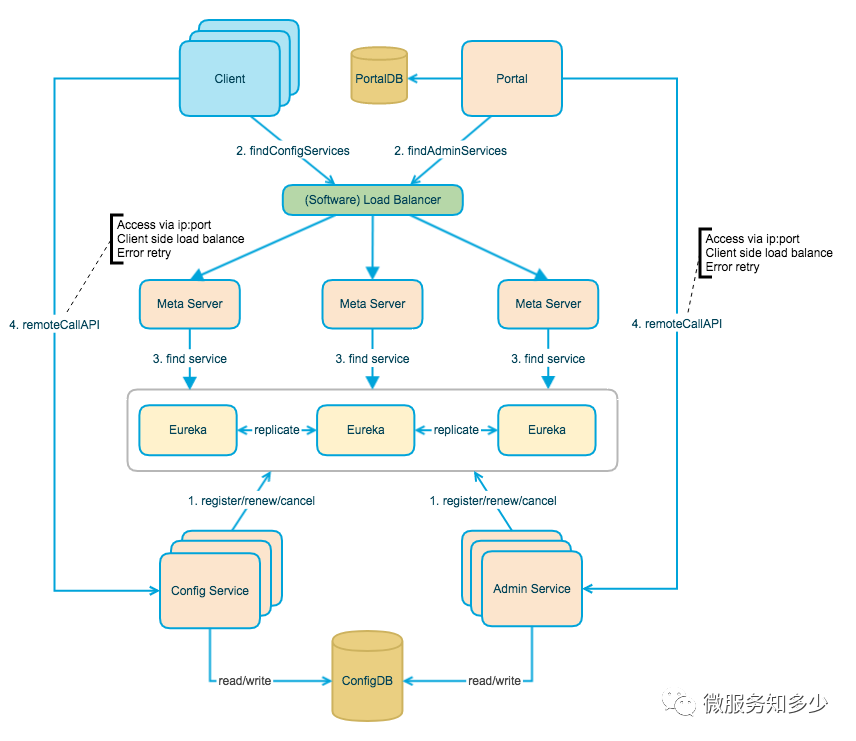
Config Service提供配置的讀取、推送等功能,服務對象是Apollo客戶端
Admin Service提供配置的修改、發(fā)布等功能,服務對象是Apollo Portal(管理界面)
Config Service和Admin Service都是多實例、無狀態(tài)部署,需要通過注冊中心進行服務注冊和發(fā)現(xiàn)
注冊中心默認采用的是Eureka,在K8S中由Service充當
Apollo客戶端通過注冊中心獲取Config Service服務列表進行配置讀取
Apollo Portal通過注冊中心獲取Admin Service服務列表進行配置管理
基于上面對Apollo的介紹,其物理架構總結起來就是:
每一套環(huán)境都必須擁有自己獨立的Config Service 和 Admin Service 以及獨立ConfigDB。
多套環(huán)境可以公用一套Apollo Portal 進行管理,Portal擁有獨立PortalDB。
3. 基于Helm部署到K8S
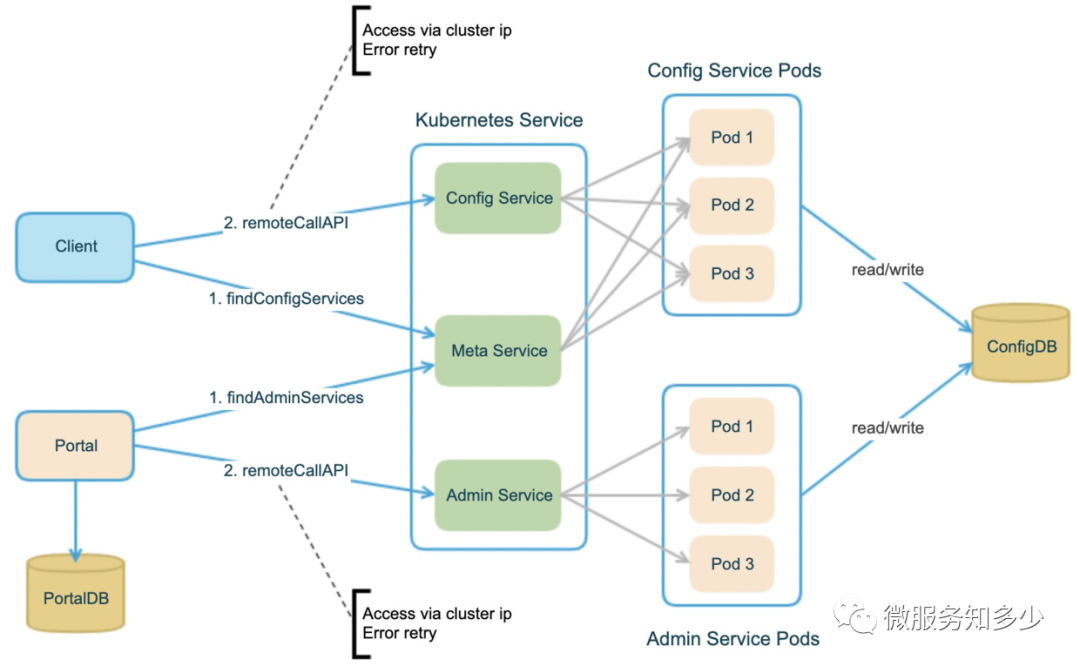
因為Apollo 1.7.0版本增加了基于Kubernetes原生服務發(fā)現(xiàn)的部署模式,來替換內置的Eureka,所以在整體部署上有很大簡化,同時官方也提供了Helm Charts,讓Apollo更加易于開箱即用。下面就以部署一套測試環(huán)境為例講解一下Apollo的部署要點。(部署至本機Docker Desktop Local K8S環(huán)境)。
環(huán)境要求:Kubernetes 1.10+,Helm 3
3.1 搭建 Apollo Config&Portal DB
從上圖的物理架構上來看,首先要部署好Config DB和PortalDB。關于DB的搭建,建議直接使用bitnami/mysqlchart搭建。搭建步驟如下:
> helm repo add bitnami https://charts.bitnami.com/bitnami
> helm repo list
> helm repo update
> helm search repo bitnami/mysql
NAME            CHART VERSION   APP VERSION     DESCRIPTION
bitnami/mysql   6.14.8          8.0.21          Chart to create a Highly available MySQL cluster
執(zhí)行helm包的安裝,需要自定義配置文件,也就是values.yaml。我們可以先行下載 mysql chart包。
之所以選擇將chart包下載到本地,是為了確保后續(xù)維護能夠基于一致的chart包版本。避免因為執(zhí)行
helm repo update導致chart包版本自動升級,而不自知。
> helm pull bitnami/mysql --untar  //下載并解包
mysql
 ├── Chart.yaml
 ├── ci
 │   └── values-production.yaml
 ├── files
 │   └── docker-entrypoint-initdb.d
 │       └── README.md
 ├── README.md
 ├── templates
 │   ├── initialization-configmap.yaml
 │   ├── master-configmap.yaml
 │   ├── master-statefulset.yaml
 │   ├── master-svc.yaml
 │   ├── NOTES.txt
 │   ├── secrets.yaml
 │   ├── serviceaccount.yaml
 │   ├── servicemonitor.yaml
 │   ├── slave-configmap.yaml
 │   ├── slave-statefulset.yaml
 │   ├── slave-svc.yaml
 │   └── _helpers.tpl
 ├── values-production.yaml
 └── values.yaml
根據(jù)官網(wǎng)分布式部署指南中所示,其提供了DB的初始化腳本用來分別創(chuàng)建ApolloConfigDB和ApolloPortalDB。因此可以直接將以上SQL腳本下載到mysql chart的files/docker-entrypoint-initdb.d目錄下,這樣在部署mysql實例時就會自動執(zhí)行腳本創(chuàng)建數(shù)據(jù)庫。
> cd mysql/files/docker-entrypoint-initdb.d
> curl https://raw.githubusercontent.com/ctripcorp/apollo/master/scripts/sql/apolloportaldb.sql > apolloportaldb.sql //下載apolloportaldb.sql
> curl https://raw.githubusercontent.com/ctripcorp/apollo/master/scripts/sql/apolloconfigdb.sql > apolloconfigdb.sql 下載apolloconfigdb.sql
> ls

    Directory: C:\Users\Shengjie\k8s\helm\charts\apollo\mysql\files\docker-entrypoint-initdb.d

Mode                 LastWriteTime         Length Name
----                 -------------         ------ ----
-a---           8/12/2020 11:01 PM          21291 apolloconfigdb.sql
-a---           8/12/2020 10:56 PM          16278 apolloportaldb.sql
-a---            8/9/2020  6:26 PM            242 README.md
然后復制values.yaml并命名為dev-mysql-values.yaml。然后修改核心配置:
global.storageClass=hostpath
可通過kubectl get sc查看集群支持的storageClass,我這邊選擇默認的hostpath。其創(chuàng)建的pv的默認回收策略為delete,也就意味著卸載mysql,數(shù)據(jù)直接刪除,這點需要注意!!!如果需要保留測試數(shù)據(jù),請更新storageClass。root.password=root
修改默認root用戶的密碼
修改完畢后,執(zhí)行以下腳本進行安裝:
> kubectl create ns db #創(chuàng)建單獨db命名空間
> helm install mysql-apollo . -f dev-mysql-values.yaml -n db
NAME: mysql-apollo
LAST DEPLOYED: Sun Aug 16 11:01:18 2020
NAMESPACE: db
STATUS: deployed
REVISION: 1
TEST SUITE: None
NOTES:
Please be patient while the chart is being deployed

Tip:

  Watch the deployment status using the command: kubectl get pods -w --namespace db

Services:

  echo Master: mysql-apollo.db.svc.cluster.local:3306
  echo Slave:  mysql-apollo-slave.db.svc.cluster.local:3306

Administrator credentials:

  echo Username: root
  echo Password : $(kubectl get secret --namespace db mysql-apollo -o jsonpath="{.data.mysql-root-password}" | base64 --decode)

To connect to your database:

  1. Run a pod that you can use as a client:

      kubectl run mysql-apollo-client --rm --tty -i --restart='Never' --image  docker.io/bitnami/mysql:8.0.21-debian-10-r17 --namespace db --command -- bash

  2. To connect to master service (read/write):

      mysql -h mysql-apollo.db.svc.cluster.local -uroot -p my_database

  3. To connect to slave service (read-only):

      mysql -h mysql-apollo-slave.db.svc.cluster.local -uroot -p my_database

To upgrade this helm chart:

  1. Obtain the password as described on the 'Administrator credentials' section and set the 'root.password' parameter as shown below:

      ROOT_PASSWORD=$(kubectl get secret --namespace db mysql-apollo -o jsonpath="{.data.mysql-root-password}" | base64 --decode)
      helm upgrade mysql-apollo bitnami/mysql --set root.password=$ROOT_PASSWORD
按照上面提示,驗證數(shù)據(jù)庫成功創(chuàng)建:
> kubectl run mysql-apollo-client --rm --tty -i --restart='Never' --image  docker.io/bitnami/mysql:8.0.21-debian-10-r17
--namespace db --command -- bash  # 創(chuàng)建mysql-client pod
I have no name!@mysql-apollo-client:/$ mysql -h mysql-apollo.db.svc.cluster.local -uroot -proot    # 連接至master 節(jié)點
mysql: [Warning] Using a password on the command line interface can be insecure.
Welcome to the MySQL monitor.  Commands end with ; or \g.
Your MySQL connection id is 61
Server version: 8.0.21 Source distribution

Copyright (c) 2000, 2020, Oracle and/or its affiliates. All rights reserved.

Oracle is a registered trademark of Oracle Corporation and/or its
affiliates. Other names may be trademarks of their respective
owners.

Type 'help;' or '\h' for help. Type '\c' to clear the current input statement.

mysql> show databases; # 查看databases;
+--------------------+
| Database           |
+--------------------+
| ApolloConfigDB     |
| ApolloPortalDB     |
| information_schema |
| my_database        |
| mysql              |
| performance_schema |
| sys                |
+--------------------+
7 rows in set (0.00 sec)

mysql> use ApolloConfigDB; # 切換至ApolloConfigDB;
Reading table information for completion of table and column names
You can turn off this feature to get a quicker startup with -A

Database changed
mysql> show tables;  # 查看數(shù)據(jù)表;
+--------------------------+
| Tables_in_ApolloConfigDB |
+--------------------------+
| AccessKey                |
| App                      |
| AppNamespace             |
| Audit                    |
| Cluster                  |
| Commit                   |
| GrayReleaseRule          |
| Instance                 |
| InstanceConfig           |
| Item                     |
| Namespace                |
| NamespaceLock            |
| Release                  |
| ReleaseHistory           |
| ReleaseMessage           |
| ServerConfig             |
+--------------------------+
16 rows in set (0.01 sec)
至此,確認Apollo ConfigDB和PortalDB搭建成功。
3.2 搭建 Apollo Config Service
搭建Apollo Service 需要添加攜程官方chart倉庫:
> helm repo add apollo http://ctripcorp.github.io/apollo/charts
> helm search repo apollo
NAME                    CHART VERSION   APP VERSION     DESCRIPTION
apollo/apollo-portal    0.1.0           1.7.0           A Helm chart for Apollo Portal
apollo/apollo-service   0.1.0           1.7.0           A Helm chart for Apollo Config Service and Apol...
從上可知,主要包含兩個chart,分別用來部署service和portal。下來研究下apollo/apollo-service 這個chart。老規(guī)矩,先把chart包下載下來:
> helm pull apollo/apollo-service --untar
apollo-service
 ├── Chart.yaml
 ├── templates
 │   ├── deployment-adminservice.yaml
 │   ├── deployment-configservice.yaml
 │   ├── NOTES.txt
 │   ├── service-adminservice.yaml
 │   ├── service-configdb.yaml
 │   ├── service-configservice.yaml
 │   └── _helpers.tpl
 └── values.yaml
從上面的樹形圖來看,主要就是用來部署config service 和 admin service。緊接著,復制一個values.yaml,命名為dev-apollo-svc-values.yaml。主要修改以下配置:
configdb.host=mysql-apollo.db
指定configdb的主機,因為是在集群內部,直接使用服務名即可configdb.password=root
指定configdb的秘密
修改后的配置如下:
configdb:
  name: apollo-configdb
  # apolloconfigdb host
  host: "mysql-apollo.db"
  port: 3306
  dbName: ApolloConfigDB
  # apolloconfigdb user name
  userName: "root"
  # apolloconfigdb password
  password: "root"
....
其他配置可以暫定不動,緊接著執(zhí)行以下命令進行安裝:
> kubectl create ns apollo # 創(chuàng)建apollo 命名空間
> helm install --dry-run --debug apollo-dev-svc . -f dev-apollo-svc-values.yaml -n apollo # 測試安裝,驗證模板生成的資源文件是否有誤
> helm install apollo-dev-svc . -f dev-apollo-svc-values.yaml -n apollo
NAME: apollo-dev-svc
LAST DEPLOYED: Sun Aug 16 11:17:38 2020
NAMESPACE: apollo
STATUS: deployed
REVISION: 1
TEST SUITE: None
NOTES:
Get meta service url for current release by running these commands:
  echo http://apollo-dev-svc-apollo-configservice.apollo:8080

For local test use:
  export POD_NAME=$(kubectl get pods --namespace apollo -l "app=apollo-dev-svc-apollo-configservice" -o jsonpath="{.items[0].metadata.name}")
  echo http://127.0.0.1:8080
  kubectl --namespace apollo port-forward $POD_NAME 8080:8080
這里要記住上面的meta service url:http://apollo-dev-svc-apollo-configservice.apollo:8080
那如何確認正確部署了呢:
> kubectl get all -n apollo # 查看apollo命名空間下部署的資源
NAME                                                       READY   STATUS    RESTARTS   AGE
pod/apollo-dev-svc-apollo-adminservice-7d4468ff46-gw6h4    1/1     Running   0          3m26s
pod/apollo-dev-svc-apollo-configservice-58d6c44cd4-n4qk9   1/1     Running   0          3m26s

NAME                                          TYPE        CLUSTER-IP       EXTERNAL-IP   PORT(S)    AGE
service/apollo-dev-svc-apollo-adminservice    ClusterIP   10.99.251.14             8090/TCP   3m26s
service/apollo-dev-svc-apollo-configservice   ClusterIP   10.108.121.201           8080/TCP   3m26s

NAME                                                  READY   UP-TO-DATE   AVAILABLE   AGE
deployment.apps/apollo-dev-svc-apollo-adminservice    1/1     1            1           3m26s
deployment.apps/apollo-dev-svc-apollo-configservice   1/1     1            1           3m26s

NAME                                                             DESIRED   CURRENT   READY   AGE
replicaset.apps/apollo-dev-svc-apollo-adminservice-7d4468ff46    1         1         1       3m26s
replicaset.apps/apollo-dev-svc-apollo-configservice-58d6c44cd4   1         1         1       3m26s
從上可知暴露了兩個服務configservice和adminservice,來嘗試將configservice進行端口轉發(fā)到本地端口來看一下。
> kubectl port-forward service/apollo-dev-svc-apollo-configservice 8080:8080 -n apollo # 轉發(fā)configservice到本地服務
Forwarding from 127.0.0.1:8080 -> 8080
Forwarding from [::1]:8080 -> 8080
使用瀏覽器訪問?localhost:8080,可以看到輸出[{"appName":"apollo-configservice","instanceId":"apollo-configservice:http://apollo.shisheng.wang/config-svc","homepageUrl":"http://apollo.shisheng.wang/config-svc"},{"appName":"apollo-adminservice","instanceId":"apollo-adminservice:http://apollo.shisheng.wang/admin-svc","homepageUrl":"http://apollo.shisheng.wang/admin-svc"}]。
至此說明,Apollo Service 搭建成功。
3.3 搭建 Apollo Portal Service
同樣,先來下載portal chart包,并研究下目錄結構:
> helm pull apollo/apollo-portal --untar
apollo-portal
 ├── Chart.yaml
 ├── templates
 │   ├── deployment-portal.yaml
 │   ├── ingress-portal.yaml
 │   ├── NOTES.txt
 │   ├── service-portal.yaml
 │   ├── service-portaldb.yaml
 │   └── _helpers.tpl
 └── values.yaml
從上可知,portal 相對來說,主要是構建portal服務,并可以通過ingress暴露服務。復制一個values.yaml,命名為dev-apollo-portal-values.yaml。主要修改以下配置:
ingress.enabled=true
啟用ingress,并通過注解設置ingress controller,因為portal是個有狀態(tài)服務,所以要關注Sessiion狀態(tài)維持。以下主要是針對nginx-ingress-controller的配置,如果使用的其他的ingress-controller請注意更改。(nginx-ingress-controller的安裝,這里就不具體展開了,可以簡單執(zhí)行helm install nginx bitnaim/nginx-ingress-controller?安裝就好了。)
ingress:
  enabled: true
  annotations:
    kubernetes.io/ingress.class: nginx
    nginx.ingress.kubernetes.io/rewrite-target: /
    nginx.ingress.kubernetes.io/affinity: "cookie"
    nginx.ingress.kubernetes.io/session-cookie-name: "route"
  hosts:
    - host: "apollo.demo.com"
      paths: ["/"]
  tls: []
指定配置源 ,主要是envs和metaServers兩個配置項:
config.envs=devconfig.metaServers.dev=http://apollo-dev-svc-apollo-configservice.apollo:8080(上面部署apollo service輸出的apollo service url)如果同時啟用開發(fā)、測試和生產環(huán)境。可以配置為:envs: "dev,uat,prd",metaServers 分別指定對應環(huán)境的配置即可。
以下是只啟用開發(fā)環(huán)境的配置:
config:
  # spring profiles to activate
  profiles: "github,auth"
  # specify the env names, e.g. dev,pro
  envs: "dev"
  # specify the meta servers, e.g.
  # dev: http://apollo-configservice-dev:8080
  # pro: http://apollo-configservice-pro:8080
  metaServers:
    dev: http://apollo-svc-dev-apollo-configservice.apollo:8080
    # dev: http://apollo.shisheng.wang
  # specify the context path, e.g. /apollo
  contextPath: ""
  # extra config files for apollo-portal, e.g. application-ldap.yml
  files: {}
portaldb.host=mysql-apollo.db & portaldb.password=root
指定portaldb的主機和密碼
portaldb:
  name: apollo-portaldb
  # apolloportaldb host
  host: mysql-apollo.db
  port: 3306
  dbName: ApolloPortalDB
  # apolloportaldb user name
  userName: root
  # apolloportaldb password
  password: root
其他配置可以暫定不動,緊接著執(zhí)行以下命令進行安裝:
> Helm install --dry-run --debug apollo-dev-portal . -f dev-apollo-portal-values.yaml -n apollo # 測試安裝,驗證模板生成的資源文件是否有誤
> Helm install apollo-dev-portal . -f dev-apollo-portal-values.yaml -n apollo
PS C:\Users\Shengjie\k8s\helm\charts\apollo\apollo-portal> Helm install apollo-dev-portal . -f dev-apollo-portal-values.yaml -n apollo
NAME: apollo-dev-portal
LAST DEPLOYED: Sun Aug 16 11:53:18 2020
NAMESPACE: apollo
STATUS: deployed
REVISION: 1
TEST SUITE: None
NOTES:
Get apollo portal url by running these commands:
  http://apollo.demo.com/
到這一步,如果需要本地可以訪問,還需要修改本地hosts,添加127.0.0.1 apollo.demo.com。然后打開你的Browser輸入http://apollo.demo.com/,就可以訪問了。默認用戶密碼是:[apollo/admin]。
3.4. 暴露 config service
以上部署的是開發(fā)環(huán)境,但要想開發(fā)環(huán)境要訪問到config service,我們還需要些小動作。這個時候就需要修改apollo service的chart模板,在template目錄增加ingress-configservice.yaml文件,內容如下:
# ingress-configservice.yaml
{{- if .Values.configService.ingress.enabled -}}{{- $fullName := include "apollo.configService.fullName" . -}}{{- $svcPort := .Values.configService.service.port -}}{{- if semverCompare ">=1.14-0" .Capabilities.KubeVersion.GitVersion -}}
apiVersion: networking.k8s.io/v1beta1
{{- else -}}
apiVersion: extensions/v1beta1
{{- end }}
kind: Ingress
metadata:
  name: {{ $fullName }}
  labels:
    {{- include "apollo.service.labels" . | nindent 4 }}
  {{- with .Values.configService.ingress.annotations }}
  annotations:
    {{- toYaml . | nindent 4 }}
  {{- end }}
spec:
{{- if .Values.configService.ingress.tls }}
  tls:
  {{- range .Values.configService.ingress.tls }}
    - hosts:
      {{- range .hosts }}
        - {{ . | quote }}
      {{- end }}
      secretName: {{ .secretName }}
  {{- end }}{{- end }}
  rules:
  {{- range .Values.configService.ingress.hosts }}
    - host: {{ .host | quote }}
      http:
        paths:
        {{- range .paths }}
          - path: {{ . }}
            backend:
              serviceName: {{ $fullName }}
              servicePort: {{ $svcPort }}
        {{- end }}
{{- end }}{{- end }}然后修改values.yaml在configService節(jié)點下增加ingress配置選項:
configService:
  name: apollo-configservice
  fullNameOverride: ""
  replicaCount: 2
  containerPort: 8080
  image:
    repository: apolloconfig/apollo-configservice
    pullPolicy: IfNotPresent
  imagePullSecrets: []
  service:
    fullNameOverride: ""
    port: 8080
    targetPort: 8080
    type: ClusterIP
  # 以下為新增ingress配置項
  ingress:
    enabled: false
    annotations: {}
    hosts:
      - host: ""
        paths: []
    tls: []
然后再修改上面我們創(chuàng)建的dev-apollo-svc-values.yaml下的configService節(jié)點,添加對應ingress和config.configServiceUrlOverride配置:
configService:
  name: apollo-configservice
  fullNameOverride: ""
  replicaCount: 1
  containerPort: 8080
  image:
    repository: apolloconfig/apollo-configservice
    pullPolicy: IfNotPresent
  imagePullSecrets: []
  service:
    fullNameOverride: ""
    port: 8080
    targetPort: 8080
    type: ClusterIP
  ingress:
    enabled: true
    annotations:
      kubernetes.io/ingress.class: nginx
      nginx.ingress.kubernetes.io/rewrite-target: /$2
    hosts:
      - host: "apollo.demo.com"
        paths: ["/config-svc(/|$)(.*)"]
    tls: []
  liveness:
    initialDelaySeconds: 100
    periodSeconds: 10
  readiness:
    initialDelaySeconds: 30
    periodSeconds: 5
  config:
    # spring profiles to activate
    profiles: "github,kubernetes"
    # override apollo.config-service.url: config service url to be accessed by apollo-client
    configServiceUrlOverride: "http://apollo.demo.com/config-svc"
    # override apollo.admin-service.url: admin service url to be accessed by apollo-portal
    adminServiceUrlOverride: ""
修改完畢,執(zhí)行以下命令升級apollo service:
> helm upgrade apollo-service-dev . -f dev-apollo-svc-values.yaml -n apollo
NAME: apollo-service-dev
LAST DEPLOYED: Tue Aug 18 14:20:41 2020
NAMESPACE: apollo
STATUS: deployed
REVISION: 1
TEST SUITE: None
NOTES:
Get meta service url for current release by running these commands:
  echo http://apollo-service-dev-apollo-configservice.apollo:8080

For local test use:
  export POD_NAME=$(kubectl get pods --namespace apollo -l "app=apollo-service-dev-apollo-configservice" -o jsonpath="{.items[0].metadata.name}")
  echo http://127.0.0.1:8080
  kubectl --namespace apollo port-forward $POD_NAME 8080:8080
> curl http://apollo.demo.com/config-svc
[{"appName":"apollo-configservice","instanceId":"apollo-configservice:http://apollo.demo.com/config-svc","homepageUrl":"http://apollo.demo.com/config-svc"},{"appName":"apollo-adminservice","instanceId":"apollo-adminservice:http://apollo-service-dev-apollo-adminservice.apollo:8090","homepageUrl":"http://apollo-service-dev-apollo-adminservice.apollo:8090"}]
從上面的輸出可以看到,現(xiàn)在已經可以通過http://apollo.demo.com/config-svc讀取metaServer配置了,后面本地開發(fā)環(huán)境就可以通過這個鏈接來讀取Apollo的配置。
4. .NET Core 集成Apollo
這一部分我就快速帶過了,執(zhí)行以下命令創(chuàng)建項目,并引入apollo和swagger相關包:
> dotnet new webapi -n K8S.NET.Apollo
> cd K8S.NET.Apollo
> dotnet add package Com.Ctrip.Framework.Apollo.Configuration
> dotnet add package Swashbuckle.AspNetCore
修改appsettings.json增加apollo配置:
{
    "AllowedHosts": "*",
    "apollo": {
        "AppId": "test",
        "MetaServer": "http://apollo.demo.com/config-svc",
        "Env": "Dev"
    }
}
修改Program.cs,添加Apollo配置源如下:
public static IHostBuilder CreateHostBuilder(string[] args) =>
    Host.CreateDefaultBuilder(args)
    .ConfigureAppConfiguration(configBuilder =>
    {
        configBuilder.AddApollo(configBuilder.Build().GetSection("apollo"))
            .AddDefault()
            .AddNamespace("TEST1.connectionstrings", "ConnectionStrings")
            .AddNamespace("logging", ConfigFileFormat.Json)
            ;
    })
        .ConfigureWebHostDefaults(webBuilder =>
        {
            webBuilder.UseStartup();
        });
修改Startup.cs,添加Swagger集成,方便測試:
public void ConfigureServices(IServiceCollection services)
{
    services.AddControllers();
    services.AddSwaggerGen(c =>
    {
        c.SwaggerDoc("v1", new OpenApiInfo { Title = this.GetType().Namespace, Version = "v1" });
    });
}
// This method gets called by the runtime. Use this method to configure the HTTP request pipeline.
public void Configure(IApplicationBuilder app, IWebHostEnvironment env)
{
    if (env.IsDevelopment())
    {
        app.UseDeveloperExceptionPage();
    }
    app.UseSwagger();
    app.UseSwaggerUI(c =>
    {
        c.SwaggerEndpoint("/swagger/v1/swagger.json", $"{this.GetType().Namespace} V1");
        c.RoutePrefix = string.Empty;
    });

    //...
}
添加ApolloController,增加以下測試代碼:
namespace K8S.NET.Apollo.Controllers
{
    [ApiController]
    [Route("[controller]/[action]")]
    public class ApolloController : Controller
    {
        private readonly IConfiguration _configuration;
        public ApolloController(IConfiguration configuration)
        {
            _configuration = configuration;
        }

        [HttpGet("key")]
        public IActionResult GetLogLevelSection()
        {
            var key = "Logging:LogLevel";
            var val = _configuration.GetSection(key).Get();
            return Ok($"{key}:{JsonSerializer.Serialize(val)}");
        }

        [HttpGet("key")]
        public IActionResult GetString(string key)
        {
            var val = _configuration.GetValue<string>(key);
            return Ok($"{key}:{val}");
        }

        [HttpGet("key")]
        public IActionResult GetConnectionStrings(string key)
        {
            var val = _configuration.GetConnectionString(key);
            return Ok($"{key}:{val}");
        }
    }

    public class LoggingOptions : Dictionary<string, string>
    {
    }
}
登錄Apollo Portal,添加test項目,并增加以下配置,并發(fā)布。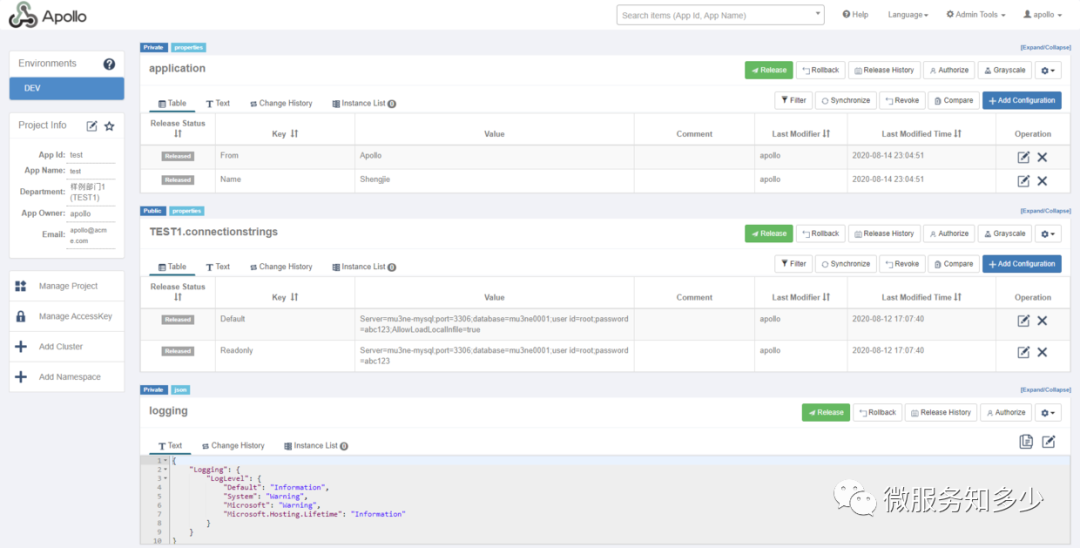
本地調試,就能夠獲取云端配置,另外Apollo同時會同步一份配置到本地目錄:c:/opt/data/test/config-cache。這樣就可以保證即使無法建立云端連接,也可以正常加載本地配置。
執(zhí)行以下命令,進行配置讀取和驗證:
> curl https://localhost:5001/Apollo/GetLogLevelSection
Logging:LogLevel:{"Default":"Information","Microsoft":"Warning","Microsoft.Hosting.Lifetime":"Information"}
> curl https://localhost:5001/Apollo/GetString/key?key=name
name:Shengjie
> curl https://localhost:5001/Apollo/GetConnectionStrings/key?key=Default
Default:Server=mu3ne-mysql;port=3306;database=mu3ne0001;user id=root;password=abc123;AllowLoadLocalInfile=true
5.配置遷移指北
相信采用Apollo的絕大多數(shù)都不是一開始就用的,都是再配置逐漸復雜之后,才進行遷移的。我也不例外,之前是用K8S的ConfigMap來做配置管理。下面就來講下遷移指南,我將其分為兩種模式:
偷懶模式
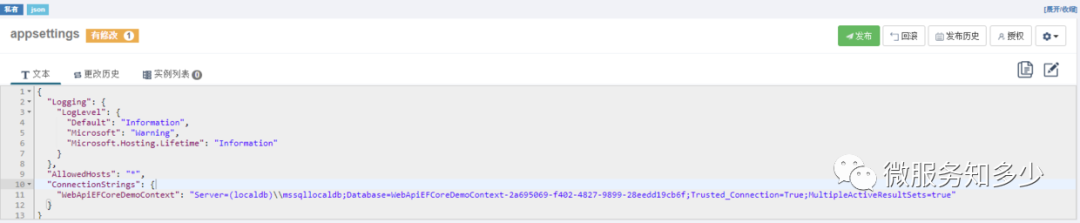
如果想改動最小,就直接將項目配置繼續(xù)以Json格式維護到Apollo的私有命名空間下。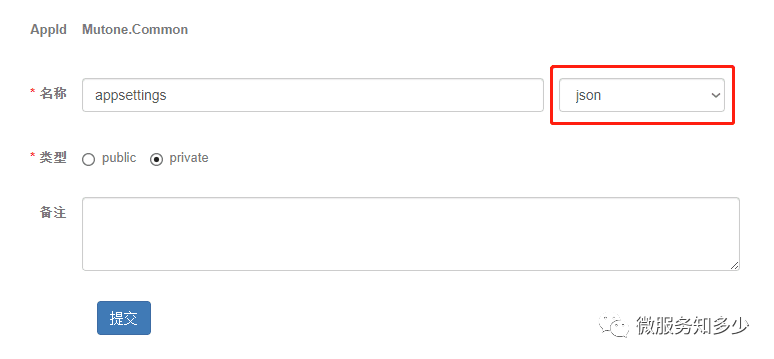
public static IHostBuilder CreateHostBuilder(string[] args) =>
    Host.CreateDefaultBuilder(args)
        .ConfigureAppConfiguration((context, builder) =>
        {
            builder.AddApollo(builder.Build().GetSection("apollo"))
                .AddDefault()
                .AddNamespace("appsettings",ConfigFileFormat.Json);
        })
        .ConfigureWebHostDefaults(webBuilder =>
        {
            webBuilder.UseStartup();
        });
強迫癥模式
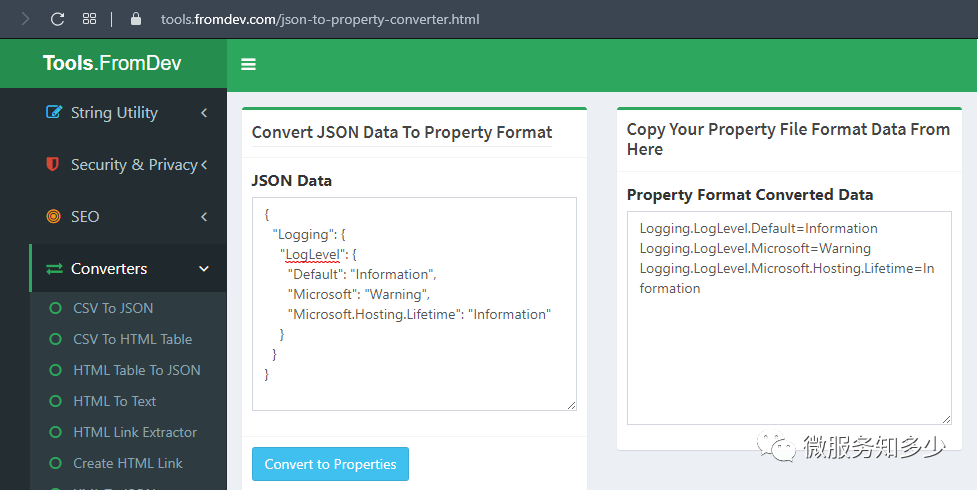
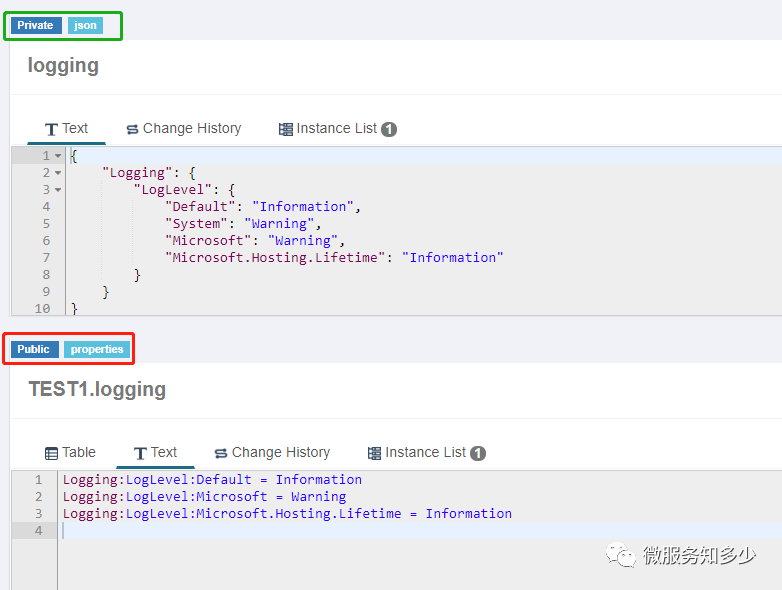
也有人考慮,既然上Apollo,就要用到它的特性,因此對現(xiàn)有配置就要分門別類。哪些是公用的,哪些是私有的。對于公用的就要定義到公共的命名空間下。公共命名空間的配置格式只有Properties格式,因此需要將Json轉為Properties。比如針對Logging配置可以借助網(wǎng)站 json2properties converter進行在線轉換。如下所示:
如果真這樣做,你就錯了,你會發(fā)現(xiàn)最終的日志配置不生效。這是因為properties格式是以.進行分割,而.NET Core是用:來識別節(jié)點配置, 因此properties配置按:分割就好了,如下所示,以下兩種配置等效:
6. 最后
以上,相信若能夠動手實操,你將收獲匪淺。
本文Demo和Chart包的完整配置已上傳至Github:K8S.NET.Apollo,請按需取用。