
Spring Boot 郵件發(fā)送的 5 種姿勢(shì)
郵件發(fā)送其實(shí)是一個(gè)非常常見的需求,用戶注冊(cè),找回密碼等地方,都會(huì)用到,使用 JavaSE 代碼發(fā)送郵件,步驟還是挺繁瑣的,Spring Boot 中對(duì)于郵件發(fā)送,提供了相關(guān)的自動(dòng)化配置類,使得郵件發(fā)送變得非常容易,本文我們就來一探究竟!看看使用 Spring Boot 發(fā)送郵件的 5 中姿勢(shì)。
郵件基礎(chǔ)
我們經(jīng)常會(huì)聽到各種各樣的郵件協(xié)議,比如 SMTP、POP3、IMAP ,那么這些協(xié)議有什么作用,有什么區(qū)別?我們先來討論一下這個(gè)問題。
SMTP 是一個(gè)基于 TCP/IP 的應(yīng)用層協(xié)議,江湖地位有點(diǎn)類似于 HTTP,SMTP 服務(wù)器默認(rèn)監(jiān)聽的端口號(hào)為 25 。看到這里,小伙伴們可能會(huì)想到既然 SMTP 協(xié)議是基于 TCP/IP 的應(yīng)用層協(xié)議,那么我是不是也可以通過 Socket 發(fā)送一封郵件呢?回答是肯定的。
生活中我們投遞一封郵件要經(jīng)過如下幾個(gè)步驟:
深圳的小王先將郵件投遞到深圳的郵局 深圳的郵局將郵件運(yùn)送到上海的郵局 上海的小張來郵局取郵件
這是一個(gè)縮減版的生活中郵件發(fā)送過程。這三個(gè)步驟可以分別對(duì)應(yīng)我們的郵件發(fā)送過程,假設(shè)從 [email protected] 發(fā)送郵件到 [email protected] :
[email protected] 先將郵件投遞到騰訊的郵件服務(wù)器 騰訊的郵件服務(wù)器將我們的郵件投遞到網(wǎng)易的郵件服務(wù)器 [email protected] 登錄網(wǎng)易的郵件服務(wù)器查看郵件
郵件投遞大致就是這個(gè)過程,這個(gè)過程就涉及到了多個(gè)協(xié)議,我們來分別看一下。
SMTP 協(xié)議全稱為 Simple Mail Transfer Protocol,譯作簡(jiǎn)單郵件傳輸協(xié)議,它定義了郵件客戶端軟件與 SMTP 服務(wù)器之間,以及 SMTP 服務(wù)器與 SMTP 服務(wù)器之間的通信規(guī)則。
也就是說 [email protected] 用戶先將郵件投遞到騰訊的 SMTP 服務(wù)器這個(gè)過程就使用了 SMTP 協(xié)議,然后騰訊的 SMTP 服務(wù)器將郵件投遞到網(wǎng)易的 SMTP 服務(wù)器這個(gè)過程也依然使用了 SMTP 協(xié)議,SMTP 服務(wù)器就是用來收郵件。
而 POP3 協(xié)議全稱為 Post Office Protocol ,譯作郵局協(xié)議,它定義了郵件客戶端與 POP3 服務(wù)器之間的通信規(guī)則,那么該協(xié)議在什么場(chǎng)景下會(huì)用到呢?當(dāng)郵件到達(dá)網(wǎng)易的 SMTP 服務(wù)器之后, [email protected] 用戶需要登錄服務(wù)器查看郵件,這個(gè)時(shí)候就該協(xié)議就用上了:郵件服務(wù)商都會(huì)為每一個(gè)用戶提供專門的郵件存儲(chǔ)空間,SMTP 服務(wù)器收到郵件之后,就將郵件保存到相應(yīng)用戶的郵件存儲(chǔ)空間中,如果用戶要讀取郵件,就需要通過郵件服務(wù)商的 POP3 郵件服務(wù)器來完成。
最后,可能也有小伙伴們聽說過 IMAP 協(xié)議,這個(gè)協(xié)議是對(duì) POP3 協(xié)議的擴(kuò)展,功能更強(qiáng),作用類似,這里不再贅述。
準(zhǔn)備工作
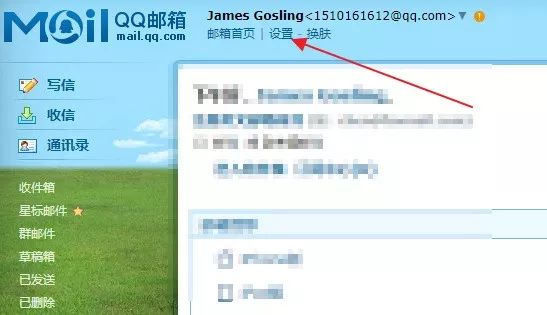
目前國(guó)內(nèi)大部分的郵件服務(wù)商都不允許直接使用用戶名/密碼的方式來在代碼中發(fā)送郵件,都是要先申請(qǐng)授權(quán)碼,這里以 QQ 郵箱為例,向大家演示授權(quán)碼的申請(qǐng)流程:首先我們需要先登錄 QQ 郵箱網(wǎng)頁(yè)版,點(diǎn)擊上方的設(shè)置按鈕:
然后點(diǎn)擊賬戶選項(xiàng)卡:

在賬戶選項(xiàng)卡中找到開啟POP3/SMTP選項(xiàng),如下:
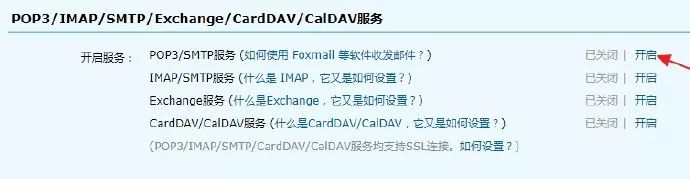
點(diǎn)擊開啟,開啟相關(guān)功能,開啟過程需要手機(jī)號(hào)碼驗(yàn)證,按照步驟操作即可,不贅述。開啟成功之后,即可獲取一個(gè)授權(quán)碼,將該號(hào)碼保存好,一會(huì)使用。
項(xiàng)目創(chuàng)建
接下來,我們就可以創(chuàng)建項(xiàng)目了,Spring Boot 中,對(duì)于郵件發(fā)送提供了自動(dòng)配置類,開發(fā)者只需要加入相關(guān)依賴,然后配置一下郵箱的基本信息,就可以發(fā)送郵件了。
首先創(chuàng)建一個(gè) Spring Boot 項(xiàng)目,引入郵件發(fā)送依賴:
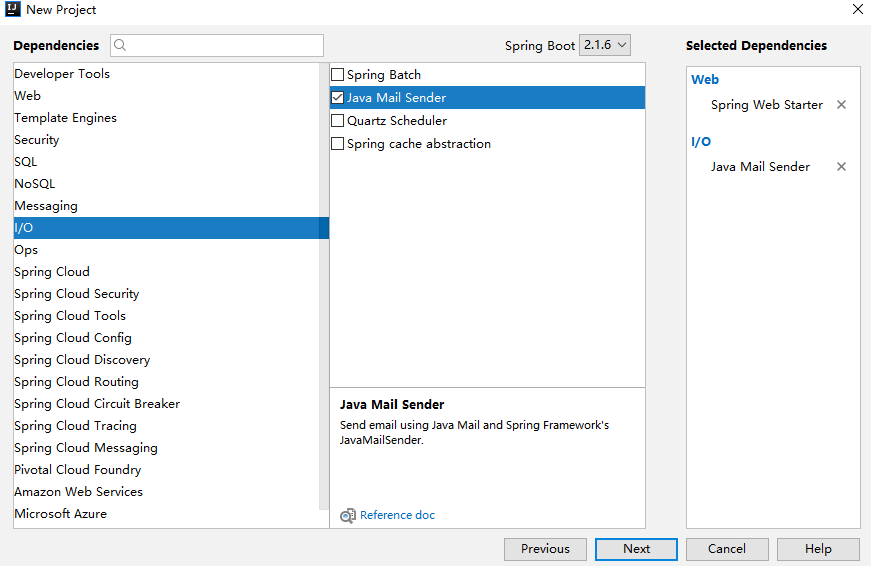
創(chuàng)建完成后,項(xiàng)目依賴如下:
<dependency>
    <groupId>org.springframework.bootgroupId>
    <artifactId>spring-boot-starter-mailartifactId>
dependency>
<dependency>
    <groupId>org.springframework.bootgroupId>
    <artifactId>spring-boot-starter-webartifactId>
dependency>
配置郵箱基本信息
項(xiàng)目創(chuàng)建成功后,接下來在 application.properties 中配置郵箱的基本信息:
spring.mail.host=smtp.qq.com
spring.mail.port=587
[email protected]
spring.mail.password=ubknfzhjkhrbbabe
spring.mail.default-encoding=UTF-8
spring.mail.properties.mail.smtp.socketFactoryClass=javax.net.ssl.SSLSocketFactory
spring.mail.properties.mail.debug=true
配置含義分別如下:
配置 SMTP 服務(wù)器地址 SMTP 服務(wù)器的端口 配置郵箱用戶名 配置密碼,注意,不是真正的密碼,而是剛剛申請(qǐng)到的授權(quán)碼 默認(rèn)的郵件編碼 配飾 SSL 加密工廠 表示開啟 DEBUG 模式,這樣,郵件發(fā)送過程的日志會(huì)在控制臺(tái)打印出來,方便排查錯(cuò)誤
如果不知道 smtp 服務(wù)器的端口或者地址的的話,可以參考 騰訊的郵箱文檔
https://service.mail.qq.com/cgi-bin/help?subtype=1&&id=28&&no=371
做完這些之后,Spring Boot 就會(huì)自動(dòng)幫我們配置好郵件發(fā)送類,相關(guān)的配置在 org.springframework.boot.autoconfigure.mail.MailSenderAutoConfiguration 類中,部分源碼如下:
@Configuration
@ConditionalOnClass({ MimeMessage.class, MimeType.class, MailSender.class })
@ConditionalOnMissingBean(MailSender.class)
@Conditional(MailSenderCondition.class)
@EnableConfigurationProperties(MailProperties.class)
@Import({ MailSenderJndiConfiguration.class, MailSenderPropertiesConfiguration.class })
public class MailSenderAutoConfiguration {
}
從這段代碼中,可以看到,導(dǎo)入了另外一個(gè)配置 MailSenderPropertiesConfiguration 類,這個(gè)類中,提供了郵件發(fā)送相關(guān)的工具類:
@Configuration
@ConditionalOnProperty(prefix = "spring.mail", name = "host")
class MailSenderPropertiesConfiguration {
        private final MailProperties properties;
        MailSenderPropertiesConfiguration(MailProperties properties) {
                this.properties = properties;
        }
        @Bean
        @ConditionalOnMissingBean
        public JavaMailSenderImpl mailSender() {
                JavaMailSenderImpl sender = new JavaMailSenderImpl();
                applyProperties(sender);
                return sender;
        }
}
可以看到,這里創(chuàng)建了一個(gè) JavaMailSenderImpl 的實(shí)例, JavaMailSenderImpl 是 JavaMailSender 的一個(gè)實(shí)現(xiàn),我們將使用 JavaMailSenderImpl 來完成郵件的發(fā)送工作。
做完如上兩步,郵件發(fā)送的準(zhǔn)備工作就算是完成了,接下來就可以直接發(fā)送郵件了。
具體的發(fā)送,有 5 種不同的方式,我們一個(gè)一個(gè)來看。
發(fā)送簡(jiǎn)單郵件
簡(jiǎn)單郵件就是指郵件內(nèi)容是一個(gè)普通的文本文檔:
@Autowired
JavaMailSender javaMailSender;
@Test
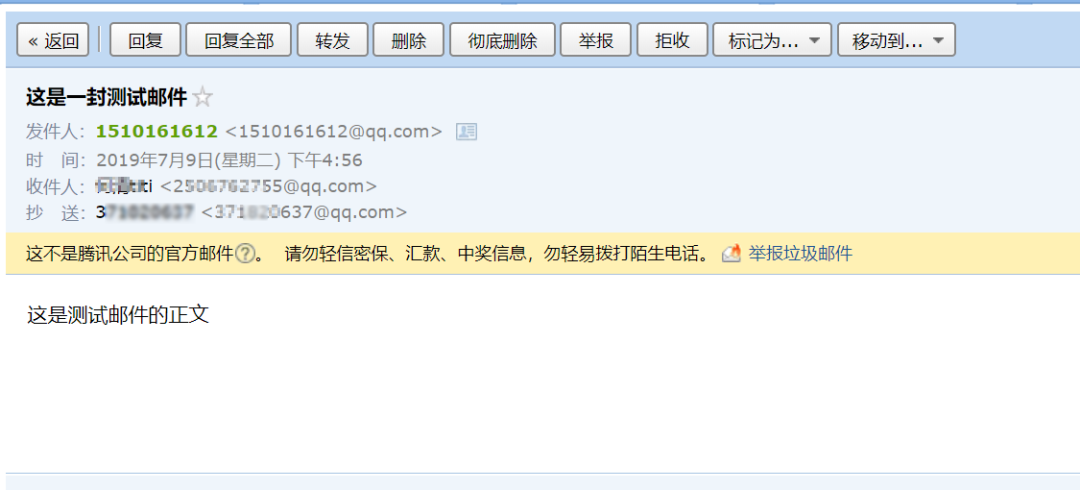
public void sendSimpleMail() {
SimpleMailMessage message = new SimpleMailMessage();
message.setSubject("這是一封測(cè)試郵件");
message.setFrom("[email protected]");
message.setTo("[email protected]");
message.setCc("[email protected]");
message.setBcc("[email protected]");
message.setSentDate(new Date());
message.setText("這是測(cè)試郵件的正文");
javaMailSender.send(message);
}
從上往下,代碼含義分別如下:
構(gòu)建一個(gè)郵件對(duì)象 設(shè)置郵件主題 設(shè)置郵件發(fā)送者 設(shè)置郵件接收者,可以有多個(gè)接收者 設(shè)置郵件抄送人,可以有多個(gè)抄送人 設(shè)置隱秘抄送人,可以有多個(gè) 設(shè)置郵件發(fā)送日期 設(shè)置郵件的正文 發(fā)送郵件
最后執(zhí)行該方法,就可以實(shí)現(xiàn)郵件的發(fā)送,發(fā)送效果圖如下:
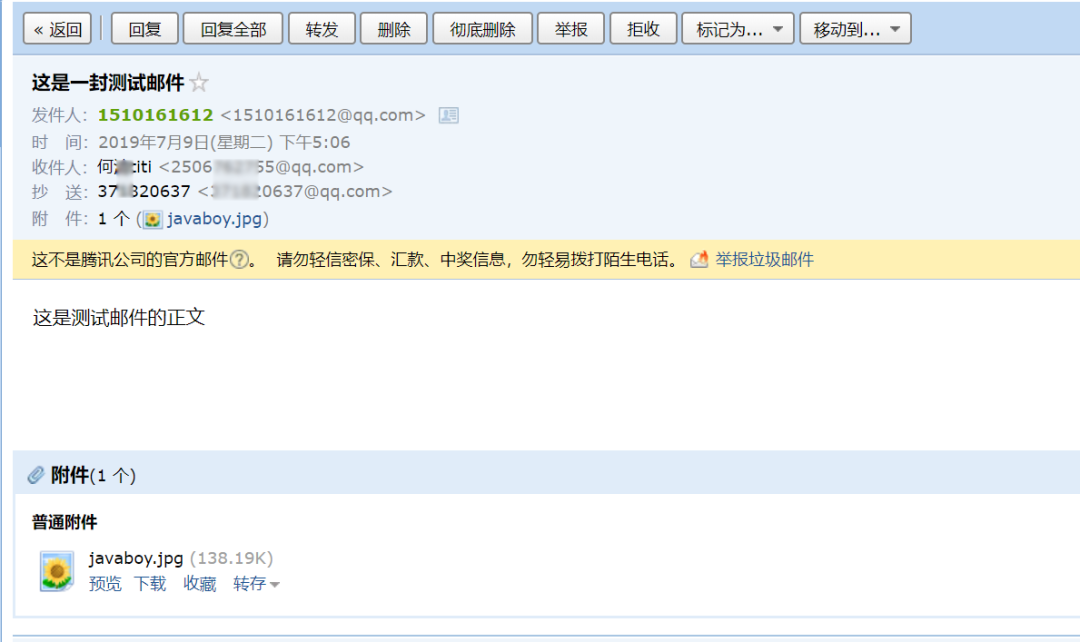
發(fā)送帶附件的郵件
郵件的附件可以是圖片,也可以是普通文件,都是支持的。
@Test
public void sendAttachFileMail() throws MessagingException {
    MimeMessage mimeMessage = javaMailSender.createMimeMessage();
    MimeMessageHelper helper = new MimeMessageHelper(mimeMessage,true);
    helper.setSubject("這是一封測(cè)試郵件");
    helper.setFrom("[email protected]");
    helper.setTo("[email protected]");
    helper.setCc("[email protected]");
    helper.setBcc("[email protected]");
    helper.setSentDate(new Date());
    helper.setText("這是測(cè)試郵件的正文");
    helper.addAttachment("javaboy.jpg",new File("C:\\Users\\sang\\Downloads\\javaboy.png"));
    javaMailSender.send(mimeMessage);
}
注意這里在構(gòu)建郵件對(duì)象上和前文有所差異,這里是通過 javaMailSender 來獲取一個(gè)復(fù)雜郵件對(duì)象,然后再利用 MimeMessageHelper 對(duì)郵件進(jìn)行配置,MimeMessageHelper 是一個(gè)郵件配置的輔助工具類,創(chuàng)建時(shí)候的 true 表示構(gòu)建一個(gè) multipart message 類型的郵件,有了 MimeMessageHelper 之后,我們針對(duì)郵件的配置都是由 MimeMessageHelper 來代勞。
最后通過 addAttachment 方法來添加一個(gè)附件。
執(zhí)行該方法,郵件發(fā)送效果圖如下:
發(fā)送帶圖片資源的郵件
圖片資源和附件有什么區(qū)別呢?圖片資源是放在郵件正文中的,即一打開郵件,就能看到圖片。但是一般來說,不建議使用這種方式,一些公司會(huì)對(duì)郵件內(nèi)容的大小有限制(因?yàn)檫@種方式是將圖片一起發(fā)送的)。
@Test
public void sendImgResMail() throws MessagingException {
MimeMessage mimeMessage = javaMailSender.createMimeMessage();
MimeMessageHelper helper = new MimeMessageHelper(mimeMessage, true);
helper.setSubject("這是一封測(cè)試郵件");
helper.setFrom("[email protected]");
helper.setTo("[email protected]");
helper.setCc("[email protected]");
helper.setBcc("[email protected]");
helper.setSentDate(new Date());
helper.setText("hello 大家好,這是一封測(cè)試郵件,這封郵件包含兩種圖片,分別如下
第一張圖片:
在公司實(shí)際開發(fā)中,第一種和第三種都不是使用最多的郵件發(fā)送方案。因?yàn)檎碚f,郵件的內(nèi)容都是比較的豐富的,所以大部分郵件都是通過 HTML 來呈現(xiàn)的,如果直接拼接 HTML 字符串,這樣以后不好維護(hù),為了解決這個(gè)問題,一般郵件發(fā)送,都會(huì)有相應(yīng)的郵件模板。最具代表性的兩個(gè)模板就是 Freemarker 模板和 Thyemeleaf 模板了。
使用 Freemarker 作郵件模板
首先需要引入 Freemarker 依賴:
<dependency>
<groupId>org.springframework.bootgroupId>
<artifactId>spring-boot-starter-freemarkerartifactId>
dependency>
然后在 resources/templates 目錄下創(chuàng)建一個(gè) mail.ftl 作為郵件發(fā)送模板:
<html lang="en">
<head>
    <meta charset="UTF-8">
    <title>Titletitle>
head>
<body>
<p>hello 歡迎加入 xxx 大家庭,您的入職信息如下:p>
<table border="1">
    <tr>
        <td>姓名td>
        <td>${username}td>
    tr>
    <tr>
        <td>工號(hào)td>
        <td>${num}td>
    tr>
    <tr>
        <td>薪水td>
        <td>${salary}td>
    tr>
table>
<div style="color: #ff1a0e">一起努力創(chuàng)造輝煌div>
body>
html>
接下來,將郵件模板渲染成 HTML ,然后發(fā)送即可。
@Test
public void sendFreemarkerMail() throws MessagingException, IOException, TemplateException {
    MimeMessage mimeMessage = javaMailSender.createMimeMessage();
    MimeMessageHelper helper = new MimeMessageHelper(mimeMessage, true);
    helper.setSubject("這是一封測(cè)試郵件");
    helper.setFrom("[email protected]");
    helper.setTo("[email protected]");
    helper.setCc("[email protected]");
    helper.setBcc("[email protected]");
    helper.setSentDate(new Date());
    //構(gòu)建 Freemarker 的基本配置
    Configuration configuration = new Configuration(Configuration.VERSION_2_3_0);
    // 配置模板位置
    ClassLoader loader = MailApplication.class.getClassLoader();
    configuration.setClassLoaderForTemplateLoading(loader, "templates");
    //加載模板
    Template template = configuration.getTemplate("mail.ftl");
    User user = new User();
    user.setUsername("javaboy");
    user.setNum(1);
    user.setSalary((double) 99999);
    StringWriter out = new StringWriter();
    //模板渲染,渲染的結(jié)果將被保存到 out 中 ,將out 中的 html 字符串發(fā)送即可
    template.process(user, out);
    helper.setText(out.toString(),true);
    javaMailSender.send(mimeMessage);
}
需要注意的是,雖然引入了 Freemarker 的自動(dòng)化配置,但是我們?cè)谶@里是直接 new Configuration 來重新配置 Freemarker 的,所以 Freemarker 默認(rèn)的配置這里不生效,因此,在填寫模板位置時(shí),值為 templates 。
調(diào)用該方法,發(fā)送郵件,效果圖如下:
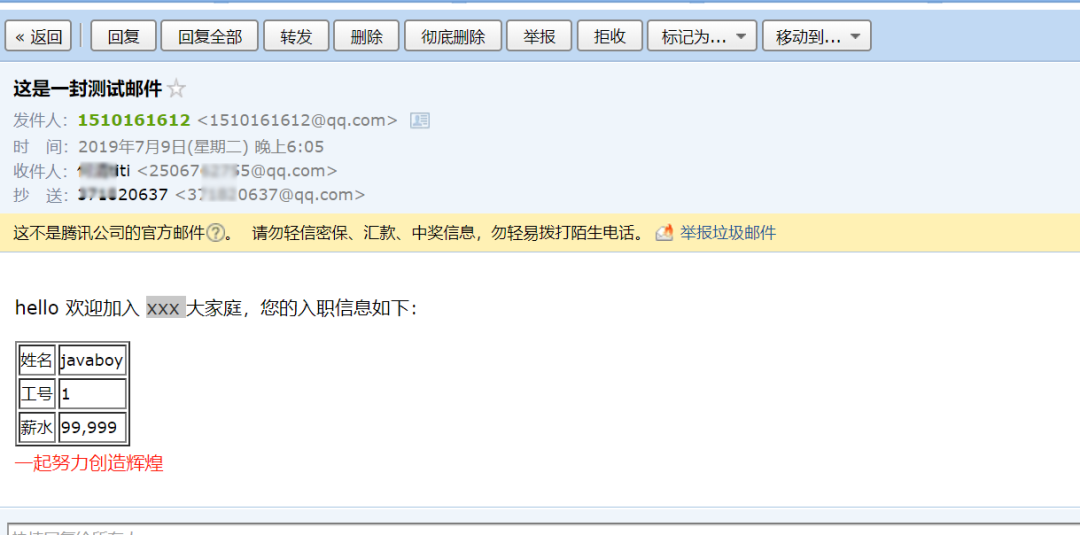
使用 Thymeleaf 作郵件模板
推薦在 Spring Boot 中使用 Thymeleaf 來構(gòu)建郵件模板。因?yàn)?Thymeleaf 的自動(dòng)化配置提供了一個(gè) TemplateEngine,通過 TemplateEngine 可以方便的將 Thymeleaf 模板渲染為 HTML ,同時(shí),Thymeleaf 的自動(dòng)化配置在這里是繼續(xù)有效的 。
首先,引入 Thymeleaf 依賴:
<dependency>
    <groupId>org.springframework.bootgroupId>
    <artifactId>spring-boot-starter-thymeleafartifactId>
dependency>
然后,創(chuàng)建 Thymeleaf 郵件模板:
<html lang="en" xmlns:th="http://www.thymeleaf.org">
<head>
    <meta charset="UTF-8">
    <title>Titletitle>
head>
<body>
<p>hello 歡迎加入 xxx 大家庭,您的入職信息如下:p>
<table border="1">
    <tr>
        <td>姓名td>
        <td th:text="${username}">td>
    tr>
    <tr>
        <td>工號(hào)td>
        <td th:text="${num}">td>
    tr>
    <tr>
        <td>薪水td>
        <td th:text="${salary}">td>
    tr>
table>
<div style="color: #ff1a0e">一起努力創(chuàng)造輝煌div>
body>
html>
接下來發(fā)送郵件:
@Autowired
TemplateEngine templateEngine;

@Test
public void sendThymeleafMail() throws MessagingException {
    MimeMessage mimeMessage = javaMailSender.createMimeMessage();
    MimeMessageHelper helper = new MimeMessageHelper(mimeMessage, true);
    helper.setSubject("這是一封測(cè)試郵件");
    helper.setFrom("[email protected]");
    helper.setTo("[email protected]");
    helper.setCc("[email protected]");
    helper.setBcc("[email protected]");
    helper.setSentDate(new Date());
    Context context = new Context();
    context.setVariable("username", "javaboy");
    context.setVariable("num","000001");
    context.setVariable("salary", "99999");
    String process = templateEngine.process("mail.html", context);
    helper.setText(process,true);
    javaMailSender.send(mimeMessage);
}
調(diào)用該方法,發(fā)送郵件,效果圖如下:
好了,這就是我們今天說的 5 種郵件發(fā)送姿勢(shì),不知道你掌握了沒有呢?
本文案例已經(jīng)上傳到 GitHub:https://github.com/lenve/javaboy-code-samples。
有問題歡迎留言討論。

1、Spring Boot2 系列教程(一)純 Java 搭建 SSM 項(xiàng)目
2、Spring Boot2 系列教程(二)創(chuàng)建 Spring Boot 項(xiàng)目的三種方式
3、Spring Boot2 系列教程(三)理解 spring-boot-starter-parent
4、Spring Boot2 系列教程(四)理解配置文件 application.properties !
5、Spring Boot2 系列教程(五)Spring Boot中的 yaml 配置
8、Spring Boot2 系列教程(八)Spring Boot 中配置 Https
9、Spring Boot2 系列教程(九)Spring Boot 整合 Thymeleaf
10、Spring Boot2 系列教程(十)Spring Boot 整合 Freemarker
11、Spring Boot2 系列教程(十一)Spring Boot 中的靜態(tài)資源配置
12、Spring Boot2 系列教程(十二)@ControllerAdvice 的三種使用場(chǎng)景
13、Spring Boot2 系列教程(十三)Spring Boot 中的全局異常處理
14、Spring Boot2 系列教程(十四)CORS 解決跨域問題
15、Spring Boot2 系列教程(十五)定義系統(tǒng)啟動(dòng)任務(wù)的兩種方式
16、Spring Boot2 系列教程(十六)定時(shí)任務(wù)的兩種實(shí)現(xiàn)方式
17、Spring Boot2 系列教程(十七)SpringBoot 整合 Swagger2
18、Spring Boot2 系列教程(十八)Spring Boot 中自定義 SpringMVC 配置
19、Spring Boot2 系列教程(十九)Spring Boot 整合 JdbcTemplate
20、Spring Boot2 系列教程(二十)Spring Boot 整合JdbcTemplate 多數(shù)據(jù)源
21、Spring Boot2 系列教程(二十一)整合 MyBatis
22、Spring Boot2 系列教程(二十二)整合 MyBatis 多數(shù)據(jù)源
23、Spring Boot2 系列教程(二十三)理解 Spring Data Jpa
26、Spring Boot2 系列教程(二十六)Spring Boot 整合 Redis
27、Spring Boot2 系列教程(二十七)Nginx 極簡(jiǎn)掃盲入門
28、Spring Boot2 系列教程(二十八)Spring Boot 整合 Session 共享
29、Spring Boot2 系列教程(二十九)Spring Boot 整合 Redis
30、Spring Boot2 系列教程(三十)Spring Boot 整合 Ehcache
31、Spring Boot2 系列教程(三十一)Spring Boot 構(gòu)建 RESTful 風(fēng)格應(yīng)用
32、Spring Boot2 系列教程(三十二)Spring Boot 整合 Shiro
33、Spring Boot2 系列教程(三十三)整合 Spring Security
34、Spring Boot2 系列教程(三十四)Spring Security 添加驗(yàn)證碼
35、Spring Boot2 系列教程(三十五)SpringSecurity 使用 JSON 格式登錄
36、Spring Boot2 系列教程(三十六)SpringSecurity 中角色繼承的坑
37、Spring Boot2 系列教程(三十七)Spring Security 整合 JWT
38、Spring Boot2 系列教程(三十八)Spring Security 非法請(qǐng)求直接返回 JSON
39、Spring Boot2 系列教程(三十九)Spring Boot 熱部署
40、Spring Boot2 系列教程(四十)Spring Boot 可執(zhí)行 jar 分析
41、Spring Boot2 系列教程(四十一)部署 Spring Boot 到遠(yuǎn)程 Docker 容器
42、Spring Boot2 系列教程(四十二)使用 Jib 部署 Spring Boot
喜歡就點(diǎn)個(gè)"在看"唄^_^