
實(shí)戰(zhàn):車牌識(shí)別之車牌定位
點(diǎn)擊上方“小白學(xué)視覺”,選擇加"星標(biāo)"或“置頂”
重磅干貨,第一時(shí)間送達(dá)

本文轉(zhuǎn)自|3D視覺工坊
從本節(jié)起,我們開始嘗試做一下車牌識(shí)別中的算法部分。從上一節(jié)的基本框架圖中,可以看到,要想做車牌識(shí)別,第一步還是要知道車牌在圖片中的位置!
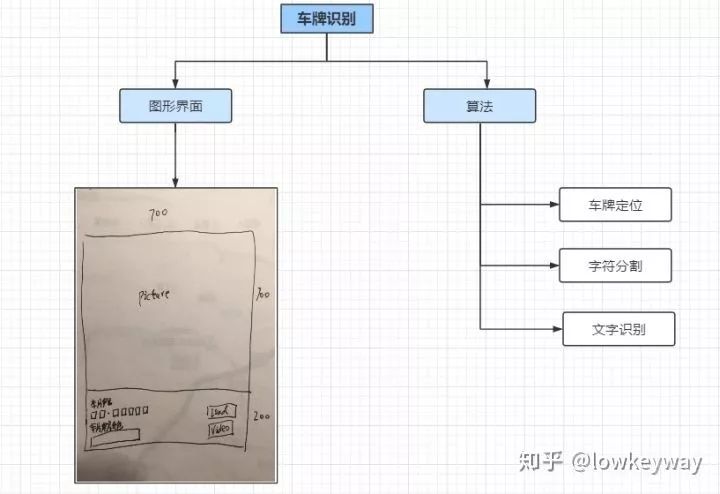
所以,萬里長(zhǎng)征第一步,我們先從車牌定位開始吧。
車牌定位
尋找車牌對(duì)于人腦來說真是小事一樁,這也是經(jīng)過千錘百煉的結(jié)果。但是對(duì)于計(jì)算機(jī)來說可能就沒有這么簡(jiǎn)單了。我們先來看看在物理世界什么是車牌,以及他們有什么特征。
我們以中國車牌為例,車牌的種類也是繁雜得很。從汽車類型上分有:
小型車號(hào)牌
大型車號(hào)牌
掛車號(hào)牌
使、領(lǐng)館汽車號(hào)牌
港澳出境車號(hào)牌
教練號(hào)牌
警車號(hào)牌
消防號(hào)牌
等等。。。
從車牌底色上看有:
藍(lán)色
黃色
綠色
白色
黑色
黃色+綠色
面對(duì)如此眾多的分類,最怕的就是一開始就想做一個(gè)大而全的系統(tǒng)。敏捷開發(fā)才是王道,我們以其中一個(gè)最普通的小型車號(hào)牌+藍(lán)色為例,找一找它的特征點(diǎn):
1. 尺寸
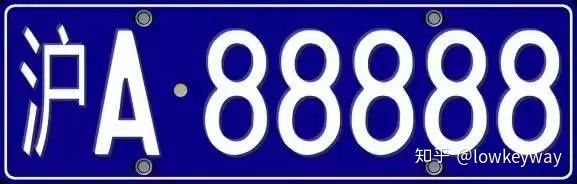
寬440mm×高140mm的矩形
2. 顏色
背景為藍(lán)色,顯示內(nèi)容為白色
3. 內(nèi)容
以“滬A-88888”為例,格式為“漢字(省/直轄市縮寫)”+“大寫字母(市/區(qū)縮寫)”+“點(diǎn)(-)”+“5位大寫字母和數(shù)字的組合(隨機(jī)車牌號(hào))”
好了,了解過了車牌的基本內(nèi)容,我們就要開始思考如何在一張數(shù)字圖像上找到車牌。這里我們只利用兩個(gè)有用信息尺寸和顏色(內(nèi)容部分比較難,放在后面)。
尺寸因?yàn)閳D片大小和車牌遠(yuǎn)近的問題,只能用到它的比例和矩形特征。我們可以嘗試找到符合寬高比在(2, 4)之間的矩形。那么車牌就在這些矩形里了。
顏色部分可以用來做精調(diào),可以在上面的矩形里找到符合藍(lán)色覆蓋比例的部分。這樣一可以剔除那些非藍(lán)色的矩形,而來可以縮小矩形范圍提煉精確的車牌內(nèi)容。
為了實(shí)現(xiàn)上面兩個(gè)大思路,再具體一些可以分成如下七步:
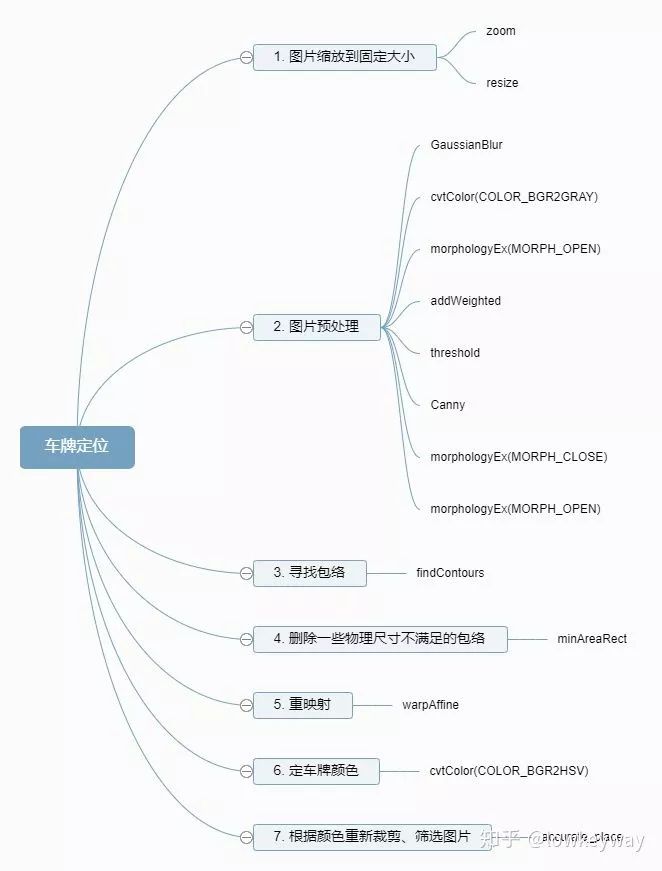
1. 圖片縮放到固定的大小
由于加載圖片大小的差異,縮放到固定大小的最重要的原因是方便后面的模糊、開、閉操作,可以用一個(gè)統(tǒng)一的內(nèi)核大小處理不同的圖片了。
def zoom(w, h, wMax, hMax):
	# if w <= wMax and h <= hMax:
	# 	return w, h
	widthScale = 1.0 * wMax / w
	heightScale = 1.0 * hMax / h

	scale = min(widthScale, heightScale)

	resizeWidth = int(w * scale)
	resizeHeight = int(h * scale)

	return resizeWidth, resizeHeight

# Step1: Resize
img = np.copy(self.imgOri)
h, w = img.shape[:2]
imgWidth, imgHeight = zoom(w, h, self.maxLength, self.maxLength)
print(w, h, imgWidth, imgHeight)
img =cv.resize(img, (imgWidth, imgHeight), interpolation=cv.INTER_AREA)
cv.imshow("imgResize", img) 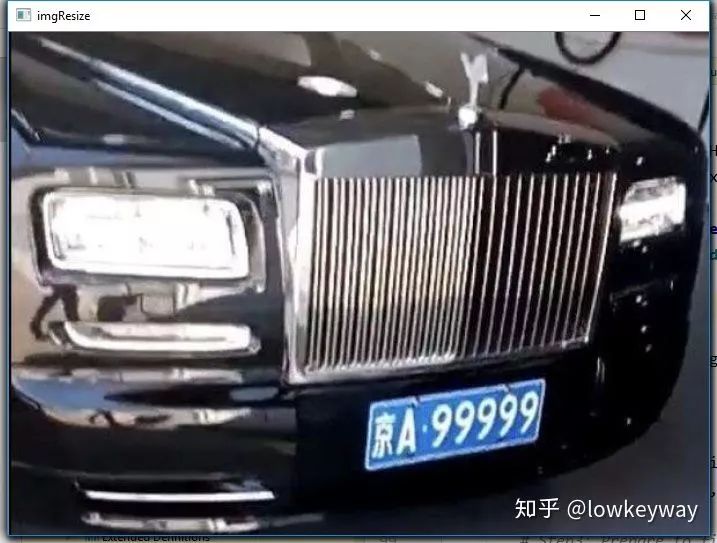
2. 圖片預(yù)處理
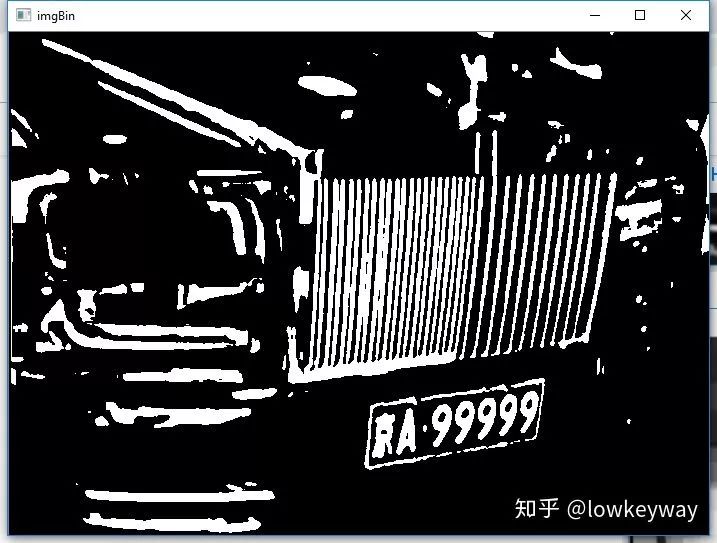
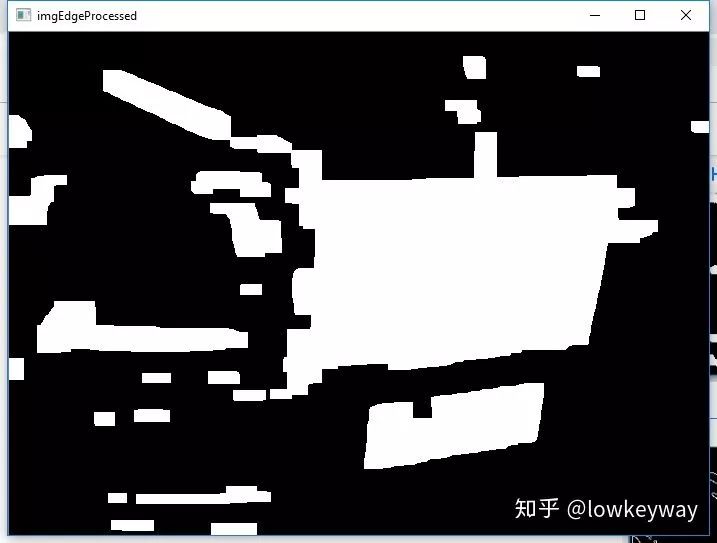
圖片預(yù)處理部分是最重要的,這里面所有做的操作都是給有效地尋找包絡(luò)服務(wù)的,其中用到了高斯模糊來降低噪聲,開操作和加權(quán)來強(qiáng)化對(duì)比度,二值化和Canny邊緣檢測(cè)來找到物體輪廓,用先閉后開操作找到整塊整塊的矩形。
# Step2: Prepare to find contours
img = cv.GaussianBlur(img, (3, 3), 0)
imgGary = cv.cvtColor(img, cv.COLOR_BGR2GRAY)
cv.imshow("imgGary", imgGary)

kernel = np.ones((20, 20), np.uint8)
imgOpen = cv.morphologyEx(imgGary, cv.MORPH_OPEN, kernel)
cv.imshow("imgOpen", imgOpen)

imgOpenWeight = cv.addWeighted(imgGary, 1, imgOpen, -1, 0)
cv.imshow("imgOpenWeight", imgOpenWeight)

ret, imgBin = cv.threshold(imgOpenWeight, 0, 255, cv.THRESH_OTSU + cv.THRESH_BINARY)
cv.imshow("imgBin", imgBin)

imgEdge = cv.Canny(imgBin, 100, 200)
cv.imshow("imgEdge", imgEdge)

kernel = np.ones((10, 19), np.uint8)
imgEdge = cv.morphologyEx(imgEdge, cv.MORPH_CLOSE, kernel)
imgEdge = cv.morphologyEx(imgEdge, cv.MORPH_OPEN, kernel)
cv.imshow("imgEdgeProcessed", imgEdge) 


3. 尋找包絡(luò)
有了上面的處理,尋找包絡(luò)就簡(jiǎn)單多了。OpenCV的一個(gè)接口findContours就搞定!
# Step3: Find Contours
image, contours, hierarchy = cv.findContours(imgEdge, cv.RETR_TREE, cv.CHAIN_APPROX_SIMPLE)
contours = [cnt for cnt in contours if cv.contourArea(cnt) > self.minArea]
4. 刪除一些物理尺寸不滿足的包絡(luò)
輪詢所有包絡(luò),通過minAreaRect找到他們對(duì)應(yīng)的最小矩形。先通過寬、高比來刪除一些不符合條件的。
# Step4: Delete some rects
carPlateList = []
imgDark = np.zeros(img.shape, dtype = img.dtype)
for index, contour in enumerate(contours):
	rect = cv.minAreaRect(contour) # [中心(x,y), (寬,高), 旋轉(zhuǎn)角度]
	w, h = rect[1]
	if w < h:
		w, h = h, w
	scale = w/h
	if scale > 2 and scale < 4:
		# color = (random.randint(0, 255), random.randint(0, 255), random.randint(0, 255))
		color = (255, 255, 255)
		carPlateList.append(rect)
		cv.drawContours(imgDark, contours, index, color, 1, 8)

		box = cv.boxPoints(rect)  # Peak Coordinate
		box = np.int0(box)
		# Draw them out
		cv.drawContours(imgDark, [box], 0, (0, 0, 255), 1)

cv.imshow("imgGaryContour", imgDark)
print("Vehicle number: ", len(carPlateList)) 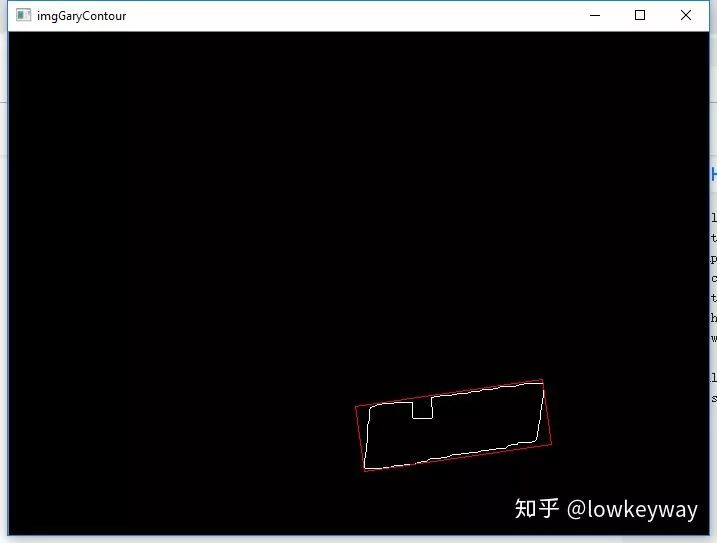
5. 重映射
這里做的是仿射變換,為什么要做這個(gè)呢?原因是因?yàn)榕臄z角度的原因,我們得到的矩形通常是由寫偏角的,這里希望把它們擺正。
# Step5: Rect rectify
imgPlatList = []
for index, carPlat in enumerate(carPlateList):
	if carPlat[2] > -1 and carPlat[2] < 1:
		angle = 1
	else:
		angle = carPlat[2]

	carPlat = (carPlat[0], (carPlat[1][0] + 5, carPlat[1][1] + 5), angle)
	box = cv.boxPoints(carPlat)

	# Which point is Left/Right/Top/Bottom
	w, h = carPlat[1][0], carPlat[1][1]
	if w > h:
		LT = box[1]
		LB = box[0]
		RT = box[2]
		RB = box[3]
	else:
		LT = box[2]
		LB = box[1]
		RT = box[3]
		RB = box[0]

	for point in [LT, LB, RT, RB]:
		pointLimit(point, imgWidth, imgHeight)

	# Do warpAffine
	newLB = [LT[0], LB[1]]
	newRB = [RB[0], LB[1]]
	oldTriangle = np.float32([LT, LB, RB])
	newTriangle = np.float32([LT, newLB, newRB])
	warpMat = cv.getAffineTransform(oldTriangle, newTriangle)
	imgAffine = cv.warpAffine(img, warpMat, (imgWidth, imgHeight))
	cv.imshow("imgAffine" + str(index), imgAffine)
	print("Index: ", index)

	imgPlat = imgAffine[int(LT[1]):int(newLB[1]), int(newLB[0]):int(newRB[0])]
	imgPlatList.append(imgPlat)
cv.imshow("imgPlat" + str(index), imgPlat) 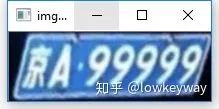
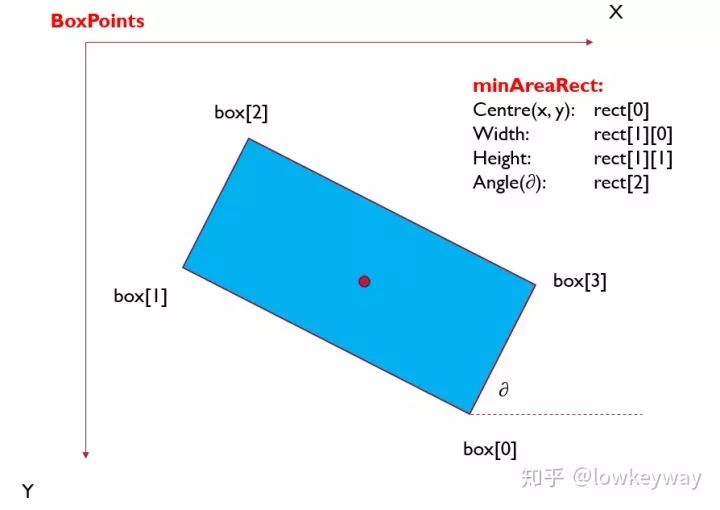
需要注意的是這里用了boxPoints接口獲取了矩形的四個(gè)點(diǎn)的坐標(biāo),需要通過這四個(gè)點(diǎn)坐標(biāo)對(duì)應(yīng)矩形的左上、右上、左下、右下四個(gè)點(diǎn),才能給后面的warpAffine仿射變換做鋪墊。
函數(shù) cv2.minAreaRect() 返回一個(gè)Box2D結(jié)構(gòu)rect:(最小外接矩形的中心(x,y),(寬度,高度),旋轉(zhuǎn)角度),但是要繪制這個(gè)矩形,我們需要矩形的4個(gè)頂點(diǎn)坐標(biāo)box, 通過函數(shù) cv2.cv.BoxPoints() 獲得,返回形式[ [x0,y0], [x1,y1], [x2,y2], [x3,y3] ]。得到的最小外接矩形的4個(gè)頂點(diǎn)順序、中心坐標(biāo)、寬度、高度、旋轉(zhuǎn)角度(是度數(shù)形式,不是弧度數(shù))的對(duì)應(yīng)關(guān)系如下:
6. 定車牌顏色
基本思路就是把上面重映射后的圖片轉(zhuǎn)換到HSV空間,然后通過統(tǒng)計(jì)全部像素的個(gè)數(shù)以及單個(gè)顏色對(duì)應(yīng)的個(gè)數(shù),如果滿足藍(lán)色占了全部像素的1/3及以上的時(shí)候,就認(rèn)為這是一個(gè)藍(lán)色車牌。
#Step6: Find correct place by color.
colorList = []
for index, imgPlat in enumerate(imgPlatList):
green = yellow = blue = 0
imgHsv = cv.cvtColor(imgPlat, cv.COLOR_BGR2HSV)
rows, cols = imgHsv.shape[:2]
imgSize = cols * rows
color = None
for row in range(rows):
for col in range(cols):
H = imgHsv.item(row, col, 0)
S = imgHsv.item(row, col, 1)
V = imgHsv.item(row, col, 2)
if 11 < H <= 34 and S > 34:
yellow += 1
elif 35 < H <= 99 and S > 34:
green += 1
elif 99 < H <= 124 and S > 34:
blue += 1
limit1 = limit2 = 0
if yellow * 3 >= imgSize:
color = "yellow"
limit1 = 11
limit2 = 34
elif green * 3 >= imgSize:
color = "green"
limit1 = 35
limit2 = 99
elif blue * 3 >= imgSize:
color = "blue"
limit1 = 100
limit2 = 124
print("Image Index[", index, '], Color:', color)
colorList.append(color)
print(blue, green, yellow, imgSize)
if color is None:
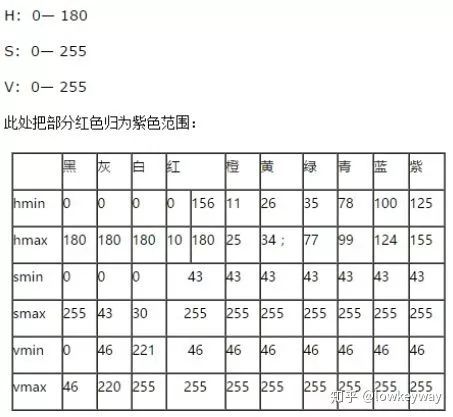
continue 附:
HSV空間下的顏色判斷關(guān)系表。
7. 根據(jù)顏色重新裁剪、篩選圖片
我們知道了車牌顏色之后,就可以通過逐行、逐列掃描,把車牌精確到更小的范圍,這樣還可以通過寬高比剔除一些不正確的矩形,而且還得到了精確唯一車牌圖像內(nèi)容!
def accurate_place(self, imgHsv, limit1, limit2, color):
	rows, cols = imgHsv.shape[:2]
	left = cols
	right = 0
	top = rows
	bottom = 0

	# rowsLimit = 21
	rowsLimit = rows * 0.8 if color != "green" else rows * 0.5  # 綠色有漸變
	colsLimit = cols * 0.8 if color != "green" else cols * 0.5  # 綠色有漸變
	for row in range(rows):
		count = 0
		for col in range(cols):
			H = imgHsv.item(row, col, 0)
			S = imgHsv.item(row, col, 1)
			V = imgHsv.item(row, col, 2)
			if limit1 < H <= limit2 and 34 < S:# and 46 < V:
				count += 1
		if count > colsLimit:
			if top > row:
				top = row
			if bottom < row:
				bottom = row
	for col in range(cols):
		count = 0
		for row in range(rows):
			H = imgHsv.item(row, col, 0)
			S = imgHsv.item(row, col, 1)
			V = imgHsv.item(row, col, 2)
			if limit1 < H <= limit2 and 34 < S:# and 46 < V:
				count += 1
		if count > rowsLimit:
			if left > col:
				left = col
			if right < col:
				right = col
	return left, right, top, bottom

# Step7: Resize vehicle img.
left, right, top, bottom = self.accurate_place(imgHsv, limit1, limit2, color)
w = right - left
h = bottom - top

if left == right or top == bottom:
	continue

scale = w/h
if scale < 2 or scale > 4:
	continue


needAccurate = False
if top >= bottom:
	top = 0
	bottom = rows
	needAccurate = True
if left >= right:
	left = 0
	right = cols
	needAccurate = True
# imgPlat[index] = imgPlat[top:bottom, left:right] \
# if color != "green" or top < (bottom - top) // 4 \
# else imgPlat[top - (bottom - top) // 4:bottom, left:right]
imgPlatList[index] = imgPlat[top:bottom, left:right]
cv.imshow("Vehicle Image " + str(index), imgPlatList[index]) 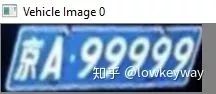
好了,我們終于拿到了最終結(jié)果,下一步就是把這里面的內(nèi)容提取出來吧!
目前遇到的問題:
1. 獲取矩形如果傾斜有角度,仿射變換后更偏了,不知道后面內(nèi)容提取容易分離不。
全部代碼:
import cv2 as cv
import numpy as np
from numpy.linalg import norm
import matplotlib.pyplot as plt
import sys, os, json, random


class LPRAlg:
	maxLength 	= 700
	minArea 	= 2000
	def __init__(self, imgPath = None):
		if imgPath is None:
			print("Please input correct path!")
			return None

		self.imgOri = cv.imread(imgPath)
		if self.imgOri is None:
			print("Cannot load this picture!")
			return None

		# cv.imshow("imgOri", self.imgOri)

	def accurate_place(self, imgHsv, limit1, limit2, color):
		rows, cols = imgHsv.shape[:2]
		left = cols
		right = 0
		top = rows
		bottom = 0

		# rowsLimit = 21
		rowsLimit = rows * 0.8 if color != "green" else rows * 0.5  # 綠色有漸變
		colsLimit = cols * 0.8 if color != "green" else cols * 0.5  # 綠色有漸變
		for row in range(rows):
			count = 0
			for col in range(cols):
				H = imgHsv.item(row, col, 0)
				S = imgHsv.item(row, col, 1)
				V = imgHsv.item(row, col, 2)
				if limit1 < H <= limit2 and 34 < S:# and 46 < V:
					count += 1
			if count > colsLimit:
				if top > row:
					top = row
				if bottom < row:
					bottom = row
		for col in range(cols):
			count = 0
			for row in range(rows):
				H = imgHsv.item(row, col, 0)
				S = imgHsv.item(row, col, 1)
				V = imgHsv.item(row, col, 2)
				if limit1 < H <= limit2 and 34 < S:# and 46 < V:
					count += 1
			if count > rowsLimit:
				if left > col:
					left = col
				if right < col:
					right = col
		return left, right, top, bottom

	def findVehiclePlate(self):
		def zoom(w, h, wMax, hMax):
			# if w <= wMax and h <= hMax:
			# 	return w, h
			widthScale = 1.0 * wMax / w
			heightScale = 1.0 * hMax / h

			scale = min(widthScale, heightScale)

			resizeWidth = int(w * scale)
			resizeHeight = int(h * scale)

			return resizeWidth, resizeHeight

		def pointLimit(point, maxWidth, maxHeight):
			if point[0] < 0:
				point[0] = 0
			if point[0] > maxWidth:
				point[0] = maxWidth
			if point[1] < 0:
				point[1] = 0
			if point[1] > maxHeight:
				point[1] = maxHeight

		if self.imgOri is None:
			print("Please load picture frist!")
			return False

		# Step1: Resize
		img = np.copy(self.imgOri)
		h, w = img.shape[:2]
		imgWidth, imgHeight = zoom(w, h, self.maxLength, self.maxLength)
		print(w, h, imgWidth, imgHeight)
		img =cv.resize(img, (imgWidth, imgHeight), interpolation=cv.INTER_AREA)
		cv.imshow("imgResize", img)

		# Step2: Prepare to find contours
		img = cv.GaussianBlur(img, (3, 3), 0)
		imgGary = cv.cvtColor(img, cv.COLOR_BGR2GRAY)
		cv.imshow("imgGary", imgGary)

		kernel = np.ones((20, 20), np.uint8)
		imgOpen = cv.morphologyEx(imgGary, cv.MORPH_OPEN, kernel)
		cv.imshow("imgOpen", imgOpen)

		imgOpenWeight = cv.addWeighted(imgGary, 1, imgOpen, -1, 0)
		cv.imshow("imgOpenWeight", imgOpenWeight)

		ret, imgBin = cv.threshold(imgOpenWeight, 0, 255, cv.THRESH_OTSU + cv.THRESH_BINARY)
		cv.imshow("imgBin", imgBin)

		imgEdge = cv.Canny(imgBin, 100, 200)
		cv.imshow("imgEdge", imgEdge)

		kernel = np.ones((10, 19), np.uint8)
		imgEdge = cv.morphologyEx(imgEdge, cv.MORPH_CLOSE, kernel)
		imgEdge = cv.morphologyEx(imgEdge, cv.MORPH_OPEN, kernel)
		cv.imshow("imgEdgeProcessed", imgEdge)

		# Step3: Find Contours
		image, contours, hierarchy = cv.findContours(imgEdge, cv.RETR_TREE, cv.CHAIN_APPROX_SIMPLE)
		contours = [cnt for cnt in contours if cv.contourArea(cnt) > self.minArea]

		# Step4: Delete some rects
		carPlateList = []
		imgDark = np.zeros(img.shape, dtype = img.dtype)
		for index, contour in enumerate(contours):
			rect = cv.minAreaRect(contour) # [中心(x,y), (寬,高), 旋轉(zhuǎn)角度]
			w, h = rect[1]
			if w < h:
				w, h = h, w
			scale = w/h
			if scale > 2 and scale < 4:
				# color = (random.randint(0, 255), random.randint(0, 255), random.randint(0, 255))
				color = (255, 255, 255)
				carPlateList.append(rect)
				cv.drawContours(imgDark, contours, index, color, 1, 8)

				box = cv.boxPoints(rect)  # Peak Coordinate
				box = np.int0(box)
				# Draw them out
				cv.drawContours(imgDark, [box], 0, (0, 0, 255), 1)

		cv.imshow("imgGaryContour", imgDark)
		print("Vehicle number: ", len(carPlateList))

		# Step5: Rect rectify
		imgPlatList = []
		for index, carPlat in enumerate(carPlateList):
			if carPlat[2] > -1 and carPlat[2] < 1:
				angle = 1
			else:
				angle = carPlat[2]

			carPlat = (carPlat[0], (carPlat[1][0] + 5, carPlat[1][1] + 5), angle)
			box = cv.boxPoints(carPlat)

			# Which point is Left/Right/Top/Bottom
			w, h = carPlat[1][0], carPlat[1][1]
			if w > h:
				LT = box[1]
				LB = box[0]
				RT = box[2]
				RB = box[3]
			else:
				LT = box[2]
				LB = box[1]
				RT = box[3]
				RB = box[0]

			for point in [LT, LB, RT, RB]:
				pointLimit(point, imgWidth, imgHeight)

			# Do warpAffine
			newLB = [LT[0], LB[1]]
			newRB = [RB[0], LB[1]]
			oldTriangle = np.float32([LT, LB, RB])
			newTriangle = np.float32([LT, newLB, newRB])
			warpMat = cv.getAffineTransform(oldTriangle, newTriangle)
			imgAffine = cv.warpAffine(img, warpMat, (imgWidth, imgHeight))
			cv.imshow("imgAffine" + str(index), imgAffine)
			print("Index: ", index)

			imgPlat = imgAffine[int(LT[1]):int(newLB[1]), int(newLB[0]):int(newRB[0])]
			imgPlatList.append(imgPlat)
			cv.imshow("imgPlat" + str(index), imgPlat)

		#Step6: Find correct place by color.
		colorList = []
		for index, imgPlat in enumerate(imgPlatList):
			green = yellow = blue = 0
			imgHsv = cv.cvtColor(imgPlat, cv.COLOR_BGR2HSV)
			rows, cols = imgHsv.shape[:2]
			imgSize = cols * rows
			color = None

			for row in range(rows):
				for col in range(cols):
					H = imgHsv.item(row, col, 0)
					S = imgHsv.item(row, col, 1)
					V = imgHsv.item(row, col, 2)

					if 11 < H <= 34 and S > 34:
						yellow += 1
					elif 35 < H <= 99 and S > 34:
						green += 1
					elif 99 < H <= 124 and S > 34:
						blue += 1

			limit1 = limit2 = 0
			if yellow * 3 >= imgSize:
				color = "yellow"
				limit1 = 11
				limit2 = 34
			elif green * 3 >= imgSize:
				color = "green"
				limit1 = 35
				limit2 = 99
			elif blue * 3 >= imgSize:
				color = "blue"
				limit1 = 100
				limit2 = 124

			print("Image Index[", index, '], Color:', color)
			colorList.append(color)
			print(blue, green, yellow, imgSize)

			if color is None:
				continue

			# Step7: Resize vehicle img.
			left, right, top, bottom = self.accurate_place(imgHsv, limit1, limit2, color)
			w = right - left
			h = bottom - top

			if left == right or top == bottom:
				continue

			scale = w/h
			if scale < 2 or scale > 4:
				continue


			needAccurate = False
			if top >= bottom:
				top = 0
				bottom = rows
				needAccurate = True
			if left >= right:
				left = 0
				right = cols
				needAccurate = True
			# imgPlat[index] = imgPlat[top:bottom, left:right] \
			# if color != "green" or top < (bottom - top) // 4 \
			# else imgPlat[top - (bottom - top) // 4:bottom, left:right]
			imgPlatList[index] = imgPlat[top:bottom, left:right]
			cv.imshow("Vehicle Image " + str(index), imgPlatList[index])


if __name__ == '__main__':
	L = LPRAlg("3.jfif")
	L.findVehiclePlate()
cv.waitKey(0)交流群
歡迎加入公眾號(hào)讀者群一起和同行交流,目前有SLAM、三維視覺、傳感器、自動(dòng)駕駛、計(jì)算攝影、檢測(cè)、分割、識(shí)別、醫(yī)學(xué)影像、GAN、算法競(jìng)賽等微信群(以后會(huì)逐漸細(xì)分),請(qǐng)掃描下面微信號(hào)加群,備注:”昵稱+學(xué)校/公司+研究方向“,例如:”張三 + 上海交大 + 視覺SLAM“。請(qǐng)按照格式備注,否則不予通過。添加成功后會(huì)根據(jù)研究方向邀請(qǐng)進(jìn)入相關(guān)微信群。請(qǐng)勿在群內(nèi)發(fā)送廣告,否則會(huì)請(qǐng)出群,謝謝理解~