
OpenCV基礎(chǔ)知識入門
點擊上方“程序員大白”,選擇“星標(biāo)”公眾號
重磅干貨,第一時間送達(dá)
OpenCV
先決條件
https://code.visualstudio.com/download
python -m venv env
env\scripts\activate激活環(huán)境,你會在C:\Users\username\Desktop\opencv之前看到小括號(env)出現(xiàn)。pip install opencv-python
我們會在本文中涵蓋7個主題
讀,寫和顯示圖像
img = cv2.imread("PATH_TO_IMAGE.jpg/png")
Example
img = imread("images/dog0.jpg")
cv2.imshow("WINDOW NAME",IMG_VAR)
Example
imshow("Dog Image",img)
cv2.imwrite(FILENAME, IMAGE)
filename: A string representing the file name. The filename must include image format like .jpg, .png, etc.
image: It is the image that is to be saved.
Example
cv2.imwrite('images/img',img)
video = cv2.VideoCapture("FILEPATH.mp4")
Example
video = cv2.VideoCapture("video/dog/dog.mp4")
while True:
   success , img = cap.read()
   cv2.imshow("Video",img)
   if cv2.waitKey(1) & 0xff==ord('q'):##key 'q' will break the loop
       break
cap = cv2.VideoCapture(0)
cap.set(3,640)  ## Frame width
cap.set(4,480)  ## Frame Height
cap.set(10,100) ## Brightness
while True:
   success, img = cap.read()
   cv2.imshow("Video",img)
   if cv2.waitKey(1) & 0xff == ord('q'):
        break
cv2.resize(IMG,(WIDTH,HEIGHT))
IMG: image which we want to resize
WIDTH: new width of the resize image
HEIGHT: new height of the resize image
Example
cv2.resize(img,(224,224))
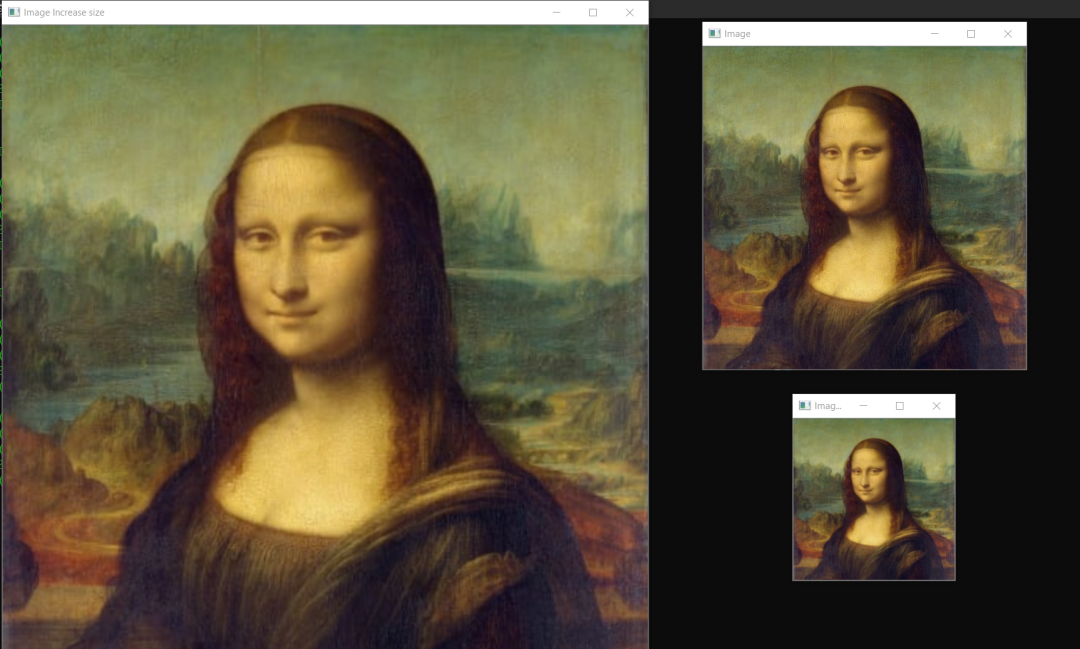
shape來找到任何圖像的形狀,然后根據(jù)圖像形狀,可以增加或減小圖像的大小。讓我們看看示例。import cv2
img = cv2.imread("images/img0.jpg") ##Choose any image
print(img.shape)
imgResize = cv2.resize(img,(224,224)) ##Decrease size
imgResize2 = cv2.resize(img,(1024,1024)) ##Increase size
cv2.imshow("Image",img)
cv2.imshow("Image Resize",imgResize)
cv2.imshow("Image Increase size",imgResize2)
print(imgResize.shape)
cv2.waitKey(0)
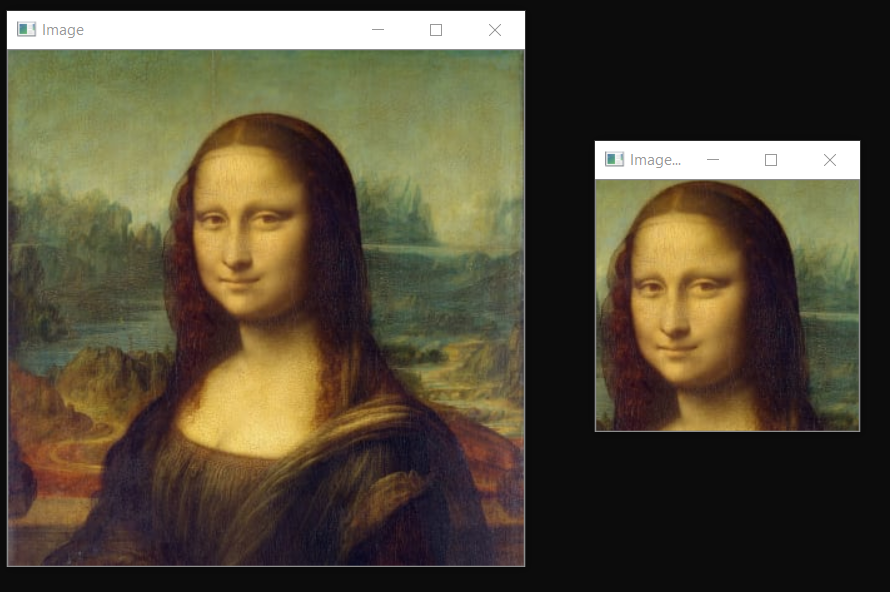
import cv2
img = cv2.imread("images/img0.jpg") ##Choose any image
print(img.shape)
shape = img.shape
imgResize = cv2.resize(img,(shape[0]//2,shape[1]//2))##Decrease size
imgResize2 = cv2.resize(img,(shape[0]*2,shape[1]*2)) ##Increase size
cv2.imshow("Image",img)
cv2.imshow("Image Resize",imgResize)
cv2.imshow("Image Increase size",imgResize2)
print(imgResize.shape)
cv2.waitKey(0)
imgCropped = img[y1:y2, x1:x2]
(x1,y1): top-left vertex
(x2,y2): bottom-right vertex
Example
imgCropped = img[0:100,200:200]
import cv2
img = cv2.imread("images/img0.jpg")
imgCropped = img[50:250,120:330]
cv2.imshow("Image cropped",imgCropped)
cv2.imshow("Image",img)
cv2.waitKey(0)
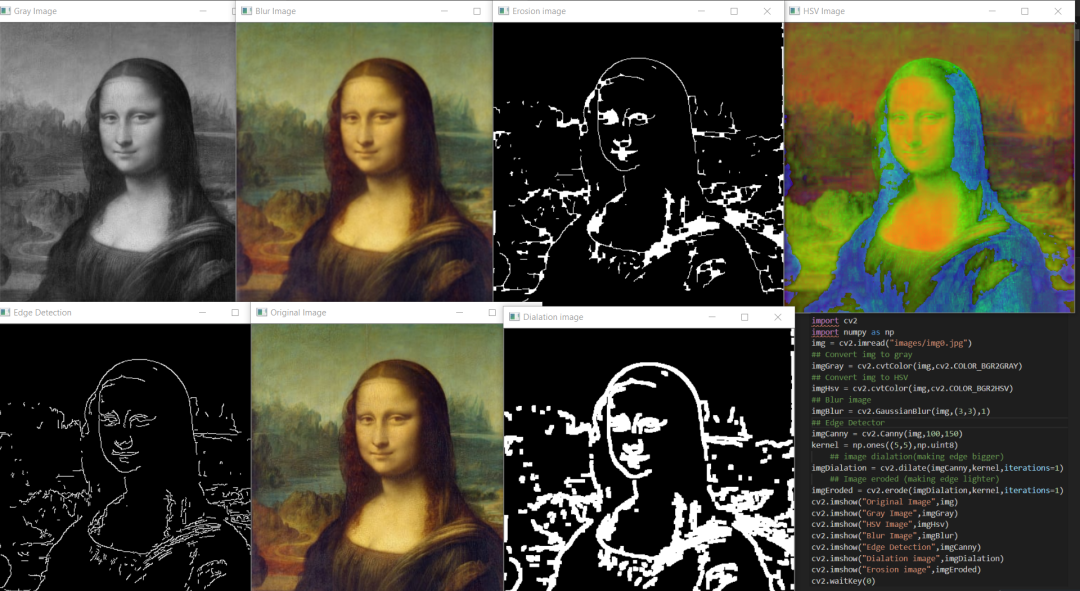
基本的圖像過濾器使用的函數(shù)
cvtColor,這里我們將cv2.COLOR_BGR2GRAY作為參數(shù)傳遞。imgGray = cv2.cvtColor(IMG,cv2.CODE)
IMG: Original image
CODE: Conversion code for Gray(COLOR_BGR2GRAY)
Example
imgGray = cv2.cvtColor(img,cv2.COLOR_BGR2GRAY)
cvtColor,這里我們將cv2.COLOR_BGR2HSV作為參數(shù)傳遞。它主要用于對象跟蹤。imgGray = cv2.cvtColor(IMG,cv2.CODE)
IMG: Original image
CODE: Conversion code for Gray(COLOR_BGR2HSV)
Example
imgHsv = cv2.cvtColor(img,cv2.COLOR_BGR2HSV)
imgBlur = cv2.GaussianBlur(img,(sigmaX,sigmaY),kernalSize)
kernalsize ? A Size object representing the size of the kernel.
sigmaX ? A variable representing the Gaussian kernel standard deviation in X direction.
sigmaY - same as sigmaX
Exmaple
imgBlur = cv2.GaussianBlur(img,(3,3),0)
imgCanny = cv2.Canny(img,threshold1,threshold2)
threshold1,threshold2:Different values of threshold different for every images
Example
imgCanny = cv2.Canny(img,100,150)
kernel = np.ones((5,5),np.uint8) ## DEFINING KERNEL OF 5x5
imgDialation = cv2.dilate(imgCanny,kernel,iterations=1) ##DIALATION
kernel = np.ones((5,5),np.uint8) ## DEFINING KERNEL OF 5x5
imgDialation = cv2.erode(imgCanny,kernel,iterations=1) ##EROSION
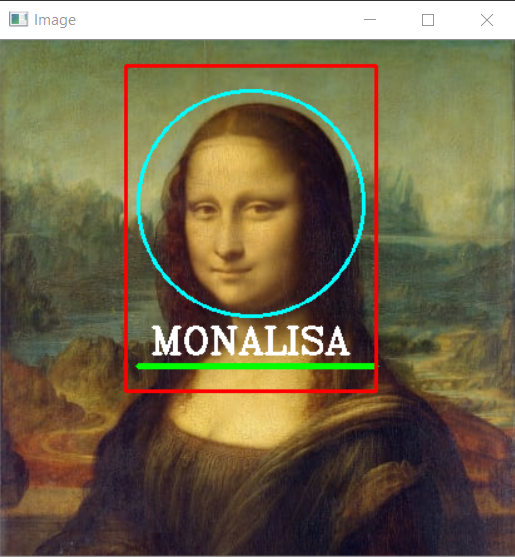
cv2.rectangle(img,(w,h),(x,y),(R,G,B),THICKNESS)
w: width
h: height
x: distance from x axis
y: distance from y axis
R,G,B: color in RGB form (255,255,0)
THICKNESS: thickness of rectangel(integer)
Example
cv2.rectangle(img,(100,300),(200,300),(255,0,255),2)
cv2.circle(img,(x,y),radius,(R,G,B),THICKNESS)
x: distance from x axis
y: distance from y axis
radius: size of radius(integer)
R,G,B: color in RGB form (255,255,0)
THICKNESS: thickness of rectangel(integer)
Example
cv2.circle(img,(200,130),90,(255,255,0),2)
cv2.line(img,(x1,y1),(x2,y2),(R,G,B),THICKNESS)
x1,y1: start point of line (integer)
x2,y2: end point of line (integer)
R,G,B: color in RGB form (255,255,0)
THICKNESS: thickness of rectangel(integer)
Example
cv2.line(img,(110,260),(300,260),(0,255,0),3)
在OpenCV中,我們有一個函數(shù)cv2.puttext, 可以在特定位置的圖像上寫文本。它以圖像,文本,x,y,顏色,字體,字體比例,粗細(xì)為輸入。
cv2.putText(img,text,(x,y),FONT,FONT_SCALE,(R,G,B),THICKNESS)
img: image to put text on
text: text to put on image
X: text distance from X axis
Y: text distance from Y axis
FONT: Type of FONT (ALL FONT TYPES)
FONT_SCALE: Scale of Font(Integer)
R,G,B: color in RGB form (255,255,0)
THICKNESS: thickness of rectangel(integer)
Example
cv2.putText(img,"HELLO",(120,250),cv2.FONT_HERSHEY_COMPLEX,1,(255,255,255),2)
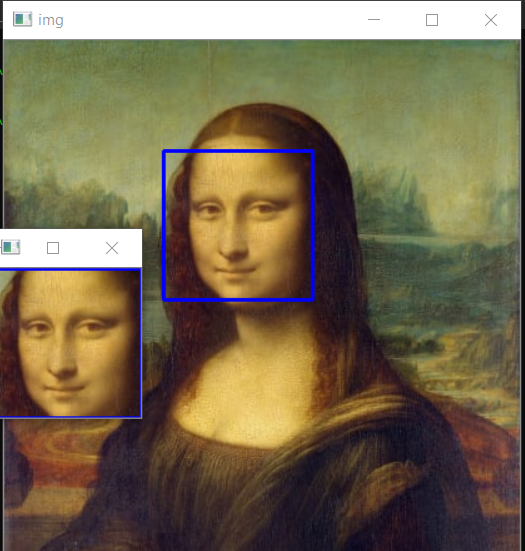
https://github.com/opencv/opencv/tree/master/data/haarcascades
import cv2
# Load the cascade
face_cascade = cv2.CascadeClassifier('haarcascade_frontalface_default.xml')
# Read the input image
img = cv2.imread('images/img0.jpg')
# Convert into grayscale
gray = cv2.cvtColor(img, cv2.COLOR_BGR2GRAY)
# Detect faces
faces = face_cascade.detectMultiScale(gray, 1.3, 4)
# Draw rectangle around the faces
for (x, y, w, h) in faces:
    cv2.rectangle(img, (x, y), (x+w, y+h), (255, 0, 0), 2)
    # Cropping Face
    crop_face = img[y:y + h, x:x + w]
    #Saving Cropped Face
    cv2.imwrite(str(w) + str(h) + '_faces.jpg', crop_face)
cv2.imshow('img', img)
cv2.imshow("imgcropped",crop_face)
cv2.waitKey()
推薦閱讀
關(guān)于程序員大白
程序員大白是一群哈工大,東北大學(xué),西湖大學(xué)和上海交通大學(xué)的碩士博士運營維護(hù)的號,大家樂于分享高質(zhì)量文章,喜歡總結(jié)知識,歡迎關(guān)注[程序員大白],大家一起學(xué)習(xí)進(jìn)步!
評論
圖片
表情