
容器運(yùn)行時Containerd基礎(chǔ)


本文目錄:
一、安裝Containerd
二、運(yùn)行一個busybox鏡像
三、創(chuàng)建CNI網(wǎng)絡(luò)
四、使containerd容器具備網(wǎng)絡(luò)功能
五、與宿主機(jī)共享目錄
六、與其它容器共享ns
七、docker/containerd并用
一、安裝Containerd
本地安裝Containerd:
yum install -y yum-utilsyum-config-manager --add-repo https://download.docker.com/linux/centos/docker-ce.repoyum install -y containerd epel-releaseyum install -y jq
Containerd版本:
[root@containerd ~]# ctr versionClient:Version: 1.4.3Revision: 269548fa27e0089a8b8278fc4fc781d7f65a939bGo version: go1.13.15Server:Version: 1.4.3Revision: 269548fa27e0089a8b8278fc4fc781d7f65a939bUUID: b7e3b0e7-8a36-4105-a198-470da2be02f2
初始化Containerd配置:
containerd config default > /etc/containerd/config.tomlsystemctl enabled containerdsystemctl start containerd
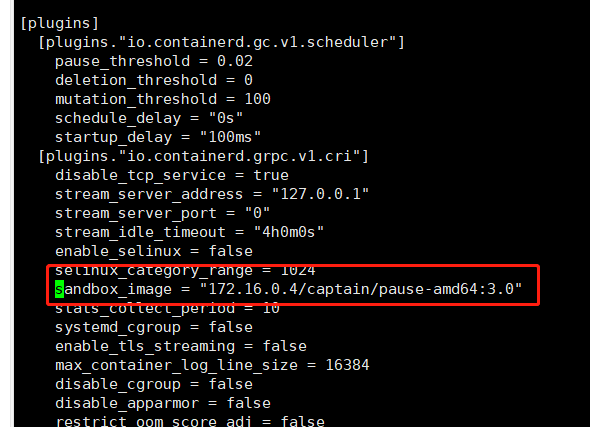
替換 containerd 默認(rèn)的sand_box鏡像,編輯/etc/containerd/config.toml文件:
# registry.cn-hangzhou.aliyuncs.com/google-containers/pause-amd64:3.0 可以使用阿里云鏡像源sandbox_image = "172.16.0.4/captain/pause-amd64:3.0"
應(yīng)用配置并重新運(yùn)行containerd服務(wù)
systemctl daemon-reloadsystemctl restart containerd
二、運(yùn)行一個busybox鏡像:
預(yù)先準(zhǔn)備:
[root@containerd ~]# # 拉取鏡像[root@containerd ~]# ctr -n k8s.io i pull docker.io/library/busybox:latest[root@containerd ~]# # 創(chuàng)建一個container(此時還未運(yùn)行)[root@containerd ~]# ctr -n k8s.io container create docker.io/library/busybox:latest busybox[root@containerd ~]# # 創(chuàng)建一個task[root@containerd ~]# ctr -n k8s.io task start -d busybox[root@containerd ~]# # 上述步驟也可以簡寫成如下[root@containerd ~]# # ctr -n k8s.io run -d docker.io/library/busybox:latest busybox
查看該容器在宿主機(jī)的PID:
[root@containerd ~]# ctr -n k8s.io task lsTASK PID STATUSbusybox 2356 RUNNING[root@containerd ~]# ps ajxf|grep "containerd-shim-runc\|2356"|grep -v grep1 2336 2336 1178 ? -1 Sl 0 0:00 /usr/bin/containerd-shim-runc-v2 -namespace k8s.io -id busybox -address /run/containerd/containerd.sock2336 2356 2356 2356 ? -1 Ss 0 0:00 \_ sh
進(jìn)入容器:
[root@containerd ~]# ctr -n k8s.io t exec --exec-id $RANDOM -t busybox sh
/ # uname -a
Linux containerd 3.10.0-1062.el7.x86_64 #1 SMP Wed Aug 7 18:08:02 UTC 2019 x86_64 GNU/Linux
/ # ls /etc
group      localtime  network    passwd     shadow
/ # ip a
1: lo: <LOOPBACK,UP,LOWER_UP> mtu 65536 qdisc noqueue qlen 1000
    link/loopback 00:00:00:00:00:00 brd 00:00:00:00:00:00
    inet 127.0.0.1/8 scope host lo
       valid_lft forever preferred_lft forever
    inet6 ::1/128 scope host
       valid_lft forever preferred_lft forever
/ #
發(fā)送SIGKILL信號量殺死該容器:
[root@containerd ~]# ctr -n k8s.io t kill -s SIGKILL busybox[root@containerd ~]# ctr -n k8s.io t rm busyboxWARN[0000] task busybox exit with non-zero exit code 137
三、創(chuàng)建CNI網(wǎng)絡(luò)
訪問如下兩個Git項(xiàng)目,并從release頁面下載最新版本:
| 鏈接 | 說明 |
|---|---|
| containernetworking/plugins | CNI插件源碼(本教程版本:v0.9.0) 文件名:cni-plugins-linux-amd64-v0.9.0.tgz |
| containernetworking/cni | CNI源碼(本教程版本:v0.8.0) 文件名:cni-v0.8.0.tar.gz |
| https://www.cni.dev/plugins/ | CNI插件列表介紹文檔 |
下載至HOME目錄并解壓:
[root@containerd ~]# pwd/root[root@containerd ~]# # 解壓至HOME目錄的cni-plugins/文件夾中[root@containerd ~]# mkdir -p cni-plugins[root@containerd ~]# tar xvf cni-plugins-linux-amd64-v0.9.0.tgz -C cni-plugins[root@containerd ~]# # 解壓至HOME目錄的cni/文件夾中[root@containerd ~]# tar -zxvf cni-v0.8.0.tar.gz[root@containerd ~]# mv cni-0.8.0 cni
本教程我們首先使用bridge插件創(chuàng)建一個網(wǎng)卡,首先執(zhí)行如下指令:
mkdir -p /etc/cni/net.dcat >/etc/cni/net.d/10-mynet.conf <<EOF{"cniVersion": "0.2.0","name": "mynet","type": "bridge","bridge": "cni0","isGateway": true,"ipMasq": true,"ipam": {"type": "host-local","subnet": "10.22.0.0/16","routes": [{ "dst": "0.0.0.0/0" }]}}EOFcat >/etc/cni/net.d/99-loopback.conf <<EOF{"cniVersion": "0.2.0","name": "lo","type": "loopback"}EOF
隨后激活網(wǎng)卡(說明:宿主機(jī)執(zhí)行ip a命令即可看到一個cni0的網(wǎng)卡):
[root@containerd ~]# cd cni/scripts/[root@containerd scripts]# CNI_PATH=/root/cni-plugins ./priv-net-run.sh echo "Hello World"Hello World[root@containerd scripts]# ip a1: lo: <LOOPBACK,UP,LOWER_UP> mtu 65536 qdisc noqueue state UNKNOWN group default qlen 1000link/loopback 00:00:00:00:00:00 brd 00:00:00:00:00:00inet 127.0.0.1/8 scope host lovalid_lft forever preferred_lft foreverinet6 ::1/128 scope hostvalid_lft forever preferred_lft forever2: ens33: <BROADCAST,MULTICAST,UP,LOWER_UP> mtu 1500 qdisc pfifo_fast state UP group default qlen 1000link/ether 00:0c:29:ea:35:42 brd ff:ff:ff:ff:ff:ffinet 192.168.105.110/24 brd 192.168.105.255 scope global noprefixroute ens33valid_lft forever preferred_lft foreverinet6 fe80::1c94:5385:5133:cd48/64 scope link noprefixroutevalid_lft forever preferred_lft forever10: cni0: <NO-CARRIER,BROADCAST,MULTICAST,UP> mtu 1500 qdisc noqueue state DOWN group default qlen 1000link/ether de:12:0b:ea:a4:bc brd ff:ff:ff:ff:ff:ffinet 10.22.0.1/24 brd 10.22.0.255 scope global cni0valid_lft forever preferred_lft foreverinet6 fe80::dc12:bff:feea:a4bc/64 scope linkvalid_lft forever preferred_lft forever
四、使containerd容器具備網(wǎng)絡(luò)功能
注重細(xì)節(jié)的我們在步驟二中將會發(fā)現(xiàn),busybox容器此刻僅有一張本地網(wǎng)卡,其是無法訪問任何網(wǎng)絡(luò)的,那么我們?nèi)绾问蛊渚邆涓魅萜骰ネā⑼獠烤W(wǎng)絡(luò)通信功能呢?不妨執(zhí)行如下指令:
[root@containerd ~]# ctr -n k8s.io t lsTASK PID STATUSbusybox 5111 RUNNING[root@containerd ~]# # pid=5111[root@containerd ~]# pid=$(ctr -n k8s.io t ls|grep busybox|awk '{print $2}')[root@containerd ~]# netnspath=/proc/$pid/ns/net[root@containerd ~]# CNI_PATH=/root/cni-plugins /root/cni/scripts/exec-plugins.sh add $pid $netnspath
隨后進(jìn)入busybox容器我們將會發(fā)現(xiàn)其新增了一張網(wǎng)卡并可以實(shí)現(xiàn)外部網(wǎng)絡(luò)訪問:
[root@containerd ~]# ctr -n k8s.io task exec --exec-id $RANDOM -t busybox sh -/ # ip a1: lo: <LOOPBACK,UP,LOWER_UP> mtu 65536 qdisc noqueue qlen 1000link/loopback 00:00:00:00:00:00 brd 00:00:00:00:00:00inet 127.0.0.1/8 scope host lovalid_lft forever preferred_lft foreverinet6 ::1/128 scope hostvalid_lft forever preferred_lft forever3: eth0@if12: <BROADCAST,MULTICAST,UP,LOWER_UP,M-DOWN> mtu 1500 qdisc noqueuelink/ether d2:f2:8d:53:fc:95 brd ff:ff:ff:ff:ff:ffinet 10.22.0.13/24 brd 10.22.0.255 scope global eth0valid_lft forever preferred_lft foreverinet6 fe80::d0f2:8dff:fe53:fc95/64 scope linkvalid_lft forever preferred_lft forever/ # ping 114.114.114.114PING 114.114.114.114 (114.114.114.114): 56 data bytes64 bytes from 114.114.114.114: seq=0 ttl=127 time=17.264 ms64 bytes from 114.114.114.114: seq=0 ttl=127 time=13.838 ms64 bytes from 114.114.114.114: seq=1 ttl=127 time=18.024 ms64 bytes from 114.114.114.114: seq=2 ttl=127 time=15.316 ms
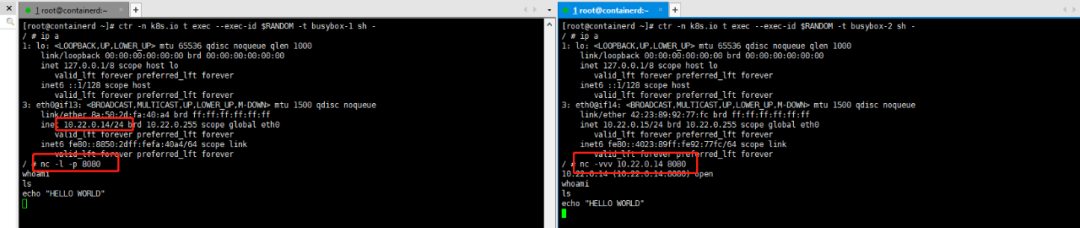
小試牛刀:按照上述方法分別創(chuàng)建兩個名為busybox-1與busybox-2容器,借助nc -l -p 8080暴露TCP服務(wù)端口進(jìn)行彼此通信。
五、與宿主機(jī)共享目錄
通過執(zhí)行如下方案,我們即可實(shí)現(xiàn)容器與宿主機(jī)的/tmp進(jìn)行共享:
[root@docker scripts]# ctr -n k8s.io c create v4ehxdz8.mirror.aliyuncs.com/library/busybox:latest busybox1 --mount type=bind,src=/tmp,dst=/host,options=rbind:rw[root@docker scripts]# ctr -n k8s.io t start -d busybox1 bash[root@docker scripts]# ctr -n k8s.io t exec -t --exec-id $RANDOM busybox1 sh/ # echo "Hello world" > /host/1/ #[root@docker scripts]# cat /tmp/1Hello world
六、與其它容器共享ns
本節(jié)僅對pid ns共享進(jìn)行舉例,其它ns共享與該方案類似
首先我們對docker的ns共享進(jìn)行實(shí)驗(yàn):
[root@docker scripts]# docker run --rm -it -d busybox sh687c80243ee15e0a2171027260e249400feeeee2607f88d1f029cc270402cdd1[root@docker scripts]# docker run --rm -it -d --pid="container:687c80243ee15e0a2171027260e249400feeeee2607f88d1f029cc270402cdd1" busybox catfa2c09bd9c042128ebb2256685ce20e265f4c06da6d9406bc357d149af7b83d2[root@docker scripts]# docker ps -aCONTAINER ID IMAGE COMMAND CREATED STATUS PORTS NAMESfa2c09bd9c04 busybox "cat" 2 seconds ago Up 1 second pedantic_goodall687c80243ee1 busybox "sh" 22 seconds ago Up 21 seconds hopeful_franklin[root@docker scripts]# docker exec -it 687c80243ee1 sh/ # ps auxPID USER TIME COMMAND1 root 0:00 sh8 root 0:00 cat15 root 0:00 sh22 root 0:00 ps aux
接下來仿照該方案我們基于containerd的方式實(shí)現(xiàn)pid ns共享:
[root@docker scripts]# ctr -n k8s.io t lsTASK PID STATUSbusybox 2255 RUNNINGbusybox1 2652 RUNNING[root@docker scripts]# # 這里的2652即為已有task運(yùn)行時的pid號[root@docker scripts]# ctr -n k8s.io c create --with-ns "pid:/proc/2652/ns/pid" v4ehxdz8.mirror.aliyuncs.com/library/python:3.6-slim python[root@docker scripts]# ctr -n k8s.io t start -d python python # 這里啟動了一個python的命令[root@docker scripts]# ctr -n k8s.io t exec -t --exec-id $RANDOM busybox1 sh/ # ps auxPID USER TIME COMMAND1 root 0:00 sh34 root 0:00 python341 root 0:00 sh47 root 0:00 ps aux
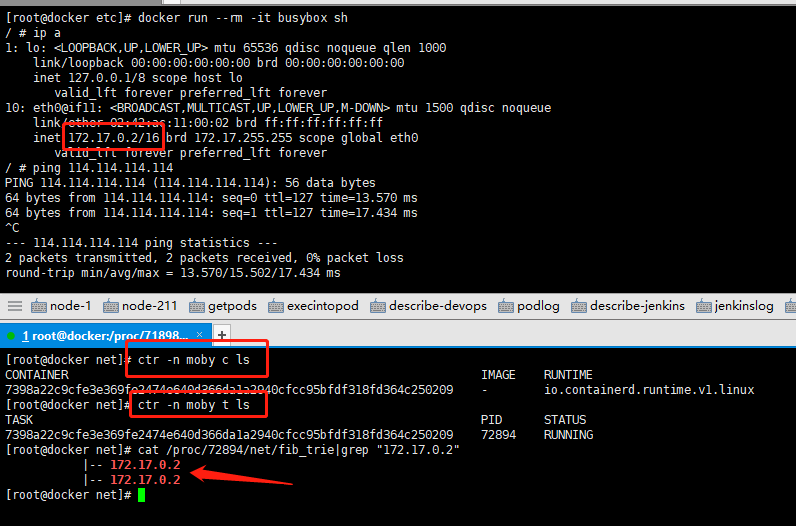
七、docker/containerd并用
參考鏈接:https://docs.docker.com/engine/reference/commandline/dockerd/
在完成對containerd的安裝/配置啟動后,我們可以在宿主機(jī)中安裝docker客戶端及服務(wù)。執(zhí)行如下指令:
yum install -y yum-utils device-mapper-persistent-data lvm2yum-config-manager --add-repo https://download.docker.com/linux/centos/docker-ce.repoyum update -y && yum install -y docker-ce-18.06.2.cesystemctl enable docker
編輯/etc/systemd/system/multi-user.target.wants/docker.service文件并為其新增--containerd啟動項(xiàng):

保存,推出后執(zhí)行如下指令:
[root@docker ~]# systemctl daemon-reload[root@docker ~]# systemctl start docker[root@docker ~]# ps aux|grep dockerroot 72570 5.0 2.9 872668 55216 ? Ssl 01:31 0:00 /usr/bin/dockerd --containerd /run/containerd/containerd.sock --debug
進(jìn)行驗(yàn)證:
文章轉(zhuǎn)載:K8S中文社區(qū)
(版權(quán)歸原作者所有,侵刪)
![]()

點(diǎn)擊下方“閱讀原文”查看更多