
Canvas 從入門(mén)到勸朋友放棄(圖解版)
在前端領(lǐng)域,如果只是懂 Vue 或者 React ,未來(lái)在職場(chǎng)的競(jìng)爭(zhēng)力可能會(huì)比較弱。
根據(jù)我多年在家待業(yè)經(jīng)驗(yàn)來(lái)看,前端未來(lái)在 數(shù)據(jù)可視化 和 AI 這兩個(gè)領(lǐng)域會(huì)比較香,而 Canvas 是數(shù)據(jù)可視化在前端方面的基礎(chǔ)技術(shù)。
本文就用光的速度將 canvas 給入門(mén)了。
 01.gif
要入門(mén)一個(gè)技術(shù),前期最重要是快!所以本文只講入門(mén)內(nèi)容,能應(yīng)付簡(jiǎn)單項(xiàng)目。深入的知識(shí)點(diǎn)會(huì)在其他文章講解。
Canvas 是什么?-
Canvas中文名叫 “畫(huà)布”,是HTML5新增的一個(gè)標(biāo)簽。 -
Canvas允許開(kāi)發(fā)者通過(guò)JS在這個(gè)標(biāo)簽上繪制各種圖案。 -
Canvas擁有多種繪制路徑、矩形、圓形、字符以及圖片的方法。 -
Canvas在某些情況下可以 “代替” 圖片。 -
Canvas可用于動(dòng)畫(huà)、游戲、數(shù)據(jù)可視化、圖片編輯器、實(shí)時(shí)視頻處理等領(lǐng)域。
| Canvas | SVG |
|---|---|
| 用JS動(dòng)態(tài)生成元素(一個(gè)HTML元素) | 用XML描述元素(類(lèi)似HTML元素那樣,可用多個(gè)元素來(lái)描述一個(gè)圖形) |
| 位圖(受屏幕分辨率影響) | 矢量圖(不受屏幕分辨率影響) |
| 不支持事件 | 支持事件 |
| 數(shù)據(jù)發(fā)生變化需要重繪 | 不需要重繪 |
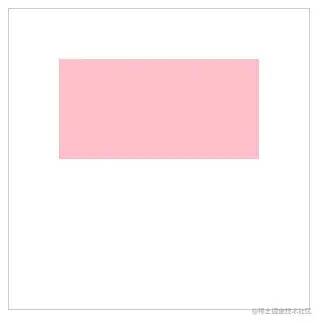
就上面的描述而言可能有點(diǎn)難懂,你可以打開(kāi) AntV 旗下的圖形編輯引擎做對(duì)比。G6[1] 是使用 canvas 開(kāi)發(fā)的,X6[2] 是使用 svg 開(kāi)發(fā)的。
我的建議是:如果要展示的數(shù)據(jù)量比較大,比如一條數(shù)據(jù)就是一個(gè)元素節(jié)點(diǎn),那使用 canvas 會(huì)比較合適;如果用戶操作的交互比較多,而且對(duì)清晰度有要求(矢量圖),那么使用 svg 會(huì)比較合適。
學(xué)習(xí)前端一定要?jiǎng)邮智么a,然后看效果展示。
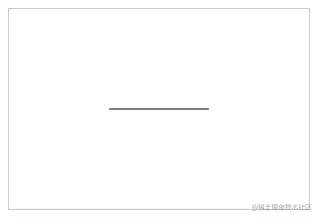
起步階段會(huì)用幾句代碼說(shuō)明 canvas 如何使用,本例會(huì)畫(huà)一條直線。
畫(huà)條直線
-
在
HTML中創(chuàng)建canvas元素 -
通過(guò)
js獲取canvas標(biāo)簽 -
從
canvas標(biāo)簽中獲取到繪圖工具 -
通過(guò)繪圖工具,在
canvas標(biāo)簽上繪制圖形
 02.png
      <!--?1、創(chuàng)建?canvas?元素?-->
<canvas
??id="c"
??width="300"
??height="200"
??style="border:?1px?solid?#ccc;"
></canvas>

<script>
??//?2、獲取?canvas?對(duì)象
??const?cnv?=?document.getElementById('c')

??//?3、獲取?canvas?上下文環(huán)境對(duì)象
??const?cxt?=?cnv.getContext('2d')

??//?4、繪制圖形
??cxt.moveTo(100,?100)?//?起點(diǎn)坐標(biāo)?(x,?y)
??cxt.lineTo(200,?100)?//?終點(diǎn)坐標(biāo)?(x,?y)
??cxt.stroke()?//?將起點(diǎn)和終點(diǎn)連接起來(lái)
</script>
復(fù)制代碼
moveTo 、 lineTo 和 stroke 方法暫時(shí)可以不用管,它們的作用是繪制圖形,這些方法在后面會(huì)講到~
注意點(diǎn)
1、默認(rèn)寬高
canvas 有 默認(rèn)的 寬度(300px) 和 高度(150px)
如果不在 canvas 上設(shè)置寬高,那 canvas 元素的默認(rèn)寬度是300px,默認(rèn)高度是150px。
2、設(shè)置 canvas 寬高
canvas 元素提供了 width 和 height 兩個(gè)屬性,可設(shè)置它的寬高。
需要注意的是,這兩個(gè)屬性只需傳入數(shù)值,不需要傳入單位(比如 px 等)。
      <canvas?width="600"?height="400"></canvas>
復(fù)制代碼
3、不能通過(guò) CSS 設(shè)置畫(huà)布的寬高
使用 css 設(shè)置 canvas 的寬高,會(huì)出現(xiàn) 內(nèi)容被拉伸 的后果!!!
 03.png
      <style>
??#c?{
????width:?400px;
????height:?400px;
????border:?1px?solid?#ccc;
??}
</style>

<canvas?id="c"></canvas>

<script>
??//?1、獲取canvas對(duì)象
??const?cnv?=?document.getElementById('c')

??//?2、獲取canvas上下文環(huán)境對(duì)象
??const?cxt?=?cnv.getContext('2d')

??//?3、繪制圖形
??cxt.moveTo(100,?100)?//?起點(diǎn)
??cxt.lineTo(200,?100)?//?終點(diǎn)
??cxt.stroke()?//?將起點(diǎn)和終點(diǎn)連接起來(lái)

??console.log(cnv.width)?//?獲取 canvas 的寬度,輸出:300
??console.log(cnv.height)?//?獲取 canvas 的高度,輸出:150
</script>
復(fù)制代碼
canvas 的默認(rèn)寬度是300px,默認(rèn)高度是150px。
-
如果使用
css修改canvas的寬高(比如本例變成 400px * 400px),那寬度就由 300px 拉伸到 400px,高度由 150px 拉伸到 400px。 -
使用
js獲取canvas的寬高,此時(shí)返回的是canvas的默認(rèn)值。
最后出現(xiàn)的效果如上圖所示。
4、線條默認(rèn)寬度和顏色
線條的默認(rèn)寬度是 1px ,默認(rèn)顏色是黑色。
但由于默認(rèn)情況下 canvas 會(huì)將線條的中心點(diǎn)和像素的底部對(duì)齊,所以會(huì)導(dǎo)致顯示效果是 2px 和非純黑色問(wèn)題。
5、IE兼容性高
暫時(shí)只有 IE 9 以上才支持 canvas 。但好消息是 IE 已經(jīng)有自己的墓碑了。
如需兼容 IE 7 和 8 ,可以使用 ExplorerCanvas[3] 。但即使是使用了 ExplorerCanvas 仍然會(huì)有所限制,比如無(wú)法使用 fillText() 方法等。
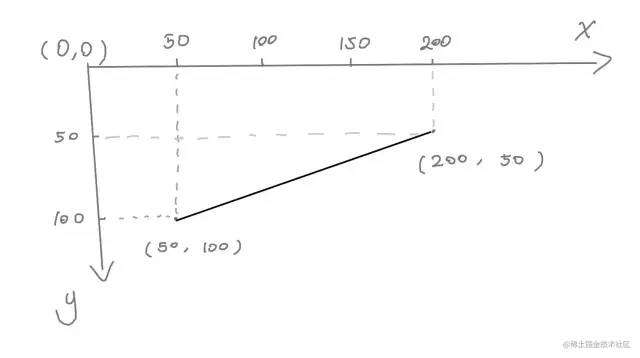
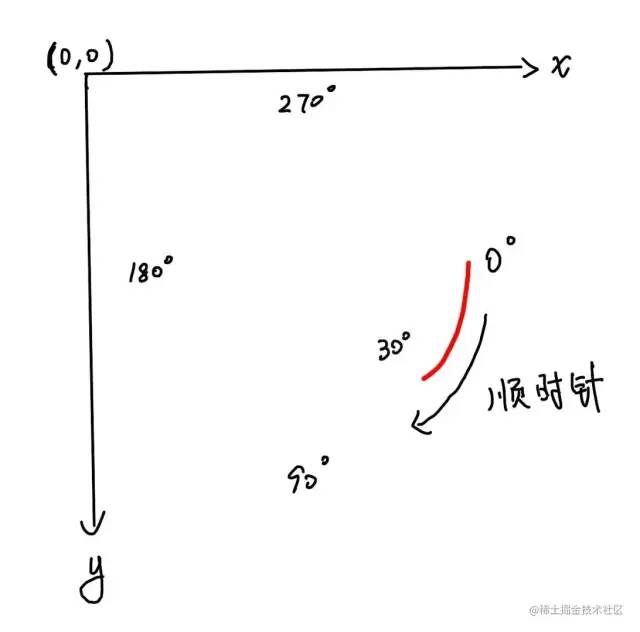
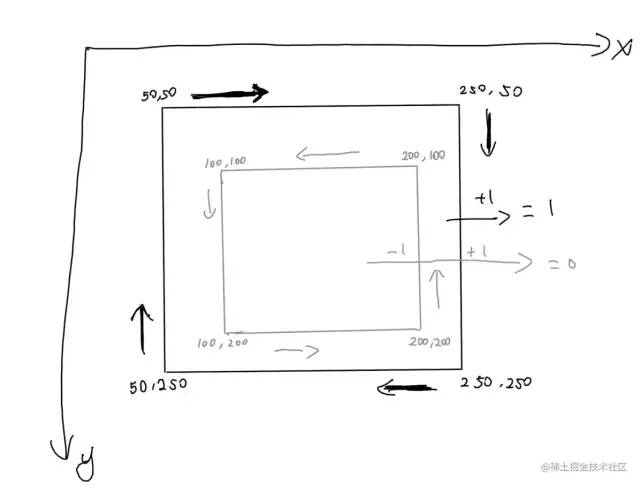
坐標(biāo)系
在繪制基礎(chǔ)圖形之前,需要先搞清除 Canvas 使用的坐標(biāo)系。
Canvas 使用的是 W3C 坐標(biāo)系 ,也就是遵循我們屏幕、報(bào)紙的閱讀習(xí)慣,從上往下,從左往右。
 04.jpg
W3C 坐標(biāo)系 和 數(shù)學(xué)直角坐標(biāo)系 的 X軸 是一樣的,只是 Y軸 的反向相反。
W3C 坐標(biāo)系 的 Y軸 正方向向下。
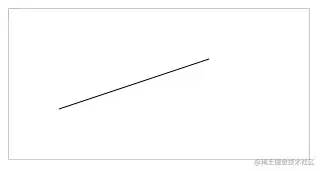
直線
一條直線
最簡(jiǎn)單的起步方式是畫(huà)一條直線。這里所說(shuō)的 “直線” 是幾何學(xué)里的 “線段” 的意思。
需要用到這3個(gè)方法:
-
moveTo(x1, y1):起點(diǎn)坐標(biāo) (x, y) -
lineTo(x2, y2):下一個(gè)點(diǎn)的坐標(biāo) (x, y) -
stroke():將所有坐標(biāo)用一條線連起來(lái)
起步階段可以先這樣理解。
 05.png
      <canvas?id="c"?style="border:?1px?solid?#ccc;"></canvas>

<script>
??const?cnv?=?document.getElementById('c')
??const?cxt?=?cnv.getContext('2d')

??//?繪制直線
??cxt.moveTo(50,?100)?//?起點(diǎn)坐標(biāo)
??cxt.lineTo(200,?50)?//?下一個(gè)點(diǎn)的坐標(biāo)
??cxt.stroke()?//?將上面的坐標(biāo)用一條線連接起來(lái)
</script>
復(fù)制代碼
上面的代碼所呈現(xiàn)的效果,可以看下圖解釋?zhuān)ㄊ植惶斆鳎?huà)得不是很標(biāo)準(zhǔn),希望能看懂)
 06.jpg
多條直線
如需畫(huà)多條直線,可以用會(huì)上面那幾個(gè)方法。
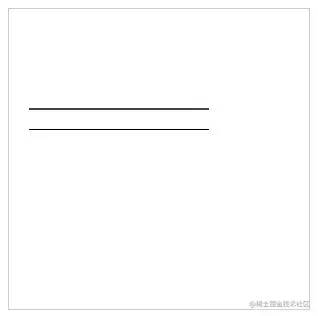 07.png
      <canvas?id="c"?width="300"?height="300"?style="border:?1px?solid?#ccc;"></canvas>

<script>
??const?cnv?=?document.getElementById('c')
??const?cxt?=?cnv.getContext('2d')

??cxt.moveTo(20,?100)
??cxt.lineTo(200,?100)
??cxt.stroke()

??cxt.moveTo(20,?120.5)
??cxt.lineTo(200,?120.5)
??cxt.stroke()
</script>
復(fù)制代碼
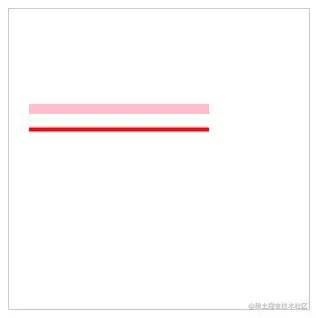
仔細(xì)觀察一下,為什么兩條線的粗細(xì)不一樣的?
明明使用的方法都是一樣的,只是第二條直線的 Y軸 的值是有小數(shù)點(diǎn)。
答:默認(rèn)情況下 canvas 會(huì)將線條的中心點(diǎn)和像素的底部對(duì)齊,所以會(huì)導(dǎo)致顯示效果是 2px 和非純黑色問(wèn)題。
 08.jpg
上圖每個(gè)格子代表 1px。
線的中心點(diǎn)會(huì)和畫(huà)布像素點(diǎn)的底部對(duì)齊,所以會(huì)線中間是黑色的,但由于一個(gè)像素就不能再切割了,所以會(huì)有半個(gè)像素被染色,就變成了淺灰色。
所以如果你設(shè)置的 Y軸 值是一個(gè)整數(shù),就會(huì)出現(xiàn)上面那種情況。
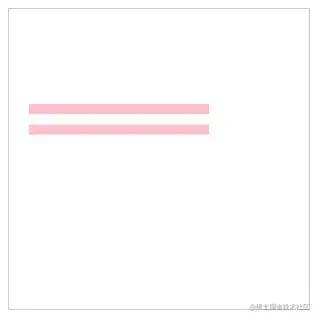
設(shè)置樣式
-
lineWidth:線的粗細(xì) -
strokeStyle:線的顏色 -
lineCap:線帽:默認(rèn):butt; 圓形:round; 方形:square
 09.png
      <canvas?id="c"?style="border:?1px?solid?#ccc;"></canvas>

<script>
??const?cnv?=?document.getElementById('c')
??const?cxt?=?cnv.getContext('2d')

??//?繪制直線
??cxt.moveTo(50,?50)
??cxt.lineTo(200,?50)

??//?修改直線的寬度
??cxt.lineWidth?=?20

??//?修改直線的顏色
??cxt.strokeStyle?=?'pink'

??//?修改直線兩端樣式
??cxt.lineCap?=?'round'?//?默認(rèn):?butt;?圓形:?round;?方形:?square

??cxt.stroke()
</script>
復(fù)制代碼
新開(kāi)路徑
開(kāi)辟新路徑的方法:
-
beginPath()
在繪制多條線段的同時(shí),還要設(shè)置線段樣式,通常需要開(kāi)辟新路徑。
要不然樣式之間會(huì)相互污染。
比如這樣
 10.png
      <canvas?id="c"?width="300"?height="300"?style="border:?1px?solid?#ccc;"></canvas>

<script>
??const?cnv?=?document.getElementById('c')
??const?cxt?=?cnv.getContext('2d')

??//?第一條線
??cxt.moveTo(20,?100)
??cxt.lineTo(200,?100)
??cxt.lineWidth?=?10
??cxt.strokeStyle?=?'pink'
??cxt.stroke()

??//?第二條線
??cxt.moveTo(20,?120.5)
??cxt.lineTo(200,?120.5)
??cxt.stroke()
</script>
復(fù)制代碼
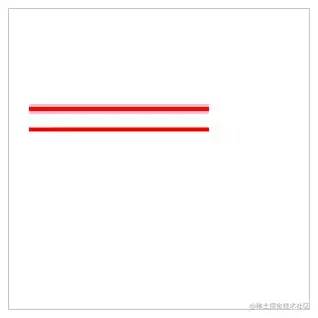
如果不想相互污染,需要做2件事:
-
使用
beginPath()方法,重新開(kāi)一個(gè)路徑 - 設(shè)置新線段的樣式(必須項(xiàng))
如果上面2步卻了其中1步都會(huì)有影響。
只使用 beginPath()
 11.png
      <canvas?id="c"?width="300"?height="300"?style="border:?1px?solid?#ccc;"></canvas>

<script>
??const?cnv?=?document.getElementById('c')
??const?cxt?=?cnv.getContext('2d')

??//?第一條線
??cxt.moveTo(20,?100)
??cxt.lineTo(200,?100)
??cxt.lineWidth?=?10
??cxt.strokeStyle?=?'pink'
??cxt.stroke()

??//?第二條線
??cxt.beginPath()?//?重新開(kāi)啟一個(gè)路徑
??cxt.moveTo(20,?120.5)
??cxt.lineTo(200,?120.5)
??cxt.stroke()
</script>
復(fù)制代碼
第一條線的樣式會(huì)影響之后的線。
但如果使用了 beginPath() ,后面的線段不會(huì)影響前面的線段。
 12.png
      <canvas?id="c"?width="300"?height="300"?style="border:?1px?solid?#ccc;"></canvas>

<script>
??const?cnv?=?document.getElementById('c')
??const?cxt?=?cnv.getContext('2d')

??//?第一條線
??cxt.moveTo(20,?100)
??cxt.lineTo(200,?100)
??cxt.stroke()

??//?第二條線
??cxt.beginPath()?//?重新開(kāi)啟一個(gè)路徑
??cxt.moveTo(20,?120.5)
??cxt.lineTo(200,?120.5)
??cxt.lineWidth?=?4
??cxt.strokeStyle?=?'red'
??cxt.stroke()
</script>
復(fù)制代碼
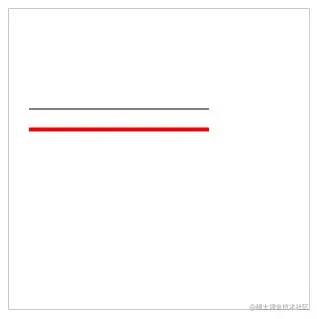
設(shè)置新線段的樣式,沒(méi)使用 beginPath() 的情況
這個(gè)情況會(huì)反過(guò)來(lái),后面的線能影響前面的線。
 13.png
      <canvas?id="c"?width="300"?height="300"?style="border:?1px?solid?#ccc;"></canvas>

<script>
??const?cnv?=?document.getElementById('c')
??const?cxt?=?cnv.getContext('2d')

??//?第一條線
??cxt.moveTo(20,?100)
??cxt.lineTo(200,?100)
??cxt.lineWidth?=?10
??cxt.strokeStyle?=?'pink'
??cxt.stroke()

??//?第二條線
??cxt.moveTo(20,?120.5)
??cxt.lineTo(200,?120.5)
??cxt.lineWidth?=?4
??cxt.strokeStyle?=?'red'
??cxt.stroke()
</script>
復(fù)制代碼
正確的做法
在設(shè)置 beginPath() 的同時(shí),也各自設(shè)置樣式。這樣就能做到相互不影響了。
 14.png
      <canvas?id="c"?width="300"?height="300"?style="border:?1px?solid?#ccc;"></canvas>

<script>
??const?cnv?=?document.getElementById('c')
??const?cxt?=?cnv.getContext('2d')

??cxt.moveTo(20,?100)
??cxt.lineTo(200,?100)
??cxt.lineWidth?=?10
??cxt.strokeStyle?=?'pink'
??cxt.stroke()

??cxt.beginPath()?//?重新開(kāi)啟一個(gè)路徑
??cxt.moveTo(20,?120.5)
??cxt.lineTo(200,?120.5)
??cxt.lineWidth?=?4
??cxt.strokeStyle?=?'red'
??cxt.stroke()
</script>
復(fù)制代碼
折線
和 直線 差不多,都是使用 moveTo() 、lineTo() 和 stroke() 方法可以繪制折線。
 15.png
      <canvas?id="c"?width="300"?height="300"?style="border:?1px?solid?#ccc;"></canvas>

<script>
??const?cnv?=?document.getElementById('c')
??const?cxt?=?cnv.getContext('2d')

??cxt.moveTo(50,?200)
??cxt.lineTo(100,?50)
??cxt.lineTo(200,?200)
??cxt.lineTo(250,?50)

??cxt.stroke()
</script>
復(fù)制代碼
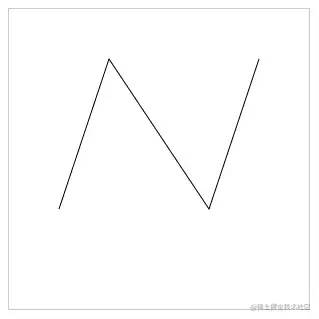
畫(huà)這種折線,最好在草稿紙上畫(huà)一個(gè)坐標(biāo)系,自己計(jì)算并描繪一下每個(gè)點(diǎn)大概在什么什么位置,最后在 canvas 中看看效果。
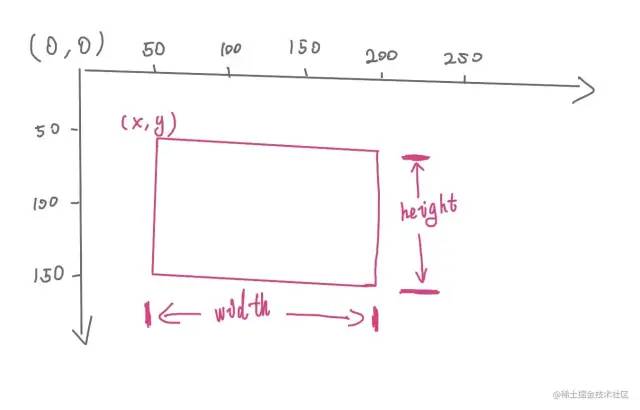
矩形
根據(jù)前面的基礎(chǔ),我們可以 使用線段來(lái)描繪矩形,但 canvas 也提供了 rect() 等方法可以直接生成矩形。
使用線段描繪矩形
可以使用前面畫(huà)線段的方法來(lái)繪制矩形
 16.png
      canvas?id="c"?width="300"?height="300"?style="border:?1px?solid?#ccc;"></canvas>

<script>
?const?cnv?=?document.getElementById('c')
?const?cxt?=?cnv.getContext('2d')

?//?繪制矩形
?cxt.moveTo(50,?50)
?cxt.lineTo(200,?50)
?cxt.lineTo(200,?120)
?cxt.lineTo(50,?120)
?cxt.lineTo(50,?50)?//?需要閉合,又或者使用?closePath()?方法進(jìn)行閉合,推薦使用?closePath()

?cxt.stroke()
</script>
復(fù)制代碼
上面的代碼幾個(gè)點(diǎn)分別對(duì)應(yīng)下圖。
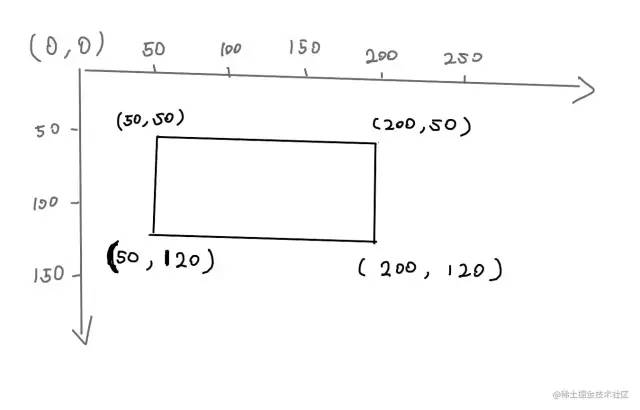 17.jpg
使用 strokeRect() 描邊矩形
-
strokeStyle:設(shè)置描邊的屬性(顏色、漸變、圖案) -
strokeRect(x, y, width, height):描邊矩形(x和y是矩形左上角起點(diǎn);width 和 height 是矩形的寬高) -
strokeStyle必須寫(xiě)在strokeRect()前面,不然樣式不生效。
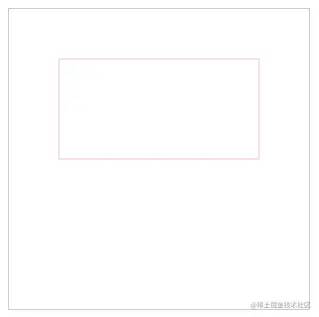 18.png
      <canvas?id="c"?width="300"?height="300"?style="border:?1px?solid?#ccc;"></canvas>

<script>
??const?cnv?=?document.getElementById('c')
??const?cxt?=?cnv.getContext('2d')

??//?strokeStyle?屬性
??//?strokeRect(x,?y,?width,?height)?方法
??cxt.strokeStyle?=?'pink'
??cxt.strokeRect(50,?50,?200,?100)
</script>
復(fù)制代碼
上面的代碼可以這樣理解
 19.jpg
使用 fillRect() 填充矩形
fillRect() 和 strokeRect() 方法差不多,但 fillRect() 的作用是填充。
需要注意的是,fillStyle 必須寫(xiě)在 fillRect() 之前,不然樣式不生效。
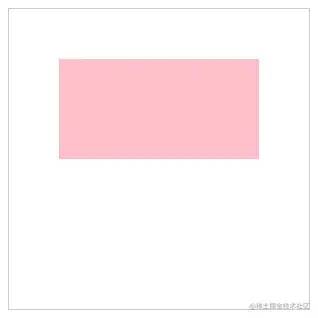 20.png
      <canvas?id="c"?width="300"?height="300"?style="border:?1px?solid?#ccc;"></canvas>

<script>
??const?cnv?=?document.getElementById('c')
??const?cxt?=?cnv.getContext('2d')

??//?fillStyle?屬性
??//?fillRect(x,?y,?width,?height)?方法
??cxt.fillStyle?=?'pink'
??cxt.fillRect(50,?50,?200,?100)?//?fillRect(x,?y,?width,?height)
</script>
復(fù)制代碼
同時(shí)使用 strokeRect() 和 fillRect()
同時(shí)使用 strokeRect() 和 fillRect() 會(huì)產(chǎn)生描邊和填充的效果
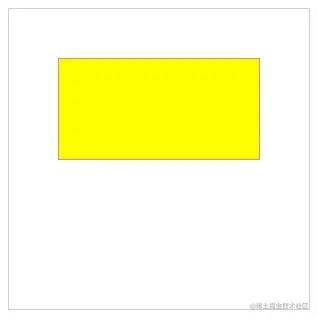 21.png
      <canvas?id="c"?width="300"?height="300"?style="border:?1px?solid?#ccc;"></canvas>

<script>
??const?cnv?=?document.getElementById('c')
??const?cxt?=?cnv.getContext('2d')

??cxt.strokeStyle?=?'red'
??cxt.strokeRect(50,?50,?200,?100)?//?strokeRect(x,?y,?width,?height)
??cxt.fillStyle?=?'yellow'
??cxt.fillRect(50,?50,?200,?100)?//?fillRect(x,?y,?width,?height)
</script>
復(fù)制代碼
使用 rect() 生成矩形
rect() 和 fillRect() 、strokeRect() 的用法差不多,唯一的區(qū)別是:
strokeRect() 和 fillRect() 這兩個(gè)方法調(diào)用后會(huì)立即繪制;rect() 方法被調(diào)用后,不會(huì)立刻繪制矩形,而是需要調(diào)用 stroke() 或 fill() 輔助渲染。
 22.png
      <canvas?id="c"?width="300"?height="300"?style="border:?1px?solid?#ccc;"></canvas>

<script>
??const?cnv?=?document.getElementById('c')
??const?cxt?=?cnv.getContext('2d')

??cxt.strokeStyle?=?'red'
??cxt.fillStyle?=?'pink'

??cxt.rect(50,?50,?200,?100)?//?rect(x,?y,?width,?height)

??cxt.stroke()
??cxt.fill()
</script>
復(fù)制代碼
等價(jià)公式:
      cxt.strokeStyle?=?'red',
cxt.rect(50,?50,?200,?100)
cxt.stroke()

//?等價(jià)于
cxt.strokeStyle?=?'red'
cxt.strokerect(50,?50,?200,?100)


//?-----------------------------


cxt.fillStyle?=?'hotpink'
cxt.rect(50,?50,?200,?100)
cxt.fill()

//?等價(jià)于
cxt.fillStyle?=?'yellowgreen'
cxt.fillRect(50,?50,?200,?100)
復(fù)制代碼
使用 clearRect() 清空矩形
使用 clearRect() 方法可以清空指定區(qū)域。
      clearRect(x,?y,?width,?height)
復(fù)制代碼
其語(yǔ)法和創(chuàng)建 cxt.rect() 差不多。
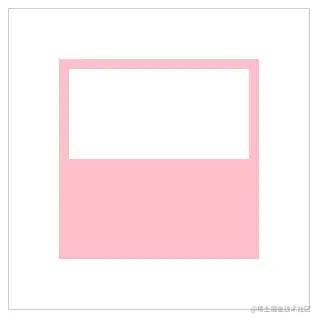 23.png
<canvas?id="c"?width="300"?height="300"?style="border:?1px?solid?#ccc;"></canvas>
<script>
??const?cnv?=?document.getElementById('c')
??const?cxt?=?cnv.getContext('2d')
??cxt.fillStyle?=?'pink'?//?設(shè)置填充顏色
??cxt.fillRect(50,?50,?200,?200)?//?填充矩形
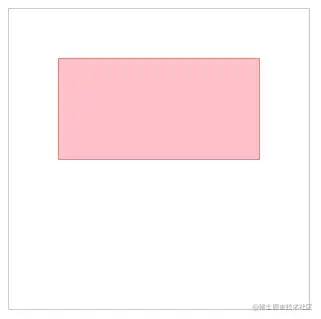
??cxt.clearRect(60,?60,?180,?90)?//?清空矩形
</script>
復(fù)制代碼
清空畫(huà)布
canvas 畫(huà)布元素是矩形,所以可以通過(guò)下面的代碼把整個(gè)畫(huà)布清空掉。
      //?省略部分代碼

cxt.clearRect(0,?0,?cnv.width,?cnv.height)
復(fù)制代碼
要清空的區(qū)域:從畫(huà)布左上角開(kāi)始,直到畫(huà)布的寬和畫(huà)布的高為止。
多邊形
Canvas 要畫(huà)多邊形,需要使用 moveTo() 、 lineTo() 和 closePath() 。
三角形
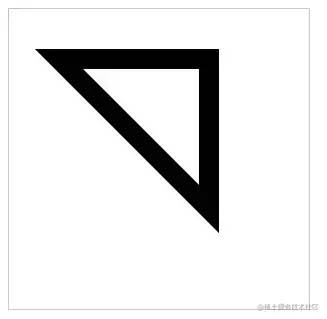
雖然三角形是常見(jiàn)圖形,但 canvas 并沒(méi)有提供類(lèi)似 rect() 的方法來(lái)繪制三角形。
需要確定三角形3個(gè)點(diǎn)的坐標(biāo)位置,然后使用 stroke() 或者 fill() 方法生成三角形。
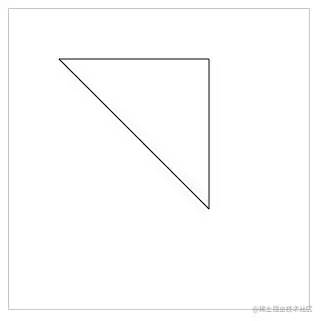 24.png
      <canvas?id="c"?width="300"?height="300"?style="border:?1px?solid?#ccc;"></canvas>

<script>

??const?cnv?=?document.getElementById('c')
??const?cxt?=?cnv.getContext('2d')

??cxt.moveTo(50,?50)
??cxt.lineTo(200,?50)
??cxt.lineTo(200,?200)

??//?注意點(diǎn):如果使用 lineTo 閉合圖形,是不能很好閉合拐角位的。
??cxt.lineTo(50,?50)?//?閉合

??cxt.stroke()

</script>
復(fù)制代碼
注意,默認(rèn)情況下不會(huì)自動(dòng)從最后一個(gè)點(diǎn)連接到起點(diǎn)。最后一步需要設(shè)置一下 cxt.lineTo(50, 50) ,讓它與 cxt.moveTo(50, 50) 一樣。這樣可以讓路徑回到起點(diǎn),形成一個(gè)閉合效果。
但這樣做其實(shí)是有點(diǎn)問(wèn)題的,而且也比較麻煩,要記住起始點(diǎn)坐標(biāo)。
上面的閉合操作,如果遇到設(shè)置了 lineWidth 或者 lineJoin 就會(huì)有問(wèn)題,比如:
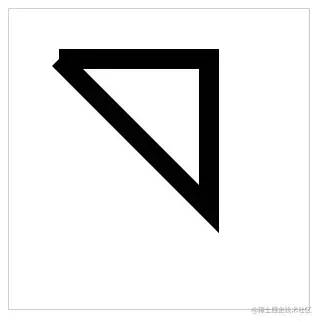 25.png
      //?省略部分代碼
cxt.lineWidth?=?20
復(fù)制代碼
當(dāng)線段變粗后,起始點(diǎn)和結(jié)束點(diǎn)的鏈接處,拐角就出現(xiàn)“不正常”現(xiàn)象。
如果需要真正閉合,可以使用 closePath() 方法。
 26.png
      <canvas?id="c"?width="300"?height="300"?style="border:?1px?solid?#ccc;"></canvas>

<script>
??const?cnv?=?document.getElementById('c')
??const?cxt?=?cnv.getContext('2d')

??cxt.moveTo(50,?50)
??cxt.lineTo(200,?50)
??cxt.lineTo(200,?200)
??//?手動(dòng)閉合
??cxt.closePath()

??cxt.lineJoin?=?'miter'?//?線條連接的樣式。miter:?默認(rèn); bevel:?斜面; round:?圓角
??cxt.lineWidth?=?20
??cxt.stroke()
</script>
復(fù)制代碼
使用 cxt.closePath() 可以自動(dòng)將終點(diǎn)和起始點(diǎn)連接起來(lái),此時(shí)看上去就正常多了。
菱形
有一組鄰邊相等的平行四邊形是菱形
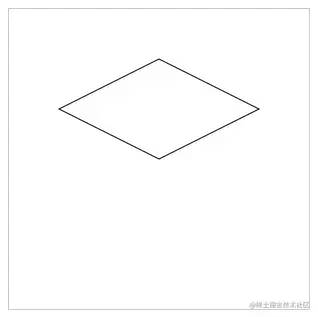 27.png
      <canvas?id="c"?width="300"?height="300"?style="border:?1px?solid?#ccc;"></canvas>

<script>
??const?cnv?=?document.getElementById('c')
??const?cxt?=?cnv.getContext('2d')

??cxt.moveTo(150,?50)
??cxt.lineTo(250,?100)
??cxt.lineTo(150,?150)
??cxt.lineTo(50,?100)
??cxt.closePath()
??cxt.stroke()
</script>
復(fù)制代碼
要繪制直線類(lèi)型的圖形,在草稿紙上標(biāo)記出起始點(diǎn)和每個(gè)拐角的點(diǎn),然后再連線即可。相對(duì)曲線圖形來(lái)說(shuō),直線圖形是比較容易的。
圓形
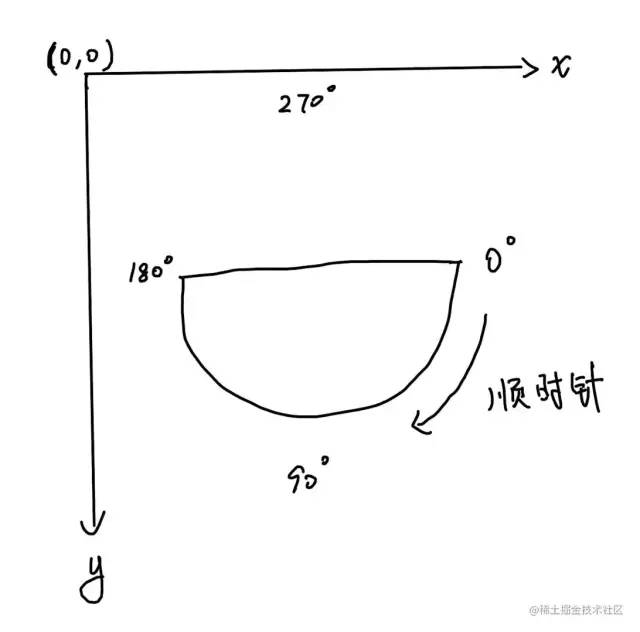
繪制圓形的方法是 arc()。
語(yǔ)法:
      arc(x,?y,?r,?sAngle,?eAngle,counterclockwise)
復(fù)制代碼
-
x和y: 圓心坐標(biāo) -
r: 半徑 -
sAngle: 開(kāi)始角度 -
eAngle: 結(jié)束角度 -
counterclockwise: 繪制方向(true: 逆時(shí)針; false: 順時(shí)針),默認(rèn) false
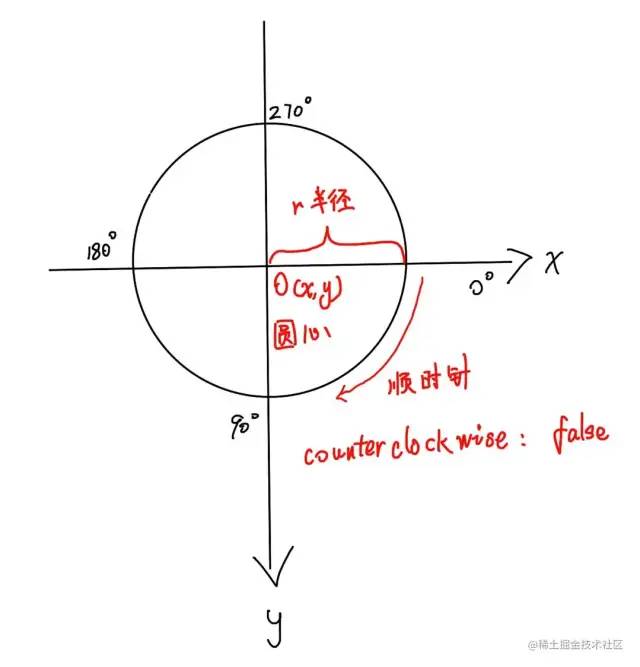 28.jpg
開(kāi)始角度和結(jié)束角度,都是以弧度為單位。例如 180°就寫(xiě)成 Math.PI ,360°寫(xiě)成 Math.PI * 2 ,以此類(lèi)推。
在實(shí)際開(kāi)發(fā)中,為了讓自己或者別的開(kāi)發(fā)者更容易看懂弧度的數(shù)值,1°應(yīng)該寫(xiě)成 Math.PI / 180。
-
100°:
100 * Math.PI / 180 -
110°:
110 * Math.PI / 180 -
241°:
241 * Math.PI / 180
注意:繪制圓形之前,必須先調(diào)用 beginPath() 方法!!!在繪制完成之后,還需要調(diào)用 closePath() 方法!!!
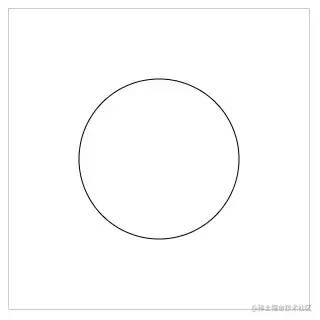 29.png
      <canvas?id="c"?width="300"?height="300"?style="border:?1px?solid?#ccc;"></canvas>

<script>
??const?cnv?=?document.getElementById('c')
??const?cxt?=?cnv.getContext('2d')

??cxt.beginPath()
??cxt.arc(150,?150,?80,?0,?360?*?Math.PI?/?180)
??cxt.closePath()

??cxt.stroke()
</script>
復(fù)制代碼
半圓
如果使用 arc() 方法畫(huà)圓時(shí),沒(méi)做到剛好繞完一周(360°)就直接閉合路徑,就會(huì)出現(xiàn)半圓的狀態(tài)。
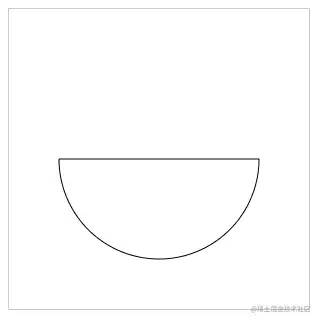 30.png
      <canvas?id="c"?width="300"?height="300"?style="border:?1px?solid?#ccc;"></canvas>

<script>
??const?cnv?=?document.getElementById('c')
??const?cxt?=?cnv.getContext('2d')

??cxt.beginPath()
??cxt.arc(150,?150,?100,?0,?180?*?Math.PI?/?180)?//?順時(shí)針
??cxt.closePath()

??cxt.stroke()
</script>
復(fù)制代碼
上面的代碼中,cxt.arc 最后一個(gè)參數(shù)沒(méi)傳,默認(rèn)是 false ,所以是順時(shí)針繪制。
 31.jpg
如果希望半圓的弧面在上方,可以將 cxt.arc 最后一個(gè)參數(shù)設(shè)置成 true
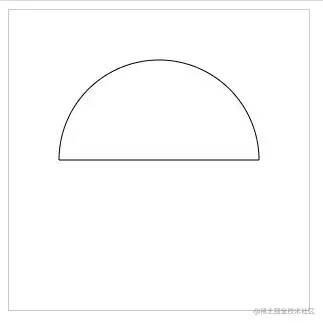 32.png
      <canvas?id="c"?width="300"?height="300"?style="border:?1px?solid?#ccc;"></canvas>

<script>
??const?cnv?=?document.getElementById('c')
??const?cxt?=?cnv.getContext('2d')

??cxt.beginPath()
??cxt.arc(150,?150,?100,?0,?180?*?Math.PI?/?180,?true)
??cxt.closePath()

??cxt.stroke()
</script>
復(fù)制代碼
弧線
使用 arc() 方法畫(huà)半圓時(shí),如果最后不調(diào)用 closePath() 方法,就不會(huì)出現(xiàn)閉合路徑。也就是說(shuō),那是一條弧線。
在 canvas 中,畫(huà)弧線有2中方法:arc() 和 arcTo() 。
arc() 畫(huà)弧線
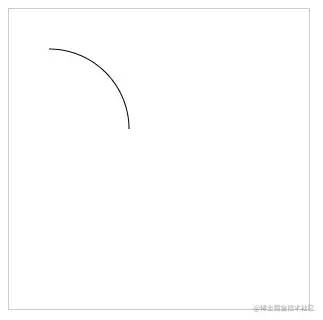
如果想畫(huà)一條 0° ~ 30° 的弧線,可以這樣寫(xiě)
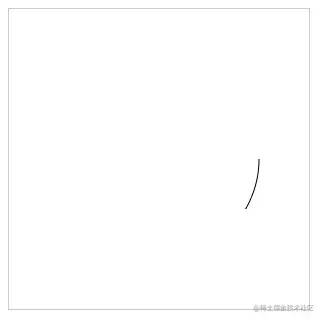 33.png
      <canvas?id="c"?width="300"?height="300"?style="border:?1px?solid?#ccc;"></canvas>

<script>
??const?cnv?=?document.getElementById('c')
??const?cxt?=?cnv.getContext('2d')

??cxt.beginPath()
??cxt.arc(150,?150,?100,?0,?30?*?Math.PI?/?180)

??cxt.stroke()
</script>
復(fù)制代碼
原理如下圖所示,紅線代表畫(huà)出來(lái)的那條弧線。
 34.jpg
arcTo() 畫(huà)弧線
arcTo() 的使用方法會(huì)更加復(fù)雜,如果初學(xué)看不太懂的話可以先跳過(guò),看完后面的再回來(lái)補(bǔ)補(bǔ)。
語(yǔ)法:
      arcTo(cx, cy, x2, y2, radius)
復(fù)制代碼
-
cx: 兩切線交點(diǎn)的橫坐標(biāo) -
cy: 兩切線交點(diǎn)的縱坐標(biāo) -
x2: 結(jié)束點(diǎn)的橫坐標(biāo) -
y2: 結(jié)束點(diǎn)的縱坐標(biāo) -
radius: 半徑
其中,(cx, cy) 也叫控制點(diǎn),(x2, y2) 也叫結(jié)束點(diǎn)。
是不是有點(diǎn)奇怪,為什么沒(méi)有 x1 和 y1 ?
(x1, y1) 是開(kāi)始點(diǎn),通常是由 moveTo() 或者 lineTo() 提供。
arcTo() 方法利用 開(kāi)始點(diǎn)、控制點(diǎn)和結(jié)束點(diǎn)形成的夾角,繪制一段與夾角的兩邊相切并且半徑為 radius 的圓弧。
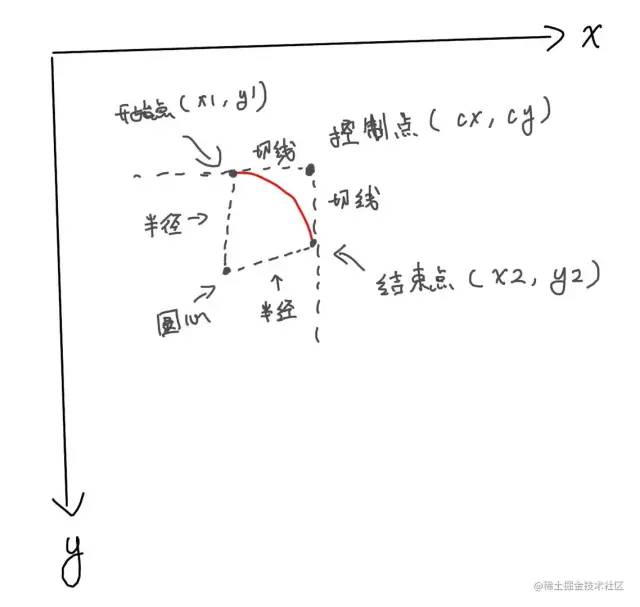 35.jpg
舉個(gè)例子
 36.png
      <canvas?id="c"?width="300"?height="300"?style="border:?1px?solid?#ccc;"></canvas>

<script>
??const?cnv?=?document.getElementById('c')
??const?cxt?=?cnv.getContext('2d')

??cxt.moveTo(40,?40)
??cxt.arcTo(120,?40,?120,?120,?80)

??cxt.stroke()
</script>
復(fù)制代碼
基礎(chǔ)樣式
前面學(xué)完基礎(chǔ)圖形,接下來(lái)可以開(kāi)始了解一下如何設(shè)置元素的基礎(chǔ)樣式。
描邊 stroke()
前面的案例中,其實(shí)已經(jīng)知道使用 stroke() 方法進(jìn)行描邊了。這里就不再多講這個(gè)方法。
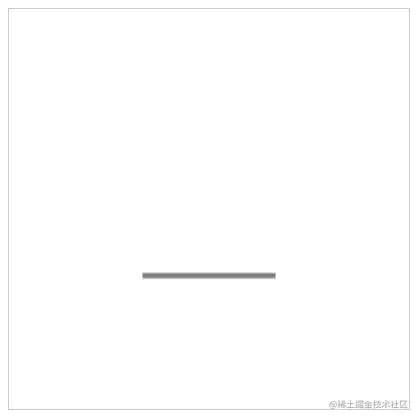
線條寬度 lineWidth
lineWidth 默認(rèn)值是 1 ,默認(rèn)單位是 px。
語(yǔ)法:
      lineWidth?=?線寬
復(fù)制代碼
 37.png
      <canvas?id="c"?width="300"?height="300"?style="border:?1px?solid?#ccc;"></canvas>

<script>
??const?cnv?=?document.getElementById('c')
??const?cxt?=?cnv.getContext('2d')

??//?線寬?10
??cxt.beginPath()
??cxt.moveTo(50,?50)
??cxt.lineTo(250,?50)
??cxt.lineWidth?=?10?//?設(shè)置線寬
??cxt.stroke()

??//?線寬?20
??cxt.beginPath()
??cxt.moveTo(50,?150)
??cxt.lineTo(250,?150)
??cxt.lineWidth?=?20?//?設(shè)置線寬
??cxt.stroke()

??//?線寬?30
??cxt.beginPath()
??cxt.moveTo(50,?250)
??cxt.lineTo(250,?250)
??cxt.lineWidth?=?30?//?設(shè)置線寬
??cxt.stroke()
</script>
復(fù)制代碼
線條顏色 strokeStyle
使用 strokeStyle 可以設(shè)置線條顏色
語(yǔ)法:
      strokeStyle?=?顏色值
復(fù)制代碼
 38.png
<canvas?id="c"?width="300"?height="300"?style="border:?1px?solid?#ccc;"></canvas>
<script>
??const?cnv?=?document.getElementById('c')
??const?cxt?=?cnv.getContext('2d')
??cxt.moveTo(50,?50)
??cxt.lineTo(250,?50)
??cxt.lineWidth?=?20
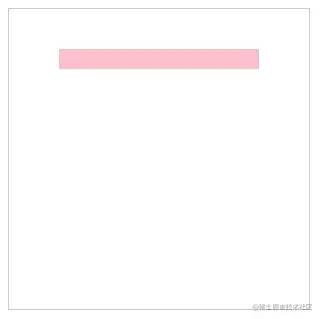
??cxt.strokeStyle?=?'pink'?//?設(shè)置顏色
??cxt.stroke()
</script>
復(fù)制代碼
為了展示方便,我將 lineWidth 設(shè)為 20。
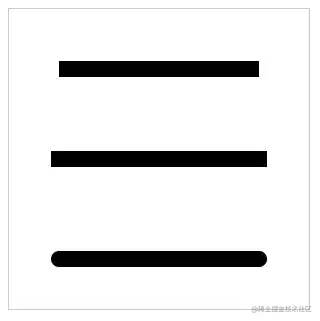
線帽 lineCap
線帽指的是線段的開(kāi)始和結(jié)尾處的樣式,使用 lineCap 可以設(shè)置
語(yǔ)法:
      lineCap?=?'屬性值'
復(fù)制代碼
屬性值包括:
-
butt: 默認(rèn)值,無(wú)線帽 -
square: 方形線帽 -
round: 圓形線帽
 39.png
      <canvas?id="c"?width="300"?height="300"?style="border:?1px?solid?#ccc;"></canvas>

<script>
??const?cnv?=?document.getElementById('c')
??const?cxt?=?cnv.getContext('2d')

??//?設(shè)置線寬,方便演示
??cxt.lineWidth?=?16

??//?默認(rèn)線帽?butt
??cxt.beginPath()
??cxt.moveTo(50,?60)
??cxt.lineTo(250,?60)
??cxt.stroke()


??//?方形線帽?square
??cxt.beginPath()
??cxt.lineCap?=?'square'
??cxt.moveTo(50,?150)
??cxt.lineTo(250,?150)
??cxt.stroke()


??//?圓形線帽?round
??cxt.beginPath()
??cxt.lineCap?=?'round'
??cxt.moveTo(50,?250)
??cxt.lineTo(250,?250)
??cxt.stroke()
</script>
復(fù)制代碼
使用 square 和 round 的話,會(huì)使線條變得稍微長(zhǎng)一點(diǎn)點(diǎn),這是給線條增加線帽的部分,這個(gè)長(zhǎng)度在日常開(kāi)發(fā)中需要注意。
線帽只對(duì)線條的開(kāi)始和結(jié)尾處產(chǎn)生作用,對(duì)拐角不會(huì)產(chǎn)生任何作用。
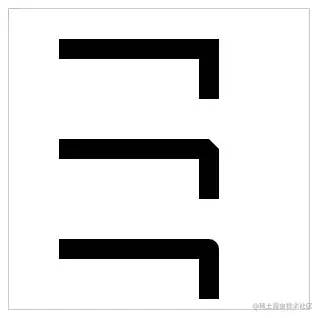
拐角樣式 lineJoin
如果需要設(shè)置拐角樣式,可以使用 lineJoin 。
語(yǔ)法:
      lineJoin?=?'屬性值'
復(fù)制代碼
屬性值包括:
-
miter: 默認(rèn)值,尖角 -
round: 圓角 -
bevel: 斜角
 40.png
      <canvas?id="c"?width="300"?height="300"?style="border:?1px?solid?#ccc;"></canvas>

<script>
??const?cnv?=?document.getElementById('c')
??const?cxt?=?cnv.getContext('2d')
??
??cxt.lineWidth?=?20

??//?默認(rèn),尖角
??cxt.moveTo(50,?40)
??cxt.lineTo(200,?40)
??cxt.lineTo(200,?90)
??cxt.stroke()

??//?斜角?bevel
??cxt.beginPath()
??cxt.moveTo(50,?140)
??cxt.lineTo(200,?140)
??cxt.lineTo(200,?190)
??cxt.lineJoin?=?'bevel'
??cxt.stroke()

??//?圓角?round
??cxt.beginPath()
??cxt.moveTo(50,?240)
??cxt.lineTo(200,?240)
??cxt.lineTo(200,?290)
??cxt.lineJoin?=?'round'
??cxt.stroke()
</script>
復(fù)制代碼
虛線 setLineDash()
使用 setLineDash() 方法可以將描邊設(shè)置成虛線。
語(yǔ)法:
      setLineDash([])
復(fù)制代碼
需要傳入一個(gè)數(shù)組,且元素是數(shù)值型。
虛線分3種情況
- 只傳1個(gè)值
- 有2個(gè)值
- 有3個(gè)以上的值
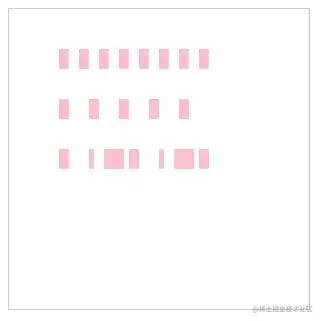 41.png
      <canvas?id="c"?width="300"?height="300"?style="border:?1px?solid?#ccc;"></canvas>

<script>
??const?cnv?=?document.getElementById('c')
??const?cxt?=?cnv.getContext('2d')

??cxt.lineWidth?=?20
??cxt.strokeStyle?=?'pink'

??cxt.moveTo(50,?50)
??cxt.lineTo(200,?50)
??cxt.setLineDash([10])?//?只傳1個(gè)參數(shù),實(shí)線與空白都是?10px
??cxt.stroke()


??cxt.beginPath()
??cxt.moveTo(50,?100)
??cxt.lineTo(200,?100)
??cxt.setLineDash([10,?20])?//?2個(gè)參數(shù),此時(shí),實(shí)線是?10px,?空白?20px
??cxt.stroke()


??cxt.beginPath()
??cxt.moveTo(50,?150)
??cxt.lineTo(200,?150)
??cxt.setLineDash([10,?20,?5])?//?傳3個(gè)以上的參數(shù),此例:10px實(shí)線,20px空白,5px實(shí)線,10px空白,20px實(shí)線,5px空白?……

??cxt.stroke()
</script>
復(fù)制代碼
此外,還可以始終 cxt.getLineDash() 獲取虛線不重復(fù)的距離;
用 cxt.lineDashOffset 設(shè)置虛線的偏移位。
填充
使用 fill() 可以填充圖形,根據(jù)前面的例子應(yīng)該掌握了如何使用 fill()
 42.png
      <canvas?id="c"?width="300"?height="300"?style="border:?1px?solid?#ccc;"></canvas>

<script>
??const?cnv?=?document.getElementById('c')
??const?cxt?=?cnv.getContext('2d')

??cxt.fillStyle?=?'pink'

??cxt.rect(50,?50,?200,?100)

??cxt.fill()
</script>
復(fù)制代碼
可以使用 fillStyle 設(shè)置填充顏色,默認(rèn)是黑色。
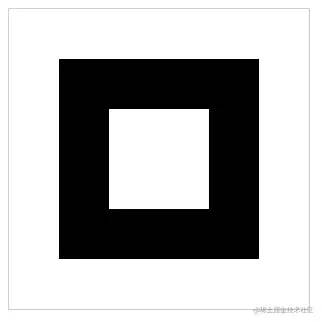
非零環(huán)繞填充
在使用 fill() 方法填充時(shí),需要注意一個(gè)規(guī)則:非零環(huán)繞填充。
在使用 moveTo 和 lineTo 描述圖形時(shí),如果是按順時(shí)針繪制,計(jì)數(shù)器會(huì)加1;如果是逆時(shí)針,計(jì)數(shù)器會(huì)減1。
當(dāng)圖形所處的位置,計(jì)數(shù)器的結(jié)果為0時(shí),它就不會(huì)被填充。
這樣說(shuō)有點(diǎn)復(fù)雜,先看看例子
 43.png
      <canvas?id="c"?width="300"?height="300"?style="border:?1px?solid?#ccc;"></canvas>

<script>
??const?cnv?=?document.getElementById('c')
??const?cxt?=?cnv.getContext('2d')

??//?外層矩形
??cxt.moveTo(50,?50)
??cxt.lineTo(250,?50)
??cxt.lineTo(250,?250)
??cxt.lineTo(50,?250)
??cxt.closePath()

??//?內(nèi)層矩形
??cxt.moveTo(200,?100)
??cxt.lineTo(100,?100)
??cxt.lineTo(100,?200)
??cxt.lineTo(200,?200)
??cxt.closePath()
??cxt.fill()
</script>
復(fù)制代碼
請(qǐng)看看上面的代碼,我畫(huà)了2個(gè)矩形,它們都沒(méi)有用 beginPath() 方法開(kāi)辟新路徑。
 44.png
內(nèi)層矩形是逆時(shí)針繪制的,所以?xún)?nèi)層的值是 -1 ,它又經(jīng)過(guò)外層矩形,而外層矩形是順時(shí)針繪制,所以經(jīng)過(guò)外層時(shí)值 +1,最終內(nèi)層的值為 0 ,所以不會(huì)被填充。
Canvas 提供了一些操作文本的方法。
為了方便演示,我們先了解一下在 Canvas 中如何給本文設(shè)置樣式。
樣式 font
和 CSS 設(shè)置 font 差不多,Canvas 也可以通過(guò) font 設(shè)置樣式。
語(yǔ)法:
      cxt.font?=?'font-style?font-variant?font-weight?font-size/line-height?font-family'
復(fù)制代碼
如果需要設(shè)置字號(hào) font-size,需要同事設(shè)置 font-family。
      cxt.font?=?'30px?宋體'
復(fù)制代碼
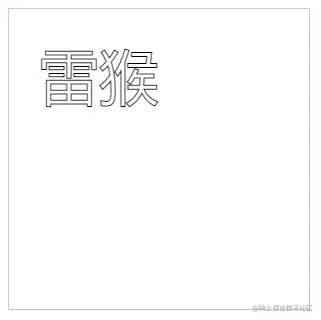
描邊 strokeText()
使用 strokeText() 方法進(jìn)行文本描邊
語(yǔ)法:
      strokeText(text, x, y, maxWidth)
復(fù)制代碼
-
text: 字符串,要繪制的內(nèi)容 -
x: 橫坐標(biāo),文本左邊要對(duì)齊的坐標(biāo)(默認(rèn)左對(duì)齊) -
y: 縱坐標(biāo),文本底邊要對(duì)齊的坐標(biāo) -
maxWidth: 可選參數(shù),表示文本渲染的最大寬度(px),如果文本超出maxWidth設(shè)置的值,文本會(huì)被壓縮。
 45.png
<canvas?id="c"?width="300"?height="300"?style="border:?1px?solid?#ccc;"></canvas>
<script>
??const?cnv?=?document.getElementById('c')
??const?cxt?=?cnv.getContext('2d')
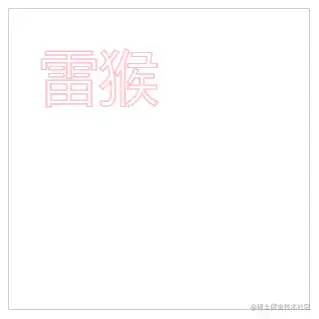
??cxt.font?=?'60px?Arial'?//?將字號(hào)設(shè)置成?60px,方便觀察
??cxt.strokeText('雷猴',?30,?90)
</script>
復(fù)制代碼
設(shè)置描邊顏色 strokeStyle
使用 strokeStyle 設(shè)置描邊顏色。
 46.png
      <canvas?id="c"?width="300"?height="300"?style="border:?1px?solid?#ccc;"></canvas>

<script>
??const?cnv?=?document.getElementById('c')
??const?cxt?=?cnv.getContext('2d')

??cxt.font?=?'60px?Arial'?//?將字號(hào)設(shè)置成?60px,方便觀察
??cxt.strokeStyle?=?'pink'?//?設(shè)置文本描邊顏色
??cxt.strokeText('雷猴',?30,?90)
</script>
復(fù)制代碼
填充 fillText
使用 fillText() 可填充文本。
語(yǔ)法和 strokeText() 一樣。
      fillText(text,?x,?y,?maxWidth)
復(fù)制代碼
 47.png
<canvas?id="c"?width="300"?height="300"?style="border:?1px?solid?#ccc;"></canvas>
<script>
??const?cnv?=?document.getElementById('c')
??const?cxt?=?cnv.getContext('2d')
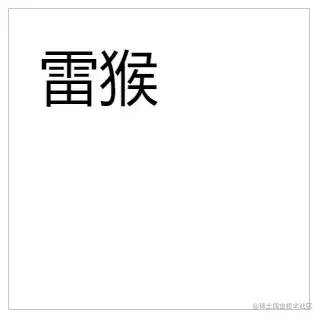
??cxt.font?=?'60px?Arial'
??cxt.fillText('雷猴',?30,?90)
</script>
復(fù)制代碼
設(shè)置填充顏色 fillStyle
使用 fillStyle 可以設(shè)置文本填充顏色。
 48.png
<canvas?id="c"?width="300"?height="300"?style="border:?1px?solid?#ccc;"></canvas>
<script>
??const?cnv?=?document.getElementById('c')
??const?cxt?=?cnv.getContext('2d')
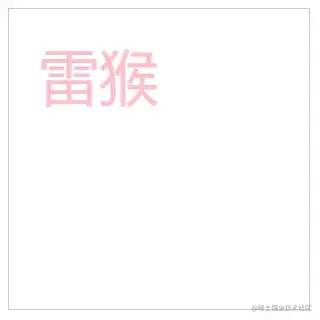
??cxt.font?=?'60px?Arial'
??cxt.fillStyle?=?'pink'
??cxt.fillText('雷猴',?30,?90)
</script>
復(fù)制代碼
獲取文本長(zhǎng)度 measureText()
measureText().width 方法可以獲取文本的長(zhǎng)度,單位是 px 。
      <canvas?id="c"?width="300"?height="300"?style="border:?1px?solid?#ccc;"></canvas>

<script>
??const?cnv?=?document.getElementById('c')
??const?cxt?=?cnv.getContext('2d')

??let?text?=?'雷猴'
??cxt.font?=?'bold?40px?Arial'
??cxt.fillText(text,?40,?80)

??console.log(cxt.measureText(text).width)?//?80
</script>
復(fù)制代碼
水平對(duì)齊方式 textAlign
使用 textAlign 屬性可以設(shè)置文字的水平對(duì)齊方式,一共有5個(gè)值可選
-
start: 默認(rèn)。在指定位置的橫坐標(biāo)開(kāi)始。 -
end: 在指定坐標(biāo)的橫坐標(biāo)結(jié)束。 -
left: 左對(duì)齊。 -
right: 右對(duì)齊。 -
center: 居中對(duì)齊。
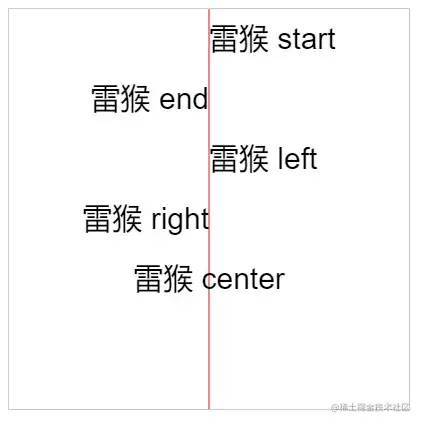 49.png
紅線是輔助參考線。
      <canvas?id="c"?width="400"?height="400"?style="border:?1px?solid?#ccc;"></canvas>

<script>
??const?cnv?=?document.getElementById('c')
??const?cxt?=?cnv.getContext('2d')

??//?豎向的輔助線(參考線,在畫(huà)布中間)
??cxt.moveTo(200,?0)
??cxt.lineTo(200,?400)
??cxt.strokeStyle?=?'red'
??cxt.stroke()

??cxt.font?=?'30px?Arial'

??//?橫坐標(biāo)開(kāi)始位對(duì)齊
??cxt.textAlign?=?'start'?//?默認(rèn)值,
??cxt.fillText('雷猴?start',?200,?40)

??//?橫坐標(biāo)結(jié)束位對(duì)齊
??cxt.textAlign?=?'end'?//?結(jié)束對(duì)齊
??cxt.fillText('雷猴?end',?200,?100)

??//?左對(duì)齊
??cxt.textAlign?=?'left'?//?左對(duì)齊
??cxt.fillText('雷猴?left',?200,?160)

??//?右對(duì)齊
??cxt.textAlign?=?'right'?//?右對(duì)齊
??cxt.fillText('雷猴?right',?200,?220)

??//?居中對(duì)齊
??cxt.textAlign?=?'center'?//?右對(duì)齊
??cxt.fillText('雷猴?center',?200,?280)
</script>
復(fù)制代碼
從上面的例子看,start 和 left 的效果好像是一樣的,end 和 right 也好像是一樣的。
在大多數(shù)情況下,它們的確一樣。但在某些國(guó)家或者某些場(chǎng)合,閱讀文字的習(xí)慣是 從右往左 時(shí),start 就和 right 一樣了,end 和 left 也一樣。這是需要注意的地方。
垂直對(duì)齊方式 textBaseline
使用 textBaseline 屬性可以設(shè)置文字的垂直對(duì)齊方式。
在使用 textBaseline 前,需要自行了解 css 的文本基線。
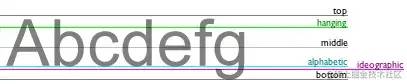 50.png
用一張網(wǎng)圖解釋一下基線
textBaseline 可選屬性:
-
alphabetic: 默認(rèn)。文本基線是普通的字母基線。 -
top: 文本基線是em方框的頂端。 -
bottom: 文本基線是em方框的底端。 -
middle: 文本基線是em方框的正中。 -
hanging: 文本基線是懸掛基線。
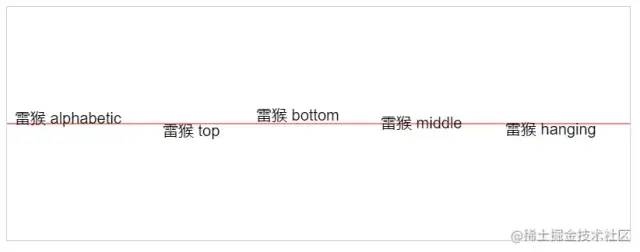 51.png
紅線是輔助參考線。
      <canvas?id="c"?width="800"?height="300"?style="border:?1px?solid?#ccc;"></canvas>

<script>
??const?cnv?=?document.getElementById('c')
??const?cxt?=?cnv.getContext('2d')

??//?橫向的輔助線(參考線,在畫(huà)布中間)
??cxt.moveTo(0,?150)
??cxt.lineTo(800,?150)
??cxt.strokeStyle?=?'red'
??cxt.stroke()

??cxt.font?=?'20px?Arial'

??//?默認(rèn)?alphabetic
??cxt.textBaseline?=?'alphabetic'
??cxt.fillText('雷猴?alphabetic',?10,?150)

??//?默認(rèn)?top
??cxt.textBaseline?=?'top'
??cxt.fillText('雷猴?top',?200,?150)

??//?默認(rèn)?bottom
??cxt.textBaseline?=?'bottom'
??cxt.fillText('雷猴?bottom',?320,?150)

??//?默認(rèn)?middle
??cxt.textBaseline?=?'middle'
??cxt.fillText('雷猴?middle',?480,?150)

??//?默認(rèn)?hanging
??cxt.textBaseline?=?'hanging'
??cxt.fillText('雷猴?hanging',?640,?150)
</script>
復(fù)制代碼
注意:在繪制文字的時(shí)候,默認(rèn)是以文字的左下角作為參考點(diǎn)進(jìn)行繪制
圖片在 Canvas 中可以使用 drawImage() 方法繪制圖片。
渲染圖片
渲染圖片的方式有2中,一種是在JS里加載圖片再渲染,另一種是把DOM里的圖片拿到 canvas 里渲染。
渲染的語(yǔ)法:
      drawImage(image,?dx,?dy)
復(fù)制代碼
-
image: 要渲染的圖片對(duì)象。 -
dx: 圖片左上角的橫坐標(biāo)位置。 -
dy: 圖片左上角的縱坐標(biāo)位置。
JS版
在 JS 里加載圖片并渲染,有以下幾個(gè)步驟:
-
創(chuàng)建
Image對(duì)象 - 引入圖片
- 等待圖片加載完成
-
使用
drawImage()方法渲染圖片
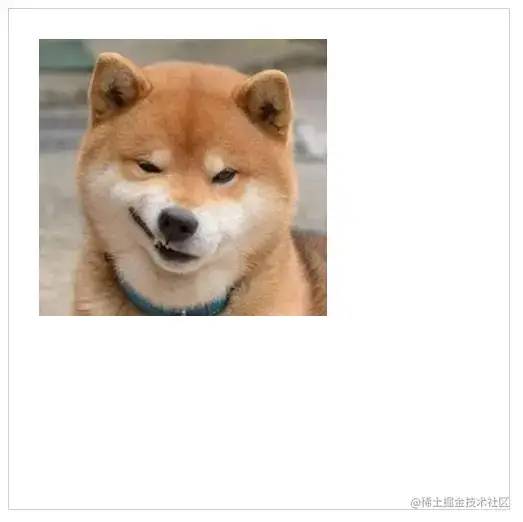 52.png
      <canvas?id="c"?width="500"?height="500"?style="border:?1px?solid?#ccc;"></canvas>

<script>
??const?cnv?=?document.getElementById('c')
??const?cxt?=?cnv.getContext('2d')

??//?1?創(chuàng)建?Image?對(duì)象
??const?image?=?new?Image()

??//?2?引入圖片
??image.src?=?'./images/dog.jpg'

??//?3?等待圖片加載完成
??image.onload?=?()?=>?{
????//?4?使用?drawImage()?方法渲染圖片
????cxt.drawImage(image,?30,?30)
??}
</script>
復(fù)制代碼
DOM版
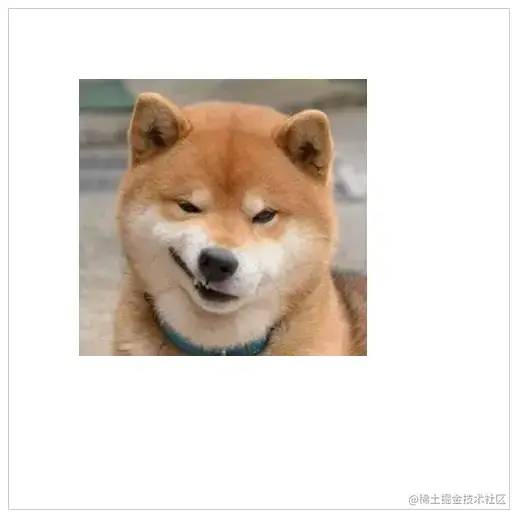 53.png
      <style>
??#dogImg?{
????display:?none;
??}
</style>

<img?src="./images/dog.jpg"?id="dogImg"/>
<canvas?id="c"?width="500"?height="500"?style="border:?1px?solid?#ccc;"></canvas>

<script>
??const?cnv?=?document.getElementById('c')
??const?cxt?=?cnv.getContext('2d')

??const?image?=?document.getElementById('dogImg')

??cxt.drawImage(image,?70,?70)
</script>
復(fù)制代碼
因?yàn)閳D片是從 DOM 里獲取到的,所以一般來(lái)說(shuō),只要在 window.onload 這個(gè)生命周期內(nèi)使用 drawImage 都可以正常渲染圖片。
本例使用了 css 的方式,把圖片的 display 設(shè)置成 none 。因?yàn)槲也幌氡?<img> 影響到本例講解。
實(shí)際開(kāi)發(fā)過(guò)程中按照實(shí)際情況設(shè)置即可。
設(shè)置圖片寬高
前面的例子都是直接加載圖片,圖片默認(rèn)的寬高是多少就加載多少。
如果需要指定圖片寬高,可以在前面的基礎(chǔ)上再添加兩個(gè)參數(shù):
      drawImage(image,?dx,?dy,?dw,?dh)
復(fù)制代碼
image、 dx、 dy 的用法和前面一樣。
dw 用來(lái)定義圖片的寬度,dh 定義圖片的高度。
 54.png
      <canvas?id="c"?width="500"?height="500"?style="border:?1px?solid?#ccc;"></canvas>

<script>
??const?cnv?=?document.getElementById('c')
??const?cxt?=?cnv.getContext('2d')

??const?image?=?new?Image()
??image.src?=?'./images/dog.jpg'

??image.onload?=?()?=>?{
????cxt.drawImage(image,?30,?30,?100,?100)
??}
</script>
復(fù)制代碼
我把圖片的尺寸設(shè)為 100px * 100px,圖片看上去比之前就小了很多。
截取圖片
截圖圖片同樣使用drawImage() 方法,只不過(guò)傳入的參數(shù)數(shù)量比之前都多,而且順序也有點(diǎn)不一樣了。
      drawImage(image,?sx,?sy,?sw,?sh,?dx,?dy,?dw,?dh)
復(fù)制代碼
以上參數(shù)缺一不可
-
image: 圖片對(duì)象 -
sx: 開(kāi)始截取的橫坐標(biāo) -
sy: 開(kāi)始截取的縱坐標(biāo) -
sw: 截取的寬度 -
sh: 截取的高度 -
dx: 圖片左上角的橫坐標(biāo)位置 -
dy: 圖片左上角的縱坐標(biāo)位置 -
dw: 圖片寬度 -
dh: 圖片高度
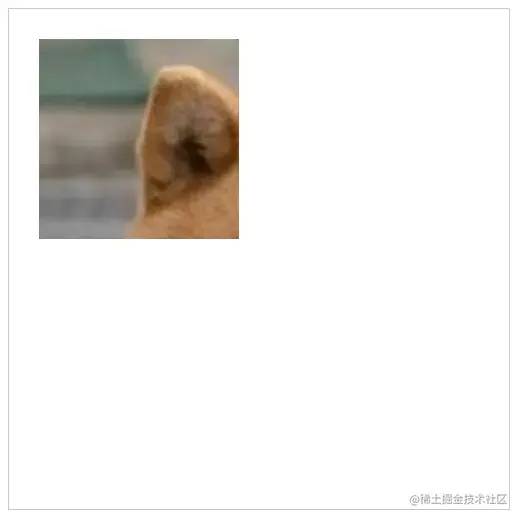 55.png
      <canvas?id="c"?width="500"?height="500"?style="border:?1px?solid?#ccc;"></canvas>

<script>
??const?cnv?=?document.getElementById('c')
??const?cxt?=?cnv.getContext('2d')

??const?image?=?new?Image()
??image.src?=?'./images/dog.jpg'

??image.onload?=?()?=>?{
????cxt.drawImage(image,?0,?0,?100,?100,?30,?30,?200,?200)
??}
</script>
復(fù)制代碼
總結(jié)
本文主要講解了在 Canvas 中繪制一些基礎(chǔ)圖形,還有一些基礎(chǔ)樣式設(shè)置。
往期干貨 :
?26個(gè)經(jīng)典微信小程序+35套微信小程序源碼+微信小程序合集源碼下載(免費(fèi))
?干貨~~~2021最新前端學(xué)習(xí)視頻~~速度領(lǐng)取
? 前端書(shū)籍-前端290本高清pdf電子書(shū)打包下載
點(diǎn)贊和在看就是最大的支持??