Hive和Hbase數(shù)據(jù)互通(用戶畫像)
背景
依舊是用戶畫像的項(xiàng)目,現(xiàn)在標(biāo)簽化的數(shù)據(jù)存放在hive中,而查詢是要在hbase上進(jìn)行查詢,所以需要將hive的數(shù)據(jù)導(dǎo)入hbase中。
方案:
1、hive和hbase的表建立映射關(guān)系,讀取的是同一份HDFS文件,只是在上層建立hbase到hive表的映射。
優(yōu)點(diǎn):一份數(shù)據(jù)存儲,兩種查詢模式,數(shù)據(jù)存儲最低;
缺點(diǎn):底層還是格式化的HDFS文件,查詢需要進(jìn)行映射轉(zhuǎn)換,效率較低;
2、將hive的數(shù)據(jù)通過生成hfile,通過bulkload導(dǎo)入到hbase,這樣底層數(shù)據(jù)的格式會轉(zhuǎn)變成Hfile存儲在hbase中,將hbase完全作為一個(gè)數(shù)據(jù)庫去查詢
優(yōu)點(diǎn):查詢效率高;
缺點(diǎn):同一份數(shù)據(jù),兩份存儲格式,空間換取時(shí)間;
介紹
1、環(huán)境問題
之前因?yàn)楦鞣N操作,導(dǎo)致hive的對應(yīng)的數(shù)據(jù)存儲路徑被刪了,所以先對hive的環(huán)境進(jìn)行重新配置,主要配置和mysql的互通;
1、刪除mysql對應(yīng)的hive庫;
2、執(zhí)行schematool -dbType mysql -initSchema
3、重啟hive
4、查看hive-site的配置
  <property>
    <name>hive.metastore.warehouse.dir</name>
    <value>/user/hive/warehouse</value>
    <description>location of default database for the warehouse</description>
  </property>
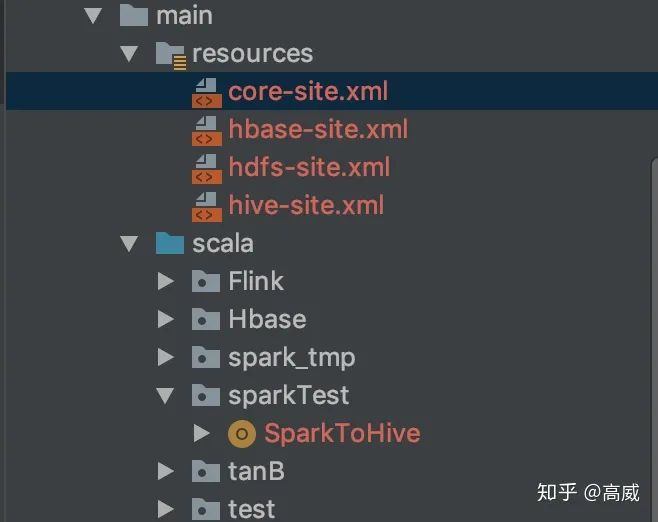
2、spark運(yùn)行環(huán)境的配置
在測試的時(shí)候,spark的運(yùn)行環(huán)境出現(xiàn)了很多問題,主要是jar包沖突和找不到類的問題。
所以基于hbase的類主要是:
        <dependency>
            <groupId>org.apache.hbase</groupId>
            <artifactId>hbase-client</artifactId>
            <version>1.1.2</version>
        </dependency>

        <dependency>
            <groupId>org.apache.hbase</groupId>
            <artifactId>hbase-protocol</artifactId>
            <version>1.1.2</version>
        </dependency>

        <dependency>
            <groupId>org.apache.hbase</groupId>
            <artifactId>hbase-common</artifactId>
            <version>1.1.2</version>
        </dependency>

        <dependency>
            <groupId>org.apache.hbase</groupId>
            <artifactId>hbase-server</artifactId>
            <version>1.1.2</version>
        </dependency>
同時(shí)spark的代碼框架中要加入resouces包,并將hive-site.xml、core-site.xml、hdfs-site.xml、hbase.xml配置文件扔進(jìn)去,方便spark運(yùn)行是能夠找到依賴的環(huán)境。
3、hive映射hbase的表。
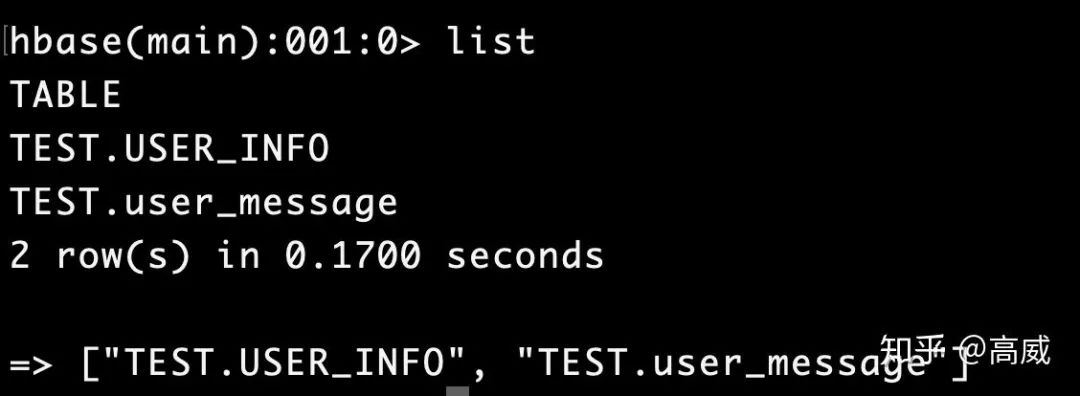
在Spark讀寫Hbase(用戶畫像)將如何像hbase寫數(shù)據(jù)方式介紹了,而且在hbase中建立了一張表:TEST.USER_INFO
現(xiàn)在將這張吧映射到hive中:
建立hive映射表:
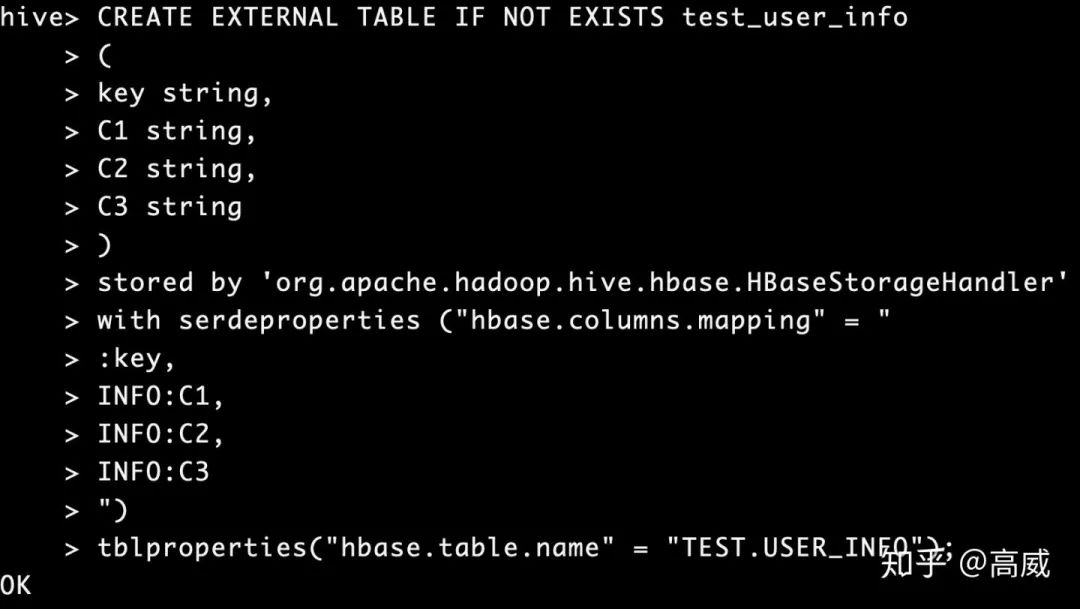
CREATE EXTERNAL TABLE IF NOT EXISTS test_user_info
(
key string,
C1 string,
C2 string,
C3 string
)
stored by 'org.apache.hadoop.hive.hbase.HBaseStorageHandler'
with serdeproperties ("hbase.columns.mapping" = "
:key,
INFO:C1,
INFO:C2,
INFO:C3
")
tblproperties("hbase.table.name" = "TEST.USER_INFO");
stored by指定數(shù)據(jù)的存儲方式。
SERDEPROPERTIES:表示字段映射,對應(yīng)hive中的表字段的順序,需要注意的是 :key指的是Hbase中的rowdy,hive表中要有一個(gè)key字段與之對應(yīng),否則會報(bào)錯(cuò)的。
TBLPROPERTIES:表示表名映射,指定需要映射的Hbase表名。
具體的映射規(guī)則:
hbase中的空cell在hive中會補(bǔ)null。
hive和hbase中不匹配的字段會補(bǔ)null。
hive內(nèi)部表的數(shù)據(jù),由hive自己管理,因此刪除hive表,則對應(yīng)的Hbase表也會被刪除。
hbase對應(yīng)的hive沒有時(shí)間戳概念,默認(rèn)返回最新版本的值。
由于HBase中沒有數(shù)據(jù)類型信息,所以在存儲數(shù)據(jù)的時(shí)候都轉(zhuǎn)化為String類型。
建表如果沒有指定:key,則第一列默認(rèn)為行健。
建表語句:
查詢結(jié)果:
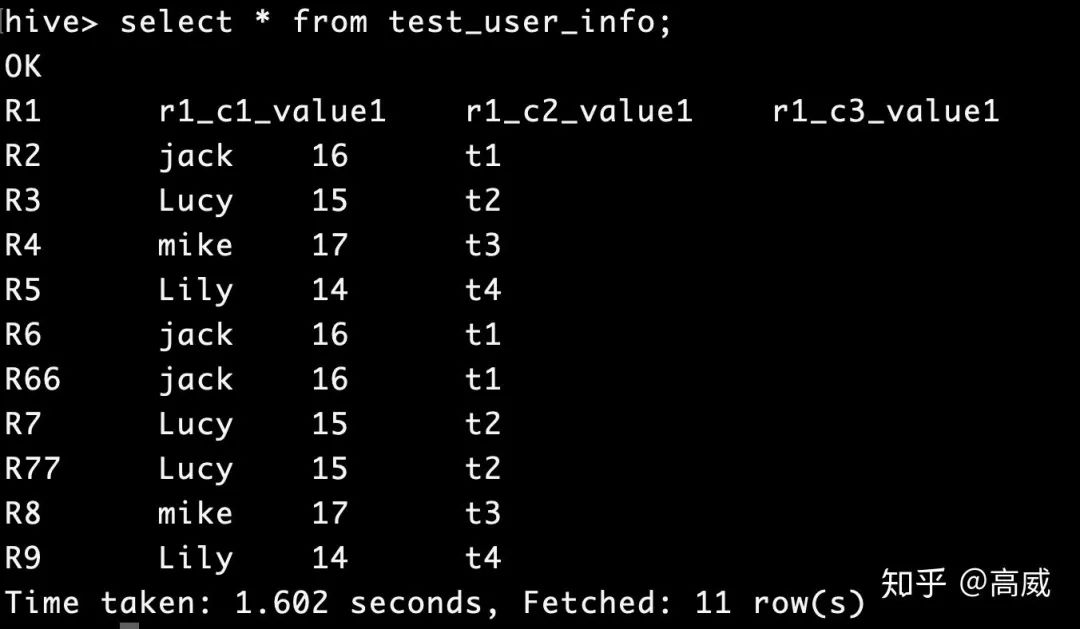
在hbase中新增只有兩個(gè)列的rowKey。

查詢結(jié)果:

可以看到在不匹配的列中會自動補(bǔ)NULL。
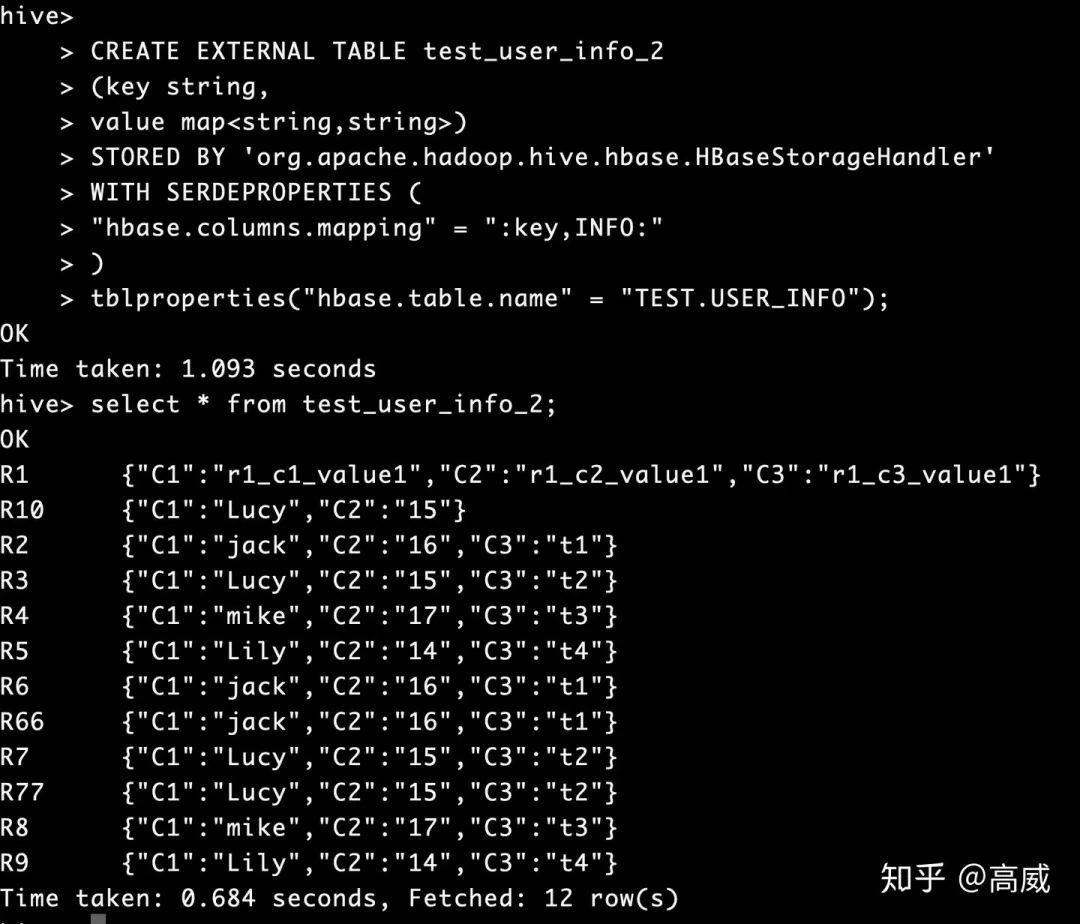
4、整個(gè)hbase的map映射到hive
規(guī)則和上面基本一樣,只不過建立hive表的時(shí)候指定的列的類型修改一下。
CREATE EXTERNAL TABLE test_user_info_2
(key string,
value map<string,string>)
STORED BY 'org.apache.hadoop.hive.hbase.HBaseStorageHandler'
WITH SERDEPROPERTIES (
"hbase.columns.mapping" = ":key,INFO:"
)
tblproperties("hbase.table.name" = "TEST.USER_INFO");
查詢結(jié)果:
5、spark生成hive表數(shù)據(jù)
val RDD = spark.sparkContext.textFile("hdfs://localhost:9000/data/user/*")
    import spark.implicits._
    val DF = RDD.map(f => (f.split(",")(0),
       f.split(",")(1),
       f.split(",")(2),
       f.split(",")(3),
       f.split(",")(4),
       f.split(",")(5),
       f.split(",")(6),
       f.split(",")(7))).
       toDF("uid","date_create","create_type","level","follow_num","first_follow_time","last_follow_time","follow_dur")
    RDD.foreach(println)
    DF.write.mode("overwrite").insertInto("default.user_message_1")
    //todo 查詢hive表數(shù)據(jù)
   spark.sql("select * from default.user_message_1").show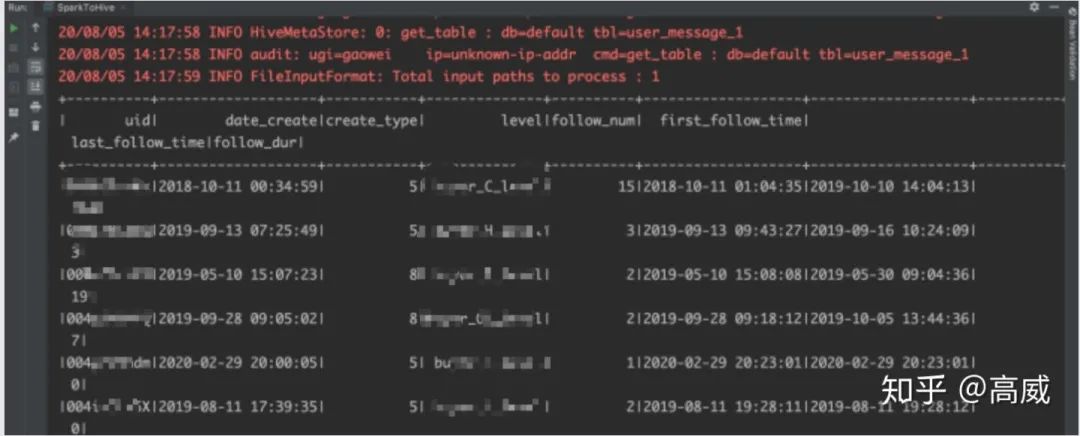
在hive上建立hbase的映射表:
CREATE TABLE user_message
(
uid string,
date_create string,
create_type int,
level string,
follow_num int,
first_follow_time string,
last_follow_time string,
follow_dur bigint
)
stored by 'org.apache.hadoop.hive.hbase.HBaseStorageHandler'
with serdeproperties ("hbase.columns.mapping" = "
:key,
user_info:date_create,
user_info:create_type,
user_info:level,
follow_info:follow_num,
follow_info:first_follow_time,
follow_info:last_follow_time,
follow_info:follow_dur
")
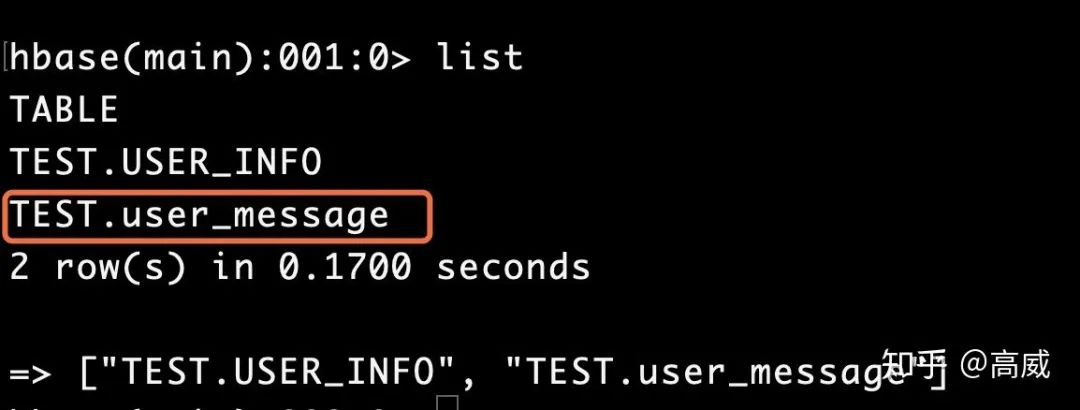
tblproperties("hbase.table.name" = "default:TEST.user_message","hbase.mapred.output.outputtable" = "default:TEST.user_message");查看hbase
將hive中user_message_1中的數(shù)據(jù)導(dǎo)入user_message中
insert overwrite table user_message select * from user_message_1;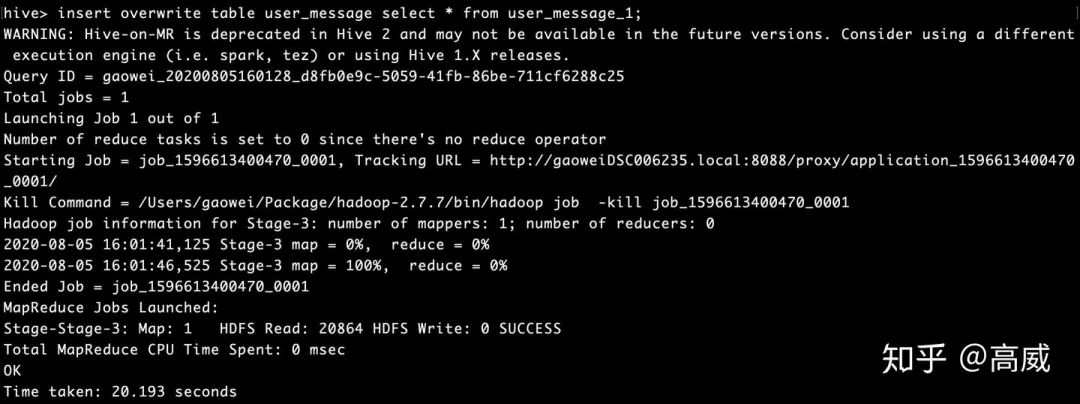
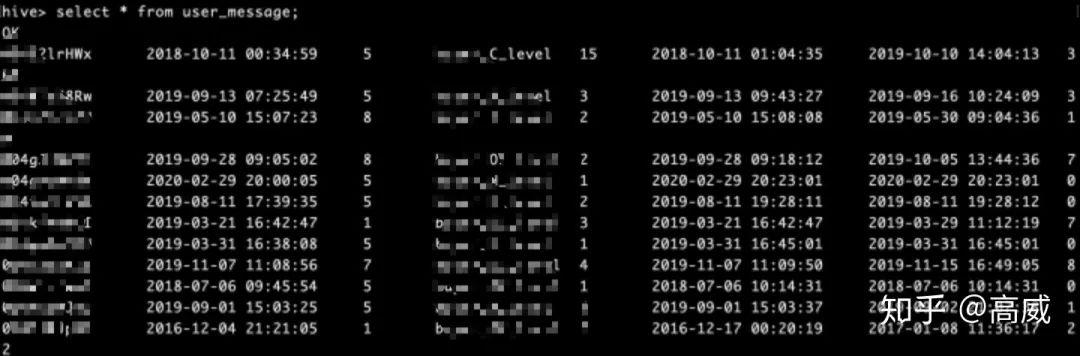
hive中查詢結(jié)果:
Hbase中查詢結(jié)果:

這樣兩邊的數(shù)據(jù)映射成功。
6、查詢hive數(shù)據(jù)寫入Hbase
package sparkTest
import org.apache.hadoop.fs.{FileSystem, Path}
import org.apache.hadoop.hbase.client.ConnectionFactory
import org.apache.hadoop.hbase.{HBaseConfiguration, TableName}
import org.apache.hadoop.hbase.io.ImmutableBytesWritable
import org.apache.hadoop.hbase.mapreduce.TableInputFormat
import org.apache.log4j.{Level, Logger}
import org.apache.spark.sql.SparkSession
import org.apache.hadoop.conf.Configuration
import org.apache.hadoop.hbase._
import org.apache.hadoop.hbase.client._
import org.apache.hadoop.hbase.mapred.TableOutputFormat
import org.apache.hadoop.hbase.util.Bytes
import org.apache.hadoop.mapred.JobConf
/** *
*
* @autor gaowei
* @Date 2020-08-06 09:53
*/
object HfiletoHbase {
def main(args: Array[String]): Unit = {
Logger.getLogger("org.apache.spark").setLevel(Level.ERROR)
val spark = SparkSession
.builder()
.appName("HfiletoHbase")
.enableHiveSupport()
.config("spark.master", "local")
.getOrCreate()
val sc = spark.sparkContext
val hiveContext = new org.apache.spark.sql.hive.HiveContext(sc)
hiveContext.sql("SET hive.exec.dynamic.partition = true")
hiveContext.sql("SET hive.exec.dynamic.partition.mode = nonstrict ")
hiveContext.sql("SET mapreduce.input.fileinputformat.input.dir.recursive = true")
hiveContext.sql("SET hive.input.dir.recursive = true")
hiveContext.sql("SET hive.mapred.supports.subdirectories = true")
hiveContext.sql("SET hive.supports.subdirectories = true")
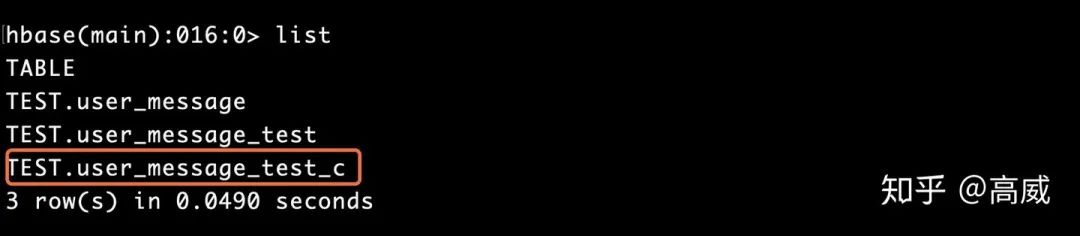
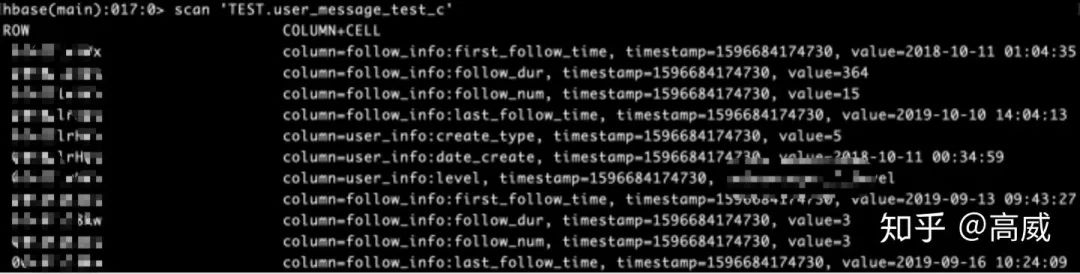
val tablename = "TEST.user_message_test_c"
val conf = HBaseConfiguration.create()
//設(shè)置zooKeeper集群地址,也可以通過將hbase-site.xml導(dǎo)入classpath,但是建議在程序里這樣設(shè)置
conf.set("hbase.zookeeper.quorum","localhost")
//設(shè)置zookeeper連接端口,默認(rèn)2181
conf.set("hbase.zookeeper.property.clientPort", "2181")
creteHTable(tablename, conf)
conf.set(TableInputFormat.INPUT_TABLE, tablename)
val DF = spark.sql(
s"""
|select uid,
|date_create,
|create_type,
|level,
|ifnull(follow_num,0) as follow_num,
|first_follow_time,
|last_follow_time,
|ifnull(follow_dur,0) as follow_dur
|from user_message_1
""".stripMargin)
val RDD = DF.rdd.map(f => (f.getAs[String]("uid"),
f.getAs[String]("date_create"),
f.getAs[Int]("create_type").toString,
f.getAs[String]("level"),
f.getAs[Int]("follow_num").toString,
f.getAs[String]("first_follow_time"),
f.getAs[String]("last_follow_time"),
f.getAs[Long]("follow_dur").toString))
for(arr <- RDD.collect()){println(arr)}
val jobConf = new JobConf()
jobConf.setOutputFormat(classOf[TableOutputFormat])
jobConf.set(TableOutputFormat.OUTPUT_TABLE,tablename)
RDD.map{f => {
val put = new Put(Bytes.toBytes(f._1))
put.add(Bytes.toBytes("user_info"),Bytes.toBytes("date_create"),Bytes.toBytes(f._2))
put.add(Bytes.toBytes("user_info"),Bytes.toBytes("create_type"),Bytes.toBytes(f._3))
put.add(Bytes.toBytes("user_info"),Bytes.toBytes("level"),Bytes.toBytes(f._4))
put.add(Bytes.toBytes("follow_info"),Bytes.toBytes("follow_num"),Bytes.toBytes(f._5))
put.add(Bytes.toBytes("follow_info"),Bytes.toBytes("first_follow_time"),Bytes.toBytes(f._6))
put.add(Bytes.toBytes("follow_info"),Bytes.toBytes("last_follow_time"),Bytes.toBytes(f._7))
put.add(Bytes.toBytes("follow_info"),Bytes.toBytes("follow_dur"),Bytes.toBytes(f._8))
(new ImmutableBytesWritable,put)
}}.saveAsHadoopDataset(jobConf)
sc.stop()
}
def creteHTable(tableName: String, hBaseConf : Configuration) = {
val connection = ConnectionFactory.createConnection(hBaseConf)
val hBaseTableName = TableName.valueOf(tableName)
val admin = connection.getAdmin
if (!admin.tableExists(hBaseTableName)) {
val tableDesc = new HTableDescriptor(hBaseTableName)
tableDesc.addFamily(new HColumnDescriptor("user_info".getBytes))
tableDesc.addFamily(new HColumnDescriptor("follow_info".getBytes))
admin.createTable(tableDesc)
}
connection.close()
}
}
結(jié)果: