
震驚!Vue路由竟然是這樣實現(xiàn)的!
作者丨前端發(fā)現(xiàn)者
來源丨前端發(fā)現(xiàn)
今日心血來潮,想起我們使用Vue開發(fā)單頁面項目基本會用到 vue-router 路由插件,通過改變Url,在不刷新頁面的情況下,更新頁面視圖。那么 vue-router 它是怎么實現(xiàn)路由跳轉(zhuǎn)頁面的呢?

好吧,沒人理我就自己玩??。我(們)先來回憶下路由的配置:
router/index.js
import Vue from 'vue'
import Router from 'vue-router'
Vue.use(Router)

//聲明路由表
const routes = [
  {
    name: 'login',
    path: '/login',
    component: () => import('@/views/login/index')
  },
  {
    name: 'register',
    path: '/register',
    component: () => import('@/views/register/index')
  }
]

export default new Router({
  routes
})
main.js引入
import router from './router'

new Vue({
  el: '#app',
  router,
  render: h => h(App)
})
App.vue使用路由組件
<template>
  <div id="app">
    <router-view />
  </div>
</template>
目前vue-router提供路由跳轉(zhuǎn)的方法有:
-
router.push 添加新路由 -
router.replace 替換當前路由 -
router.go 跳轉(zhuǎn)到指定索引路由 -
router.back 返回上一個路由 -
router.forward 跳轉(zhuǎn)下一個路由
以及常用的<view-link to="/login">去登錄</view-link>
好了,vue-router路由的使用回憶完了,腦海是否存在一下問題?
-
Vue.use(Router)時做了什么事情? -
<router-view />組件是怎么來的? -
<router-link />組件是怎么來的? -
router路由提供的編程式導(dǎo)航是怎么實現(xiàn)的? -
瀏覽器Url地址發(fā)生變化時怎么渲染對應(yīng)組件的?
我們知道,Vue中使用Vue-router的時候,實際是引入一個提供路由功能的插件,既然是插件,那么它就會向外提供一些方法供開發(fā)者使用。下面我們就針對上述的疑問一步步揭開謎底。
Vue.use(Router)時做了什么事情?
用戶執(zhí)行Vue.use的時候,其實是執(zhí)行vue-router插件的 install 方法,并且把Vue的實例作為參數(shù)傳遞進去。
注:在Vue定義,只要插件中提供 install 方法就可以被Vue作為Vue.use(xx)來使用。翻看Vue-router源碼的 src/install.js 文件,我們就可以看到下面這樣的代碼:

可以看到這個文件向外提供了 install 的方法。方法里面使用了Vue實例,并在實例中使用了 mixin 。那么在mixin中做了什么事呢?
-
在 beforeCreate 生命周期中判斷 this.$options.router 是否存在,這個東西就是我們在main.js文件中 new Vue({})創(chuàng)建路由實例時傳入的touter對象。 -
在Vue實例中指定_routerRoot緩存下自身 -
在Vue實例中指定_router緩存?zhèn)魅氲膔outer路由實例 -
路由實例調(diào)用init方法,參數(shù)為Vue實例 -
通過Vue的defineReactive方法將_route變成響應(yīng)式,指向當前路由的URL。 -
劫持數(shù)據(jù)_route,一旦_route數(shù)據(jù)發(fā)生變化后,通知router-view執(zhí)行render方法
我們再來看看src/util/toute.js文件中創(chuàng)建路由的方法。
export function createRoute (
  record: ?RouteRecord,
  location: Location,
  redirectedFrom?: ?Location,
  router?: VueRouter
): Route {
  const stringifyQuery = router && router.options.stringifyQuery

  let query: any = location.query || {}
  try {
    query = clone(query)
  } catch (e) {}

  const route: Route = {                             // 添加一個route對象
    name: location.name || (record && record.name), // 路由表配置的name屬性
    meta: (record && record.meta) || {},           // 路由表配置的meta對象
    path: location.path || '/',                   // 路由表配置的path屬性
    hash: location.hash || '',
    query,
    params: location.params || {},
    fullPath: getFullPath(location, stringifyQuery),
    matched: record ? formatMatch(record) : []
  }
  if (redirectedFrom) {
    route.redirectedFrom = getFullPath(redirectedFrom, stringifyQuery)
  }
  return Object.freeze(route)       // 最后將route對象凍結(jié)并返回(即不允許新增屬性)
}
方法參數(shù)解析:
-
record:路由記錄信息 -
location:需要跳轉(zhuǎn)的路由地址(包含path、query、hash和params的對象) -
router:router實例
<router-view />和<router-link />組件怎么來的?
你可能會注意到,我們在App.vue頁面中會使用<router-view>和<router-link />組件,但是我們并沒有手動引入和注冊這兩個組件,其實是vue-router內(nèi)部幫我們?nèi)ト肿粤私M件。
還是剛才那個 install.js 文件
import View from './components/view'
import Link from './components/link'
...
Vue.component('RouterView', View)
Vue.component('RouterLink', Link)
會看到這個幾行代碼。沒錯了,就是在執(zhí)行install方法的時候就在Vue注冊了組件了。
router路由提供的編程式導(dǎo)航是怎么實現(xiàn)的?
說到這里就要翻到src/index.js文件了。這里寫了一個VueRouter類,VueRouter里面實現(xiàn)了編程式導(dǎo)航功能以及在constructor中看到了mode選項的配置。
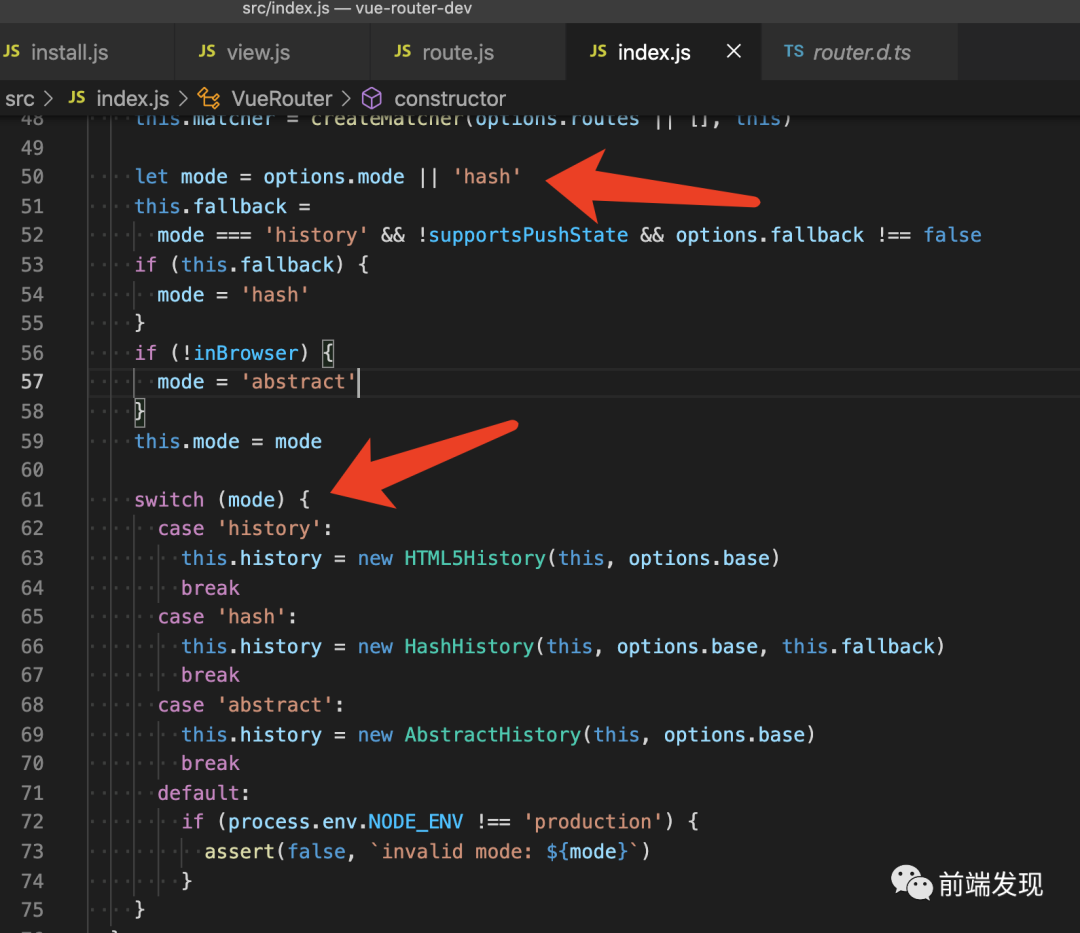
從這也就知道了默認的路由渲染模式是hash,其中出現(xiàn)的options就是路由的配置。
接著往下走,來到第167行,會看到如下代碼:
push (location: RawLocation, onComplete?: Function, onAbort?: Function) {
  // $flow-disable-line
  if (!onComplete && !onAbort && typeof Promise !== 'undefined') {
    return new Promise((resolve, reject) => {
      this.history.push(location, resolve, reject)
    })
  } else {
    this.history.push(location, onComplete, onAbort)
  }
}
replace (location: RawLocation, onComplete?: Function, onAbort?: Function) {
  // $flow-disable-line
  if (!onComplete && !onAbort && typeof Promise !== 'undefined') {
    return new Promise((resolve, reject) => {
      this.history.replace(location, resolve, reject)
    })
  } else {
    this.history.replace(location, onComplete, onAbort)
  }
}
go (n: number) {
  this.history.go(n)
}
back () {
  this.go(-1)
}
forward () {
  this.go(1)
}
如此你的代碼就可以這么寫啦
router.push(location, onComplete?, onAbort?)
router.replace(location, onComplete?, onAbort?)
router.go(n)
router.back()
router.forward()
瀏覽器Url地址發(fā)生變化時怎么渲染對應(yīng)組件的?
我們需要知道的是,當瀏覽器地址發(fā)生變化時:
?HashHistory和HTML5History會分別監(jiān)控hashchange和popstate來對路由變化作對應(yīng)的處理。HashHistory和HTML5History捕獲到變化后會對應(yīng)執(zhí)行push或replace方法,從而調(diào)用transitionTo來對路由變化作對應(yīng)的處理。
?
上面提到在install方法的mixin中,會監(jiān)聽_route數(shù)據(jù)變化,一旦_route數(shù)據(jù)發(fā)生變化后,通知router-view執(zhí)行render方法。這里就要回到剛才注冊<router-view>組件那里去了。
翻到sec/components/view.js就能看到剛才注冊的組件render函數(shù)啦
export default {
  name: 'RouterView',
  functional: true,
  props: {
    name: {
      type: String,
      default: 'default'
    }
  },
  render (_, { props, children, parent, data }) {
    data.routerView = true
    const h = parent.$createElement
    // 得到渲染的組件
    const name = props.name
    // route 對象
    const route = parent.$route
    const cache = parent._routerViewCache || (parent._routerViewCache = {})

    let depth = 0
    let inactive = false
    while (parent && parent._routerRoot !== parent) {
      const vnodeData = parent.$vnode ? parent.$vnode.data : {}
      if (vnodeData.routerView) {
        depth++
      }
      if (vnodeData.keepAlive && parent._directInactive && parent._inactive) {
        inactive = true
      }
      parent = parent.$parent
    }
    data.routerViewDepth = depth
    if (inactive) {
      // 非 keepalive 模式下 每次都需要設(shè)置鉤子
      // 進而更新(賦值&銷毀)匹配了的實例元素
      const cachedData = cache[name]
      const cachedComponent = cachedData && cachedData.component
      if (cachedComponent) {
        if (cachedData.configProps) {
          fillPropsinData(cachedComponent, data, cachedData.route, cachedData.configProps)
        }
        return h(cachedComponent, data, children)
      } else {
        return h()
      }
    }
    const matched = route.matched[depth]
    const component = matched && matched.components[name]
    if (!matched || !component) {
      cache[name] = null
      return h()
    }
    cache[name] = { component }
    data.registerRouteInstance = (vm, val) => {
      const current = matched.instances[name]
      if (
        (val && current !== vm) ||
        (!val && current === vm)
      ) {
        matched.instances[name] = val
      }
    }
    ;(data.hook || (data.hook = {})).prepatch = (_, vnode) => {
      matched.instances[name] = vnode.componentInstance
    }
    data.hook.init = (vnode) => {
      if (vnode.data.keepAlive &&
        vnode.componentInstance &&
        vnode.componentInstance !== matched.instances[name]
      ) {
        matched.instances[name] = vnode.componentInstance
      }
      handleRouteEntered(route)
    }
    const configProps = matched.props && matched.props[name]
    if (configProps) {
      extend(cache[name], {
        route,
        configProps
      })
      fillPropsinData(component, data, route, configProps)
    }
    return h(component, data, children)
  }
}

最后做個總結(jié)就是:
-
向外暴露 install 和 router ,接著初始化路由。 -
內(nèi)部注冊<router-view>和<router-link>組件。 -
設(shè)置變量保存當前路由地址,監(jiān)聽hash變化,切換當前組件,然后render渲染對應(yīng)的組件(hash模式)
-End-
最近有一些小伙伴,讓我?guī)兔φ乙恍?nbsp;面試題 資料,于是我翻遍了收藏的 5T 資料后,匯總整理出來,可以說是程序員面試必備!所有資料都整理到網(wǎng)盤了,歡迎下載!

面試題】即可獲取