Spring Security Web 權限方案
點擊上方藍色字體,選擇“標星公眾號”
優(yōu)質(zhì)文章,第一時間送達
作者 | 我係死肥宅
來源 | urlify.cn/fiqQ3y
3.1 設置登錄系統(tǒng)的賬號、密碼
方式一:在 application.properties
spring.security.user.name=atguigu
spring.security.user.password=atguigu
方式二:編寫類實現(xiàn)接口
package com.atgugui.securitydemo1.config;

import org.springframework.context.annotation.Configuration;
import org.springframework.security.config.annotation.authentication.builders.AuthenticationManagerBuilder;
import org.springframework.security.config.annotation.web.configuration.WebSecurityConfigurerAdapter;
import org.springframework.security.crypto.bcrypt.BCryptPasswordEncoder;

@Configuration
public class SecurityConfig extends WebSecurityConfigurerAdapter {
    @Override
    protected void configure(AuthenticationManagerBuilder auth) throws Exception {
        BCryptPasswordEncoder encoder = new BCryptPasswordEncoder();
        String password = encoder.encode("123");

        auth.inMemoryAuthentication()
                .passwordEncoder(encoder)
                .withUser("lucy")
                .password(password)
                .roles("admin");
    }
}
方式三:自定義編寫實現(xiàn)類
package com.atgugui.securitydemo1.config;

import org.springframework.beans.factory.annotation.Autowired;
import org.springframework.context.annotation.Bean;
import org.springframework.context.annotation.Configuration;
import org.springframework.security.config.annotation.authentication.builders.AuthenticationManagerBuilder;
import org.springframework.security.config.annotation.web.configuration.WebSecurityConfigurerAdapter;
import org.springframework.security.core.userdetails.UserDetailsService;
import org.springframework.security.crypto.bcrypt.BCryptPasswordEncoder;
import org.springframework.security.crypto.password.PasswordEncoder;

@Configuration
public class SecurityConfig1 extends WebSecurityConfigurerAdapter {
    @Autowired
    private UserDetailsService userDetailsService;

    @Override
    protected void configure(AuthenticationManagerBuilder auth) throws Exception {
        auth.userDetailsService(userDetailsService)
                .passwordEncoder(password());
    }

    @Bean
    PasswordEncoder password() {
        return new BCryptPasswordEncoder();
    }
}
package com.atgugui.securitydemo1.service;

import org.springframework.security.core.GrantedAuthority;
import org.springframework.security.core.authority.AuthorityUtils;
import org.springframework.security.core.userdetails.User;
import org.springframework.security.core.userdetails.UserDetails;
import org.springframework.security.core.userdetails.UserDetailsService;
import org.springframework.security.core.userdetails.UsernameNotFoundException;
import org.springframework.security.crypto.bcrypt.BCryptPasswordEncoder;
import org.springframework.stereotype.Service;

import java.util.List;

@Service("userDetailsService")
public class MyUserDetailService implements UserDetailsService {
    @Override
    public UserDetails loadUserByUsername(String username) throws UsernameNotFoundException {
        List<GrantedAuthority> auths = AuthorityUtils.commaSeparatedStringToAuthorityList("role");
        return new User("mary", new BCryptPasswordEncoder().encode("123"), auths);
    }
}
3.2 實現(xiàn)數(shù)據(jù)庫認證來完成用戶登錄
完成自定義登錄
3.2.1 準備 sql
CREATE TABLE users (
    id BIGINT PRIMARY KEY AUTO_INCREMENT,
    username VARCHAR(20) UNIQUE NOT NULL,
    password VARCHAR(100)
);
INSERT INTO users
VALUES (1, 'lucy', '123');
INSERT INTO users
VALUES (2, 'mary', '456');
3.2.2 添加依賴
<dependencies>
    <dependency>
        <groupId>org.springframework.boot</groupId>
        <artifactId>spring-boot-starter-security</artifactId>
    </dependency>
    <dependency>
        <groupId>org.springframework.boot</groupId>
        <artifactId>spring-boot-starter-web</artifactId>
    </dependency>

    <dependency>
        <groupId>org.springframework.boot</groupId>
        <artifactId>spring-boot-starter-test</artifactId>
        <scope>test</scope>
        <exclusions>
            <exclusion>
                <groupId>org.junit.vintage</groupId>
                <artifactId>junit-vintage-engine</artifactId>
            </exclusion>
        </exclusions>
    </dependency>
    <dependency>
        <groupId>org.springframework.security</groupId>
        <artifactId>spring-security-test</artifactId>
        <scope>test</scope>
    </dependency>

    <!-- https://mvnrepository.com/artifact/com.baomidou/mybatis-plus-boot-starter -->
    <dependency>
        <groupId>com.baomidou</groupId>
        <artifactId>mybatis-plus-boot-starter</artifactId>
        <version>3.4.2</version>
    </dependency>
    <!-- https://mvnrepository.com/artifact/mysql/mysql-connector-java -->
    <dependency>
        <groupId>mysql</groupId>
        <artifactId>mysql-connector-java</artifactId>
        <version>8.0.23</version>
    </dependency>
    <!-- https://mvnrepository.com/artifact/org.projectlombok/lombok -->
    <dependency>
        <groupId>org.projectlombok</groupId>
        <artifactId>lombok</artifactId>
        <version>1.18.20</version>
        <scope>provided</scope>
    </dependency>
</dependencies>
3.2.3 制作實體類
package com.atgugui.securitydemo1.entity;

import lombok.Data;

@Data
public class Users {
    /**
     * id
     */
    private Integer id;

    /**
     * 用戶名
     */
    private String username;

    /**
     * 密碼
     */
    private String password;
}
3.2.4 整合 MybatisPlus 制作 mapper
package com.atgugui.securitydemo1.mapper;

import com.atgugui.securitydemo1.entity.Users;
import com.baomidou.mybatisplus.core.mapper.BaseMapper;
import org.springframework.stereotype.Repository;

@Repository
public interface UsersMapper extends BaseMapper<Users> {
}
配置文件添加數(shù)據(jù)庫配置
# mysql 數(shù)據(jù)庫連接
spring.datasource.driver-class-name=com.mysql.cj.jdbc.Driver
spring.datasource.url=jdbc:mysql://localhost:3306/test?serverTimezone=GMT%2B8
spring.datasource.username=root
spring.datasource.password=12345678
3.2.5 制作登錄實現(xiàn)類
package com.atgugui.securitydemo1.service;

import com.atgugui.securitydemo1.entity.Users;
import com.atgugui.securitydemo1.mapper.UsersMapper;
import com.baomidou.mybatisplus.core.conditions.query.QueryWrapper;
import lombok.extern.slf4j.Slf4j;
import org.springframework.beans.factory.annotation.Autowired;
import org.springframework.security.core.GrantedAuthority;
import org.springframework.security.core.authority.AuthorityUtils;
import org.springframework.security.core.userdetails.User;
import org.springframework.security.core.userdetails.UserDetails;
import org.springframework.security.core.userdetails.UserDetailsService;
import org.springframework.security.core.userdetails.UsernameNotFoundException;
import org.springframework.security.crypto.bcrypt.BCryptPasswordEncoder;
import org.springframework.stereotype.Service;

import java.util.List;

@Slf4j
@Service("userDetailsService")
public class MyUserDetailService implements UserDetailsService {
    @Autowired
    private UsersMapper usersMapper;

    @Override
    public UserDetails loadUserByUsername(String username) throws UsernameNotFoundException {
        // 根據(jù)用戶名查詢
        QueryWrapper<Users> wrapper = new QueryWrapper<>();
        wrapper.eq("username", username);
        Users users = usersMapper.selectOne(wrapper);
        log.info("[Service]users:{}", users);
        if (users == null) {
            throw new UsernameNotFoundException("用戶名不存在!");
        }
        System.out.println(users);
        List<GrantedAuthority> auths = AuthorityUtils.commaSeparatedStringToAuthorityList("role");
        return new User(users.getUsername(), new BCryptPasswordEncoder().encode(users.getPassword()), auths);
    }
}
3.2.6 添加注解
package com.atgugui.securitydemo1;

import org.mybatis.spring.annotation.MapperScan;
import org.springframework.boot.SpringApplication;
import org.springframework.boot.autoconfigure.SpringBootApplication;

@SpringBootApplication
@MapperScan("com.atgugui.securitydemo1.mapper")
public class Securitydemo1Application {

    public static void main(String[] args) {
        SpringApplication.run(Securitydemo1Application.class, args);
    }

}
3.2.7 啟動測試
2021-04-17 23:35:55.905 INFO 11768 --- [nio-8111-exec-5] c.a.s.service.MyUserDetailService : [Service]users:Users(id=1, username=lucy, password=123)
3.3 未認證請求跳轉(zhuǎn)到登錄頁
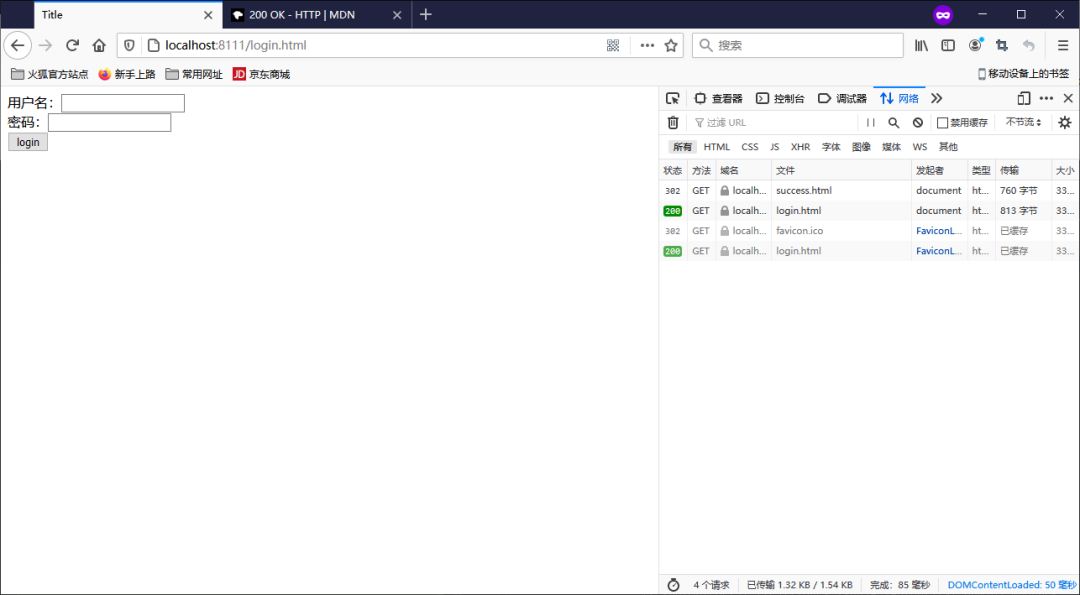
3.3.1 編寫頁面
<!DOCTYPE html>
<html lang="en">
<head>
    <meta charset="UTF-8">
    <title>Title</title>
</head>
<body>
<form action="/user/login" method="post">
    用戶名:<input type="text" name="username"><br>
    密碼:<input type="password" name="password"><br>
    <input type="submit" value="login">
</form>
</body>
</html>
3.3.2 編寫控制器
package com.atgugui.securitydemo1.controller;
import org.springframework.web.bind.annotation.GetMapping;
import org.springframework.web.bind.annotation.RequestMapping;
import org.springframework.web.bind.annotation.RestController;
@RestController
@RequestMapping("/test")
public class TestController {
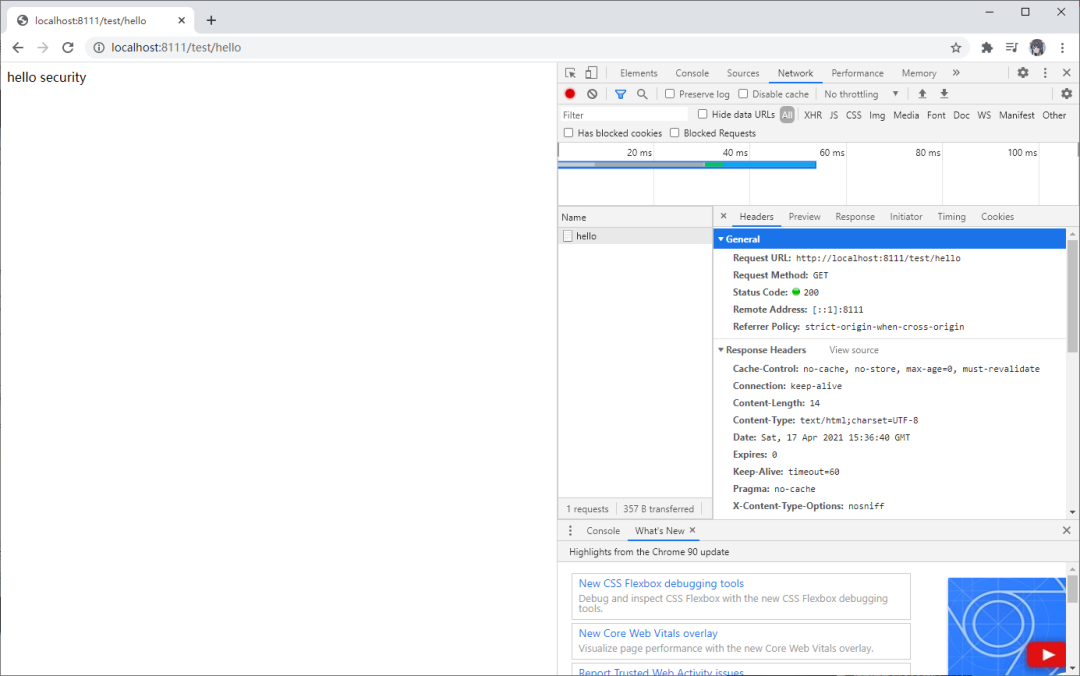
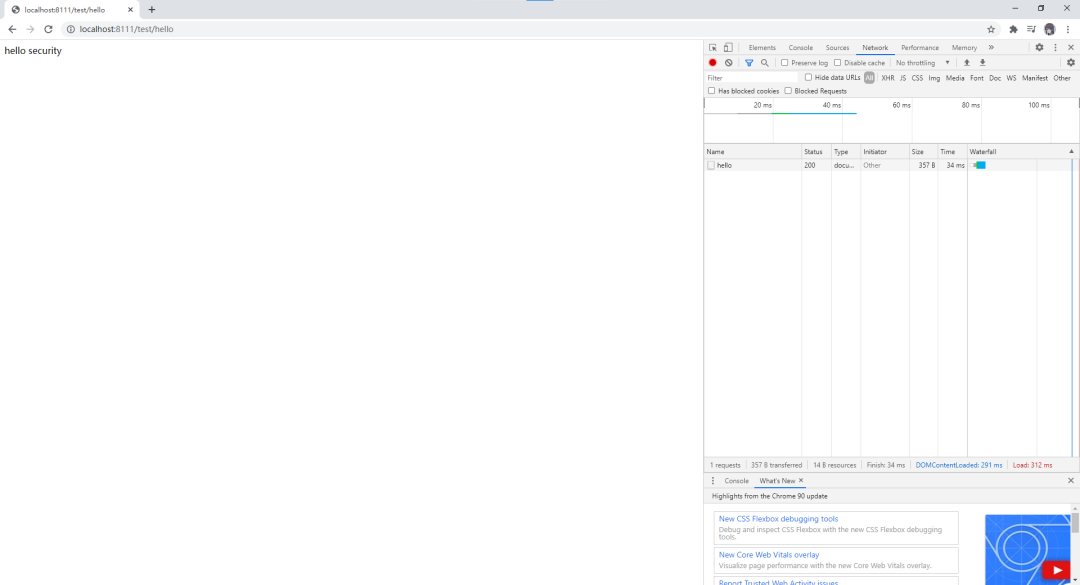
@GetMapping("hello")
public String hello() {
return "hello security";
}
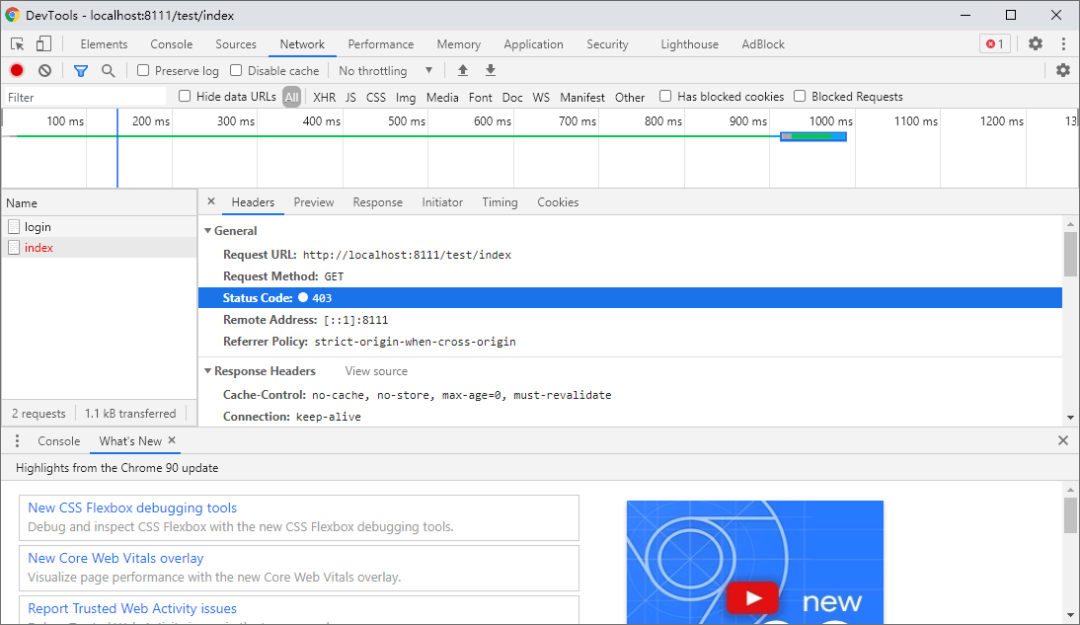
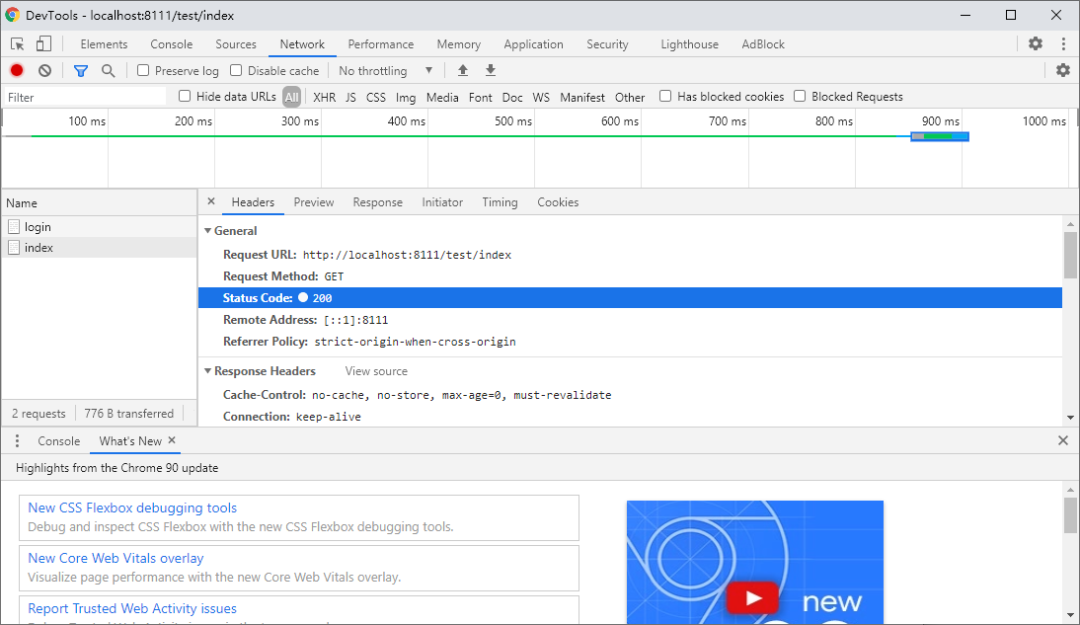
@GetMapping("index")
public String index() {
return "hello index";
}
}
3.3.3 編寫配置類放行登錄頁面以及靜態(tài)資源
package com.atgugui.securitydemo1.config;

import org.springframework.beans.factory.annotation.Autowired;
import org.springframework.context.annotation.Bean;
import org.springframework.context.annotation.Configuration;
import org.springframework.security.config.annotation.authentication.builders.AuthenticationManagerBuilder;
import org.springframework.security.config.annotation.web.builders.HttpSecurity;
import org.springframework.security.config.annotation.web.configuration.WebSecurityConfigurerAdapter;
import org.springframework.security.core.userdetails.UserDetailsService;
import org.springframework.security.crypto.bcrypt.BCryptPasswordEncoder;
import org.springframework.security.crypto.password.PasswordEncoder;

@Configuration
public class SecurityConfig1 extends WebSecurityConfigurerAdapter {
    @Autowired
    private UserDetailsService userDetailsService;

    @Override
    protected void configure(AuthenticationManagerBuilder auth) throws Exception {
        auth.userDetailsService(userDetailsService)
                .passwordEncoder(password());
    }

    @Override
    protected void configure(HttpSecurity http) throws Exception {
        http.formLogin()    // 自定義編寫的登錄頁面
                .loginPage("/login.html")   // 登錄頁面設置
                .loginProcessingUrl("/user/login")  // 登錄訪問路徑
                .defaultSuccessUrl("/test/index").permitAll()    // 登錄成功之后,跳轉(zhuǎn)路徑
                .and().authorizeRequests()
                    .antMatchers("/", "/test/hello", "user/login").permitAll()  // 直接訪問,不需要認證
                .anyRequest().authenticated()
                .and().csrf().disable();    // 關閉csrf防護
    }

    @Bean
    PasswordEncoder password() {
        return new BCryptPasswordEncoder();
    }
}
3.3.4 測試

3.4 基于角色或權限進行訪問控制
3.4.1 hasAuthority 方法
如果當前的主體具有指定的權限,則返回 true,否則返回 false
修改配置類
@Override
protected void configure(HttpSecurity http) throws Exception {
    http.formLogin()    // 自定義編寫的登錄頁面
            .loginPage("/login.html")   // 登錄頁面設置
            .loginProcessingUrl("/user/login")  // 登錄訪問路徑
            .defaultSuccessUrl("/test/index").permitAll()    // 登錄成功之后,跳轉(zhuǎn)路徑
            .and().authorizeRequests()
                .antMatchers("/", "/test/hello", "user/login").permitAll()  // 直接訪問,不需要認證
                .antMatchers("/test/index").hasAuthority("admins")  // 權限
                .anyRequest().authenticated()
            .and().csrf().disable();    // 關閉csrf防護
}
添加一個控制器
@GetMapping("index")
public String index() {
    return "hello index";
}
給用戶登錄主體賦予權限
測試
role
admins
3.4.2 hasAnyAuthority 方法
如果當前的主體有任何提供的角色(給定的作為一個逗號分隔的字符串列表)的話,返回 true
@Override
protected void configure(HttpSecurity http) throws Exception {
    http.formLogin()    // 自定義編寫的登錄頁面
            .loginPage("/login.html")   // 登錄頁面設置
            .loginProcessingUrl("/user/login")  // 登錄訪問路徑
            .defaultSuccessUrl("/test/index").permitAll()    // 登錄成功之后,跳轉(zhuǎn)路徑
            .and().authorizeRequests()
                .antMatchers("/", "/test/hello", "user/login").permitAll()  // 直接訪問,不需要認證
                .antMatchers("/test/index").hasAnyAuthority("admins,manager")  // 權限
                .anyRequest().authenticated()
            .and().csrf().disable();    // 關閉csrf防護
}
3.4.3 hasRole 方法
如果用戶具備給定角色就允許訪問,否則出現(xiàn) 403。如果當前主體具有指定的角色,則返回 true。
private static String hasRole(String role) {
   Assert.notNull(role, "role cannot be null");
   if (role.startsWith("ROLE_")) {
      throw new IllegalArgumentException(
            "role should not start with 'ROLE_' since it is automatically inserted. Got '"
                  + role + "'");
   }
   return "hasRole('ROLE_" + role + "')";
}
@Override
protected void configure(HttpSecurity http) throws Exception {
    http.formLogin()    // 自定義編寫的登錄頁面
            .loginPage("/login.html")   // 登錄頁面設置
            .loginProcessingUrl("/user/login")  // 登錄訪問路徑
            .defaultSuccessUrl("/test/index").permitAll()    // 登錄成功之后,跳轉(zhuǎn)路徑
            .and().authorizeRequests()
                .antMatchers("/", "/test/hello", "user/login").permitAll()  // 直接訪問,不需要認證
                // .antMatchers("/test/index").hasAnyAuthority("admins,manager")  // 權限
                .antMatchers("/test/index").hasRole("sale")
                .anyRequest().authenticated()
            .and().csrf().disable();    // 關閉csrf防護
}
@Override
public UserDetails loadUserByUsername(String username) throws UsernameNotFoundException {
    // 根據(jù)用戶名查詢
    QueryWrapper<Users> wrapper = new QueryWrapper<>();
    wrapper.eq("username", username);
    Users users = usersMapper.selectOne(wrapper);
    log.info("[Service]users:{}", users);
    if (users == null) {
        throw new UsernameNotFoundException("用戶名不存在!");
    }
    List<GrantedAuthority> auths = AuthorityUtils.commaSeparatedStringToAuthorityList("admins,ROLE_sale");
    return new User(users.getUsername(), new BCryptPasswordEncoder().encode(users.getPassword()), auths);
}
修改配置文件:注意配置文件中不需要添加”ROLE_“,因為上述的底層代碼會自動添加與之進行匹配。
3.4.4 hasAnyRole
表示用戶具備任何一個條件都可以訪問。
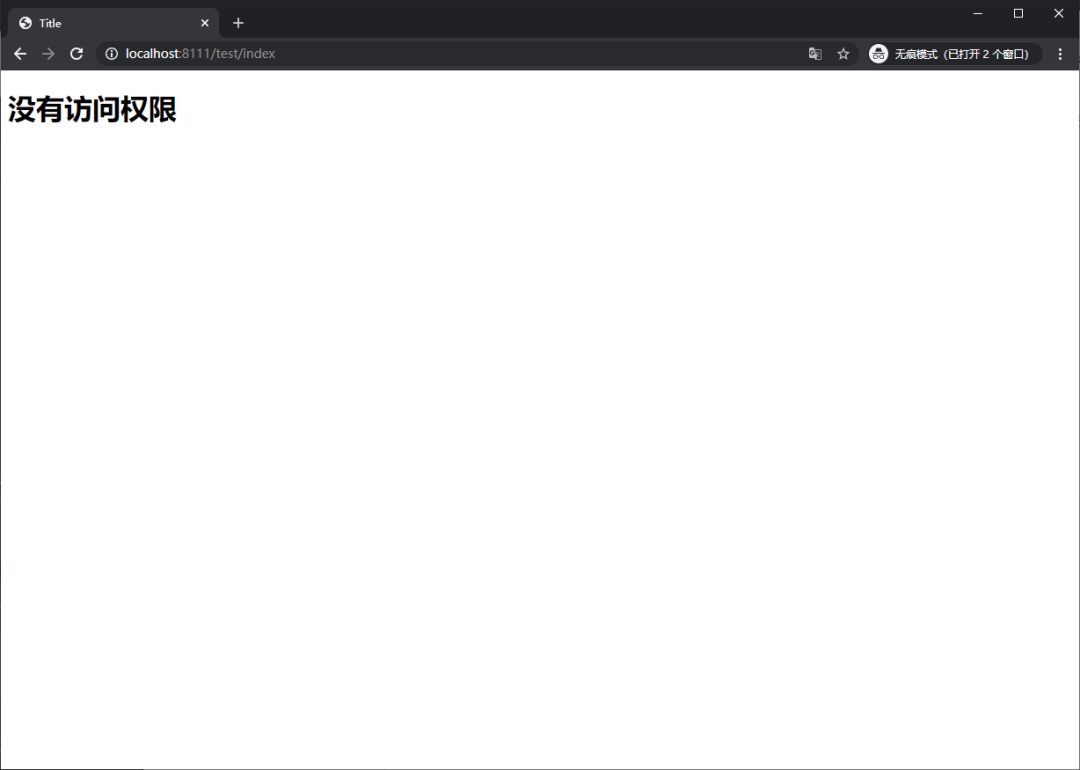
3.5 自定義 403 頁面
3.5.1 修改訪問配置類
http.exceptionHandling().accessDeniedPage("/unauth.html");
3.5.2 添加對應頁面
<!DOCTYPE html>
<html lang="en">
<head>
    <meta charset="UTF-8">
    <title>Title</title>
</head>
<body>
<h1>沒有訪問權限</h1>
</body>
</html>
3.5.3 測試
3.6 注解使用
3.6.1 @Secured
判斷是否具有角色,另外需要注意的是這里匹配的字符串需要添加前綴“ROLE_“。
使用注解先要開啟注解功能!
import org.mybatis.spring.annotation.MapperScan;
import org.springframework.boot.SpringApplication;
import org.springframework.boot.autoconfigure.SpringBootApplication;
import org.springframework.security.config.annotation.method.configuration.EnableGlobalMethodSecurity;

@SpringBootApplication
@MapperScan("com.atgugui.securitydemo1.mapper")
@EnableGlobalMethodSecurity(securedEnabled=true)
public class Securitydemo1Application {

    public static void main(String[] args) {
        SpringApplication.run(Securitydemo1Application.class, args);
    }

}
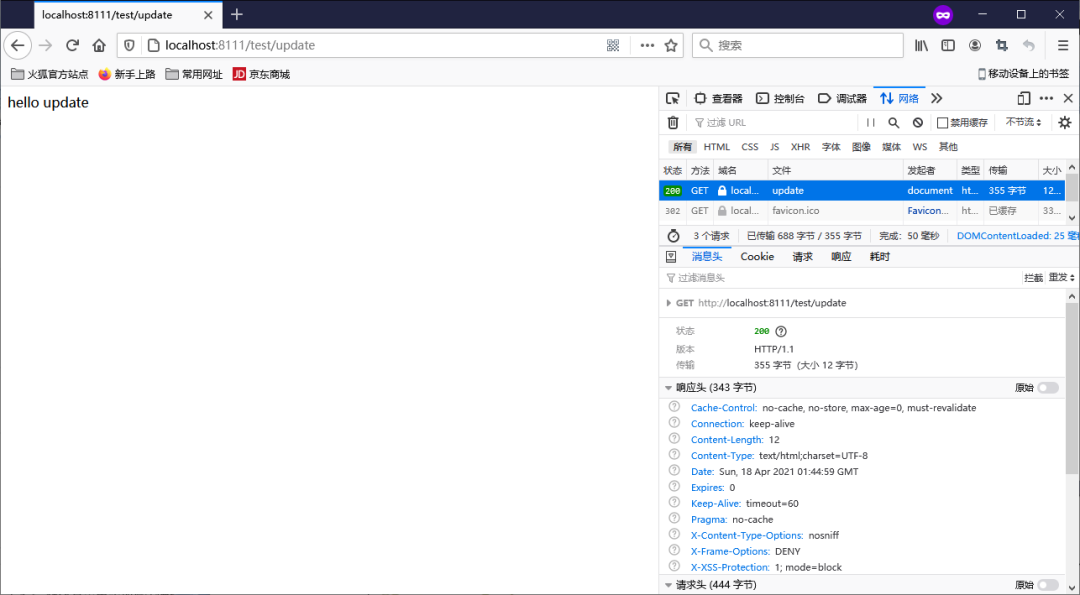
在控制器方法上添加注解
@GetMapping("update")
@Secured({"ROLE_sale", "ROLE_manager"})
public String update() {
    return "hello update";
}
登錄之后直接訪問控制器
3.6.2 @PreAuthorize
先開啟注解功能:@EnableGlobalMethodSecurity(prePostEnabled = true)
@EnableGlobalMethodSecurity(securedEnabled=true, prePostEnabled = true)
public class Securitydemo1Application {
@PreAuthorize:注解適合進入方法前的權限驗證,@PreAuthorize可以將登錄用戶的roles/permissions參數(shù)傳到方法中
@GetMapping("update")
// @Secured({"ROLE_sale", "ROLE_manager"})
@PreAuthorize("hasAnyAuthority('admins')")
public String update() {
    return "hello update";
}

3.6.3 @PostAuthorize
開啟注解功能:@EnableGlobalMethodSecurity(prePostEnabled = true)
@PostAuthorize 注解使用并不多,在方法執(zhí)行后再進行權限驗證,適合驗證帶有返回值的權限
3.6.4 @PostFilter
@PostFilter:權限驗證之后對數(shù)據(jù)進行過濾留下用戶名是admin1的數(shù)據(jù)
表達式中的 filterObject 引用的是方法返回值List中的某一個元素
@RequestMapping("getAll")
@PostAuthorize("hasAnyAuthority('admins')")
@PostFilter("filterObject.username == 'admin1'")
public List<Users> getAllUser() {
    List<Users> list = Lists.newArrayList();
    list.add(new Users(1, "admin1", "6666"));
    list.add(new Users(2, "admin2", "888"));
    return list;
}

3.6.5 @PreFilter
@PreFilter:進入控制器之前對數(shù)據(jù)進行過濾
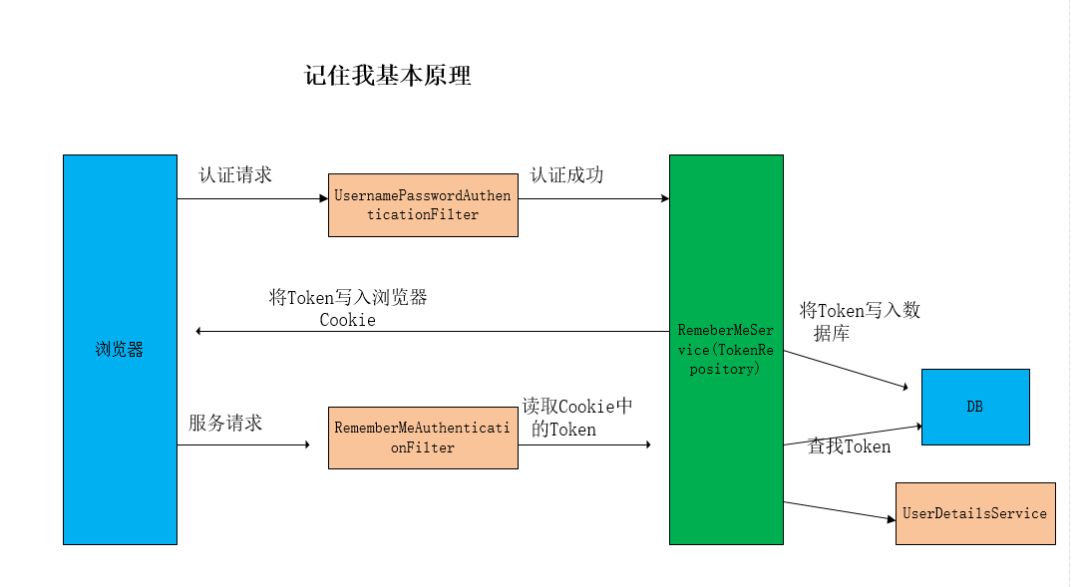
3.7 基于數(shù)據(jù)庫的記住我
3.7.1創(chuàng)建表
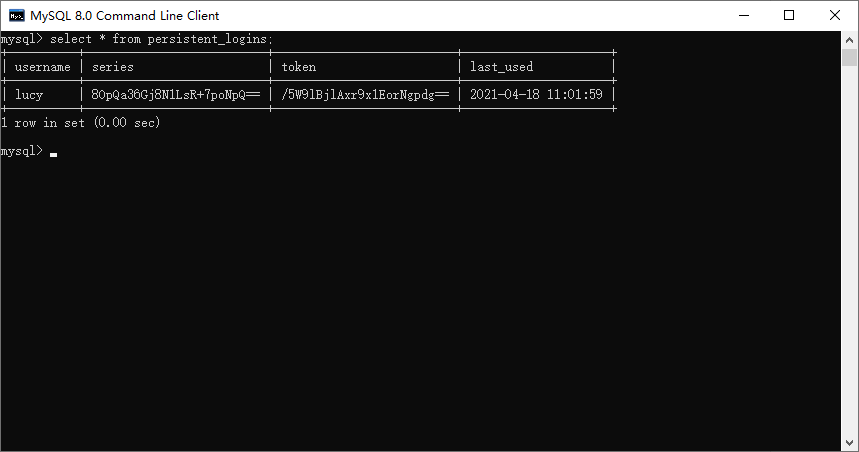
CREATE TABLE persistent_logins (
    username varchar(64) NOT NULL,
    series varchar(64) PRIMARY KEY,
    token varchar(64) NOT NULL,
    last_used timestamp NOT NULL
)
/** Default SQL for creating the database table to store the tokens */
public static final String CREATE_TABLE_SQL = "create table persistent_logins (username varchar(64) not null, series varchar(64) primary key, "
      + "token varchar(64) not null, last_used timestamp not null)";
3.7.2 添加數(shù)據(jù)庫的配置文件
spring:
  datasource:
    driver-class-name: com.mysql.jdbc.Driver
    url: jdbc:mysql://192.168.200.128:3306/test
    username: root
    password: root
3.7.3 編寫配置類
package com.atgugui.securitydemo1.config;

import org.springframework.beans.factory.annotation.Autowired;
import org.springframework.context.annotation.Bean;
import org.springframework.context.annotation.Configuration;
import org.springframework.security.web.authentication.rememberme.JdbcTokenRepositoryImpl;
import org.springframework.security.web.authentication.rememberme.PersistentTokenRepository;

import javax.sql.DataSource;

@Configuration
public class BrowserSecurityConfig {
    @Autowired
    private DataSource dataSource;

    @Bean
    public PersistentTokenRepository persistentTokenRepository() {
        JdbcTokenRepositoryImpl jdbcTokenRepository = new JdbcTokenRepositoryImpl();
        // 賦值數(shù)據(jù)源
        jdbcTokenRepository.setDataSource(dataSource);
        // 自動創(chuàng)建表,第一次執(zhí)行會創(chuàng)建,以后要執(zhí)行就要刪除掉!
        // jdbcTokenRepository.setCreateTableOnStartup(true);
        return jdbcTokenRepository;
    }
}
3.7.4 修改安全配置類
@Autowired
private UserDetailsService userDetailsService;
@Autowired
private PersistentTokenRepository tokenRepository;

@Override
protected void configure(HttpSecurity http) throws Exception {
    // 退出登錄
    http.logout().logoutUrl("/logout").logoutSuccessUrl("/index").permitAll();

    // 無權限
    http.exceptionHandling().accessDeniedPage("/unauth.html");

    http.formLogin()    // 自定義編寫的登錄頁面
            .loginPage("/login.html")   // 登錄頁面設置
            .loginProcessingUrl("/user/login")  // 登錄訪問路徑
            .defaultSuccessUrl("/success.html").permitAll()    // 登錄成功之后,跳轉(zhuǎn)路徑
            .and().authorizeRequests()
                .antMatchers("/", "/test/hello", "user/login").permitAll()  // 直接訪問,不需要認證
                // .antMatchers("/test/index").hasAnyAuthority("admins,manager")  // 權限
                .antMatchers("/test/index").hasRole("sale1")
                .anyRequest().authenticated()
                .and().rememberMe().tokenRepository(tokenRepository)
                    .tokenValiditySeconds(60).userDetailsService(userDetailsService)
            .and().csrf().disable();    // 關閉csrf防護
}
3.7.5 頁面添加記住我復選框
<!DOCTYPE html>
<html lang="en">
<head>
    <meta charset="UTF-8">
    <title>Title</title>
</head>
<body>
<form action="/user/login" method="post">
    用戶名:<input type="text" name="username"><br>
    密碼:<input type="password" name="password"><br>
    記住我:<input type="checkbox" name="remember-me" title="記住密碼"><br>
    <input type="submit" value="login">
</form>
</body>
</html>
此處:name 屬性值必須位remember-me.不能改為其他值
3.7.6 進行登錄測試
登錄成功之后,關閉瀏覽器再次訪問發(fā)現(xiàn)依然可以使用!
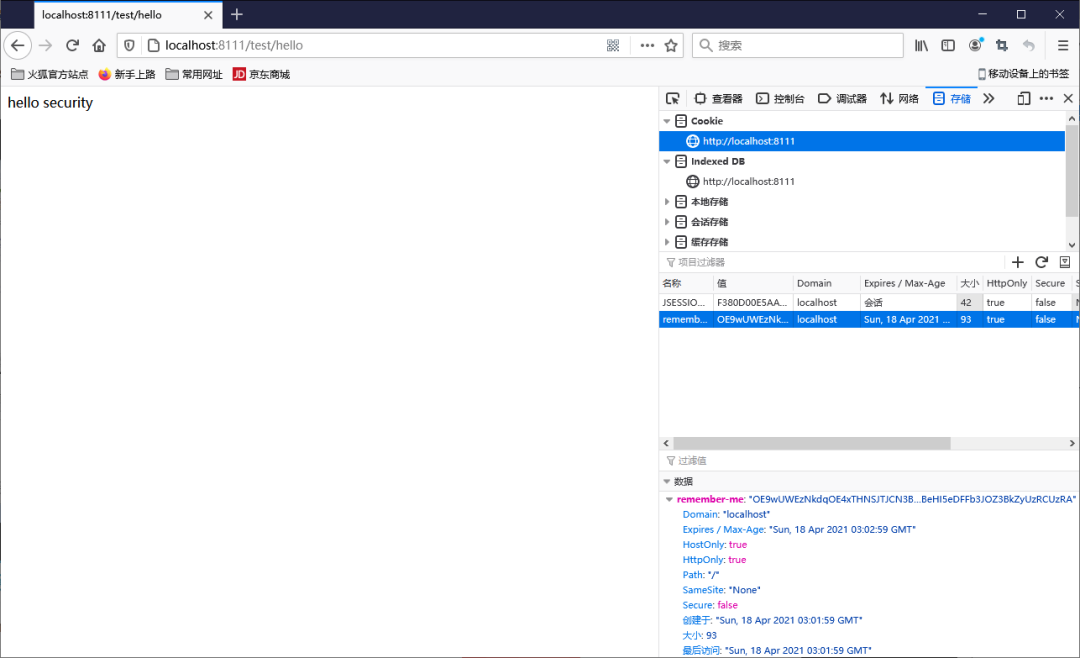
Cookie
數(shù)據(jù)庫
3.7.7 設置有效期
默認2周時間。但是可以通過設置狀態(tài)有效時間,即使項目重新啟動下次也可以正常登錄。
3.7.8 原理
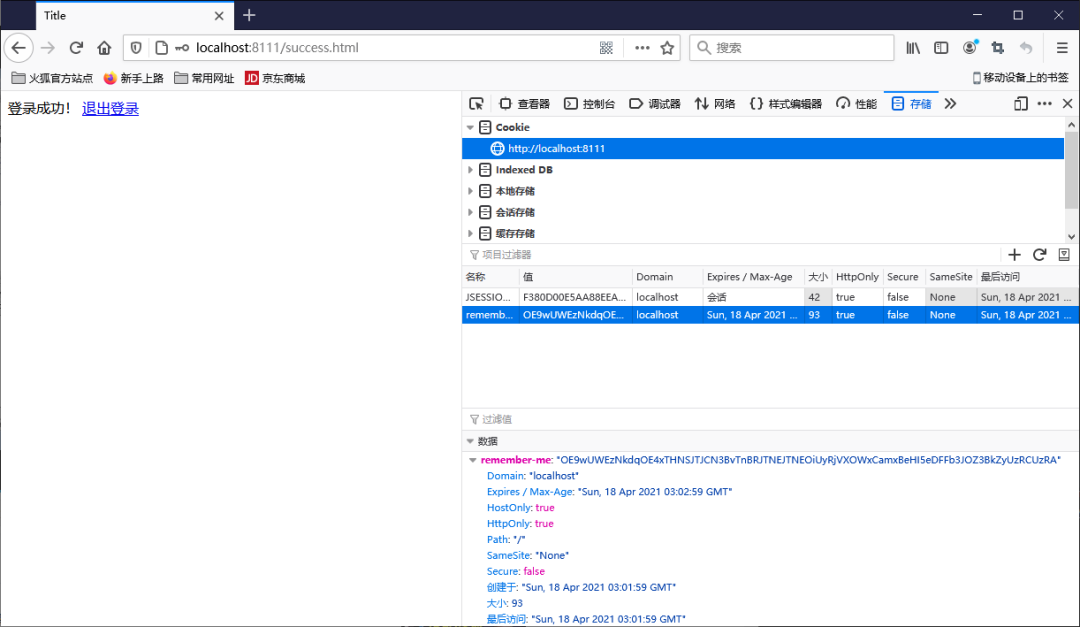
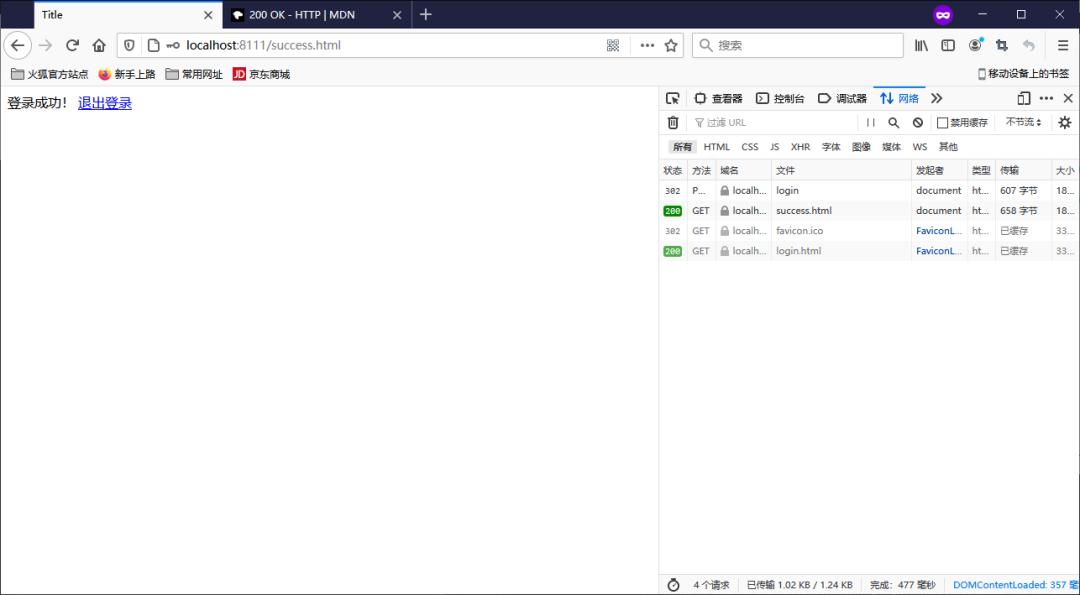
3.8 用戶注銷
3.8.1 在登錄頁面添加一個退出鏈接
<!DOCTYPE html>
<html lang="en">
<head>
    <meta charset="UTF-8">
    <title>Title</title>
</head>
<body>
登錄成功!
<a href="/logout">退出登錄</a>
</body>
</html>
3.8.2 在配置類中添加退出映射地址
@Override
protected void configure(HttpSecurity http) throws Exception {
    // 退出登錄
    http.logout().logoutUrl("/logout").logoutSuccessUrl("/index").permitAll();

    // 無權限
    http.exceptionHandling().accessDeniedPage("/unauth.html");

    http.formLogin()    // 自定義編寫的登錄頁面
            .loginPage("/login.html")   // 登錄頁面設置
            .loginProcessingUrl("/user/login")  // 登錄訪問路徑
            .defaultSuccessUrl("/success.html").permitAll()    // 登錄成功之后,跳轉(zhuǎn)路徑
            .and().authorizeRequests()
                .antMatchers("/", "/test/hello", "user/login").permitAll()  // 直接訪問,不需要認證
                // .antMatchers("/test/index").hasAnyAuthority("admins,manager")  // 權限
                .antMatchers("/test/index").hasRole("sale1")
                .anyRequest().authenticated()
            .and().csrf().disable();    // 關閉csrf防護
}
3.8.3 測試
退出之后,是無法訪問需要登錄時才能訪問的控制器!
3.9 CSRF
3.9.1 CSRF 理解
跨站請求偽造(英語:Cross-site request forgery),也被稱為one-click attack或者session riding,通常縮寫為CSRF或者XSRF,是一種挾制用戶在當前已登錄的Web應用程序上執(zhí)行非本意的操作的攻擊方法。跟跨網(wǎng)站腳本(XSS)相比,XSS利用的是用戶對指定網(wǎng)站的信任,CSRF 利用的是網(wǎng)站對用戶網(wǎng)頁瀏覽器的信任。
跨站請求攻擊,簡單地說,是攻擊者通過一些技術手段欺騙用戶的瀏覽器去訪問一個自己曾經(jīng)認證過的網(wǎng)站并運行一些操作(如發(fā)郵件,發(fā)消息,甚至財產(chǎn)操作如轉(zhuǎn)賬和購買商品)。由于瀏覽器曾經(jīng)認證過,所以被訪問的網(wǎng)站會認為是真正的用戶操作而去運行。這利用了web中用戶身份驗證的一個漏洞:簡單的身份驗證只能保證請求發(fā)自某個用戶的瀏覽器,卻不能保證請求本身是用戶自愿發(fā)出的。
從Spring Security 4.0開始,默認情況下會啟用CSRF保護,以防止CSRF攻擊應用程序,Spring Security CSRF會針對PATCH,POST,PUT和DELETE方法進行防護。
3.9.2 Spring Security 實現(xiàn)CSRF的原理
生成csrfToken 保存到HttpSession 或者Cookie 中。
package org.springframework.security.web.csrf;

import java.io.Serializable;

/**
 * Provides the information about an expected CSRF token.
 *
 * @see DefaultCsrfToken
 *
 * @author Rob Winch
 * @since 3.2
 *
 */
public interface CsrfToken extends Serializable {

   /**
    * Gets the HTTP header that the CSRF is populated on the response and can be placed
    * on requests instead of the parameter. Cannot be null.
    *
    * @return the HTTP header that the CSRF is populated on the response and can be
    * placed on requests instead of the parameter
    */
   String getHeaderName();

   /**
    * Gets the HTTP parameter name that should contain the token. Cannot be null.
    * @return the HTTP parameter name that should contain the token.
    */
   String getParameterName();

   /**
    * Gets the token value. Cannot be null.
    * @return the token value
    */
   String getToken();
SaveOnAccessCsrfToken類有個接口CsrfTokenRepository
private static final class SaveOnAccessCsrfToken implements CsrfToken {
   private transient CsrfTokenRepository tokenRepository;
   private transient HttpServletRequest request;
   private transient HttpServletResponse response;
當前接口實現(xiàn)類:HttpSessionCsrfTokenRepository,CookieCsrfTokenRepository
/**
 * A {@link CsrfTokenRepository} that persists the CSRF token in a cookie named
 * "XSRF-TOKEN" and reads from the header "X-XSRF-TOKEN" following the conventions of
 * AngularJS. When using with AngularJS be sure to use {@link #withHttpOnlyFalse()}.
 *
 * @author Rob Winch
 * @since 4.1
 */
public final class CookieCsrfTokenRepository implements CsrfTokenRepository {
   static final String DEFAULT_CSRF_COOKIE_NAME = "XSRF-TOKEN";

   static final String DEFAULT_CSRF_PARAMETER_NAME = "_csrf";
@Override
public CsrfToken generateToken(HttpServletRequest request) {
   return new DefaultCsrfToken(this.headerName, this.parameterName,
         createNewToken());
}
private String createNewToken() {
   return UUID.randomUUID().toString();
}
請求到來時,從請求中提取csrfToken,和保存的csrfToken 做比較,進而判斷當前請求是否合法。主要通過CsrfFilter 過濾器來完成。
@Override
protected void doFilterInternal(HttpServletRequest request, HttpServletResponse response, FilterChain filterChain)
      throws ServletException, IOException {
   request.setAttribute(HttpServletResponse.class.getName(), response);
   CsrfToken csrfToken = this.tokenRepository.loadToken(request);
   boolean missingToken = (csrfToken == null);
   if (missingToken) {
      csrfToken = this.tokenRepository.generateToken(request);
      this.tokenRepository.saveToken(csrfToken, request, response);
   }
   request.setAttribute(CsrfToken.class.getName(), csrfToken);
   request.setAttribute(csrfToken.getParameterName(), csrfToken);
   if (!this.requireCsrfProtectionMatcher.matches(request)) {
      if (this.logger.isTraceEnabled()) {
         this.logger.trace("Did not protect against CSRF since request did not match "
               + this.requireCsrfProtectionMatcher);
      }
      filterChain.doFilter(request, response);
      return;
   }
   String actualToken = request.getHeader(csrfToken.getHeaderName());
   if (actualToken == null) {
      actualToken = request.getParameter(csrfToken.getParameterName());
   }
   if (!equalsConstantTime(csrfToken.getToken(), actualToken)) {
      this.logger.debug(
            LogMessage.of(() -> "Invalid CSRF token found for " + UrlUtils.buildFullRequestUrl(request)));
      AccessDeniedException exception = (!missingToken) ? new InvalidCsrfTokenException(csrfToken, actualToken)
            : new MissingCsrfTokenException(actualToken);
      this.accessDeniedHandler.handle(request, response, exception);
      return;
   }
   filterChain.doFilter(request, response);
}
private RequestMatcher requireCsrfProtectionMatcher = DEFAULT_CSRF_MATCHER;
/**
 * The default {@link RequestMatcher} that indicates if CSRF protection is required or
 * not. The default is to ignore GET, HEAD, TRACE, OPTIONS and process all other
 * requests.
 */
public static final RequestMatcher DEFAULT_CSRF_MATCHER = new DefaultRequiresCsrfMatcher();
private static final class DefaultRequiresCsrfMatcher implements RequestMatcher {

   private final HashSet<String> allowedMethods = new HashSet<>(Arrays.asList("GET", "HEAD", "TRACE", "OPTIONS"));

   @Override
   public boolean matches(HttpServletRequest request) {
      return !this.allowedMethods.contains(request.getMethod());
   }

   @Override
   public String toString() {
      return "CsrfNotRequired " + this.allowedMethods;
   }

}
3.9.3 案例
在登錄頁面添加一個隱藏域
<input type="hidden" th:if="${_csrf}!=null" th:value="${_csrf.token}" name="_csrf"/>
關閉安全配置的類中的csrf
// http.csrf().disable();
鋒哥最新SpringCloud分布式電商秒殺課程發(fā)布
??????
??長按上方微信二維碼 2 秒
感謝點贊支持下哈