
vscode插件原理淺析與實戰(zhàn)
大廠技術(shù)??堅持周更??精選好文
背景
作為一位前端同學(xué)肯定對vscode不陌生,相信每位同學(xué)電腦上也都有五花八門的個性化配置,那么我們是借助什么東西做到的呢?那就是它豐富的插件生態(tài)。本次將講述插件基本原理并從一個簡單的case了解如何制作一個的vscode插件
是什么實現(xiàn)了vscode
Electron
vscode底層通過electron開發(fā)實現(xiàn),electron的核心構(gòu)成分別是:chromium、nodejs、native-api
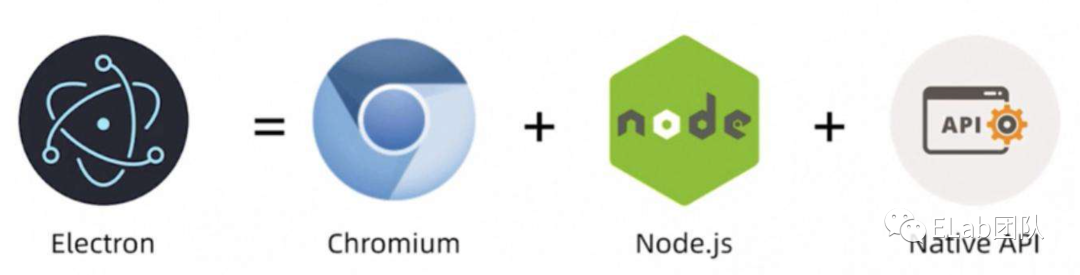
Chromium( ui 視圖) :通過web技術(shù)棧編寫實現(xiàn)ui界面,其與chrome的區(qū)別是開放開源、無需安裝可直接使用(可以簡單理解chromium是beta體驗版chrome,新特性會優(yōu)先在chromium中體驗并在穩(wěn)定后更新至chrome中)。
Nodejs (操作桌面文件系統(tǒng)) :通過node-gyp編譯,主要用來操作文件系統(tǒng)和調(diào)用本地網(wǎng)絡(luò)。
Native-API(操作系統(tǒng)緯度 api ) :使用Nodejs-C++ Addon調(diào)用操作系統(tǒng)API(Nodejs-C++ Addon插件是一種動態(tài)鏈接庫,采用C/C++語言編寫,可以通過require()將插件加載進NodeJS中進行使用),可以理解是對Nodejs接口的能力拓展。
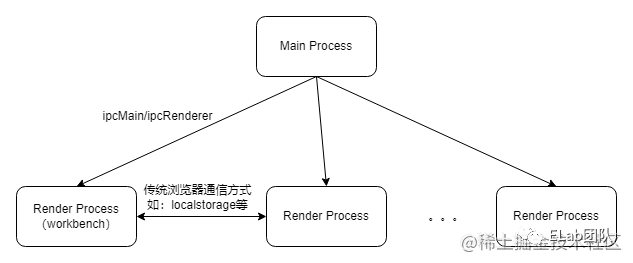
Electron 多進程:
主進程(main):每一個Electron應(yīng)用只會啟動一個主進程。
渲染進程(render):主進程會通過Chromium的api創(chuàng)建任意多個web頁面,每一個工作區(qū)(workbench)對應(yīng)一個進程,同時是BrowserWindow實例,由于chromeium(chrome)也是多進程的,所以每個頁面都單獨運行在各自的渲染進程中。
例:
//?主進程
const?{?ipcMain?}?=?require('electron');

//?主進程響應(yīng)事件
ipcMain.on('main_msg',?(event,?arg)?=>?{
??console.log(arg);?//?ping
??event.reply('renderer-msg-reply',?'pong');
})
//?渲染進程(子進程)
const?{?ipcRenderer?}?=?require('electron');

//?渲染進程響應(yīng)事件
ipcRenderer.on('renderer-msg-reply',?(event,?arg)?=>?{
??console.log(arg);?//?pong
})

//?觸發(fā)主進程響應(yīng)事件
ipcRenderer.send('main_msg',?'ping');
對于 vscode 還會有一些其他的進程,比如:
插件進程(Extension):fork渲染進程,每個插件都運行在一個NodeJS宿主環(huán)境中,即插件間共享進程
Debug進程:一個特殊的插件進程。
Search進程:搜索是密集型任務(wù),單獨占用一個進程。
。。。
通俗意義上, electron 就是給你搞了一個Chrome瀏覽器的殼子,只是比傳統(tǒng)網(wǎng)頁多了一個訪問桌面文件的功能。
vscode插件加載基本原理
https://github.com/microsoft/vscode/tree/main
插件的結(jié)構(gòu)
├──?extensions----------------------------------vscode內(nèi)置插件
├──?src
│???├──?main.js--------------------------------入口文件
│???├──?bootstrap-fork.js----------------------衍生子進程(渲染進程)
│???├──?vs
│???│???└──?workbench-------------------------工作臺
│???│???├──?base
│???│???│???├──?browser----------------------瀏覽器api,可操作dom
│???│???│???├──?common-----------------------公共js代碼
│???│???│???├──?node-------------------------nodejs?api
│???│???├──?code
│???│???│???├──?electron-browser-------------electron渲染進程
│???│???│???├──?electron-main----------------electron主進程
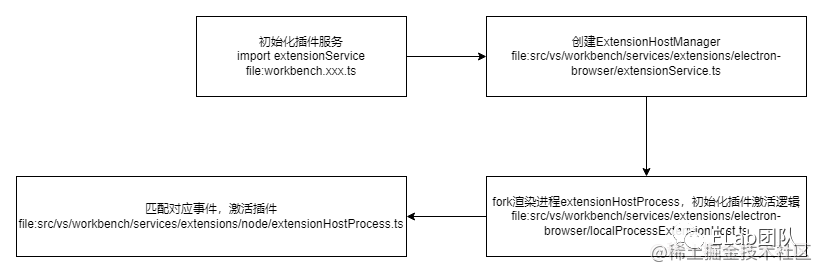
插件加載過程
初始化插件服務(wù)
在插件初始化構(gòu)造函數(shù)中通過_initialize初始化插件服務(wù)。
//?src/vs/workbench/services/extensions/electron-browser/extensionService.ts
//?通過監(jiān)聽生命周期函數(shù),創(chuàng)建ExtensionHostManager
export?class?ExtensionService?extends?AbstractExtensionService?implements?IExtensionService?{
????constructor()?{
????????this._lifecycleService.when(LifecyclePhase.Ready).then(()?=>?{
????????????//?reschedule?to?ensure?this?runs?after?restoring?viewlets,?panels,?and?editors
????????????runWhenIdle(()?=>?{
????????????????this?._initialize()?;?//?初始化插件服務(wù)
????????????},?50?/*max?delay*/);
????????});
????}
}

//?src/vs/workbench/services/extensions/common/abstractExtensionService.ts
//?啟動初始化插件服務(wù)方法
protected?async?_initialize():?Promise?{
????perf.mark('code/willLoadExtensions');
????this?._startExtensionHosts(?true?,?[])?;
????//?...
}

private?_startExtensionHosts(isInitialStart:?boolean,?initialActivationEvents:?string[]):?void?{
????//?創(chuàng)建插件進程,分別為LocalProcessExtensionHost(本地插件,如個人插件)、RemoteExtensionHost(遠程插件,如WSL?Remote)、WebWorkerExtensionHost(web?worker進程)
????const?extensionHosts?=?this._createExtensionHosts(isInitialStart);
????extensionHosts.forEach((extensionHost)?=>?{
????????//?創(chuàng)建ExtensionHostManager
????????const?processManager:?IExtensionHostManager?=?createExtensionHostManager(this._instantiationService,?extensionHost,?isInitialStart,?initialActivationEvents,?this._acquireInternalAPI());
????????processManager.onDidExit(([code,?signal])?=>?this._onExtensionHostCrashOrExit(processManager,?code,?signal));
????????processManager.onDidChangeResponsiveState((responsiveState)?=>?{?this._onDidChangeResponsiveChange.fire({?isResponsive:?responsiveState?===?ResponsiveState.Responsive?});?});
????????this._extensionHostManagers.push(processManager);
????});
}
fork渲染進程
fork渲染進程,并加載 extensionHostProcess。由于vscode考慮插件可能會影響啟動性能和IDE自身的穩(wěn)定性,所以通過進程隔離來解決這個問題,插件進程fork渲染進程,保證每個插件都運行在一個nodejs宿主環(huán)境中,不影響IDE及其啟動時間。
//?src/vs/workbench/services/extensions/common/extensionHostManager.ts
//?啟動fork渲染進程
class?ExtensionHostManager?extends?Disposable?{
??constructor()?{
??????this._proxy?=?this._extensionHost.start()?!.then();
??}
}
//?src/vs/workbench/services/extensions/electron-browser/localProcessExtensionHost.ts
class?LocalProcessExtensionHost?implements?IExtensionHost?{
??public?start():?Promise?|?null?{
????//?...
????const?opts?=?{
??????env:?objects.mixin(objects.deepClone(process.env),?{
????????//?加載插件進程,指明插件進程入口
????????AMD_ENTRYPOINT:?'vs/workbench/services/extensions/node/extensionHostProcess',
??????}),
????}

????//?衍生子進程(渲染進程)
????this._extensionHostProcess?=?fork(getPathFromAmdModule(require,?'bootstrap-fork'),?['--type=extensionHost'],?opts);
??}
}
初始化插件激活邏輯
//?src/vs/workbench/services/extensions/node/extensionHostProcess.ts
import?{?startExtensionHostProcess?}?from?"vs/workbench/services/extensions/node/extensionHostProcessSetup";
startExtensionHostProcess().catch((err)?=>?console.log(err));

//?src/vs/workbench/services/extensions/node/extensionHostProcessSetup.ts
export?async?function?startExtensionHostProcess():?Promise?{
????const?extensionHostMain?=?new?ExtensionHostMain(
????????renderer.protocol,
????????initData,
????????hostUtils,
????????uriTransformer
????);
}

//?src/vs/workbench/services/extensions/common/extensionHostMain.ts
export?class?ExtensionHostMain?{
??constructor()?{
????//?必須在創(chuàng)建extensionService之后再調(diào)用initialize,因為initialize本身會依賴extensionService的實例
????this._extensionService?=?instaService.invokeFunction(accessor?=>?accessor.get(IExtHostExtensionService));
????this._extensionService.initialize();
??}
}
插件激活
//?src/vs/workbench/api/node/extHost.services.ts
import?{?ExtHostExtensionService?}?from?'vs/workbench/api/node/extHostExtensionService';

//?注冊插件服務(wù)
registerSingleton(IExtHostExtensionService,?ExtHostExtensionService);
繼承AbstractExtHostExtensionService
//?src/vs/workbench/api/node/extHostExtensionService.ts
export?class?ExtHostExtensionService?extends?AbstractExtHostExtensionService?{
????//?...
}
//?src/vs/workbench/api/common/extHostExtensionService.ts
abstract?class?AbstractExtHostExtensionService?extends?Disposable?{
??constructor()?{
????this._activator?=?this._register(new?ExtensionsActivator());
??}

??//?根據(jù)activationEvent事件名激活插件,如onCommand
??private?_activateByEvent(activationEvent:?string,?startup:?boolean):?Promise?{
????return?this._activator.activateByEvent(activationEvent,?startup);
??}
}
加載流程
簡單實戰(zhàn)
背景:實現(xiàn)選擇指定目錄右鍵自動生成lynx頁面基本目錄結(jié)構(gòu)的插件。
目標拆解:
選擇自定義目錄,添加右鍵點擊菜單
輸入lynx頁面名稱
按照模版生成對應(yīng)文件
環(huán)境準備
nodejs
vscode
安裝Yeoman[1]和VS Code Extension Generator[2]
npm?install?-g?yo?generator-code
初始化項目工程
yo?code
具體實現(xiàn)
//?package.json
{
?"name":?"lynxlowcode",
?"displayName":?"LynxLowcode",
?"description":?"",
?"version":?"0.0.2",
?"engines":?{
??"vscode":?"^1.62.0"
?},
?"categories":?[
??"Other"
?],
?"activationEvents":?[
??"onCommand:lynxlowcode.newLynxComponent"
?],
?"main":?"./out/extension.js",
?"contributes":?{
??"commands":?[
???{
????"command":?"lynxlowcode.newLynxComponent",
????"title":?"新建Lynx組件"
???}
??],
??"menus":?{
???"explorer/context":?[
????{
?????"command":?"lynxlowcode.newLynxComponent",
?????"group":?"z_commands",
?????"when":?"explorerResourceIsFolder"
????}
???]
??}
?},
?"scripts":?{
??"vscode:prepublish":?"npm?run?compile",
??"compile":?"tsc?-p?./",
??"watch":?"tsc?-watch?-p?./",
??"pretest":?"npm?run?compile?&&?npm?run?lint",
??"lint":?"eslint?src?--ext?ts",
??"test":?"node?./out/test/runTest.js"
?},
?"devDependencies":?{
??"@types/fs-extra":?"^9.0.13",
??"@types/glob":?"^7.1.4",
??"@types/mocha":?"^9.0.0",
??"@types/node":?"14.x",
??"@types/vscode":?"^1.62.0",
??"@typescript-eslint/eslint-plugin":?"^4.31.1",
??"@typescript-eslint/parser":?"^4.31.1",
??"@vscode/test-electron":?"^1.6.2",
??"eslint":?"^7.32.0",
??"fs-extra":?"^10.0.1",
??"glob":?"^7.1.7",
??"mocha":?"^9.1.1",
??"typescript":?"^4.4.3"
?},
?"dependencies":?{
??"import":?"^0.0.6",
??"path":?"^0.12.7"
?}
}
main:指定了插件的入口函數(shù)。
activationEvents:指定觸發(fā)事件,當指定事件發(fā)生時才觸發(fā)插件執(zhí)行。需額外關(guān)注*這個特殊的插件類型,因為他在初始化完成后就會觸發(fā)插件執(zhí)行,并不需要任何自定義觸發(fā)事件。
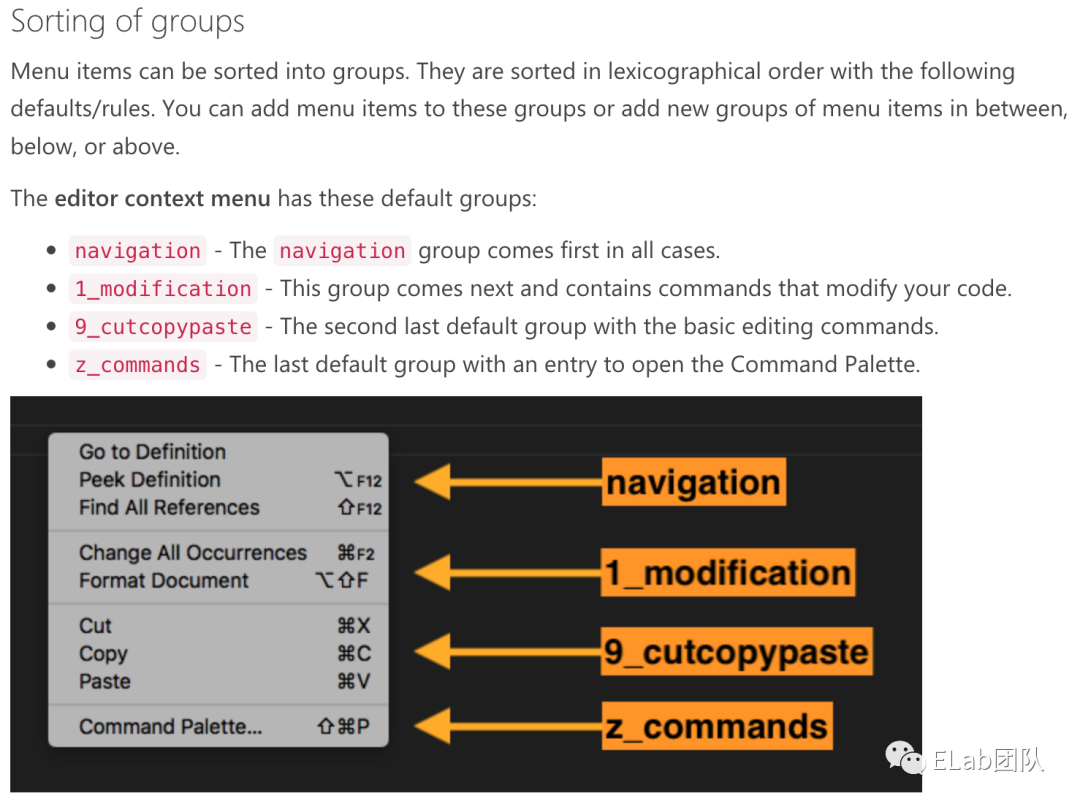
contributes:描述插件的拓展點,用于定義插件要擴展 vscode 哪部分功能,如commands命令面板、menus資源管理面板等。
聲明指令
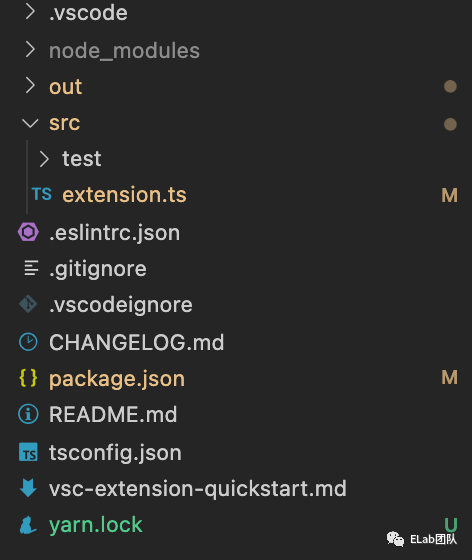
初始化插件項目成功后會看到上圖的目錄結(jié)構(gòu),其中我們需要重點關(guān)注src目錄和package.json文件,其中src目錄下的extension.ts文件為入口文件,包含activate和deactivate分別作為插件啟動和插件卸載時的生命周期函數(shù),可以將邏輯直接寫在兩個函數(shù)內(nèi)也可抽象后在其中調(diào)用。
同時我們希望插件在適當?shù)臅r機啟動activate或關(guān)閉deactivate,vscode也給我們提供了多種onXXX的事件作為多種執(zhí)行時機的入口方法。那么我們該如何使用這些事件呢?
事件列表
//?當打開特定語言時,插件被激活
onLanguage
//?當調(diào)用命令時,插件被激活
onCommand
//?當調(diào)試時,插件被激活
onDebug
//?打開文件夾且該文件夾包含設(shè)置的文件名模式時,插件被激活
workspaceContains
//?每當讀取特定文件夾?or?文件時,插件被激活
onFileSystem
//?在側(cè)邊欄展開指定id的視圖時,插件被激活
onView
//?在基于vscode或?vscode-insiders協(xié)議的url打開時(類似schema),插件被激活
onUri
//?在打開自定義設(shè)置viewType的?webview?時,插件被激活
onWebviewPanel
//?在打開自定義設(shè)置viewType的自定義編輯器,插件被激活
onCustomEditor
//?每當擴展請求具有authentication.getSession()匹配的providerId時,插件被激活
onAuthenticationRequest
//?在vscode啟動一段時間后,插件被激活,類似?*?但不會影響vscode啟動速度
onStartupFinished
//?在所有插件都被激活后,插件被激活,會影響vscode啟動速度,不推薦使用
*
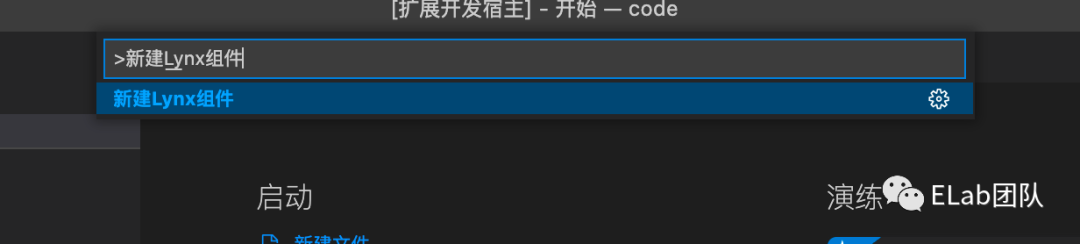
如何使用這些事件呢?我們以onCommand為例。首先需要在package.json文件中注冊activationEvents和commands。
{
????"activationEvents":?[
??????"onCommand:lynxlowcode.newLynxComponent"?//?注冊命令事件
?????],
????"contributes":?{
??????//?標識命令增加了哪些功能
??????"commands":?[
???????{
????????"command":?"lynxlowcode.newLynxComponent",
????????"title":?"新建Lynx組件"?//?可根據(jù)title使用command?+?shift?+?p進行搜索
???????}
??????]
?????}
?//?...
}
然后在extension.ts文件的activate方法中編寫自定義邏輯。
//?extension.ts
import?*?as?vscode?from?'vscode';

//?this?method?is?called?when?your?extension?is?activated
export?function?activate(context:?vscode.ExtensionContext)?{
??//?為命令添加事件
??let?init?=?vscode.commands.registerCommand('lynxlowcode.newLynxComponent',?()?=>?{
????newLynxComponent();?//?此處是我們的自定義邏輯
??});
??//?事件回調(diào)棧
??context.subscriptions.push(init);
}

//?this?method?is?called?when?your?extension?is?deactivated
export?function?deactivate()?{}
添加目錄右鍵點擊事件
//?package.json
{
?//?...
?"menus":?{
???"explorer/context":?[
????{
?????"command":?"lynxlowcode.newLynxComponent",
?????"group":?"z_commands",?//?位于命令容器面板
?????"when":?"explorerResourceIsFolder"?//?資源管理器為目錄
????}
???]
??}
}
喚起組件名稱輸入面板
//?extension.ts
import?*?as?vscode?from?'vscode';
import?{?openInputBox?}?from?'./openInputBox';

//?this?method?is?called?when?your?extension?is?activated
export?function?activate(context:?vscode.ExtensionContext)?{
??let?newLynxComponent?=?vscode.commands.registerCommand('lynxlowcode.newLynxComponent',?(file:?vscode.Uri)?=>?{
????/**?喚起輸入框?*/
????openInputBox(file);
??});
??context.subscriptions.push(newLynxComponent);
}

//?this?method?is?called?when?your?extension?is?deactivated
export?function?deactivate()?{}
//?openInputBox.ts
import?{?window,?InputBoxOptions,?InputBox,?Uri?}?from?'vscode';
import?{?pathExists?}?from?'fs-extra';
import?{?join?}?from?'path';
import?{?createTemplate?}?from?'./createTemplate';

/**
?*?喚起輸入組件名稱面板
?*/
export?const?openInputBox?=?(file:?Uri):?void?=>?{
??/**?新建輸入框?qū)ο?*/
??const?inputBox?=?window.createInputBox();

??/**?配置placeholder?*/
??inputBox.placeholder?=?'請輸入你的組件名稱,按Enter確認';

??/**?獲取輸入框的值?*/
??const?inputValue?=?inputBox.value;

??/**?input值更新回調(diào)?*/
??inputBox.onDidChangeValue(async?(value:?string)?=>?{
????/**?判斷輸入的名稱是否為空?*/
????if?(value.length???????return?'組件名稱不能為空!!!';
????}

????/**?獲取最終組件完整路徑?*/
????const?location?=?join(file.fsPath,?value);

????/**?判斷該完整路徑是否已經(jīng)存在?*/
????if?(await?pathExists(location))?{
??????return?`該?${location}路徑已經(jīng)存在,請換一個名稱或路徑!!!`;
????}
??}),

??/**?input框隱藏回調(diào)?*/
??inputBox.onDidHide(()?=>?{
????/**?重置輸入框值?*/
????inputBox.value?=?'';

????/**?重置為可用?*/
????inputBox.enabled?=?true;

????/**?重置為空閑?*/
????inputBox.busy?=?false;
??});

??/**?確認回調(diào)?*/
??inputBox.onDidAccept(async?()?=>?{
????/**?禁用輸入框,防止用戶再次輸入?*/
????inputBox.enabled?=?false;

????/**?將輸入框置為繁忙,等待最終創(chuàng)建結(jié)果?*/
????inputBox.busy?=?true;

????const?result?=?createTemplate();

????if(result)?{
??????inputBox.hide();
??????window.showInformationMessage('創(chuàng)建成功成功,請查看!!!');
????}?else?{
??????window.showInformationMessage('創(chuàng)建失敗,請重試!!!');
????}
????inputBox.enabled?=?true;
????inputBox.busy?=?false;
??});

??/**?展示input輸入框?*/
??inputBox.show();
};
根據(jù)輸入面板創(chuàng)建模版文件
import?fs?from?'fs';
/**
?*?創(chuàng)建模版文件
?*/
export?const?createTemplate?=?(location:?string,?name:?string)?=>?{
??/**?同步創(chuàng)建文件夾?*/
??const?mkdirResult?=?fs.mkdirSync(location,?{
????recursive:?true
??});

??/**?創(chuàng)建文件夾失敗?*/
??if?(!mkdirResult)?{
????return?false;
??}
??try?{
????/**?新建tsx文件并寫入內(nèi)容?*/
????fs.writeFileSync(`${location}/index.tsx`,?`
import?{?Component?}?from?'@byted-lynx/react-runtime';
import?'./index.scss';

interface?${name}PropsType?{}

interface?${name}StateType?{}

export?default?class?${name}?extends?Component<${name}PropsType,?${name}StateType>?{
??constructor(props:?${name}PropsType)?{
????super(props);
????this.state?=?{};
??}
??render():?JSX.IntrinsicElements?{
????return?(
??????
????????${name}組件
??????
????);
??}
}
??`);
??/**?新建scss文件?*/
??fs.writeFileSync(`${location}/index.scss`,?'');
??return?true;
??}?catch?(e)?{
????console.log(e);
????return?false;
??}
};
可優(yōu)化點
增加模版類型 通過下載模版替代寫入字符串文本
?? 謝謝支持
以上便是本次分享的全部內(nèi)容,希望對你有所幫助^_^
喜歡的話別忘了?分享、點贊、收藏?三連哦~。
歡迎關(guān)注公眾號 前端Sharing?收獲大廠一手好文章~
參考資料
Yeoman: https://yeoman.io/
[2]VS Code Extension Generator: https://www.npmjs.com/package/generator-code