淺析eslint原理
大廠技術 堅持周更 精選好文
在前端開發(fā)過程中,eslint規(guī)范已經(jīng)成為必不可少的一環(huán),我們需要eslint來保證代碼規(guī)范,相對統(tǒng)一同學們的代碼風格,不然就會出現(xiàn)所有同學都隨意引入自己偏好的風格或者規(guī)范,讓所有人一起分擔引入規(guī)范的代價。
同時,有些lint規(guī)則可以避免bug的產(chǎn)生,在提高代碼可讀性的前提下,減少問題數(shù)量,將問題更多的暴露在開發(fā)階段。
一、eslint的規(guī)則
說起eslint,第一想到的就是eslints里面的每條規(guī)則,我們通過以下簡單的配置就可以來控制規(guī)則的開啟及關閉。其中:0 1 2 分別對應 'off' 'warn' 'error';如果是個數(shù)組,第二個參數(shù)可以自定義配置。
{
  "rules": {
    "arrow-body-style" : 0, // 0 1 2
    "quotes" : [ "error" , "single" ]
  }
}
其中rules的每一個key就是對應的一條規(guī)則,透過使用去思考,eslint如何去實現(xiàn)的這條規(guī)則呢???
eslint的核心rules
eslint 的核心就是 rules,理解一個 rule 的結構對于理解 eslint 的原理和創(chuàng)建自定義規(guī)則非常重要。
我們看一下自定義eslint 規(guī)則[1] 再結合目前已有的某條規(guī)則來分析
看一下最簡單的一條規(guī)則 no-with
module.exports = {
meta: { // 包含規(guī)則的元數(shù)據(jù)
// 指示規(guī)則的類型,值為 "problem"、"suggestion" 或 "layout"
type: "suggestion",
docs: { // 對 ESLint 核心規(guī)則來說是必需的
description: "disallow `with` statements", // 提供規(guī)則的簡短描述在規(guī)則首頁展示
// category (string) 指定規(guī)則在規(guī)則首頁處于的分類
recommended: true, // 配置文件中的 "extends": "eslint:recommended"屬性是否啟用該規(guī)則
url: "https://eslint.org/docs/rules/no-with" // 指定可以訪問完整文檔的 url
},
// fixable 如果沒有 fixable 屬性,即使規(guī)則實現(xiàn)了 fix 功能,ESLint 也不會進行修復。如果規(guī)則不是可修復的,就省略 fixable 屬性。
schema: [], // 指定該選項 這樣的 ESLint 可以避免無效的規(guī)則配置
// deprecated (boolean) 表明規(guī)則是已被棄用。如果規(guī)則尚未被棄用,你可以省略 deprecated 屬性。
messages: {
unexpectedWith: "Unexpected use of 'with' statement."
}
},
// create (function) 返回一個對象,其中包含了 ESLint 在遍歷 js 代碼的抽象語法樹 AST (ESTree 定義的 AST) 時,用來訪問節(jié)點的方法。
create(context) {
// 如果一個 key 是個節(jié)點類型或 selector,在 向下 遍歷樹時,ESLint 調用 visitor 函數(shù)
// 如果一個 key 是個節(jié)點類型或 selector,并帶有 :exit,在 向上 遍歷樹時,ESLint 調用 visitor 函數(shù)
// 如果一個 key 是個事件名字,ESLint 為代碼路徑分析調用 handler 函數(shù)
// selector 類型可以到 estree 查找
return {
// 入?yún)楣?jié)點node
WithStatement(node) {
context.report({ node, messageId: "unexpectedWith" });
}
};
}
};
有兩部分組成:meta create;
meta:(對象)包含規(guī)則的元數(shù)據(jù),包括 規(guī)則的類型,文檔,是否推薦規(guī)則,是否可修復等信息;
creat:(函數(shù))返回一個對象其中包含了 ESLint 在遍歷 JavaScript 代碼的抽象語法樹 AST (ESTree[2] 定義的 AST) 時,用來訪問節(jié)點的方法,入?yún)樵摴?jié)點。
如果一個 key 是個節(jié)點類型或 selector[3],在 向下 遍歷樹時,ESLint 調用 visitor 函數(shù) 如果一個 key 是個節(jié)點類型或 selector[4],并帶有 :exit,在 向上 遍歷樹時,ESLint 調用 visitor 函數(shù)如果一個 key 是個事件名字,ESLint 為代碼路徑分析[5]調用 handler 函數(shù)
二、eslint 命令的執(zhí)行
在package.json里配置bin
"bin": {
  "eslint": "bin/eslint.js" // 告訴 npm 你的命令是什么
}
然后創(chuàng)建對應的文件
#!/usr/bin/env node
console.log("console.log output")
這就是eslint命令行的入口
(async function main() {
    // 監(jiān)聽異常處理
    process.on("uncaughtException", onFatalError);
    process.on("unhandledRejection", onFatalError);

    // 如果參數(shù)有 --init 就執(zhí)行初始化
    if (process.argv.includes("--init")) {
        await require("../lib/init/config-initializer").initializeConfig();
        return;
    }

    // 否則就執(zhí)行 檢查代碼的代碼
    process.exitCode = await require("../lib/cli").execute(
        process.argv,
        process.argv.includes("--stdin") ? await readStdin() : null
    );
}()).catch(onFatalError);
代碼檢查的函數(shù)是 cli.execute() ****從lib中引入的cli對象。
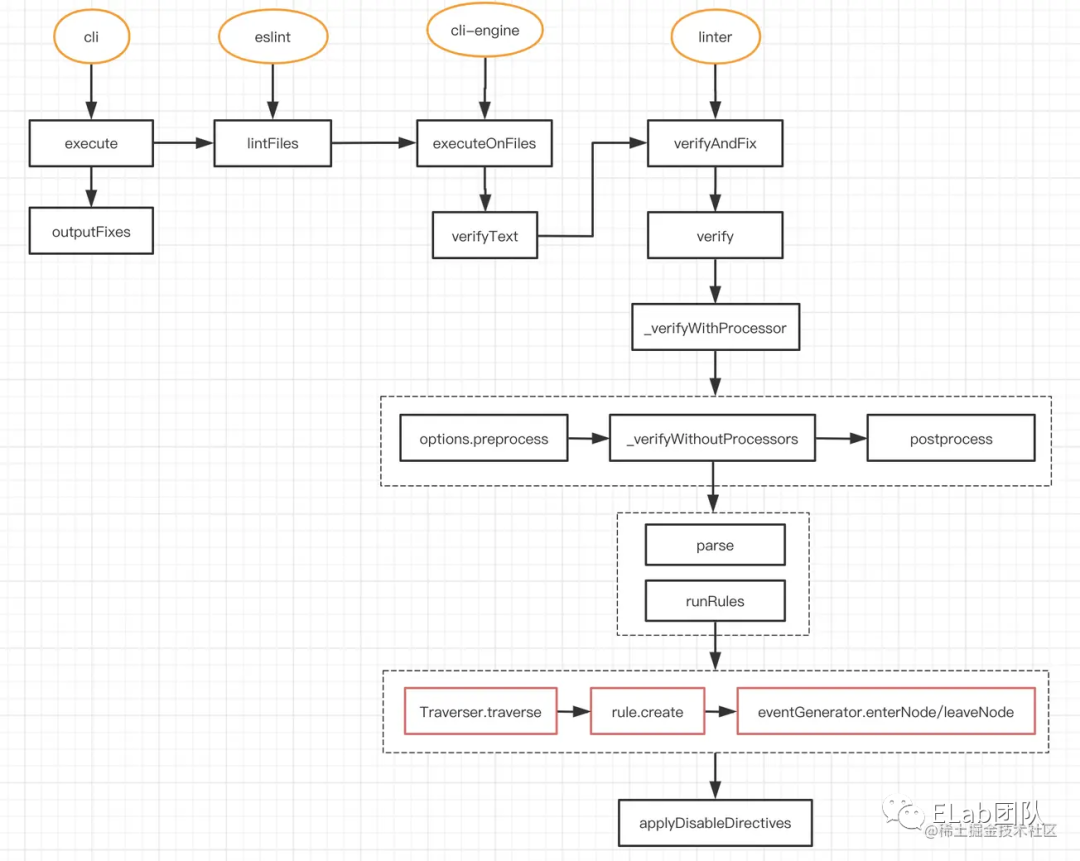
三、eslint 執(zhí)行的調用棧
execute() 函數(shù)
這是 eslint 的主要代碼執(zhí)行邏輯,主要流程如下:
解析命令行參數(shù),校驗參數(shù)正確與否及打印相關信息; 初始化 根據(jù)配置實例一個engine對象 CLIEngine實例;engine.executeOnFiles讀取源代碼進行檢查,返回報錯信息和修復結果。
execute(args, text) {
        if (Array.isArray(args)) {
            debug("CLI args: %o", args.slice(2));
        }
        let currentOptions;
        try {
        // 先校驗參數(shù) 如果輸入 --halp 提示 --help,并通過options的配置給默認值
            currentOptions = options.parse(args);
        } catch (error) {
            log.error(error.message);
            return 2;
        }

        const files = currentOptions._;
        const useStdin = typeof text === "string";

        // ---省略很多---參數(shù)校驗及輸出
        // ...
        // 根據(jù)配置實例一個engine對象
        const engine = new CLIEngine(translateOptions(currentOptions));
        // report 就是最后的結果
        const report = useStdin ? engine.executeOnText(text, currentOptions.stdinFilename, true) : engine.executeOnFiles(files);
        // ...
        // ---省略很多---參數(shù)校驗及輸出

        return 0;
    }
可以看到eslint就是在執(zhí)行 engine.executeOnFiles(files) 之后獲得檢查的結果
executeOnFiles (files) 函數(shù)
可以看到eslint就是在執(zhí)行 engine.executeOnFiles(files) 之后獲得檢查的結果;該函數(shù)主要作用是對一組文件和目錄名稱執(zhí)行當前配置。
簡單看一下 executeOnFile s ()
該函數(shù)輸入文件目錄,返回lint之后的結果
主要執(zhí)行邏輯如下:
fileEnumerator 類,迭代所有的文件路徑及信息; 檢查是否忽略的文件,lint緩存 等等一堆操作; 調用 verifyText() 函數(shù)執(zhí)行檢查 儲存lint之后的結果
/**
 * Executes the current configuration on an array of file and directory names.
 * @param {string[]} patterns An array of file and directory names.
 * @returns {LintReport} The results for all files that were linted.
 */
executeOnFiles(patterns) {

    // .....
        // fileEnumerator 類,迭代所有的文件路徑及信息
        for (const { config, filePath, ignored } of fileEnumerator.iterateFiles(patterns)) {

        // ....... 檢查是否忽略的文件,緩存 等等一堆操作

            // Do lint.
            const result = verifyText({
                text: fs.readFileSync(filePath, "utf8"),
                filePath,
                config,
                cwd,
                fix,
                allowInlineConfig,
                reportUnusedDisableDirectives,
                extensionRegExp: fileEnumerator.extensionRegExp,
                linter
            });

            results.push(result);

            /*
             * Store the lint result in the LintResultCache.
             * NOTE: The LintResultCache will remove the file source and any
             * other properties that are difficult to serialize, and will
             * hydrate those properties back in on future lint runs.
             */
            if (lintResultCache) {
                lintResultCache.setCachedLintResults(filePath, config, result);
            }
        }
}
verifyText() 函數(shù)
其實就是調用了 linter.verifyAndFix() 函數(shù)
verifyAndFix() 函數(shù)
這個函數(shù)是核心函數(shù),顧名思義verify & fix
代碼核心處理邏輯是通過一個 do while 循環(huán)控制;以下兩個條件會打斷循環(huán)
沒有更多可以被fix的代碼了 循環(huán)超過十次 其中 verify 函數(shù)對源代碼文件進行代碼檢查,從規(guī)則維度返回檢查結果數(shù)組 applyFixes 函數(shù)拿到上一步的返回,去fix代碼 如果設置了可以fix,那么使用fix之后的結果 代替原本的text
/**
         * This loop continues until one of the following is true:
         *
         * 1. No more fixes have been applied.
         * 2. Ten passes have been made.
         * That means anytime a fix is successfully applied, there will be another pass.
         * Essentially, guaranteeing a minimum of two passes.
         */
        do {
            passNumber++; // 初始值0
            // 這個函數(shù)就是 verify  在 verify 過程中會把代碼轉換成ast
            debug(`Linting code for ${debugTextDescription} (pass ${passNumber})`);
            messages = this.verify(currentText, config, options);
            // 這個函數(shù)就是 fix
            debug(`Generating fixed text for ${debugTextDescription} (pass ${passNumber})`);
            fixedResult = SourceCodeFixer.applyFixes(currentText, messages, shouldFix);

            /*
             * 如果有 syntax errors 就 break.
             * 'fixedResult.output' is a empty string.
             */
            if (messages.length === 1 && messages[0].fatal) {
                break;
            }

            // keep track if any fixes were ever applied - important for return value
            fixed = fixed || fixedResult.fixed;

            // 使用fix之后的結果 代替原本的text
            currentText = fixedResult.output;

        } while (
            fixedResult.fixed &&
            passNumber < MAX_AUTOFIX_PASSES // 10
        );
在verify過程中,會調用 parse 函數(shù),把代碼轉換成AST
// 默認的ast解析是espree
const espree = require("espree");

let parserName = DEFAULT_PARSER_NAME; // 'espree'
let parser = espree;
parse函數(shù)會返回兩種結果 {success: false, error: Problem} 解析AST成功 {success: true, sourceCode: SourceCode} 解析AST失敗
最終會調用 runRules() 函數(shù)
這個函數(shù)是代碼檢查和修復的核心方法,會對代碼進行規(guī)則校驗。
創(chuàng)建一個 eventEmitter 實例。是eslint自己實現(xiàn)的很簡單的一個事件觸發(fā)類 on監(jiān)聽 emit觸發(fā); 遞歸遍歷 AST,深度優(yōu)先搜索,把節(jié)點添加到 nodeQueue。一個node放入兩次,類似于A->B->C->...->C->B->A; 遍歷 rules,調用 rule.create()(rules中提到的meta和create函數(shù)) 拿到事件(selector)映射表,添加事件監(jiān)聽。 包裝一個 ruleContext 對象,會通過參數(shù),傳給 rule.create(),其中包含 report() 函數(shù),每個rule的 handler 都會執(zhí)行這個函數(shù),拋出問題; 調用 rule.create(ruleContext), 遍歷其返回的對象,添加事件監(jiān)聽;(如果需要lint計時,則調用process.hrtime()計時); 遍歷 nodeQueue,觸發(fā)當前節(jié)點事件的回調,調用 NodeEventGenerator 實例里面的函數(shù),觸發(fā) emitter.emit()。
 // 1. 創(chuàng)建一個 eventEmitter 實例。是eslint自己實現(xiàn)的很簡單的一個事件觸發(fā)類 on監(jiān)聽 emit觸發(fā)
const emitter = createEmitter();

// 2. 遞歸遍歷 AST,把節(jié)點添加到 nodeQueue。一個node放入兩次 A->B->C->...->C->B->A
Traverser.traverse(sourceCode.ast, {
        enter(node, parent) {
            node.parent = parent;
            nodeQueue.push({ isEntering: true, node });
        },
        leave(node) {
            nodeQueue.push({ isEntering: false, node });
        },
        visitorKeys: sourceCode.visitorKeys
    });

 // 3. 遍歷 rules,調用 rule.create() 拿到事件(selector)映射表,添加事件監(jiān)聽。
 // (這里的 configuredRules 是我們在 .eslintrc.json 設置的 rules)
 Object.keys(configuredRules).forEach(ruleId => {
        const severity = ConfigOps.getRuleSeverity(configuredRules[ruleId]);

        // 通過ruleId拿到每個規(guī)則對應的一個對象,里面有兩部分 meta & create 見 【編寫rule】
        const rule = ruleMapper(ruleId);

        // ....

        const messageIds = rule.meta && rule.meta.messages;
        let reportTranslator = null;
        // 這個對象比較重要,會傳給 每個規(guī)則里的 rule.create函數(shù)
        const ruleContext = Object.freeze(
            Object.assign(
                Object.create(sharedTraversalContext),
                {
                    id: ruleId,
                    options: getRuleOptions(configuredRules[ruleId]),
                    // 每個rule的 handler 都會執(zhí)行這個函數(shù),拋出問題
                    report(...args) {
                        if (reportTranslator === null) {
                            reportTranslator = createReportTranslator({
                                ruleId,
                                severity,
                                sourceCode,
                                messageIds,
                                disableFixes
                            });
                        }
                        const problem = reportTranslator(...args);
                        // 省略一堆錯誤校驗
                        // ....
                        // 省略一堆錯誤校驗

                        // lint的結果
                        lintingProblems.push(problem);
                    }
                }
            )
        );
        // 包裝了一下,其實就是 執(zhí)行 rule.create(ruleContext);
        // rule.create(ruleContext) 會返回一個對象,key就是事件名稱
        const ruleListeners = createRuleListeners(rule, ruleContext);

        /**
         * 在錯誤信息中加入ruleId
         * @param {Function} ruleListener 監(jiān)聽到每個node,然后對應的方法rule.create(ruleContext)返回的對象中對應key的value
         * @returns {Function} ruleListener wrapped in error handler
         */
        function addRuleErrorHandler(ruleListener) {
            return function ruleErrorHandler(...listenerArgs) {
                try {
                    return ruleListener(...listenerArgs);
                } catch (e) {
                    e.ruleId = ruleId;
                    throw e;
                }
            };
        }

        // 遍歷 rule.create(ruleContext) 返回的對象,添加事件監(jiān)聽
        Object.keys(ruleListeners).forEach(selector => {
            const ruleListener = timing.enabled
                ? timing.time(ruleId, ruleListeners[selector]) // 調用process.hrtime()計時
                : ruleListeners[selector];
        // 對每一個 selector 進行監(jiān)聽,添加 callback
            emitter.on(
                selector,
                addRuleErrorHandler(ruleListener)
            );
        });
    });

  // 只有頂層node類型是Program才進行代碼路徑分析
  const eventGenerator = nodeQueue[0].node.type === "Program"
      ? new CodePathAnalyzer(new NodeEventGenerator(emitter, { visitorKeys: sourceCode.visitorKeys, fallback: Traverser.getKeys }))
      : new NodeEventGenerator(emitter, { visitorKeys: sourceCode.visitorKeys, fallback: Traverser.getKeys });

  // 4. 遍歷 nodeQueue,觸發(fā)當前節(jié)點事件的回調。
  // 這個 nodeQueue 是前面push進所有的node,分為 入口 和 離開
    nodeQueue.forEach(traversalInfo => {
        currentNode = traversalInfo.node;
        try {
            if (traversalInfo.isEntering) {
                // 調用 NodeEventGenerator 實例里面的函數(shù)
                // 在這里觸發(fā) emitter.emit()
                eventGenerator.enterNode(currentNode);
            } else {
                eventGenerator.leaveNode(currentNode);
            }
        } catch (err) {
            err.currentNode = currentNode;
            throw err;
        }
    });
 // lint的結果
 return lintingProblems;
執(zhí)行節(jié)點匹配 NodeEventGenerator
在該類里面,會根據(jù)前面 nodeQueque 分別調用 進入節(jié)點和離開節(jié)點,來區(qū)分不同的調用時機。
// 進入節(jié)點 把這個node的父節(jié)點push進去
    enterNode(node) {
        if (node.parent) {
            this.currentAncestry.unshift(node.parent);
        }
        this.applySelectors(node, false);
    }
    // 離開節(jié)點
    leaveNode(node) {
        this.applySelectors(node, true);
        this.currentAncestry.shift();
    }
    // 進入還是離開 都執(zhí)行的這個函數(shù)
    // 調用這個函數(shù),如果節(jié)點匹配,那么就觸發(fā)事件
    applySelector(node, selector) {
        if (esquery.matches(node, selector.parsedSelector, this.currentAncestry, this.esqueryOptions)) {
            // 觸發(fā)事件,執(zhí)行 handler
            this.emitter.emit(selector.rawSelector, node);
        }
    }
四、總體運行機制
概括來說就是,ESLint 會遍歷前面說到的 AST,然后在遍歷到「不同的節(jié)點」或者「特定的時機」的時候,觸發(fā)相應的處理函數(shù),然后在函數(shù)中,可以拋出錯誤,給出提示。
Tips: espree需要更換解析器
問題:espree無法識別 TypeScript 的一些語法,所以在我們項目中的 .eslintrc.json 里才要配置
{
 "parser": '@typescript-eslint/parser'
}
給eslint指定解析器,替代掉默認的解析器。
eslint 中涉及到規(guī)則的校驗源碼調用棧大致就如上分析,但其實eslint遠不止這些,還有很多可以值得學習的點,如:迭代文件路徑、fix修復文本、報告錯誤及自定義格式等等,歡迎感興趣的同學一起討論交流,也歡迎同學批評指正~
參考資料
https://zhuanlan.zhihu.com/p/53680918
https://juejin.cn/post/7054741990558138376
https://www.teqng.com/2022/03/14/%E4%BB%8E%E9%9B%B6%E5%BC%80%E5%A7%8B%E6%B7%B1%E5%85%A5%E7%90%86%E8%A7%A3-eslint-%E6%A0%B8%E5%BF%83%E5%8E%9F%E7%90%86/#ESLint_shi_ru_he_gong_zuo_de
參考資料
我們看一下自定義eslint 規(guī)則: https://eslint.bootcss.com/docs/developer-guide/working-with-rules
[2]ESTree: https://github.com/estree/estree
[3]selector: https://eslint.bootcss.com/docs/developer-guide/selectors
[4]selector: https://eslint.bootcss.com/docs/developer-guide/selectors
[5]代碼路徑分析: https://eslint.bootcss.com/docs/developer-guide/code-path-analysis
?? 謝謝支持
以上便是本次分享的全部內容,希望對你有所幫助^_^
喜歡的話別忘了 分享、點贊、收藏 三連哦~。
歡迎關注公眾號 ELab團隊 收貨大廠一手好文章~
我們來自字節(jié)跳動,是旗下大力教育前端部門,負責字節(jié)跳動教育全線產(chǎn)品前端開發(fā)工作。
我們圍繞產(chǎn)品品質提升、開發(fā)效率、創(chuàng)意與前沿技術等方向沉淀與傳播專業(yè)知識及案例,為業(yè)界貢獻經(jīng)驗價值。包括但不限于性能監(jiān)控、組件庫、多端技術、Serverless、可視化搭建、音視頻、人工智能、產(chǎn)品設計與營銷等內容。
歡迎感興趣的同學在評論區(qū)或使用內推碼內推到作者部門拍磚哦 ??
字節(jié)跳動校/社招投遞鏈接: https://jobs.bytedance.com/campus/position?referral_code=BA6TQ9U
內推碼:BA6TQ9U
往期推薦

零基礎理解 ESLint 核心原理