Nginx 極簡教程 — 幫助新手快速入門

作者:dunwu|原文地址: https://github.com/dunwu/nginx-tutorial
概述 安裝與使用 安裝 使用 nginx 配置實戰(zhàn) http 反向代理配置 負載均衡配置 網(wǎng)站有多個 webapp 的配置 https 反向代理配置 靜態(tài)站點配置 搭建文件服務器 跨域解決方案 參考
概述
什么是 Nginx?
Nginx (engine x) 是一款輕量級的 Web 服務器 、反向代理服務器及電子郵件(IMAP/POP3)代理服務器。
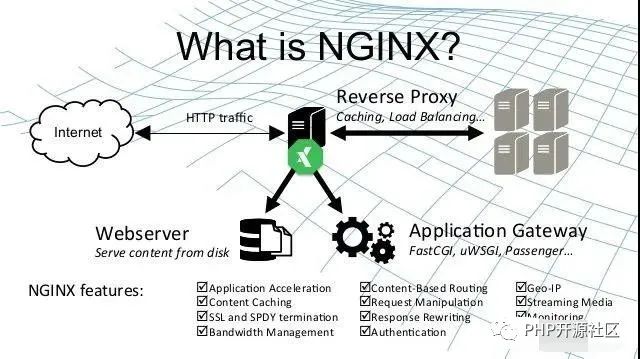
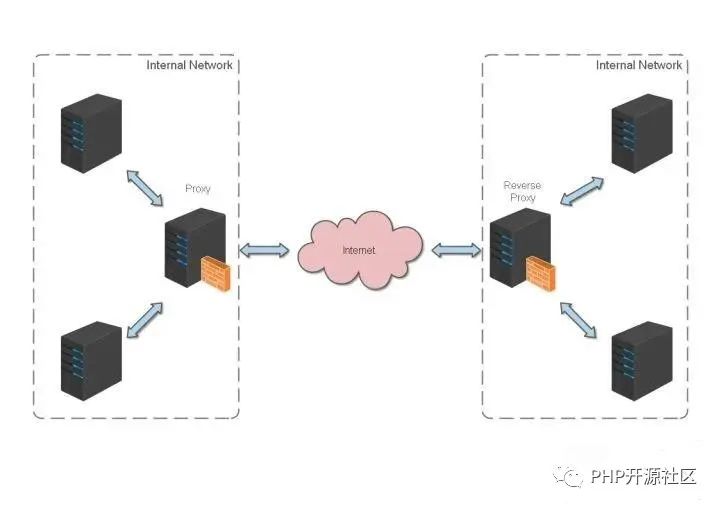
什么是反向代理?
反向代理(Reverse Proxy)方式是指以代理服務器來接受 internet 上的連接請求,然后將請求轉發(fā)給內(nèi)部網(wǎng)絡上的服務器,并將從服務器上得到的結果返回給 internet 上請求連接的客戶端,此時代理服務器對外就表現(xiàn)為一個反向代理服務器。
安裝與使用
安裝
詳細安裝方法請參考:
https://github.com/dunwu/nginx-tutorial/blob/master/docs/nginx-ops.md
使用
nginx 的使用比較簡單,就是幾條命令。
常用到的命令如下:
nginx -s stop       快速關閉Nginx,可能不保存相關信息,并迅速終止web服務。
nginx -s quit       平穩(wěn)關閉Nginx,保存相關信息,有安排的結束web服務。
nginx -s reload     因改變了Nginx相關配置,需要重新加載配置而重載。
nginx -s reopen     重新打開日志文件。
nginx -c filename   為 Nginx 指定一個配置文件,來代替缺省的。
nginx -t            不運行,而僅僅測試配置文件。nginx 將檢查配置文件的語法的正確性,并嘗試打開配置文件中所引用到的文件。
nginx -v            顯示 nginx 的版本。
nginx -V            顯示 nginx 的版本,編譯器版本和配置參數(shù)。
如果不想每次都敲命令,可以在 nginx 安裝目錄下新添一個啟動批處理文件startup.bat,雙擊即可運行。內(nèi)容如下:
@echo off
rem 如果啟動前已經(jīng)啟動nginx并記錄下pid文件,會kill指定進程
nginx.exe -s stop

rem 測試配置文件語法正確性
nginx.exe -t -c conf/nginx.conf

rem 顯示版本信息
nginx.exe -v

rem 按照指定配置去啟動nginx
nginx.exe -c conf/nginx.conf
如果是運行在 Linux 下,寫一個 shell 腳本,大同小異。
nginx 配置實戰(zhàn)
我始終認為,各種開發(fā)工具的配置還是結合實戰(zhàn)來講述,會讓人更易理解。
http 反向代理配置
我們先實現(xiàn)一個小目標:不考慮復雜的配置,僅僅是完成一個 http 反向代理。
nginx.conf 配置文件如下:
注:conf / nginx.conf 是 nginx 的默認配置文件。你也可以使用 nginx -c 指定你的配置文件
#運行用戶#user somebody;#啟動進程,通常設置成和cpu的數(shù)量相等worker_processes 1;#全局錯誤日志error_log D:/Tools/nginx-1.10.1/logs/error.log;error_log D:/Tools/nginx-1.10.1/logs/notice.log notice;error_log D:/Tools/nginx-1.10.1/logs/info.log info;#PID文件,記錄當前啟動的nginx的進程IDpid D:/Tools/nginx-1.10.1/logs/nginx.pid;#工作模式及連接數(shù)上限events {worker_connections 1024; #單個后臺worker process進程的最大并發(fā)鏈接數(shù)}#設定http服務器,利用它的反向代理功能提供負載均衡支持http {#設定mime類型(郵件支持類型),類型由mime.types文件定義include D:/Tools/nginx-1.10.1/conf/mime.types;default_type application/octet-stream;#設定日志log_format main '[$remote_addr] - [$remote_user] [$time_local] "$request" ''$status $body_bytes_sent "$http_referer" ''"$http_user_agent" "$http_x_forwarded_for"';access_log D:/Tools/nginx-1.10.1/logs/access.log main;rewrite_log on;#sendfile 指令指定 nginx 是否調(diào)用 sendfile 函數(shù)(zero copy 方式)來輸出文件,對于普通應用,#必須設為 on,如果用來進行下載等應用磁盤IO重負載應用,可設置為 off,以平衡磁盤與網(wǎng)絡I/O處理速度,降低系統(tǒng)的uptime.sendfile on;#tcp_nopush on;#連接超時時間keepalive_timeout 120;tcp_nodelay on;#gzip壓縮開關#gzip on;#設定實際的服務器列表upstream zp_server1{server 127.0.0.1:8089;}#HTTP服務器server {#監(jiān)聽80端口,80端口是知名端口號,用于HTTP協(xié)議listen 80;#定義使用www.xx.com訪問server_name www.helloworld.com;#首頁index index.html#指向webapp的目錄root D:\01_Workspace\Project\github\zp\SpringNotes\spring-security\spring-shiro\src\main\webapp;#編碼格式charset utf-8;#代理配置參數(shù)proxy_connect_timeout 180;proxy_send_timeout 180;proxy_read_timeout 180;proxy_set_header Host $host;proxy_set_header X-Forwarder-For $remote_addr;#反向代理的路徑(和upstream綁定),location 后面設置映射的路徑location / {proxy_pass http://zp_server1;}#靜態(tài)文件,nginx自己處理location ~ ^/(images|javascript|js|css|flash|media|static)/ {root D:\01_Workspace\Project\github\zp\SpringNotes\spring-security\spring-shiro\src\main\webapp\views;#過期30天,靜態(tài)文件不怎么更新,過期可以設大一點,如果頻繁更新,則可以設置得小一點。expires 30d;}#設定查看Nginx狀態(tài)的地址location /NginxStatus {stub_status on;access_log on;auth_basic "NginxStatus";auth_basic_user_file conf/htpasswd;}#禁止訪問 .htxxx 文件location ~ /\.ht {deny all;}#錯誤處理頁面(可選擇性配置)#error_page 404 /404.html;#error_page 500 502 503 504 /50x.html;#location = /50x.html {# root html;#}}}
好了,讓我們來試試吧:
啟動 webapp,注意啟動綁定的端口要和 nginx 中的
upstream設置的端口保持一致。更改 host:在 C:\Windows\System32\drivers\etc 目錄下的 host 文件中添加一條 DNS 記錄
127.0.0.1 www.helloworld.com啟動前文中 startup.bat 的命令
在瀏覽器中訪問 www.helloworld.com,不出意外,已經(jīng)可以訪問了。
負載均衡配置
上一個例子中,代理僅僅指向一個服務器。
但是,網(wǎng)站在實際運營過程中,多半都是有多臺服務器運行著同樣的 app,這時需要使用負載均衡來分流。
nginx 也可以實現(xiàn)簡單的負載均衡功能。
假設這樣一個應用場景:將應用部署在 192.168.1.11:80、192.168.1.12:80、192.168.1.13:80 三臺 linux 環(huán)境的服務器上。網(wǎng)站域名叫 www.helloworld.com,公網(wǎng) IP 為 192.168.1.11。在公網(wǎng) IP 所在的服務器上部署 nginx,對所有請求做負載均衡處理。
nginx.conf 配置如下:
http {#設定mime類型,類型由mime.type文件定義include /etc/nginx/mime.types;default_type application/octet-stream;#設定日志格式access_log /var/log/nginx/access.log;#設定負載均衡的服務器列表upstream load_balance_server {#weigth參數(shù)表示權值,權值越高被分配到的幾率越大server 192.168.1.11:80 weight=5;server 192.168.1.12:80 weight=1;server 192.168.1.13:80 weight=6;}#HTTP服務器server {#偵聽80端口listen 80;#定義使用www.xx.com訪問server_name www.helloworld.com;#對所有請求進行負載均衡請求location / {root /root; #定義服務器的默認網(wǎng)站根目錄位置index index.html index.htm; #定義首頁索引文件的名稱proxy_pass http://load_balance_server ;#請求轉向load_balance_server 定義的服務器列表#以下是一些反向代理的配置(可選擇性配置)#proxy_redirect off;proxy_set_header Host $host;proxy_set_header X-Real-IP $remote_addr;#后端的Web服務器可以通過X-Forwarded-For獲取用戶真實IPproxy_set_header X-Forwarded-For $remote_addr;proxy_connect_timeout 90; #nginx跟后端服務器連接超時時間(代理連接超時)proxy_send_timeout 90; #后端服務器數(shù)據(jù)回傳時間(代理發(fā)送超時)proxy_read_timeout 90; #連接成功后,后端服務器響應時間(代理接收超時)proxy_buffer_size 4k; #設置代理服務器(nginx)保存用戶頭信息的緩沖區(qū)大小proxy_buffers 4 32k; #proxy_buffers緩沖區(qū),網(wǎng)頁平均在32k以下的話,這樣設置proxy_busy_buffers_size 64k; #高負荷下緩沖大小(proxy_buffers*2)proxy_temp_file_write_size 64k; #設定緩存文件夾大小,大于這個值,將從upstream服務器傳client_max_body_size 10m; #允許客戶端請求的最大單文件字節(jié)數(shù)client_body_buffer_size 128k; #緩沖區(qū)代理緩沖用戶端請求的最大字節(jié)數(shù)}}}
網(wǎng)站有多個 webapp 的配置
當一個網(wǎng)站功能越來越豐富時,往往需要將一些功能相對獨立的模塊剝離出來,獨立維護。這樣的話,通常,會有多個 webapp。
舉個例子:假如 www.helloworld.com 站點有好幾個 webapp,finance(金融)、product(產(chǎn)品)、admin(用戶中心)。訪問這些應用的方式通過上下文(context)來進行區(qū)分:
www.helloworld.com/finance/
www.helloworld.com/product/
www.helloworld.com/admin/
我們知道,http 的默認端口號是 80,如果在一臺服務器上同時啟動這 3 個 webapp 應用,都用 80 端口,肯定是不成的。所以,這三個應用需要分別綁定不同的端口號。
那么,問題來了,用戶在實際訪問 www.helloworld.com 站點時,訪問不同 webapp,總不會還帶著對應的端口號去訪問吧。所以,你再次需要用到反向代理來做處理。
配置也不難,來看看怎么做吧:
http {#此處省略一些基本配置upstream product_server{server www.helloworld.com:8081;}upstream admin_server{server www.helloworld.com:8082;}upstream finance_server{server www.helloworld.com:8083;}server {#此處省略一些基本配置#默認指向product的serverlocation / {proxy_pass http://product_server;}location /product/{proxy_pass http://product_server;}location /admin/ {proxy_pass http://admin_server;}location /finance/ {proxy_pass http://finance_server;}}}
https 反向代理配置
一些對安全性要求比較高的站點,可能會使用 HTTPS(一種使用 ssl 通信標準的安全 HTTP 協(xié)議)。
這里不科普 HTTP 協(xié)議和 SSL 標準。但是,使用 nginx 配置 https 需要知道幾點:
HTTPS 的固定端口號是 443,不同于 HTTP 的 80 端口 SSL 標準需要引入安全證書,所以在 nginx.conf 中你需要指定證書和它對應的 key
其他和 http 反向代理基本一樣,只是在 Server 部分配置有些不同。
#HTTP服務器server {#監(jiān)聽443端口。443為知名端口號,主要用于HTTPS協(xié)議listen 443 ssl;#定義使用www.xx.com訪問server_name www.helloworld.com;#ssl證書文件位置(常見證書文件格式為:crt/pem)ssl_certificate cert.pem;#ssl證書key位置ssl_certificate_key cert.key;#ssl配置參數(shù)(選擇性配置)ssl_session_cache shared:SSL:1m;ssl_session_timeout 5m;#數(shù)字簽名,此處使用MD5ssl_ciphers HIGH:!aNULL:!MD5;ssl_prefer_server_ciphers on;location / {root /root;index index.html index.htm;}}
靜態(tài)站點配置
有時候,我們需要配置靜態(tài)站點(即 html 文件和一堆靜態(tài)資源)。
舉例來說:如果所有的靜態(tài)資源都放在了 /app/dist 目錄下,我們只需要在 nginx.conf 中指定首頁以及這個站點的 host 即可。
配置如下:
worker_processes 1;events {worker_connections 1024;}http {include mime.types;default_type application/octet-stream;sendfile on;keepalive_timeout 65;gzip on;gzip_types text/plain application/x-javascript text/css application/xml text/javascript application/javascript image/jpeg image/gif image/png;gzip_vary on;server {listen 80;server_name static.zp.cn;location / {root /app/dist;index index.html;#轉發(fā)任何請求到 index.html}}}
然后,添加 HOST:
127.0.0.1 static.zp.cn此時,在本地瀏覽器訪問 static.zp.cn ,就可以訪問靜態(tài)站點了。
搭建文件服務器
有時候,團隊需要歸檔一些數(shù)據(jù)或資料,那么文件服務器必不可少。使用 Nginx 可以非常快速便捷的搭建一個簡易的文件服務。
Nginx 中的配置要點:
將 autoindex 開啟可以顯示目錄,默認不開啟。 將 autoindex_exact_size 開啟可以顯示文件的大小。 將 autoindex_localtime 開啟可以顯示文件的修改時間。 root 用來設置開放為文件服務的根路徑。 charset 設置為 charset utf-8,gbk;,可以避免中文亂碼問題(windows 服務器下設置后,依然亂碼,本人暫時沒有找到解決方法)。
一個最簡化的配置如下:
autoindex on;# 顯示目錄autoindex_exact_size on;# 顯示文件大小autoindex_localtime on;# 顯示文件時間server {charset utf-8,gbk; # windows 服務器下設置后,依然亂碼,暫時無解listen 9050 default_server;listen [::]:9050 default_server;server_name _;root /share/fs;}
跨域解決方案
web 領域開發(fā)中,經(jīng)常采用前后端分離模式。這種模式下,前端和后端分別是獨立的 web 應用程序,例如:后端是 PHP程序,前端是 React 或 Vue 應用。
各自獨立的 web app 在互相訪問時,勢必存在跨域問題。解決跨域問題一般有兩種思路:
CORS
在后端服務器設置 HTTP 響應頭,把你需要運行訪問的域名加入加入 Access-Control-Allow-Origin中。
jsonp
把后端根據(jù)請求,構造 json 數(shù)據(jù),并返回,前端用 jsonp 跨域。
這兩種思路,本文不展開討論。
需要說明的是,nginx 根據(jù)第一種思路,也提供了一種解決跨域的解決方案。
舉例:www.helloworld.com 網(wǎng)站是由一個前端 app ,一個后端 app 組成的。前端端口號為 9000, 后端端口號為 8080。
前端和后端如果使用 http 進行交互時,請求會被拒絕,因為存在跨域問題。來看看,nginx 是怎么解決的吧:
首先,在 enable-cors.conf 文件中設置 cors :
# allow origin listset $ACAO '*';# set single originif ($http_origin ~* (www.helloworld.com)$) {set $ACAO $http_origin;}if ($cors = "trueget") {add_header 'Access-Control-Allow-Origin' "$http_origin";add_header 'Access-Control-Allow-Credentials' 'true';add_header 'Access-Control-Allow-Methods' 'GET, POST, OPTIONS';add_header 'Access-Control-Allow-Headers' 'DNT,X-Mx-ReqToken,Keep-Alive,User-Agent,X-Requested-With,If-Modified-Since,Cache-Control,Content-Type';}if ($request_method = 'OPTIONS') {set $cors "${cors}options";}if ($request_method = 'GET') {set $cors "${cors}get";}if ($request_method = 'POST') {set $cors "${cors}post";}
接下來,在你的服務器中 include enable-cors.conf 來引入跨域配置:
# ----------------------------------------------------# 此文件為項目 nginx 配置片段# 可以直接在 nginx config 中 include(推薦)# 或者 copy 到現(xiàn)有 nginx 中,自行配置# www.helloworld.com 域名需配合 dns hosts 進行配置# 其中,api 開啟了 cors,需配合本目錄下另一份配置文件# ----------------------------------------------------upstream front_server{server www.helloworld.com:9000;}upstream api_server{server www.helloworld.com:8080;}server {listen 80;server_name www.helloworld.com;location ~ ^/api/ {include enable-cors.conf;proxy_pass http://api_server;rewrite "^/api/(.*)$" /$1 break;}location ~ ^/ {proxy_pass http://front_server;}}
到此,就完成了。
參考
Nginx 的中文維基 Nginx 安裝
最后
歡迎加我微信(winty230),拉你進技術群,長期交流學習...
歡迎關注「前端Q」,認真學前端,做個專業(yè)的技術人...