
使用 OpenCV 的基于標(biāo)記的增強(qiáng)現(xiàn)實(shí)
點(diǎn)擊上方“小白學(xué)視覺”,選擇加"星標(biāo)"或“置頂”
重磅干貨,第一時(shí)間送達(dá)

先決條件
了解什么是增強(qiáng)現(xiàn)實(shí) (AR)、虛擬現(xiàn)實(shí) (VR) 和混合現(xiàn)實(shí) (MR),Marker-based AR 和 Marker-less AR 之間的區(qū)別:https://arshren.medium.com/all-you-want-to-know-about-augmented-reality-1d5a8cd08977
基于標(biāo)記的增強(qiáng)現(xiàn)實(shí)
基于標(biāo)記的 AR,也稱為圖像識(shí)別 AR,使用對(duì)象或基準(zhǔn)標(biāo)記作為參考來確定相機(jī)的位置或方向。
基于位置的 AR 通過掃描像 ArUco 標(biāo)記這樣的標(biāo)記來工作。ArUco 標(biāo)記檢測(cè)觸發(fā)增強(qiáng)體驗(yàn)以定位對(duì)象、文本、視頻或動(dòng)畫以顯示在設(shè)備上。
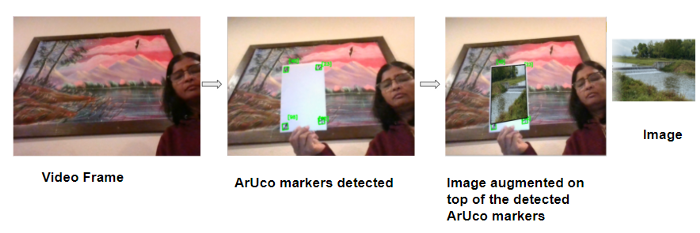
在這個(gè)例子中,我們將編寫一個(gè)簡(jiǎn)單的代碼,借助 ArUco 標(biāo)記來增強(qiáng)視頻流上的圖像。
ArUco 標(biāo)記
ArUco(Augmented Reality University of Cordoba) 由 S.Garrido-Jurado 等人于 2014 年在他們的工作“自動(dòng)生成和檢測(cè)遮擋下高度可靠的基準(zhǔn)標(biāo)記”(https://www.researchgate.net/publication/260251570_Automatic_generation_and_detection_of_highly_reliable_fiducial_markers_under_occlusion)中開發(fā)。
ArUco 標(biāo)記是用于相機(jī)姿態(tài)估計(jì)的基準(zhǔn)方形標(biāo)記。當(dāng)在視頻中檢測(cè)到 ArUco 標(biāo)記時(shí),你可以在檢測(cè)到的標(biāo)記上增加數(shù)字內(nèi)容,例如圖像。

尺寸為 6X6 的 ArUco 標(biāo)記
ArUco 標(biāo)記是一種合成方形標(biāo)記,內(nèi)部的二進(jìn)制矩陣包含在帶有唯一標(biāo)識(shí)符的寬黑色邊框內(nèi)。在 ArUco 標(biāo)記中, 黑色表示1,白色表示0。
標(biāo)記大小決定了內(nèi)部二進(jìn)制矩陣的大小。ArUco 標(biāo)記中的奇數(shù)塊代表奇偶校驗(yàn)位,標(biāo)記中的偶數(shù)方塊代表數(shù)據(jù)位。
黑色邊框便于在圖像內(nèi)快速檢測(cè),二進(jìn)制矩陣允許對(duì)其進(jìn)行識(shí)別。
ArUco 標(biāo)記幫助相機(jī)了解角度、高度和深度,并在計(jì)算機(jī)視覺、機(jī)器人和增強(qiáng)現(xiàn)實(shí)中得到應(yīng)用。
ArUco 標(biāo)記由預(yù)定義的字典組成,涵蓋一系列不同的字典大小和標(biāo)記大小。要生成 ArUco 標(biāo)記,你需要指定:
字典大小:是字典中標(biāo)記的數(shù)量
指示位數(shù)的標(biāo)記大小
上面的 ArUco 標(biāo)記來自 100 個(gè)標(biāo)記的字典,標(biāo)記大小為 6X6 二進(jìn)制矩陣。
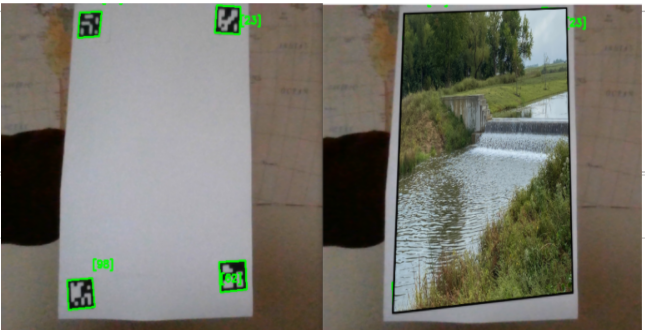
此示例將使用計(jì)算機(jī)的默認(rèn)攝像頭捕捉視頻,然后從 6x6x100 字典中引入 4 個(gè) ArUco 標(biāo)記。一旦檢測(cè)到 ArUco 標(biāo)記,就在檢測(cè)到的 ArUco 標(biāo)記上增加圖像。
在此處閱讀如何使用 OpenCV 讀取、寫入和顯示視頻:https://arshren.medium.com/read-and-write-videos-using-opencv-7f92548afcba
導(dǎo)入所需的庫(kù)
import numpy as np
import cv2
import imutils
檢測(cè)圖像中的 ArUco 標(biāo)記
要檢測(cè)圖像中的 ArUco 標(biāo)記,
分析圖像以找到作為標(biāo)記候選的正方形形狀。
檢測(cè)到候選后,驗(yàn)證其內(nèi)部編碼以確保它們是 ArUco 標(biāo)記。
在 OpenCV 中,ArUco 標(biāo)記字典遵循命名約定cv2.aruco.DICT_NxN_M,其中 N 是二進(jìn)制矩陣的大小,代表標(biāo)記的大小,M 是字典中 ArUco 標(biāo)記的數(shù)量。
要檢測(cè) ArUco 標(biāo)記,請(qǐng)將 BGR 圖像轉(zhuǎn)換為灰度圖像,以便于檢測(cè)。getattr()用于訪問 ArUco 標(biāo)記中鍵屬性的值以加載 ArUco 字典。
檢測(cè)在detectMarkers()函數(shù)中執(zhí)行,其中輸入?yún)?shù)是包含 ArUco 標(biāo)記的圖像,ArUco 字典對(duì)象,在我們的例子中是 6x6x100 和 DetectorParameters(). detectMarkers()函數(shù)返回四個(gè)角的向量、它們的 id 以及檢測(cè)到但不符合 ArUco 編碼的任何矩形。
def findArucoMarkers(img, markerSize = 6, totalMarkers=250, draw=True):
    gray = cv2.cvtColor(img, cv2.COLOR_BGR2GRAY)
    key = getattr(cv2.aruco, f'DICT_{markerSize}X{markerSize}_{totalMarkers}')

    #Load the dictionary that was used to generate the markers.
    arucoDict = cv2.aruco.Dictionary_get(key)

    # Initialize the detector parameters using default values
    arucoParam = cv2.aruco.DetectorParameters_create()

    # Detect the markers
    bboxs, ids, rejected = cv2.aruco.detectMarkers(gray, arucoDict, parameters = arucoParam)
    return bboxs, ids
通過將源圖像疊加在視頻頂部來應(yīng)用增強(qiáng)現(xiàn)實(shí)。
開始使用計(jì)算機(jī)的默認(rèn)攝像頭捕捉視頻,并讀取要疊加在 ArUco 標(biāo)記上的圖像。
檢測(cè)視頻幀中的 ArUco 標(biāo)記并找到每個(gè) ArUco 標(biāo)記的所有四個(gè)角的位置。計(jì)算視頻幀和將要疊加的圖像之間的單應(yīng)性。
單應(yīng)性是一個(gè)圖像中的點(diǎn)到另一圖像中的對(duì)應(yīng)點(diǎn)的變換映射。
OpenCV 的findHomography()計(jì)算圖像和視頻幀點(diǎn)之間的單應(yīng)性函數(shù) h 以扭曲圖像以適應(yīng)視頻幀。然后對(duì)扭曲的圖像進(jìn)行屏蔽并復(fù)制到視頻幀上。

import numpy as np
import cv2
import imutils

# function to detect ArUco Markers
def findArucoMarkers(img, markerSize = 6, totalMarkers=250, draw=True):
    gray = cv2.cvtColor(img, cv2.COLOR_BGR2GRAY)
    key = getattr(cv2.aruco, f'DICT_{markerSize}X{markerSize}_{totalMarkers}')


    #Load the dictionary that was used to generate the markers.
    arucoDict = cv2.aruco.Dictionary_get(key)

    # Initialize the detector parameters using default values
    arucoParam = cv2.aruco.DetectorParameters_create()

    # Detect the markers
    bboxs, ids, rejected = cv2.aruco.detectMarkers(gray, arucoDict, parameters = arucoParam)
    return bboxs, ids

# Superimposing the image on the aruco markers detected in the video
imgH=480
imgW=640

video = cv2. VideoCapture(0)

ret, video_frame=video.read()
image = cv2.imread(r'nature.png')
image = cv2.resize(image, (imgH, imgW))

while(video.isOpened()):
    if ret==True:
        refPts=[]
        #Detect the Aruco markers on the video frame
        arucofound =findArucoMarkers(video_frame, totalMarkers=100)
        h, w = video_frame.shape[:2]

        # if the aruco markers are detected
        if  len(arucofound[0])!=0:

                for Corner, id in zip(arucofound[0], arucofound[1]):

                    corners = Corner.reshape((4, 2))
                    (topLeft, topRight, bottomRight, bottomLeft) = corners
                    topRight = (int(topRight[0]), int(topRight[1]))
                    bottomRight = (int(bottomRight[0]), int(bottomRight[1]))
                    bottomLeft = (int(bottomLeft[0]), int(bottomLeft[1]))
                    topLeft = (int(topLeft[0]), int(topLeft[1]))
                    # draw lines around the marker and display the marker id
                    cv2.line(video_frame, topLeft, topRight, (0, 255, 0), 2)
                    cv2.line(video_frame, topRight, bottomRight, (0, 255, 0), 2)
                    cv2.line(video_frame, bottomRight, bottomLeft, (0, 255, 0), 2)
                    cv2.line(video_frame, bottomLeft, topLeft, (0, 255, 0), 2)
                    cv2.putText(video_frame, str(id),(topLeft[0], topLeft[1] - 15), cv2.FONT_HERSHEY_SIMPLEX,0.5, (0, 255, 0), 2)
                    corner = np.squeeze(Corner)
                    refPts.append(corner)

                    # only when all the 4 markes are detected in the image
                    if len(refPts)==4:
                        ( refPtBR, refPtTR,refPtBL, refPtTL) = refPts
                        video_pt = np.array([  refPtTL[3], refPtBL[3],refPtBR[2], refPtTR[3]])

                        # grab the spatial dimensions of the  image and define the
                        # transform matrix for the image in
                        #top-left, top-right,bottom-right, and bottom-left order
                        image_pt = np.float32([[0,0], [h,0], [h,w], [0,w]])

                        # compute the homography matrix between the image and the video frame
                        matrix, _ = cv2.findHomography( image_pt, video_pt)

                        #warp the  image to video frame based on the homography
                        warped  = cv2.warpPerspective(image, matrix, (video_frame.shape[1], video_frame.shape[0]))

                        #Create a mask representing region to
                        #copy from the warped image into the video frame.
                        mask = np.zeros((imgH, imgW), dtype="uint8")
                        cv2.fillConvexPoly(mask, video_pt.astype("int32"), (255, 255, 255),cv2.LINE_AA)

                        # give the source image a black border
                        # surrounding it when applied to the source image,
                        #you can apply a dilation operation
                        rect = cv2.getStructuringElement(cv2.MORPH_RECT, (3, 3))
                        mask = cv2.dilate(mask, rect, iterations=2)

                        # Copy the mask with the three channel version by stacking it depth-wise,
                        # This will allow copying the warped source image into the input image
                        maskScaled = mask.copy() / 255.0
                        maskScaled = np.dstack([maskScaled] * 3)

                        # Copy the masked warped image into the video frame by
                        # (1) multiplying the warped image and masked together,
                        # (2) multiplying the Video frame with the mask
                        # (3) adding the resulting images
                        warpedMultiplied = cv2.multiply(warped.astype("float"), maskScaled)
                        imageMultiplied = cv2.multiply(video_frame.astype(float), 1.0 - maskScaled)
                        #imgout = video frame multipled with mask
                        #        + warped image multipled with mask
                        output = cv2.add(warpedMultiplied, imageMultiplied)
                        output = output.astype("uint8")
                        cv2.imshow("output", output)

    ret, video_frame=video.read()
    key = cv2.waitKey(20)
    # if key q is pressed then break
    if key == 113:
        break

#finally destroy/close all open windows
video.release()
cv2.destroyAllWindows()
最終輸出會(huì)將圖像映射到視頻中檢測(cè)到的 ArUco 標(biāo)記的頂部。
使用 ArUco 標(biāo)記的增強(qiáng)現(xiàn)實(shí)
此處提供代碼:https://github.com/arshren/AR_Aruco
參考:
https://docs.opencv.org/4.x/d5/dae/tutorial_aruco_detection.html
https://machinelearningknowledge.ai/augmented-reality-using-aruco-marker-detection-with-python-opencv/
https://learnopencv.com/augmented-reality-using-aruco-markers-in-opencv-c-python/
好消息!
小白學(xué)視覺知識(shí)星球
開始面向外開放啦??????
下載1:OpenCV-Contrib擴(kuò)展模塊中文版教程 在「小白學(xué)視覺」公眾號(hào)后臺(tái)回復(fù):擴(kuò)展模塊中文教程,即可下載全網(wǎng)第一份OpenCV擴(kuò)展模塊教程中文版,涵蓋擴(kuò)展模塊安裝、SFM算法、立體視覺、目標(biāo)跟蹤、生物視覺、超分辨率處理等二十多章內(nèi)容。 下載2:Python視覺實(shí)戰(zhàn)項(xiàng)目52講 在「小白學(xué)視覺」公眾號(hào)后臺(tái)回復(fù):Python視覺實(shí)戰(zhàn)項(xiàng)目,即可下載包括圖像分割、口罩檢測(cè)、車道線檢測(cè)、車輛計(jì)數(shù)、添加眼線、車牌識(shí)別、字符識(shí)別、情緒檢測(cè)、文本內(nèi)容提取、面部識(shí)別等31個(gè)視覺實(shí)戰(zhàn)項(xiàng)目,助力快速學(xué)校計(jì)算機(jī)視覺。 下載3:OpenCV實(shí)戰(zhàn)項(xiàng)目20講 在「小白學(xué)視覺」公眾號(hào)后臺(tái)回復(fù):OpenCV實(shí)戰(zhàn)項(xiàng)目20講,即可下載含有20個(gè)基于OpenCV實(shí)現(xiàn)20個(gè)實(shí)戰(zhàn)項(xiàng)目,實(shí)現(xiàn)OpenCV學(xué)習(xí)進(jìn)階。 交流群
歡迎加入公眾號(hào)讀者群一起和同行交流,目前有SLAM、三維視覺、傳感器、自動(dòng)駕駛、計(jì)算攝影、檢測(cè)、分割、識(shí)別、醫(yī)學(xué)影像、GAN、算法競(jìng)賽等微信群(以后會(huì)逐漸細(xì)分),請(qǐng)掃描下面微信號(hào)加群,備注:”昵稱+學(xué)校/公司+研究方向“,例如:”張三 + 上海交大 + 視覺SLAM“。請(qǐng)按照格式備注,否則不予通過。添加成功后會(huì)根據(jù)研究方向邀請(qǐng)進(jìn)入相關(guān)微信群。請(qǐng)勿在群內(nèi)發(fā)送廣告,否則會(huì)請(qǐng)出群,謝謝理解~