實(shí)踐教程 | 基于opencv實(shí)現(xiàn)模塊化圖像處理管道

極市導(dǎo)讀
?在這篇文章中,我們將學(xué)習(xí)如何為圖像處理實(shí)現(xiàn)一個(gè)簡(jiǎn)單的模塊化管道,本文使用 OpenCV 進(jìn)行圖像處理和操作,并使用 Python 生成器進(jìn)行管道步驟。?>>加入極市CV技術(shù)交流群,走在計(jì)算機(jī)視覺(jué)的最前沿
在這篇文章中,我們將學(xué)習(xí)如何為圖像處理實(shí)現(xiàn)一個(gè)簡(jiǎn)單的模塊化管道,本文使用 OpenCV 進(jìn)行圖像處理和操作,并使用 Python 生成器進(jìn)行管道步驟。
圖像處理管道是一組按預(yù)定義順序執(zhí)行的任務(wù),用于將圖像轉(zhuǎn)換為所需的結(jié)果或提取一些有趣的特征。
任務(wù)示例可以是:
圖像轉(zhuǎn)換,如平移、旋轉(zhuǎn)、調(diào)整大小、翻轉(zhuǎn)和裁剪,
圖像的增強(qiáng),
提取感興趣區(qū)域(ROI),
計(jì)算特征描述符,
圖像或?qū)ο蠓诸?lèi),
物體檢測(cè),
用于機(jī)器學(xué)習(xí)的圖像注釋?zhuān)?/p>
最終結(jié)果可能是一個(gè)新圖像,或者只是一個(gè)包含一些圖像信息的JSON文件。
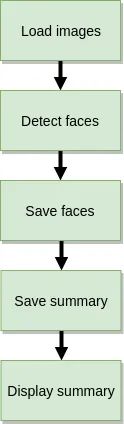
假設(shè)我們?cè)谝粋€(gè)目錄中有大量圖像,并且想要檢測(cè)其中的人臉并將每個(gè)人臉寫(xiě)入單獨(dú)的文件。此外,我們希望有一些 JSON 摘要文件,它告訴我們?cè)诤翁幷业饺四樢约霸谀膫€(gè)文件中找到人臉。我們的人臉檢測(cè)流程如下所示:
這是一個(gè)非常簡(jiǎn)單的例子,可以用以下代碼總結(jié):
import cv2
import os
import json
import numpy as np

def parse_args():
    import argparse

    # Parse command line arguments
    ap = argparse.ArgumentParser(description="Image processing pipeline")
    ap.add_argument("-i", "--input", required=True,
                    help="path to input image files")
    ap.add_argument("-o", "--output", default="output",
                    help="path to output directory")
    ap.add_argument("-os", "--out-summary", default=None,
                    help="output JSON summary file name")
    ap.add_argument("-c", "--classifier", default="models/haarcascade/haarcascade_frontalface_default.xml",
                    help="path to where the face cascade resides")

    return vars(ap.parse_args())

def list_images(path, valid_exts=None):
    image_files = []
    # Loop over the input directory structure
    for (root_dir, dir_names, filenames) in os.walk(path):
        for filename in sorted(filenames):
            # Determine the file extension of the current file
            ext = filename[filename.rfind("."):].lower()
            if valid_exts and ext.endswith(valid_exts):
                # Construct the path to the file and yield it
                file = os.path.join(root_dir, filename)
                image_files.append(file)

    return image_files

def main(args):
    os.makedirs(args["output"], exist_ok=True)

    # load the face detector
    detector = cv2.CascadeClassifier(args["classifier"])

    # list images from input directory
    input_image_files = list_images(args["input"], (".jpg", ".png"))

    # Storage for JSON summary
    summary = {}

    # Loop over the image paths
    for image_file in input_image_files:
        # Load the image and convert it to grayscale
        image = cv2.imread(image_file)
        gray = cv2.cvtColor(image, cv2.COLOR_BGR2GRAY)

        # Detect faces
        face_rects = detector.detectMultiScale(gray, scaleFactor=1.05, minNeighbors=5,
                                               minSize=(30, 30), flags=cv2.CASCADE_SCALE_IMAGE)
        summary[image_file] = {}
        # Loop over all detected faces
        for i, (x, y, w, h) in enumerate(face_rects):
            face = image[y:y+w, x:x+h]

            # Prepare output directory for faces
            output = os.path.join(*(image_file.split(os.path.sep)[1:]))
            output = os.path.join(args["output"], output)
            os.makedirs(output, exist_ok=True)

            # Save faces
            face_file = os.path.join(output, f"{i:05d}.jpg")
            cv2.imwrite(face_file, face)

            # Store summary data
            summary[image_file][face_file] = np.array([x, y, w, h], dtype=int).tolist()

        # Display summary
        print(f"[INFO] {image_file}: face detections {len(face_rects)}")

    # Save summary data
    if args["out_summary"]:
        summary_file = os.path.join(args["output"], args["out_summary"])
        print(f"[INFO] Saving summary to {summary_file}...")
        with open(summary_file, 'w') as json_file:
            json_file.write(json.dumps(summary))

if __name__ == '__main__':
    args = parse_args()
    main(args)
用于人臉檢測(cè)和提取的簡(jiǎn)單圖像處理腳本
代碼中的注釋也很有探索性,讓我們來(lái)深入研究一下。首先,我們定義命令行參數(shù)解析器(第 6-20 行)以接受以下參數(shù):
--input:這是包含我們圖像的目錄的路徑(可以是子目錄),這是唯一的強(qiáng)制性參數(shù)。
--output: 保存管道結(jié)果的輸出目錄。
--out-summary:如果我們想要一個(gè) JSON 摘要,只需提供它的名稱(chēng)(例如 output.json)。
--classifier:用于人臉檢測(cè)的預(yù)訓(xùn)練 Haar 級(jí)聯(lián)的路徑
接下來(lái),我們定義list_images函數(shù)(第 22-34 行),它將幫助我們遍歷輸入目錄結(jié)構(gòu)以獲取圖像路徑。對(duì)于人臉檢測(cè),我們使用稱(chēng)為Haar級(jí)聯(lián)(第 40 行)的 Viola-Jones 算法,在深度學(xué)習(xí)和容易出現(xiàn)誤報(bào)(在沒(méi)有人臉的地方報(bào)告人臉)的時(shí)代,這是一種相當(dāng)古老的算法。
主要處理循環(huán)如下:我們遍歷圖像文件(第 49行),逐個(gè)讀取它們(第 51 行),檢測(cè)人臉(第 55 行),將它們保存到準(zhǔn)備好的目錄(第 59-72 行)并保存帶有人臉坐標(biāo)的摘要報(bào)告(第 78-82 行)。
準(zhǔn)備項(xiàng)目環(huán)境:
$ git clone git://github.com/jagin/image-processing-pipeline.git
$ cd image-processing-pipeline
$ git checkout 77c19422f0d7a90f1541ff81782948e9a12d2519
$ conda env create -f environment.yml
$ conda activate pipeline
為了確保你們的代碼能夠正常運(yùn)行,請(qǐng)檢查你們的切換分支命令是否正確:
77c19422f0d7a90f1541ff81782948e9a12d2519
讓我們運(yùn)行它:$ python process\_images.py --input assets/images -os output.json 我們得到了一個(gè)很好的總結(jié):
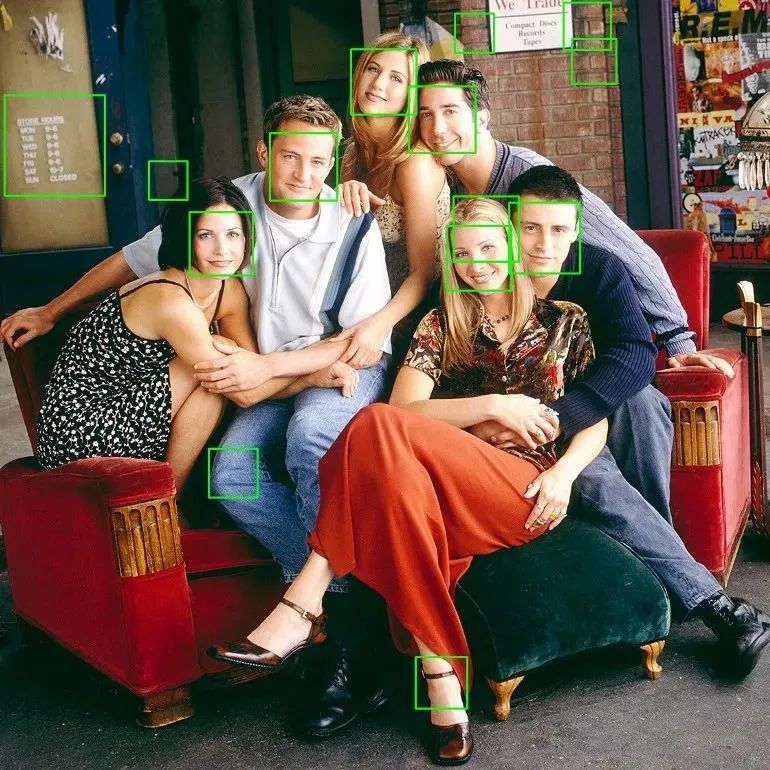
[INFO] assets/images/friends/friends\_01.jpg: face detections 2
[INFO] assets/images/friends/friends\_02.jpg: face detections 3
[INFO] assets/images/friends/friends\_03.jpg: face detections 5
[INFO] assets/images/friends/friends\_04.jpg: face detections 14
[INFO] assets/images/landscapes/landscape\_01.jpg: face detections 0
[INFO] assets/images/landscapes/landscape\_02.jpg: face detections 0
[INFO] Saving summary to output/output.json...
每個(gè)圖像的人臉圖像(也有誤報(bào))存儲(chǔ)在單獨(dú)的目錄中。
output
├── images
│   └── friends
│       ├── friends_01.jpg
│       │   ├── 00000.jpg
│       │   └── 00001.jpg
│       ├── friends_02.jpg
│       │   ├── 00000.jpg
│       │   ├── 00001.jpg
│       │   └── 00002.jpg
│       ├── friends_03.jpg
│       │   ├── 00000.jpg
│       │   ├── 00001.jpg
│       │   ├── 00002.jpg
│       │   ├── 00003.jpg
│       │   └── 00004.jpg
│       └── friends_04.jpg
│           ├── 00000.jpg
│           ├── 00001.jpg
│           ├── 00002.jpg
│           ├── 00003.jpg
│           ├── 00004.jpg
│           ├── 00005.jpg
│           ├── 00006.jpg
│           ├── 00007.jpg
│           ├── 00008.jpg
│           ├── 00009.jpg
│           ├── 00010.jpg
│           ├── 00011.jpg
│           ├── 00012.jpg
│           └── 00013.jpg
└── output.json如果覺(jué)得有用,就請(qǐng)分享到朋友圈吧!
公眾號(hào)后臺(tái)回復(fù)“CVPR21檢測(cè)”獲取CVPR2021目標(biāo)檢測(cè)論文下載~

#?CV技術(shù)社群邀請(qǐng)函?#

備注:姓名-學(xué)校/公司-研究方向-城市(如:小極-北大-目標(biāo)檢測(cè)-深圳)
即可申請(qǐng)加入極市目標(biāo)檢測(cè)/圖像分割/工業(yè)檢測(cè)/人臉/醫(yī)學(xué)影像/3D/SLAM/自動(dòng)駕駛/超分辨率/姿態(tài)估計(jì)/ReID/GAN/圖像增強(qiáng)/OCR/視頻理解等技術(shù)交流群
每月大咖直播分享、真實(shí)項(xiàng)目需求對(duì)接、求職內(nèi)推、算法競(jìng)賽、干貨資訊匯總、與?10000+來(lái)自港科大、北大、清華、中科院、CMU、騰訊、百度等名校名企視覺(jué)開(kāi)發(fā)者互動(dòng)交流~