
基于OpenCV的視頻處理管道
點擊上方“小白學(xué)視覺”,選擇加"星標(biāo)"或“置頂”
重磅干貨,第一時間送達

目前可依靠模塊化方式實現(xiàn)圖像處理管道,檢測一堆圖像文件中的人臉,并將其與漂亮的結(jié)構(gòu)化JSON摘要文件一起保存在單獨的文件夾中。
讓我們對視頻流也可以進行同樣的操作。為此,我們將構(gòu)建以下管道:
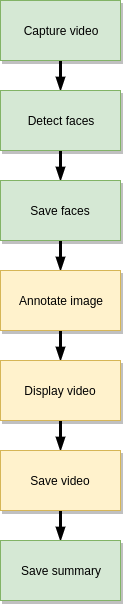
首先,我們需要捕獲視頻流。該管線任務(wù)將從視頻文件或網(wǎng)絡(luò)攝像頭(逐幀)生成一系列圖像。接下來,我們將檢測每個幀上的臉部并將其保存。接下來的三個塊是可選的,它們的目標(biāo)是創(chuàng)建帶有注釋的輸出視頻,例如在檢測到的人臉周圍的框。我們可以顯示帶注釋的視頻并將其保存。最后一個任務(wù)將收集有關(guān)檢測到的面部的信息,并保存帶有面部的框坐標(biāo)和置信度的JSON摘要文件。
如果尚未設(shè)置jagin / image-processing-pipeline存儲庫以查看源代碼并運行一些示例,則可以立即執(zhí)行以下操作:
git clone git://github.com/jagin/image-processing-pipeline.gitcd image-processing-pipelinegit checkout 7df1963247caa01b503980fe152138b88df6c526conda env create -f environment.ymlconda activate pipeline
如果已經(jīng)克隆了存儲庫并設(shè)置了環(huán)境,請使用以下命令對其進行更新:
git pullgit checkout 7df1963247caa01b503980fe152138b88df6c526conda env update -f environment.yml
使用OpenCV捕獲視頻非常簡單。我們需要創(chuàng)建一個VideoCapture對象,其中參數(shù)是設(shè)備索引(指定哪個攝像機的數(shù)字)或視頻文件的名稱。然后,我們可以逐幀捕獲視頻流。
我們可以使用以下CaptureVideo擴展類來實現(xiàn)捕獲視頻任務(wù)Pipeline:
import cv2from pipeline.pipeline import Pipelineclass CaptureVideo(Pipeline):def __init__(self, src=0):self.cap = cv2.VideoCapture(src)if not self.cap.isOpened():raise IOError(f"Cannot open video {src}")self.fps = int(self.cap.get(cv2.CAP_PROP_FPS))self.frame_count = int(self.cap.get(cv2.CAP_PROP_FRAME_COUNT))super(CaptureVideo, self).__init__()def generator(self):image_idx = 0while self.has_next():ret, image = self.cap.read()if not ret:# no frames has been grabbedbreakdata = {"image_id": f"{image_idx:05d}","image": image,}if self.filter(data):image_idx += 1yield self.map(data)def cleanup(self):# Closes video file or capturing deviceself.cap.release()
使用__init__我們創(chuàng)建VideoCapture對象(第6行)并提取視頻流的屬性,例如每秒幀數(shù)和幀數(shù)。我們將需要它們顯示進度條并正確保存視頻。圖像幀將在具有字典結(jié)構(gòu)的generator函數(shù)(第30行)中產(chǎn)生:
data = {"image_id": f"{image_idx:05d}","image": image,}
當(dāng)然,數(shù)據(jù)中也包括圖像的序列號和幀的二進制數(shù)據(jù)。
我們準(zhǔn)備檢測面部。這次,我們將使用OpenCV的深度神經(jīng)網(wǎng)絡(luò)模塊,而不是我在上一個故事中所承諾的Haar級聯(lián)。我們將要使用的模型更加準(zhǔn)確,并且還為我們提供了置信度得分。

從版本3.3開始,OpenCV支持許多深度學(xué)習(xí)框架,例如Caffe,TensorFlow和PyTorch,從而使我們能夠加載模型,預(yù)處理輸入圖像并進行推理以獲得輸出分類。
有一位優(yōu)秀的博客文章中阿德里安·羅斯布魯克(Adrian Rosebrock)解釋如何使用OpenCV和深度學(xué)習(xí)實現(xiàn)人臉檢測。我們將在FaceDetector類中使用部分代碼:
import cv2import numpy as npclass FaceDetector:def __init__(self, prototxt, model, confidence=0.5):self.confidence = confidenceself.net = cv2.dnn.readNetFromCaffe(prototxt, model)def detect(self, images):# convert images into blobblob = self.preprocess(images)# pass the blob through the network and obtain the detections and predictionsself.net.setInput(blob)detections = self.net.forward()# Prepare storage for faces for every image in the batchfaces = dict(zip(range(len(images)), [[] for _ in range(len(images))]))# loop over the detectionsfor i in range(0, detections.shape[2]):# extract the confidence (i.e., probability) associated with the predictionconfidence = detections[0, 0, i, 2]# filter out weak detections by ensuring the `confidence` is# greater than the minimum confidenceif confidence < self.confidence:continue# grab the image indeximage_idx = int(detections[0, 0, i, 0])# grab the image dimensions(h, w) = images[image_idx].shape[:2]# compute the (x, y)-coordinates of the bounding box for the objectbox = detections[0, 0, i, 3:7] * np.array([w, h, w, h])# Add resultfaces[image_idx].append((box, confidence))return facesdef preprocess(self, images):return cv2.dnn.blobFromImages(images, 1.0, (300, 300), (104.0, 177.0, 123.0))
我們嘗試模塊化并分離管道構(gòu)建塊,這種方法將為我們提供易于管理的代碼,并使測試更容易編寫:
import osimport cv2from pipeline.libs.face_detector import FaceDetectorimport tests.config as configclass TestFaceDetector:def test_face_detector(self):prototxt = os.path.join(config.MODELS_FACE_DETECTOR_DIR, "deploy.prototxt.txt")model = os.path.join(config.MODELS_FACE_DETECTOR_DIR, "res10_300x300_ssd_iter_140000.caffemodel")detector = FaceDetector(prototxt, model)test_image = cv2.imread(os.path.join(config.ASSETS_IMAGES_DIR, "friends", "friends_01.jpg"))faces = detector.detect([test_image])assert len(faces) == 1assert len(faces[0]) # Should recognize some faces from friends_01.jpg
使用管道架構(gòu),可以很容易地CascadeDetectFaces從上一篇文章?lián)Q成更準(zhǔn)確的深度學(xué)習(xí)人臉檢測器模型。讓我們FaceDetector在新的DetectFaces管道步驟中使用:
from pipeline.pipeline import Pipelinefrom pipeline.libs.face_detector import FaceDetectorclass DetectFaces(Pipeline):def __init__(self, prototxt, model, batch_size=1, confidence=0.5):self.detector = FaceDetector(prototxt, model, confidence=confidence)self.batch_size = batch_sizesuper(DetectFaces, self).__init__()def generator(self):batch = []stop = Falsewhile self.has_next() and not stop:try:# Buffer the pipeline streamdata = next(self.source)batch.append(data)except StopIteration:stop = True# Check if there is anything in batch.# Process it if the size match batch_size or there is the end of the input stream.if len(batch) and (len(batch) == self.batch_size or stop):# Prepare images batchimages = [data["image"] for data in batch]# Detect faces on all images at oncefaces = self.detector.detect(images)# Extract the faces and attache them to the proper imagefor image_idx, image_faces in faces.items():batch[image_idx]["faces"] = image_faces# Yield all the data from bufferfor data in batch:if self.filter(data):yield self.map(data)batch = []
我們對圖像流(第15–20行)進行緩沖,直到到達batch_size(第24行)為止,然后在所有緩沖的圖像上(第28行)檢測面部,收集面部坐標(biāo)和置信度(第31–32行),然后重新生成圖像(第35-37行)。
當(dāng)我們使用GPU(圖形處理單元)時,我們的武器庫中同時運行著數(shù)千個處理內(nèi)核,這些內(nèi)核專門用于矩陣運算。批量執(zhí)行推理總是更快,一次向深度學(xué)習(xí)模型展示的圖像多于一張一張。
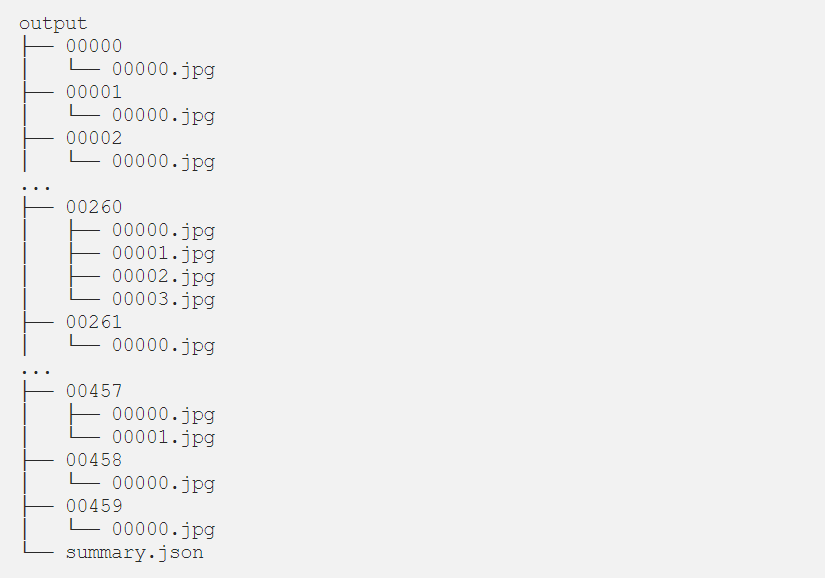
SaveFaces并SaveSummary產(chǎn)生輸出結(jié)果。在SaveFaces類,使用map功能,遍歷所有檢測到的面部,從圖像裁剪他們并保存到輸出目錄。
SaveSummary類的任務(wù)是收集有關(guān)已識別面部的所有元數(shù)據(jù),并將它們保存為結(jié)構(gòu)良好的JSON文件,該map函數(shù)用于緩沖元數(shù)據(jù)。接下來,我們使用額外的write功能擴展我們的類,我們將需要在管道的末尾觸發(fā)以將JSON文件與摘要一起保存。臉部圖像針對每一幀存儲在單獨的目錄中。
為了觀察流水線的結(jié)果,很高興可以顯示帶有帶注釋的面孔的視頻。關(guān)于AnnotateImage(pipeline/annotate_image.py)/DisplayVideo(pipeline/display_video.py)的全部內(nèi)容。
在process_video_pipeline.py文件中我們可以看到,整個管道的定義如下:
pipeline = (capture_video |detect_faces |save_faces |annotate_image |display_video |save_video |save_summary)
上面有很多解釋,但是視頻和圖像勝于雄辯。讓我們來看一下觸發(fā)命令的管道:
python process_video_pipeline.py -i assets/videos/faces.mp4 -p -d -ov faces.avi,M,];-p將顯示進度條,
-d顯示帶有批注面孔的視頻結(jié)果,
-ov faces.avi并將視頻結(jié)果保存到output文件夾。
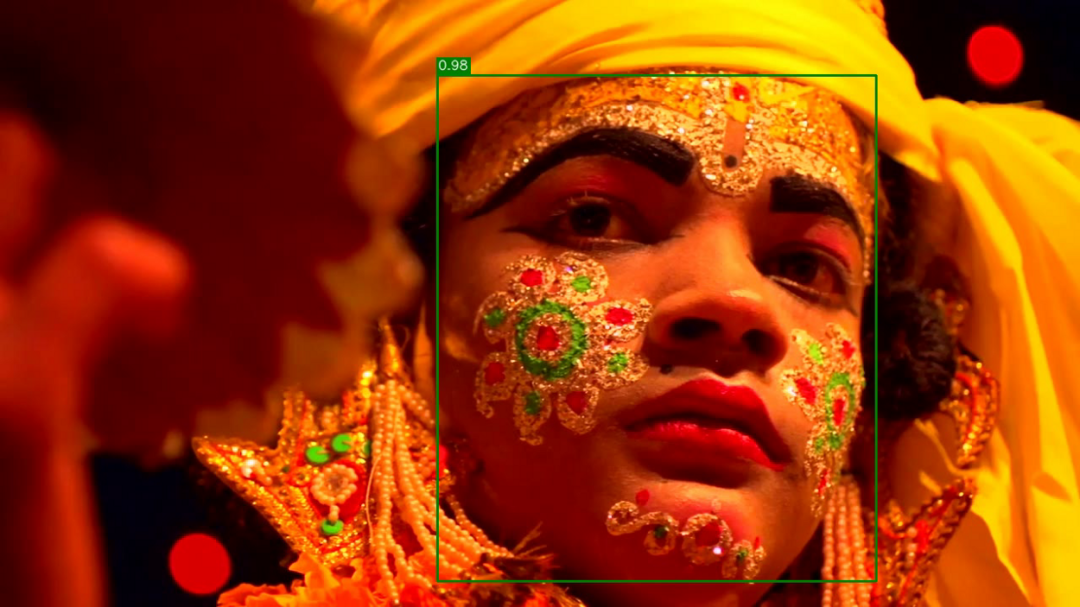
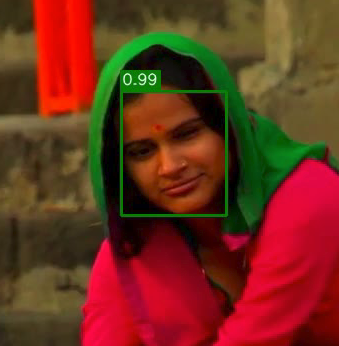
視頻最終的呈現(xiàn)效果如下:
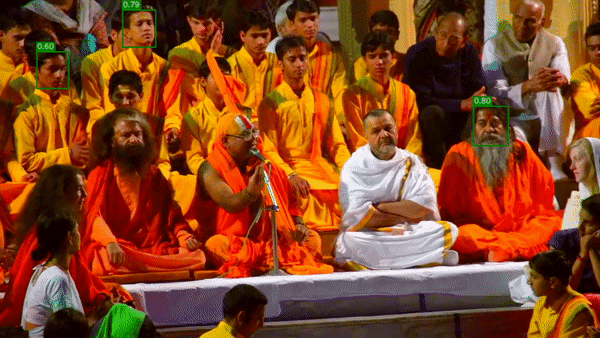
正如我們在示例視頻中看到的那樣,并不是所有臉孔都能被識別。我們可以降低設(shè)置參數(shù)的深度學(xué)習(xí)模型的置信度confidence 0.2(默認(rèn)值為0.5)。降低置信度閾值會增加假陽性的發(fā)生(在圖像中沒有臉的位置出現(xiàn)臉)。
DetectFaces類的批量處理大小:
python process_video_pipeline.py -i assets/videos/faces.mp4 -p--batch-size 1|███████████████████████████| 577/577 [00:11<00:00, 52.26it/s][INFO] Saving summary to output/summary.json...$ python process_video_pipeline.py -i assets/videos/faces.mp4 -p--batch-size 4|███████████████████████████| 577/577 [00:09<00:00, 64.66it/s][INFO] Saving summary to output/summary.json...python process_video_pipeline.py -i assets/videos/faces.mp4 -p--batch-size 8|███████████████████████████| 577/577 [00:10<00:00, 56.04it/s][INFO] Saving summary to output/summary.json...
在我們的硬件上(2.20GHz的Core i7–8750H CPU和NVIDIA RTX 2080 Ti),我門每秒獲得52.26幀的圖像--batch-size 1,但是對于--batch-size 4我們來說,速度卻提高到了每秒64.66幀。
交流群
歡迎加入公眾號讀者群一起和同行交流,目前有SLAM、三維視覺、傳感器、自動駕駛、計算攝影、檢測、分割、識別、醫(yī)學(xué)影像、GAN、算法競賽等微信群(以后會逐漸細(xì)分),請掃描下面微信號加群,備注:”昵稱+學(xué)校/公司+研究方向“,例如:”張三 + 上海交大 + 視覺SLAM“。請按照格式備注,否則不予通過。添加成功后會根據(jù)研究方向邀請進入相關(guān)微信群。請勿在群內(nèi)發(fā)送廣告,否則會請出群,謝謝理解~