
OAuth2實(shí)現(xiàn)單點(diǎn)登錄
前言
技術(shù)這東西吧,看別人寫的好像很簡(jiǎn)單似的,到自己去寫的時(shí)候就各種問(wèn)題,“一看就會(huì),一做就錯(cuò)”。網(wǎng)上關(guān)于實(shí)現(xiàn)SSO的文章一大堆,但是當(dāng)你真的照著寫的時(shí)候就會(huì)發(fā)現(xiàn)根本不是那么回事兒,簡(jiǎn)直讓人抓狂,尤其是對(duì)于我這樣的菜鳥。幾經(jīng)曲折,終于搞定了,決定記錄下來(lái),以便后續(xù)查看。先來(lái)看一下效果
準(zhǔn)備
2.1. 單點(diǎn)登錄
最常見的例子是,我們打開淘寶APP,首頁(yè)就會(huì)有天貓、聚劃算等服務(wù)的鏈接,當(dāng)你點(diǎn)擊以后就直接跳過(guò)去了,并沒(méi)有讓你再登錄一次
下面這個(gè)圖是我再網(wǎng)上找的,我覺得畫得比較明白:
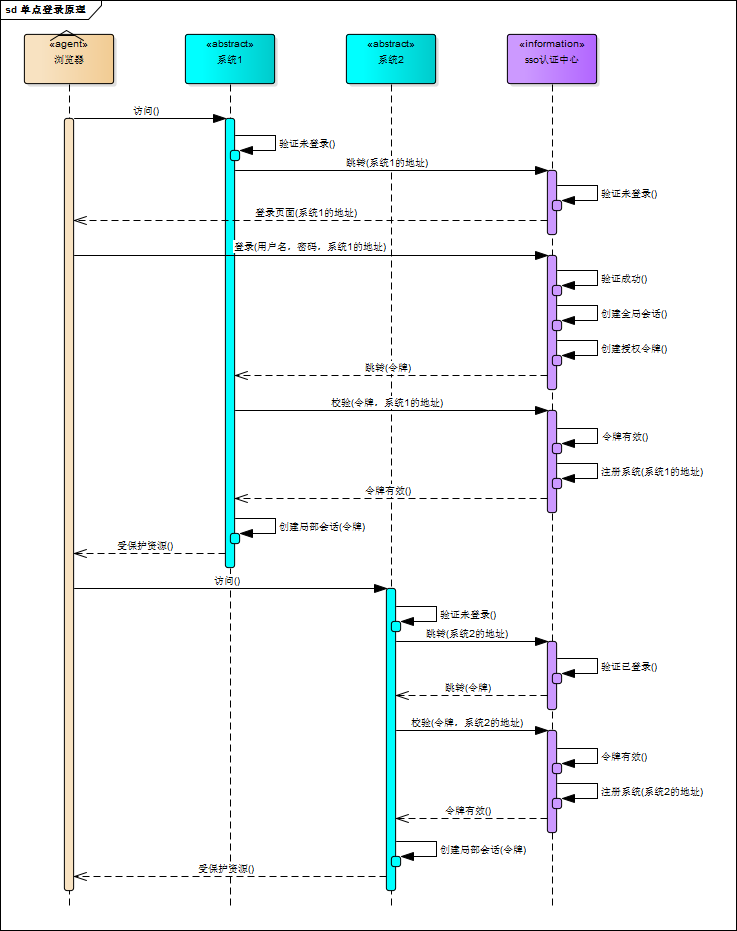
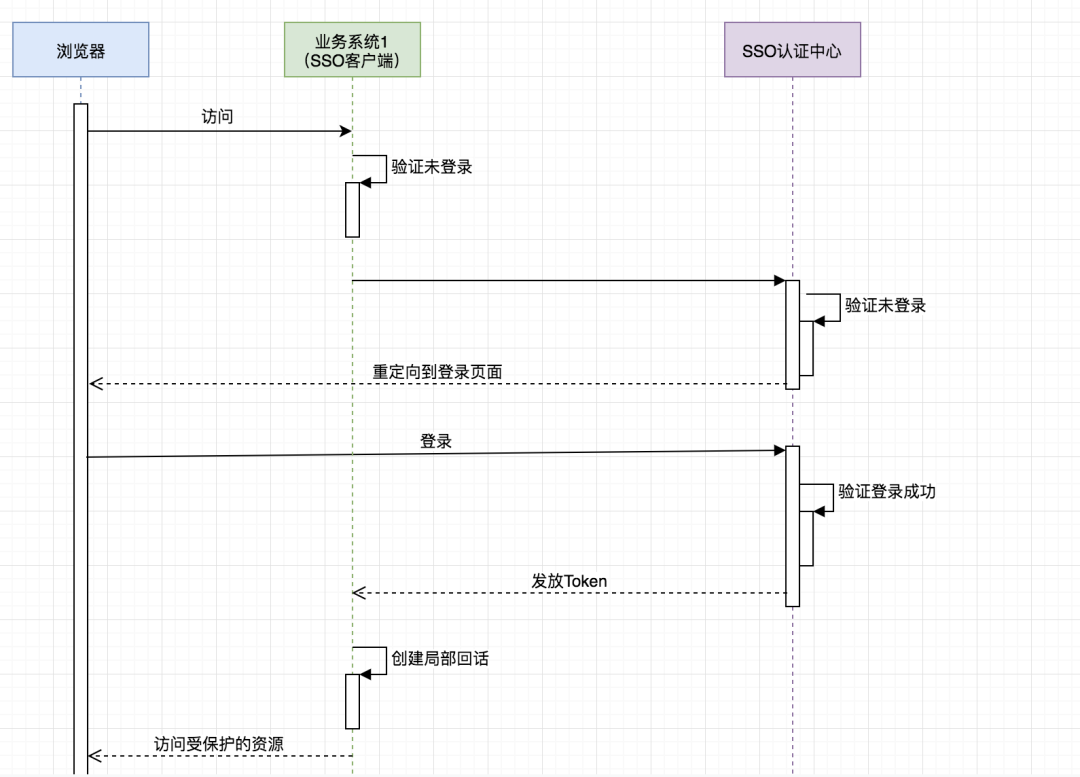
可惜有點(diǎn)兒不清晰,于是我又畫了個(gè)簡(jiǎn)版的:
重要的是理解:
SSO服務(wù)端和SSO客戶端直接是通過(guò)授權(quán)以后發(fā)放Token的形式來(lái)訪問(wèn)受保護(hù)的資源 相對(duì)于瀏覽器來(lái)說(shuō),業(yè)務(wù)系統(tǒng)是服務(wù)端,相對(duì)于SSO服務(wù)端來(lái)說(shuō),業(yè)務(wù)系統(tǒng)是客戶端 瀏覽器和業(yè)務(wù)系統(tǒng)之間通過(guò)會(huì)話正常訪問(wèn) 不是每次瀏覽器請(qǐng)求都要去SSO服務(wù)端去驗(yàn)證,只要瀏覽器和它所訪問(wèn)的服務(wù)端的會(huì)話有效它就可以正常訪問(wèn)
2.2. OAuth2
推薦以下幾篇博客
《OAuth 2.0》 https://www.cnblogs.com/cjsblog/p/9174797.html
《Spring Security對(duì)OAuth2的支持》https://www.cnblogs.com/cjsblog/p/9184173.html
利用OAuth2實(shí)現(xiàn)單點(diǎn)登錄
接下來(lái),只講跟本例相關(guān)的一些配置,不講原理,不講為什么
眾所周知,在OAuth2在有授權(quán)服務(wù)器、資源服務(wù)器、客戶端這樣幾個(gè)角色,當(dāng)我們用它來(lái)實(shí)現(xiàn)SSO的時(shí)候是不需要資源服務(wù)器這個(gè)角色的,有授權(quán)服務(wù)器和客戶端就夠了。
授權(quán)服務(wù)器當(dāng)然是用來(lái)做認(rèn)證的,客戶端就是各個(gè)應(yīng)用系統(tǒng),我們只需要登錄成功后拿到用戶信息以及用戶所擁有的權(quán)限即可
之前我一直認(rèn)為把那些需要權(quán)限控制的資源放到資源服務(wù)器里保護(hù)起來(lái)就可以實(shí)現(xiàn)權(quán)限控制,其實(shí)是我想錯(cuò)了,權(quán)限控制還得通過(guò)Spring Security或者自定義攔截器來(lái)做
3.1. Spring Security 、OAuth2、JWT、SSO
在本例中,一定要分清楚這幾個(gè)的作用
首先,SSO是一種思想,或者說(shuō)是一種解決方案,是抽象的,我們要做的就是按照它的這種思想去實(shí)現(xiàn)它
其次,OAuth2是用來(lái)允許用戶授權(quán)第三方應(yīng)用訪問(wèn)他在另一個(gè)服務(wù)器上的資源的一種協(xié)議,它不是用來(lái)做單點(diǎn)登錄的,但我們可以利用它來(lái)實(shí)現(xiàn)單點(diǎn)登錄。在本例實(shí)現(xiàn)SSO的過(guò)程中,受保護(hù)的資源就是用戶的信息(包括,用戶的基本信息,以及用戶所具有的權(quán)限),而我們想要訪問(wèn)這這一資源就需要用戶登錄并授權(quán),OAuth2服務(wù)端負(fù)責(zé)令牌的發(fā)放等操作,這令牌的生成我們采用JWT,也就是說(shuō)JWT是用來(lái)承載用戶的Access_Token的
最后,Spring Security是用于安全訪問(wèn)的,這里我們我們用來(lái)做訪問(wèn)權(quán)限控制
認(rèn)證服務(wù)器配置
4.1. Maven依賴
"1.0" encoding="UTF-8"?>
<project xmlns="http://maven.apache.org/POM/4.0.0" xmlns:xsi="http://www.w3.org/2001/XMLSchema-instance"
         xsi:schemaLocation="http://maven.apache.org/POM/4.0.0 http://maven.apache.org/xsd/maven-4.0.0.xsd">
    4.0.0

        org.springframework.boot
        spring-boot-starter-parent
        2.1.3.RELEASE


    com.cjs.sso
    oauth2-sso-auth-server
    0.0.1-SNAPSHOT
    oauth2-sso-auth-server


        1.8


            org.springframework.boot
            spring-boot-starter-data-jpa


            org.springframework.boot
            spring-boot-starter-data-redis


            org.springframework.boot
            spring-boot-starter-security


            org.springframework.security.oauth.boot
            spring-security-oauth2-autoconfigure
            2.1.3.RELEASE


            org.springframework.boot
            spring-boot-starter-thymeleaf


            org.springframework.boot
            spring-boot-starter-web


            org.springframework.session
            spring-session-data-redis


            mysql
            mysql-connector-java
            runtime


            org.projectlombok
            lombok
            true


            org.springframework.boot
            spring-boot-starter-test
            test


            org.springframework.security
            spring-security-test
            test


            org.apache.commons
            commons-lang3
            3.8.1


            com.alibaba
            fastjson
            1.2.56


                org.springframework.boot
                spring-boot-maven-plugin


</project xmlns=
這里面最重要的依賴是:spring-security-oauth2-autoconfigure
4.2. application.yml
spring:
  datasource:
    url: jdbc:mysql://localhost:3306/permission
    username: root
    password: 123456
    driver-class-name: com.mysql.jdbc.Driver
  jpa:
    show-sql: true
  session:
    store-type: redis
  redis:
    host: 127.0.0.1
    password: 123456
    port: 6379
server:
  port: 8080
4.3. AuthorizationServerConfig(重要)
package com.cjs.sso.config;

import org.springframework.beans.factory.annotation.Autowired;
import org.springframework.context.annotation.Bean;
import org.springframework.context.annotation.Configuration;
import org.springframework.context.annotation.Primary;
import org.springframework.security.core.token.DefaultToken;
import org.springframework.security.oauth2.config.annotation.configurers.ClientDetailsServiceConfigurer;
import org.springframework.security.oauth2.config.annotation.web.configuration.AuthorizationServerConfigurerAdapter;
import org.springframework.security.oauth2.config.annotation.web.configuration.EnableAuthorizationServer;
import org.springframework.security.oauth2.config.annotation.web.configurers.AuthorizationServerEndpointsConfigurer;
import org.springframework.security.oauth2.config.annotation.web.configurers.AuthorizationServerSecurityConfigurer;
import org.springframework.security.oauth2.provider.token.DefaultTokenServices;
import org.springframework.security.oauth2.provider.token.TokenStore;
import org.springframework.security.oauth2.provider.token.store.JwtAccessTokenConverter;
import org.springframework.security.oauth2.provider.token.store.JwtTokenStore;

import javax.sql.DataSource;

/**
 * @author Java技術(shù)精選
 * @date
 */
@Configuration
@EnableAuthorizationServer
public class AuthorizationServerConfig extends AuthorizationServerConfigurerAdapter {

    @Autowired
    private DataSource dataSource;

    @Override
    public void configure(AuthorizationServerSecurityConfigurer security) throws Exception {
        security.allowFormAuthenticationForClients();
        security.tokenKeyAccess("isAuthenticated()");
    }

    @Override
    public void configure(ClientDetailsServiceConfigurer clients) throws Exception {
        clients.jdbc(dataSource);
    }

    @Override
    public void configure(AuthorizationServerEndpointsConfigurer endpoints) throws Exception {
        endpoints.accessTokenConverter(jwtAccessTokenConverter());
        endpoints.tokenStore(jwtTokenStore());
//        endpoints.tokenServices(defaultTokenServices());
    }

    /*@Primary
    @Bean
    public DefaultTokenServices defaultTokenServices() {
        DefaultTokenServices defaultTokenServices = new DefaultTokenServices();
        defaultTokenServices.setTokenStore(jwtTokenStore());
        defaultTokenServices.setSupportRefreshToken(true);
        return defaultTokenServices;
    }*/

    @Bean
    public JwtTokenStore jwtTokenStore() {
        return new JwtTokenStore(jwtAccessTokenConverter());
    }

    @Bean
    public JwtAccessTokenConverter jwtAccessTokenConverter() {
        JwtAccessTokenConverter jwtAccessTokenConverter = new JwtAccessTokenConverter();
        jwtAccessTokenConverter.setSigningKey("cjs");   //  Sets the JWT signing key
        return jwtAccessTokenConverter;
    }

}
說(shuō)明:
別忘了**@EnableAuthorizationServer** Token存儲(chǔ)采用的是JWT 客戶端以及登錄用戶這些配置存儲(chǔ)在數(shù)據(jù)庫(kù),為了減少數(shù)據(jù)庫(kù)的查詢次數(shù),可以從數(shù)據(jù)庫(kù)讀出來(lái)以后再放到內(nèi)存中
4.4. WebSecurityConfig(重要)
package com.cjs.sso.config;

import com.cjs.sso.service.MyUserDetailsService;
import org.springframework.beans.factory.annotation.Autowired;
import org.springframework.context.annotation.Bean;
import org.springframework.context.annotation.Configuration;
import org.springframework.security.config.annotation.authentication.builders.AuthenticationManagerBuilder;
import org.springframework.security.config.annotation.web.builders.HttpSecurity;
import org.springframework.security.config.annotation.web.builders.WebSecurity;
import org.springframework.security.config.annotation.web.configuration.EnableWebSecurity;
import org.springframework.security.config.annotation.web.configuration.WebSecurityConfigurerAdapter;
import org.springframework.security.crypto.bcrypt.BCryptPasswordEncoder;
import org.springframework.security.crypto.password.PasswordEncoder;

/**
 * @author Java技術(shù)精選
 * @date
 */
@Configuration
@EnableWebSecurity
public class WebSecurityConfig extends WebSecurityConfigurerAdapter {

    @Autowired
    private MyUserDetailsService userDetailsService;

    @Override
    protected void configure(AuthenticationManagerBuilder auth) throws Exception {
        auth.userDetailsService(userDetailsService).passwordEncoder(passwordEncoder());
    }

    @Override
    public void configure(WebSecurity web) throws Exception {
        web.ignoring().antMatchers("/assets/**", "/css/**", "/images/**");
    }

    @Override
    protected void configure(HttpSecurity http) throws Exception {
        http.formLogin()
                .loginPage("/login")
                .and()
                .authorizeRequests()
                .antMatchers("/login").permitAll()
                .anyRequest()
                .authenticated()
                .and().csrf().disable().cors();
    }

    @Bean
    public PasswordEncoder passwordEncoder() {
        return new BCryptPasswordEncoder();
    }

}
4.5. 自定義登錄頁(yè)面(一般來(lái)講都是要自定義的)
package com.cjs.sso.controller;

import org.springframework.stereotype.Controller;
import org.springframework.web.bind.annotation.GetMapping;

/**
 * @author Java技術(shù)精選
 * @date
 */
@Controller
public class LoginController {

    @GetMapping("/login")
    public String login() {
        return "login";
    }

    @GetMapping("/")
    public String index() {
        return "index";
    }

}
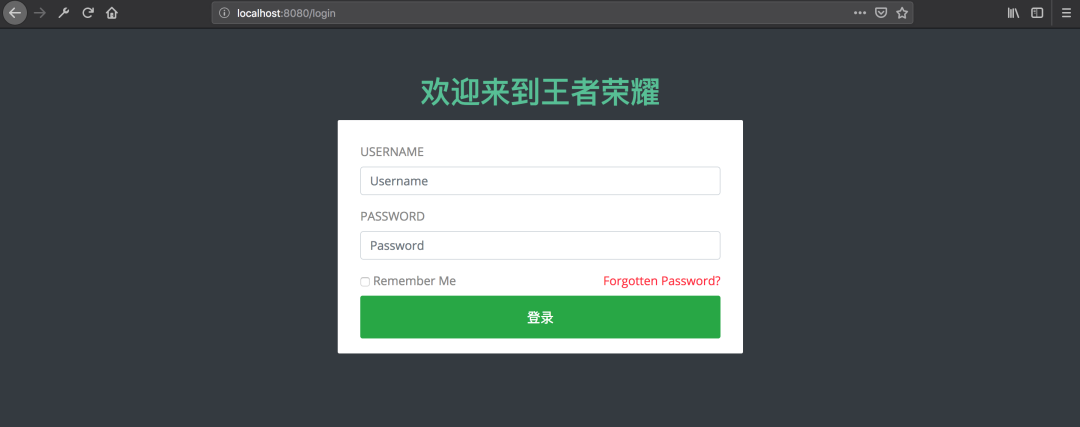
自定義登錄頁(yè)面的時(shí)候,只需要準(zhǔn)備一個(gè)登錄頁(yè)面,然后寫個(gè)Controller令其可以訪問(wèn)到即可,登錄頁(yè)面表單提交的時(shí)候method一定要是post,最重要的時(shí)候action要跟訪問(wèn)登錄頁(yè)面的url一樣
千萬(wàn)記住了,訪問(wèn)登錄頁(yè)面的時(shí)候是GET請(qǐng)求,表單提交的時(shí)候是POST請(qǐng)求,其它的就不用管了
<html xmlns:th="http://www.thymeleaf.org">
<meta charset="utf-8">
<meta http-equiv="X-UA-Compatible" content="IE=edge">
<meta name="description" content="Ela Admin - HTML5 Admin Template">
<meta name="viewport" content="width=device-width, initial-scale=1">
<link type="text/css" rel="stylesheet" th:href="@{/assets/css/normalize.css}">
<link type="text/css" rel="stylesheet" th:href="@{/assets/bootstrap-4.3.1-dist/css/bootstrap.min.css}">
<link type="text/css" rel="stylesheet" th:href="@{/assets/css/font-awesome.min.css}">
<link type="text/css" rel="stylesheet" th:href="@{/assets/css/style.css}">
<body class="bg-dark">
<div class="sufee-login d-flex align-content-center flex-wrap">
<div class="container">
<div class="login-content">
<div class="login-logo">
<h1 style="color: #57bf95;">歡迎來(lái)到王者榮耀
<div class="login-form">
<form th:action="@{/login}" method="post">
<div class="form-group">
<input type="text" class="form-control" name="username" placeholder="Username">
<div class="form-group">
<input type="password" class="form-control" name="password" placeholder="Password">
<div class="checkbox">
<label class="pull-right">
<a href="#">Forgotten Password?
<button type="submit" class="btn btn-success btn-flat m-b-30 m-t-30" style="font-size: 18px;">登錄
<script type="text/javascript" th:src="@{/assets/js/jquery-2.1.4.min.js}">
<script type="text/javascript" th:src="@{/assets/bootstrap-4.3.1-dist/js/bootstrap.min.js}">
<script type="text/javascript" th:src="@{/assets/js/main.js}">
</script </script </script </button </a href=</label class=</div class=</input </div class=</input </div class=</form th:action=</div class=</h1 style=</div class=</div class=</div class=</div class=</body class=</link </link </link </link </meta name=</meta name=</meta http-equiv=</meta charset=</html xmlns:th=4.6. 定義客戶端
4.7. 加載用戶
登錄賬戶
package com.cjs.sso.domain;

import lombok.Data;
import org.springframework.security.core.GrantedAuthority;
import org.springframework.security.core.userdetails.User;

import java.util.Collection;

/**
 * 大部分時(shí)候直接用User即可不必?cái)U(kuò)展
 * @author Java技術(shù)精選
 * @date
 */
@Data
public class MyUser extends User {

    private Integer departmentId;   //  舉個(gè)例子,部門ID

    private String mobile;  //  舉個(gè)例子,假設(shè)我們想增加一個(gè)字段,這里我們?cè)黾右粋€(gè)mobile表示手機(jī)號(hào)

    public MyUser(String username, String password, Collection authorities) {
        super(username, password, authorities);
    }

    public MyUser(String username, String password, boolean enabled, boolean accountNonExpired, boolean credentialsNonExpired, boolean accountNonLocked, Collection authorities) {
        super(username, password, enabled, accountNonExpired, credentialsNonExpired, accountNonLocked, authorities);
    }
}
加載登錄賬戶
package com.cjs.sso.service;

import com.alibaba.fastjson.JSON;
import com.cjs.sso.domain.MyUser;
import com.cjs.sso.entity.SysPermission;
import com.cjs.sso.entity.SysUser;
import lombok.extern.slf4j.Slf4j;
import org.springframework.beans.factory.annotation.Autowired;
import org.springframework.security.core.authority.SimpleGrantedAuthority;
import org.springframework.security.core.userdetails.UserDetails;
import org.springframework.security.core.userdetails.UserDetailsService;
import org.springframework.security.core.userdetails.UsernameNotFoundException;
import org.springframework.security.crypto.password.PasswordEncoder;
import org.springframework.stereotype.Service;
import org.springframework.util.CollectionUtils;

import java.util.ArrayList;
import java.util.List;

/**
 * @author Java技術(shù)精選
 * @date
 */
@Slf4j
@Service
public class MyUserDetailsService implements UserDetailsService {

    @Autowired
    private PasswordEncoder passwordEncoder;

    @Autowired
    private UserService userService;

    @Autowired
    private PermissionService permissionService;

    @Override
    public UserDetails loadUserByUsername(String username) throws UsernameNotFoundException {
        SysUser sysUser = userService.getByUsername(username);
        if (null == sysUser) {
            log.warn("用戶{}不存在", username);
            throw new UsernameNotFoundException(username);
        }
        List permissionList = permissionService.findByUserId(sysUser.getId());
        List authorityList = new ArrayList<>();
        if (!CollectionUtils.isEmpty(permissionList)) {
            for (SysPermission sysPermission : permissionList) {
                authorityList.add(new SimpleGrantedAuthority(sysPermission.getCode()));
            }
        }

        MyUser myUser = new MyUser(sysUser.getUsername(), passwordEncoder.encode(sysUser.getPassword()), authorityList);

        log.info("登錄成功!用戶: {}", JSON.toJSONString(myUser));

        return myUser;
    }
}
4.8. 驗(yàn)證
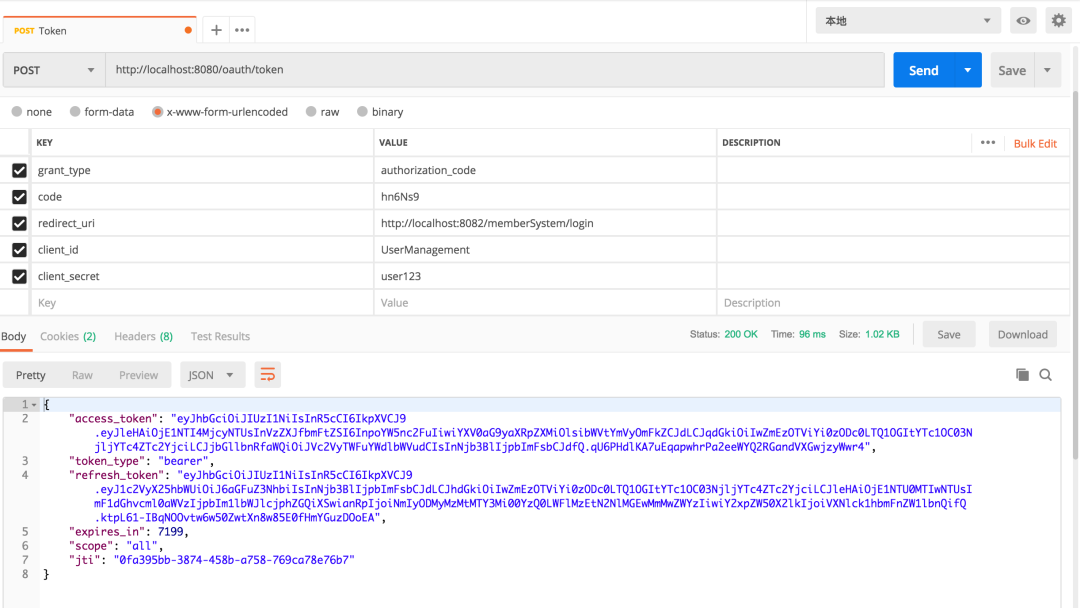
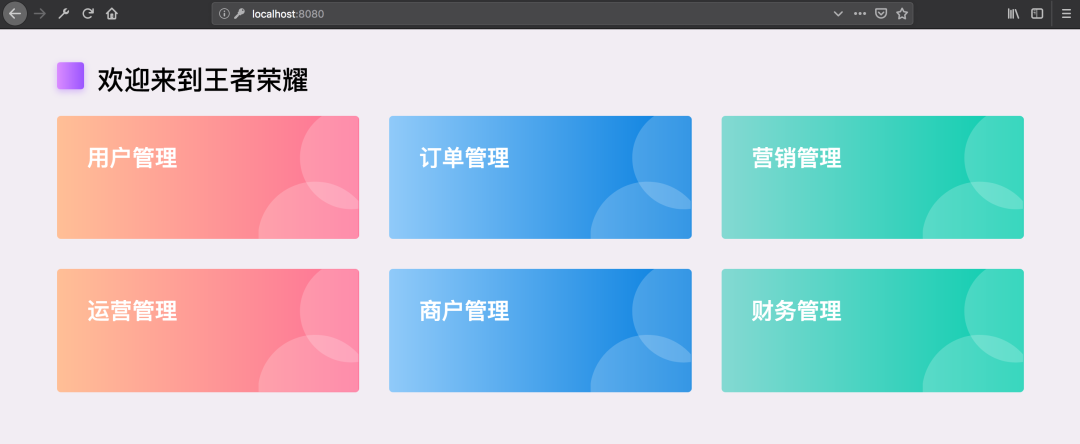
當(dāng)我們看到這個(gè)界面的時(shí)候,表示認(rèn)證服務(wù)器配置完成
兩個(gè)客戶端
5.1. Maven依賴
"1.0" encoding="UTF-8"?>
<project xmlns="http://maven.apache.org/POM/4.0.0" xmlns:xsi="http://www.w3.org/2001/XMLSchema-instance"
         xsi:schemaLocation="http://maven.apache.org/POM/4.0.0 http://maven.apache.org/xsd/maven-4.0.0.xsd">
    4.0.0

        org.springframework.boot
        spring-boot-starter-parent
        2.1.3.RELEASE


    com.cjs.sso
    oauth2-sso-client-member
    0.0.1-SNAPSHOT
    oauth2-sso-client-member
    Demo project for Spring Boot


        1.8


            org.springframework.boot
            spring-boot-starter-data-jpa


            org.springframework.boot
            spring-boot-starter-oauth2-client


            org.springframework.boot
            spring-boot-starter-security


            org.springframework.security.oauth.boot
            spring-security-oauth2-autoconfigure
            2.1.3.RELEASE


            org.springframework.boot
            spring-boot-starter-thymeleaf


            org.thymeleaf.extras
            thymeleaf-extras-springsecurity5
            3.0.4.RELEASE


            org.springframework.boot
            spring-boot-starter-web


            com.h2database
            h2
            runtime


            org.projectlombok
            lombok
            true


            org.springframework.boot
            spring-boot-starter-test
            test


            org.springframework.security
            spring-security-test
            test


                org.springframework.boot
                spring-boot-maven-plugin


</project xmlns=
5.2. application.yml
server:
  port: 8082
  servlet:
    context-path: /memberSystem
security:
  oauth2:
    client:
      client-id: UserManagement
      client-secret: user123
      access-token-uri: http://localhost:8080/oauth/token
      user-authorization-uri: http://localhost:8080/oauth/authorize
    resource:
      jwt:
        key-uri: http://localhost:8080/oauth/token_key
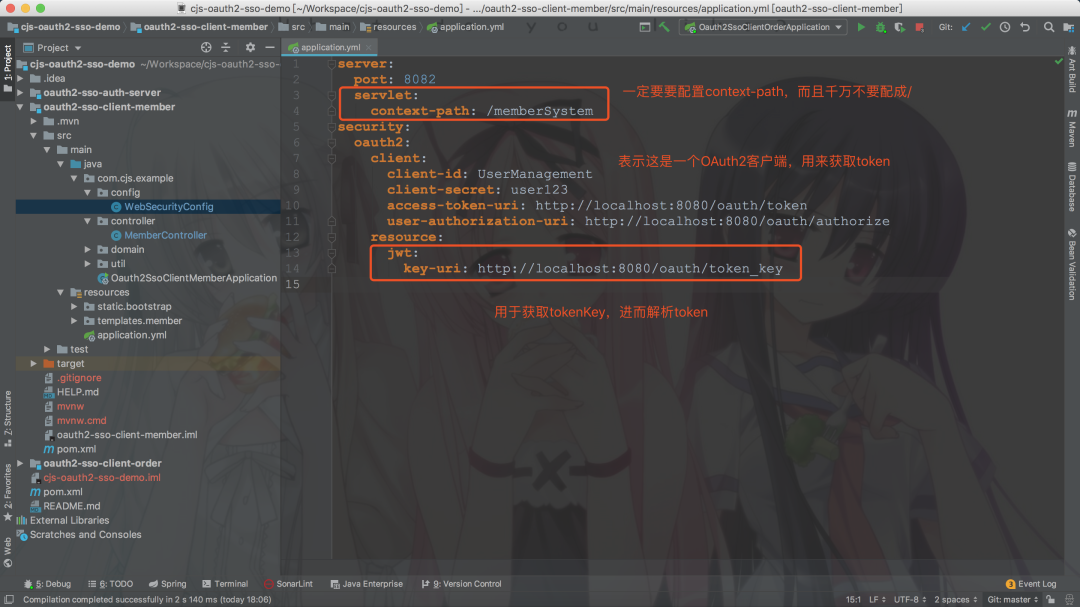
這里context-path不要設(shè)成/,不然重定向獲取code的時(shí)候回被攔截
5.3. WebSecurityConfig
package com.cjs.example.config;

import com.cjs.example.util.EnvironmentUtils;
import org.springframework.beans.factory.annotation.Autowired;
import org.springframework.boot.autoconfigure.security.oauth2.client.EnableOAuth2Sso;
import org.springframework.context.annotation.Configuration;
import org.springframework.security.config.annotation.web.builders.HttpSecurity;
import org.springframework.security.config.annotation.web.builders.WebSecurity;
import org.springframework.security.config.annotation.web.configuration.WebSecurityConfigurerAdapter;


/**
 * @author Java技術(shù)精選
 * @date
 */
@EnableOAuth2Sso
@Configuration
public class WebSecurityConfig extends WebSecurityConfigurerAdapter {

    @Autowired
    private EnvironmentUtils environmentUtils;

    @Override
    public void configure(WebSecurity web) throws Exception {
        web.ignoring().antMatchers("/bootstrap/**");
    }

    @Override
    protected void configure(HttpSecurity http) throws Exception {
        if ("local".equals(environmentUtils.getActiveProfile())) {
            http.authorizeRequests().anyRequest().permitAll();
        }else {
            http.logout().logoutSuccessUrl("http://localhost:8080/logout")
                    .and()
                    .authorizeRequests()
                    .anyRequest().authenticated()
                    .and()
                    .csrf().disable();
        }
    }
}
說(shuō)明:
最重要的注解是@EnableOAuth2Sso 權(quán)限控制這里采用Spring Security方法級(jí)別的訪問(wèn)控制,結(jié)合Thymeleaf可以很容易做權(quán)限控制 順便多提一句,如果是前后端分離的話,前端需求加載用戶的權(quán)限,然后判斷應(yīng)該顯示那些按鈕那些菜單
5.4. MemberController
package com.cjs.example.controller;

import org.springframework.security.access.prepost.PreAuthorize;
import org.springframework.security.core.Authentication;
import org.springframework.stereotype.Controller;
import org.springframework.web.bind.annotation.GetMapping;
import org.springframework.web.bind.annotation.PostMapping;
import org.springframework.web.bind.annotation.RequestMapping;
import org.springframework.web.bind.annotation.ResponseBody;

import java.security.Principal;

/**
 * @author Java技術(shù)精選
 * @date
 */
@Controller
@RequestMapping("/member")
public class MemberController {

    @GetMapping("/list")
    public String list() {

        return "member/list";
    }

    @GetMapping("/info")
    @ResponseBody
    public Principal info(Principal principal) {
        return principal;
    }

    @GetMapping("/me")
    @ResponseBody
    public Authentication me(Authentication authentication) {
        return authentication;
    }

    @PreAuthorize("hasAuthority('member:save')")
    @ResponseBody
    @PostMapping("/add")
    public String add() {

        return "add";
    }

    @PreAuthorize("hasAuthority('member:detail')")
    @ResponseBody
    @GetMapping("/detail")
    public String detail() {
        return "detail";
    }
}
5.5. Order項(xiàng)目跟它是一樣的
server:
  port: 8083
  servlet:
    context-path: /orderSystem
security:
  oauth2:
    client:
      client-id: OrderManagement
      client-secret: order123
      access-token-uri: http://localhost:8080/oauth/token
      user-authorization-uri: http://localhost:8080/oauth/authorize
    resource:
      jwt:
        key-uri: http://localhost:8080/oauth/token_key
5.6. 關(guān)于退出
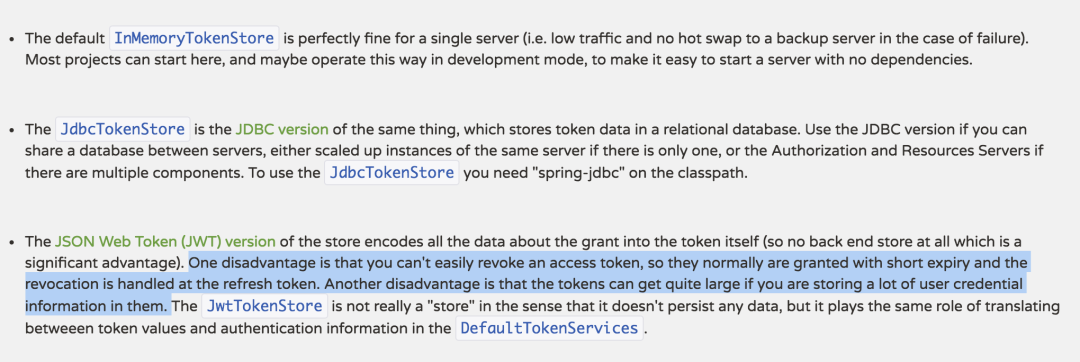
退出就是清空用于與SSO客戶端建立的所有的會(huì)話,簡(jiǎn)單的來(lái)說(shuō)就是使所有端點(diǎn)的Session失效,如果想做得更好的話可以令Token失效,但是由于我們用的JWT,故而撤銷Token就不是那么容易,關(guān)于這一點(diǎn),在官網(wǎng)上也有提到:
本例中采用的方式是在退出的時(shí)候先退出業(yè)務(wù)服務(wù)器,成功以后再回調(diào)認(rèn)證服務(wù)器,但是這樣有一個(gè)問(wèn)題,就是需要主動(dòng)依次調(diào)用各個(gè)業(yè)務(wù)服務(wù)器的logout
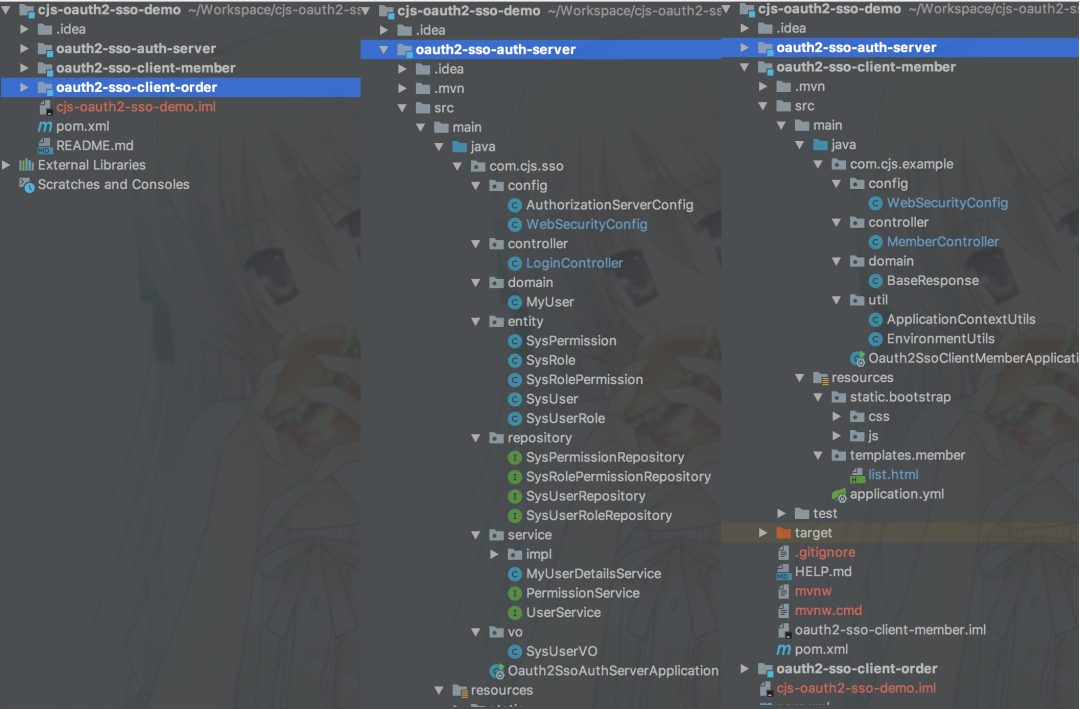
工程結(jié)構(gòu)
附上源碼:https://github.com/chengjiansheng/cjs-oauth2-sso-demo.git