
Python+OpenCV+百度智能云
點(diǎn)擊下方卡片,關(guān)注“新機(jī)器視覺”公眾號
視覺/圖像重磅干貨,第一時間送達(dá)
轉(zhuǎn)自 | 馬少爺
一、人臉識別——人數(shù)識別+標(biāo)記
1.導(dǎo)入模塊
import timeimport base64import cv2import requests
time模塊:計時
base64模塊:由于某些系統(tǒng)中只能使用ASCII字符。Base64就是用來將非ASCII字符的數(shù)據(jù)轉(zhuǎn)換成 ASCII字符的一種方法。
cv2模塊:本程序中要用到opencv的框選模塊
requests模塊:使得python進(jìn)行網(wǎng)絡(luò)請求時,變得人性化,使用Requests可以輕而易舉的完成瀏覽器可有的任何操作
def gettoken():token = ""if token == "":APP_ID = '*****' # 你的APP_IDAPI_KEY = '*****' # 你的API_KEYSECRET_KEY = '*****' # 你的SECRET_KEY# client_id 為官網(wǎng)獲取的AK, client_secret 為官網(wǎng)獲取的SKhost = 'https://aip.baidubce.com/oaut/2.0/token?grant_type=client_credentials' + '&client_id=' + API_KEY + '&client_secret=' + SECRET_KEY# print(host)response = requests.get(host)# if response:# for item in response.json().items(): # 逐項(xiàng)遍歷response.json()----字典# print(item)token = response.json()["access_token"]print(">>成功獲取到token")return token
需要注意的是:這里獲取的token你可以自己輸出一下,如果是24.*****(一長串)就說明對了。
def read_pic(name):f = open(name, "rb")base64_data = base64.b64encode(f.read())s = base64_data.decode()print(">>圖片讀取成功")return s
# 人臉檢測與屬性分析def face_nums(picture):token = gettoken()request_url = "https://aip.baidubce.com/rest/2.0/face/v3/detect"params = {"image": picture,"image_type": "BASE64","quality_control": "NORMAL","max_face_num": 10}request_url = request_url + "?access_token=" + tokenheaders = {'content-type': 'application/json'}response = requests.post(request_url, data=params, headers=headers).json()if response:print(">>成功獲取到response")# for item in response.items(): # 遍歷response# print(item)else:print("response == NULL")if response["error_code"] == 0:num = response["result"]["face_num"]print("圖中人數(shù)為:%d" % num)print(">>人數(shù)檢測完成\n")else:print("出錯了")return response
5.人臉標(biāo)記
得到上一步的response(其為字典結(jié)構(gòu)),我們試著將其輸出看看:
for item in response.items(): # 遍歷responseprint(item)
得到輸出結(jié)果:
('error_code', 0)('error_msg', 'SUCCESS')('log_id', 579201101157)('timestamp', 1612106758)('cached', 0)('result', {'face_num': 4, 'face_list': [{'face_token': 'fa26f3aa9227ef72c65dccc2cef4e09b', 'location': {'left': 331.56, 'top': 158.35, 'width': 101, 'height': 101, 'rotation': -20}, 'face_probability': 1, 'angle': {'yaw': 14.84, 'pitch': 0.53, 'roll': -19.51}}, {'face_token': '2f0747b582fa60572fa7340c3bdf081c', 'location': {'left': 245.17, 'top': 136.09, 'width': 70, 'height': 70, 'rotation': -23}, 'face_probability': 1, 'angle': {'yaw': 19.23, 'pitch': 11.06, 'roll': -28.17}}, {'face_token': '19ff570779608d83977781f2f20dfe25', 'location': {'left': 172.71, 'top': 95.36, 'width': 52, 'height': 52, 'rotation': 0}, 'face_probability': 1, 'angle': {'yaw': 0.81, 'pitch': 2.76, 'roll': -4.04}}, {'face_token': 'ad478dbf67ec8ca57657d41b520e09ae', 'location': {'left': 121.06, 'top': 49.85, 'width': 53, 'height': 47, 'rotation': 9}, 'face_probability': 1, 'angle': {'yaw': -0.72, 'pitch': 8.11, 'roll': 7.21}}]})
我們仔細(xì)分析一下,不要覺得他很復(fù)雜,其實(shí)就是一個字典里套字典的形式。其result鍵下就是我們需要的的信息,包括人數(shù),人臉坐標(biāo),還有旋度,俯仰角等。所以我們把需要的人數(shù)和人臉坐標(biāo)提取出來,通過cv2.rectangle()函數(shù)將人臉框選出來(注意,此函數(shù)里的所有參數(shù)只能為int類型,我們從字典中得到的數(shù)字為字符串類型,所以需要轉(zhuǎn)換一下)。
實(shí)現(xiàn)代碼:
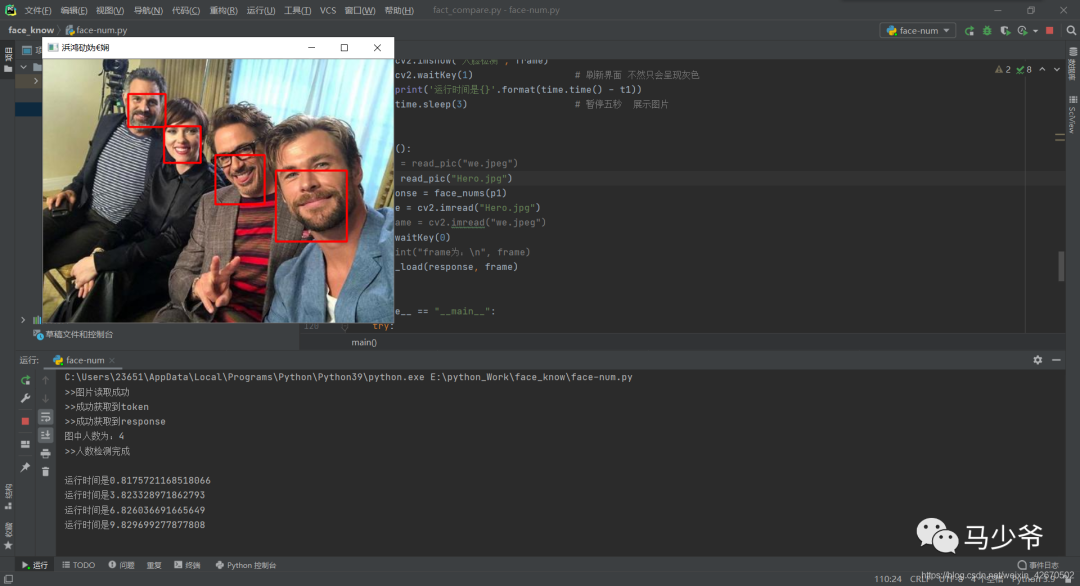
def face_load(response, frame):num = response["result"]["face_num"]load = response["result"]["face_list"]# print(load)# for item in load.items():# print(item)for i in range(num): # 使用遍歷把所有的人臉都標(biāo)出框location = load[i]['location'] # 獲取人臉坐標(biāo)# print(location)cv2.rectangle(frame, (int(location['left']), int(location['top'])),(int(location['width'] + location['left']), int(location['height'] + location['top'])),(0, 0, 255), 2) # opencv的標(biāo)框函數(shù)cv2.imshow('人臉檢測', frame)cv2.waitKey(1) # 刷新界面 不然只會呈現(xiàn)灰色print('運(yùn)行時間是{}'.format(time.time() - t1))time.sleep(3) # 暫停3秒 展示圖片
def main():# p1 = read_pic("we.jpeg")p1 = read_pic("Hero.jpg")response = face_nums(p1)frame = cv2.imread("Hero.jpg")# frame = cv2.imread("we.jpeg")cv2.waitKey(0)# print("frame為:\n", frame)face_load(response, frame)
7.運(yùn)行結(jié)果
8.總結(jié)
1、官方人臉檢測API文檔
https://cloud.baidu.com/doc/FACE/s/yk37c1u4t
2.官方常見問題及排查API文檔
https://cloud.baidu.com/doc/FACE/s/Zk5eyn5x3
3.官方常見錯誤碼API文檔
https://cloud.baidu.com/doc/FACE/s/5k37c1ujz
4.注意事項(xiàng)&解決方案:
(1)post參數(shù)中,body中image和image_type為必要參數(shù),其他根據(jù)自己的需要添加
(2)請求體格式化:Content-Type為application/json,通過json格式化請求體。
(3)Base64編碼:請求的圖片需經(jīng)過Base64編碼,圖片的base64編碼指將圖片數(shù)據(jù)編碼成一串字符串,使用該字符串代替圖像地址。您可以首先得到圖片的二進(jìn)制,然后用Base64格式編碼即可。需要注意的是,圖片的base64編碼是不包含圖片頭的,如data:image/jpg;base64,
(4)圖片格式:現(xiàn)支持PNG、JPG、JPEG、BMP,不支持GIF圖片
(5)cv2.rectangle()函數(shù)里的所有參數(shù)只能為int類型,我們從字典中得到的數(shù)字為字符串類型,所以需要轉(zhuǎn)換一下
(6)cv2.imshow()之后必須加cv2.waitKey(),否則打開時間過短會報錯
例如:
cv2.imshow('人臉檢測', frame)cv2.waitKey(1)
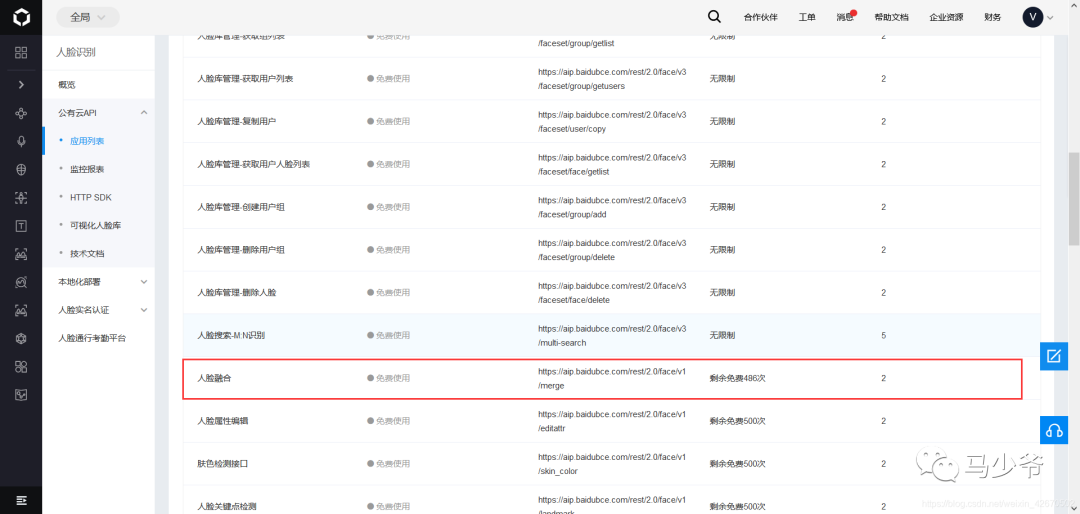
二、人臉融合
1.導(dǎo)入模塊
import base64import jsonimport requests
base64模塊:由于某些系統(tǒng)中只能使用ASCII字符。Base64就是用來將非ASCII字符的數(shù)據(jù)轉(zhuǎn)換成 ASCII字符的一種方法。
json模塊:JSON的數(shù)據(jù)格式其實(shí)就是python里面的字典格式,里面可以包含方括號括起來的數(shù)組,也就是python里面的列表。
requents模塊:進(jìn)行網(wǎng)絡(luò)請求時,變得人性化,模仿瀏覽器的訪問網(wǎng)頁并獲得反執(zhí)等
2.獲取token
def gettoken():token = ""if token == "":APP_ID = '【】' # 你的APP_IDAPI_KEY = '【】' # 你的API_KEYSECRET_KEY = '【】' # 你的SECRET_KEY# client_id 為官網(wǎng)獲取的AK, client_secret 為官網(wǎng)獲取的SKhost = 'https://aip.baidubce.com/oauth/2.0/token?grant_type=client_credentials' + \'&client_id=' + API_KEY + \'&client_secret=' + SECRET_KEY# print(host)response = requests.get(host)# if response:# for item in response.json().items(): # 逐項(xiàng)遍歷response.json()----字典# print(item)token = response.json()["access_token"]print(">>成功獲取到token")return token
這里首先要在百度智能云獲取到自己的APP_ID、API_KEY、SECRET_KEY
3.獲取圖片base64
# 3.獲取圖片base64 -- base64是圖片的一種格式,所以要先打開圖片,然后轉(zhuǎn)成base64編碼才能用def read_pic(name):f = open(name, "rb")base64_data = base64.b64encode(f.read())s = base64_data.decode()print(">>圖片讀取成功")return s
# 4.保存base64到本機(jī)def save_pic(data):# image_data = base64.decode()# f = open("mix.jpg","wb")# f.write(image_data)imagedata = base64.b64decode(data)file = open('E:\\python_Work\\face_know\\mix.jpg', "wb")file.write(imagedata)print(">>圖片保存完成")
# 5.圖片融合def mix(template, target):token = gettoken()url = "https://aip.baidubce.com/rest/2.0/face/v1/merge"request_url = url + '?access_token=' + tokenparams = {"image_template": {"image": template,"image_type": "BASE64","quality_control": "NORMAL"},"image_target": {"image": target,"image_type": "BASE64","quality_control": "NORMAL"},"merge_degree": "HIGH"}params = json.dumps(params)headers = {"content-type": "application/json"}result = requests.post(request_url, data=params, headers=headers).json()if result["error_code"] == 0:res = result["result"]["merge_image"]save_pic(res)print(">>人臉融合完成")else:print(str(result[' error_code ']) + result['error_msg'])
根據(jù)官方文檔要求,訪問方式為post,先設(shè)置訪問請求頭(headers)和主要內(nèi)容(body),
請求地址在這塊:
# 6.功能測試# 主函數(shù)def main():image1 = read_pic("Picture1.jpg")image2 = read_pic("Picture2.jpg")mix(image2, image1)if __name__ == "__main__":try:main()print(">>程序執(zhí)行完成")except Exception as result:print("出錯原因:%s" % result)
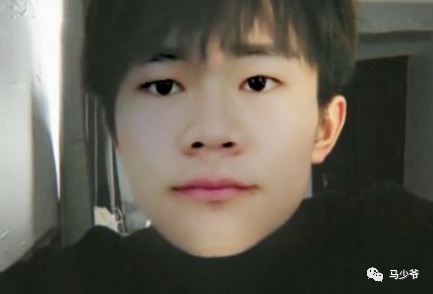
Picture2.jpg(大家都愛的千璽,侵刪)

合成效果如圖:
8.總結(jié)
注意事項(xiàng)&解決方案:
(1)post參數(shù)中,body中image和image_type為必要參數(shù),其他根據(jù)自己的需要添加
(2)請求體格式化:Content-Type為application/json,通過json格式化請求體。
(3)Base64編碼:請求的圖片需經(jīng)過Base64編碼,圖片的base64編碼指將圖片數(shù)據(jù)編碼成一串字符串,使用該字符串代替圖像地址。您可以首先得到圖片的二進(jìn)制,然后用Base64格式編碼即可。需要注意的是,圖片的base64編碼是不包含圖片頭的,如data:image/jpg;base64;
(4)一共有500次調(diào)用限制,謹(jǐn)慎使用,其他調(diào)通了在來這塊訪問,不然等程序調(diào)完,次數(shù)也不多了
三、人臉識別——視頻人臉鎖定
1.導(dǎo)入模塊
import sysimport cv2
def videocapture():cap = cv2.VideoCapture(0) # 生成讀取攝像頭對象width = int(cap.get(cv2.CAP_PROP_FRAME_WIDTH)) # 獲取視頻的寬度height = int(cap.get(cv2.CAP_PROP_FRAME_HEIGHT)) # 獲取視頻的高度fps = cap.get(cv2.CAP_PROP_FPS) # 獲取視頻的幀率fourcc = int(cap.get(cv2.CAP_PROP_FOURCC)) # 視頻的編碼# 定義視頻對象輸出writer = cv2.VideoWriter("video_result.mp4", fourcc, fps, (width, height))while cap.isOpened():ret, frame = cap.read() # 讀取攝像頭畫面cv2.imshow('teswell', frame) # 顯示畫面key = cv2.waitKey(24)writer.write(frame) # 視頻保存# 按Q退出if key == ord('q'):breakcap.release() # 釋放攝像頭cv2.destroyAllWindows() # 釋放所有顯示圖像窗口
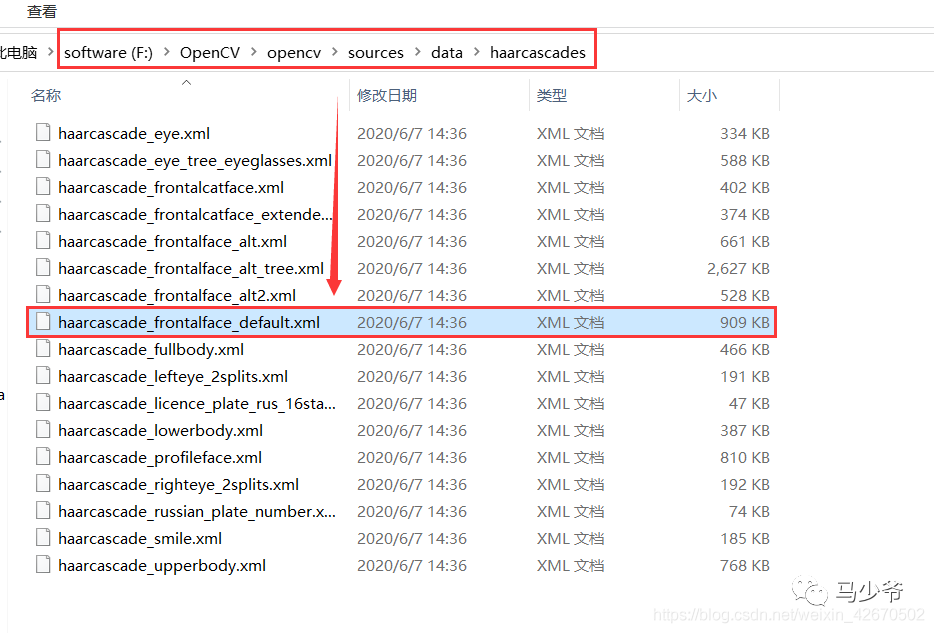
def CatchUsbVideo(window_name, camera_idx):cv2.namedWindow(window_name)# 視頻來源,可以來自一段已存好的視頻,也可以直接來自USB攝像頭cap = cv2.VideoCapture("video.mp4")# 告訴OpenCV使用人臉識別分類器#classfier = cv2.CascadeClassifier(r"./haarcascade_frontalface_alt2.xml")classfier = cv2.CascadeClassifier(r"F:\OpenCV\opencv\sources\data\haarcascades\haarcascade_frontalface_default.xml")# 識別出人臉后要畫的邊框的顏色,RGB格式color = (0, 255, 0)while cap.isOpened():ok, frame = cap.read() # 讀取一幀數(shù)據(jù)if not ok:break# 將當(dāng)前幀轉(zhuǎn)換成灰度圖像grey = cv2.cvtColor(frame, cv2.COLOR_BGR2GRAY)# 人臉檢測,1.2和2分別為圖片縮放比例和需要檢測的有效點(diǎn)數(shù)faceRects = classfier.detectMultiScale(grey, scaleFactor=1.2, minNeighbors=3, minSize=(32, 32))if len(faceRects) > 0: # 大于0則檢測到人臉for faceRect in faceRects: # 單獨(dú)框出每一張人臉x, y, w, h = faceRectcv2.rectangle(frame, (x - 10, y - 10), (x + w + 10, y + h + 10), color, 2)# 顯示圖像cv2.imshow(window_name, frame)c = cv2.waitKey(10)if c & 0xFF == ord('q'):break# 釋放攝像頭并銷毀所有窗口cap.release()cv2.destroyAllWindows()
這里需要注意,haarcascade_frontalface_alt2.xml文件的路徑,在自己的安裝路徑里,在下圖這個位置,記得替換為自己的路徑
if __name__ == '__main__':#videocapture()try:if len(sys.argv) != 1:print("Usage:%s camera_id\r\n" % (sys.argv[0]))else:CatchUsbVideo("識別人臉區(qū)域",0)except Exception as Error:print(Error)
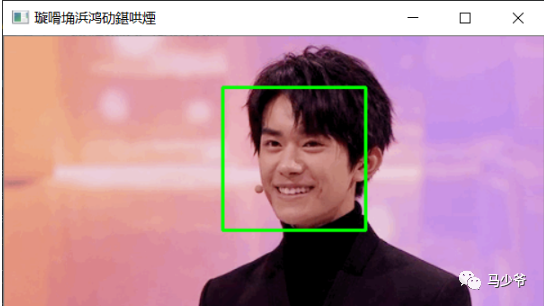
唯一問題是,最后顯示名稱因?yàn)槭侵形模瑫霈F(xiàn)如圖亂碼,暫時不知道解決方案
6.總結(jié)
本設(shè)計需要注意的是:
1.是否需要調(diào)用本地攝像頭,如果不用,本地應(yīng)該有需要檢測的視頻(我試了下,gif也可以)
2.haarcascade_frontalface_alt2.xml文件路徑要設(shè)置好
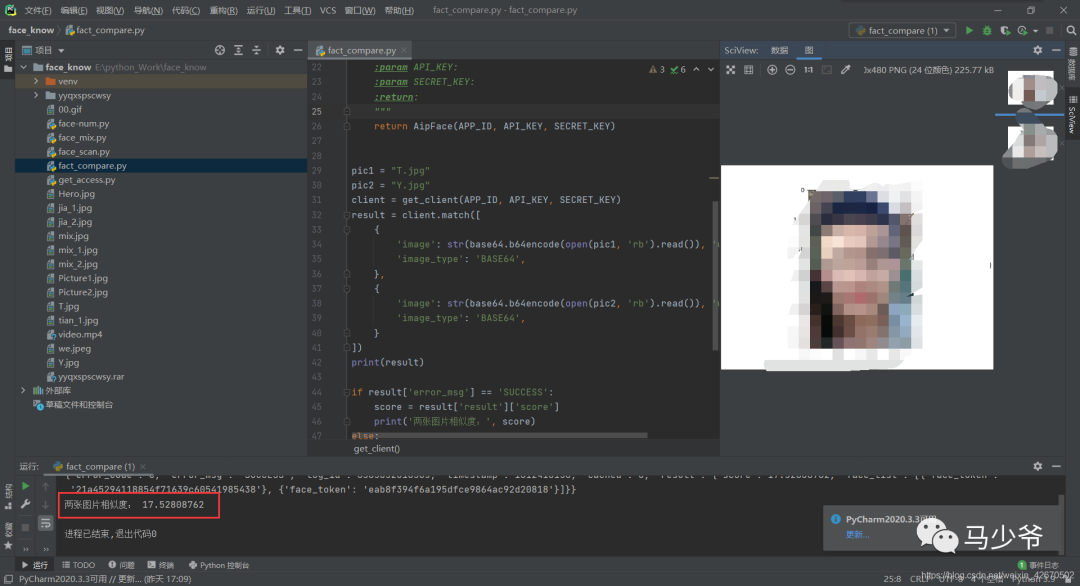
四、人臉識別——人臉相似度對比
1.導(dǎo)入模塊
from aip import AipFaceimport base64import matplotlib.pyplot as plt
""" 你的APPID,API_KEY和SECRET_KEY """APP_ID = '【】' # 你的APP_IDAPI_KEY = '【】' # 你的API_KEYSECRET_KEY = '【】' # 你的SECRET_KEY# 封裝成函數(shù),返回獲取的client對象def get_client(APP_ID, API_KEY, SECRET_KEY):"""返回client對象:param APP_ID::param API_KEY::param SECRET_KEY::return:"""return AipFace(APP_ID, API_KEY, SECRET_KEY)
pic1 = "T.jpg"pic2 = "Y.jpg"client = get_client(APP_ID, API_KEY, SECRET_KEY)result = client.match([{'image': str(base64.b64encode(open(pic1, 'rb').read()), 'utf-8'),'image_type': 'BASE64',},{'image': str(base64.b64encode(open(pic2, 'rb').read()), 'utf-8'),'image_type': 'BASE64',}])print(result)if result['error_msg'] == 'SUCCESS':score = result['result']['score']print('兩張圖片相似度:', score)else:print('錯誤信息:', result['error_msg'])pc1 = plt.imread(pic1)pc2 = plt.imread(pic2)plt.imshow(pc1)plt.show()plt.imshow(pc2)plt.show()
4、結(jié)果測試
參考文獻(xiàn):
https://blog.csdn.net/weixin_42670502
—版權(quán)聲明—
僅用于學(xué)術(shù)分享,版權(quán)屬于原作者。
若有侵權(quán),請聯(lián)系微信號:yiyang-sy 刪除或修改!