
厲害了,用Python繪制動態(tài)可視化圖表,并保存成gif格式
gif圖”,小編立馬就回復(fù)了說后面會寫一篇相關(guān)的文章來介紹如何進行保存gif格式的文件。那么我們就開始進入主題,來談一下Python當中的gif模塊。安裝相關(guān)的模塊
pip命令來安裝pip?install?gif
gif模塊之后會被當做是裝飾器放在繪制可視化圖表的函數(shù)上,主要我們依賴的還是Python當中繪制可視化圖表的matplotlib、plotly、以及altair這些模塊,因此我們還需要下面這幾個庫pip?install?"gif[altair]"?????
pip?install?"gif[matplotlib]"
pip?install?"gif[plotly]"
gif和matplotlib的結(jié)合
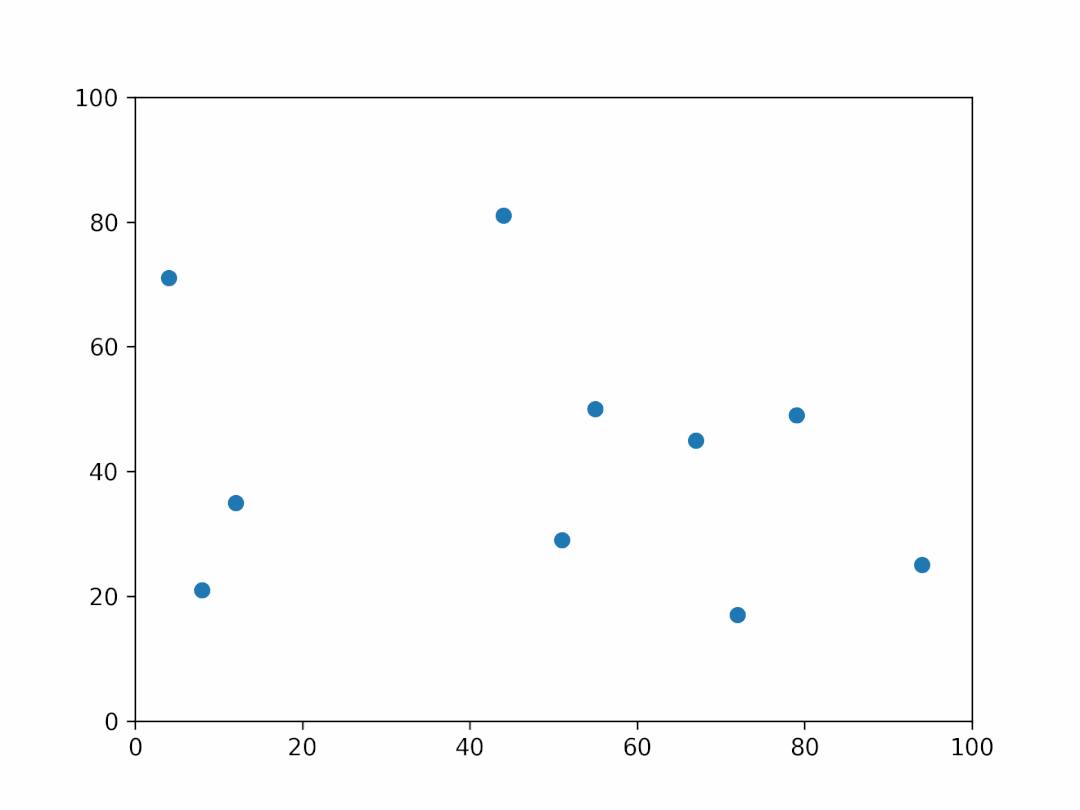
gif和matplotlib模塊的結(jié)合,我們先來看一個簡單的例子,代碼如下import?random
from?matplotlib?import?pyplot?as?plt
import?gif
x?=?[random.randint(0,?100)?for?_?in?range(100)]
y?=?[random.randint(0,?100)?for?_?in?range(100)]
gif.options.matplotlib["dpi"]?=?300
@gif.frame
def?plot(i):
????xi?=?x[i*10:(i+1)*10]
????yi?=?y[i*10:(i+1)*10]
????plt.scatter(xi,?yi)
????plt.xlim((0,?100))
????plt.ylim((0,?100))
frames?=?[]
for?i?in?range(10):
????frame?=?plot(i)
????frames.append(frame)
gif.save(frames,?'example.gif',?duration=3.5,?unit="s",?between="startend")
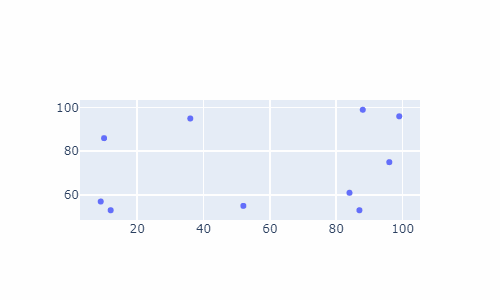
for循環(huán)將繪制出來的對象放到這個空列表當中然后保存成gif格式的文件即可。gif和plotly的結(jié)合
matplotlib的聯(lián)用之外,gif和plotly之間也可以結(jié)合起來用,代碼如下import?random
import?plotly.graph_objects?as?go
import?pandas?as?pd
import?gif
df?=?pd.DataFrame({
????'t':?list(range(10))?*?10,
????'x':?[random.randint(0,?100)?for?_?in?range(100)],
????'y':?[random.randint(0,?100)?for?_?in?range(100)]
})
@gif.frame
def?plot(i):
????d?=?df[df['t']?==?i]
????fig?=?go.Figure()
????fig.add_trace(go.Scatter(
????????x=d["x"],
????????y=d["y"],
????????mode="markers"
????))
????fig.update_layout(width=500,?height=300)
????return?fig
frames?=?[]
for?i?in?range(10):
????frame?=?plot(i)
????frames.append(frame)
gif.save(frames,?'example_plotly.gif',?duration=100)
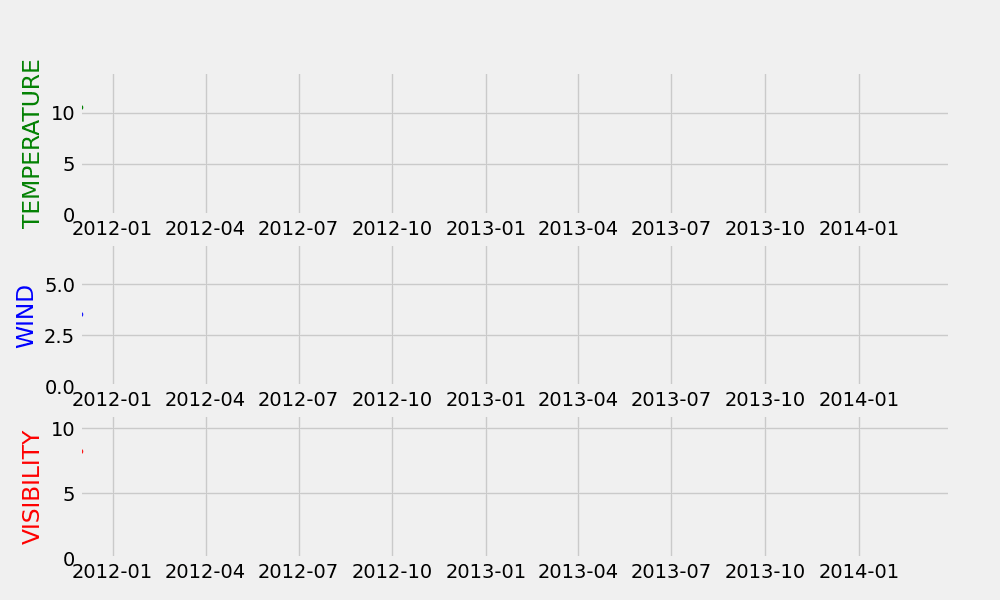
matplotlib多子圖動態(tài)可視化
#?讀取數(shù)據(jù)
df?=?pd.read_csv('weather_hourly_darksky.csv')
df?=?df.rename(columns={"time":?"date"})

@gif.frame
def?plot(df,?date):
????df?=?df.loc[df.index[0]:pd.Timestamp(date)]

????fig,?(ax1,?ax2,?ax3)?=?plt.subplots(3,?figsize=(10,?6),?dpi=100)

????ax1.plot(df.temperature,?marker='o',?linestyle='--',?linewidth=1,?markersize=3,?color='g')
????maxi?=?round(df.temperature.max()?+?3)
????ax1.set_xlim([START,?END])
????ax1.set_ylim([0,?maxi])
????ax1.set_ylabel('TEMPERATURE',?color='green')

????ax2.plot(df.windSpeed,?marker='o',?linestyle='--',?linewidth=1,?markersize=3,?color='b')
????maxi?=?round(df.windSpeed.max()?+?3)
????ax2.set_xlim([START,?END])
????ax2.set_ylim([0,?maxi])
????ax2.set_ylabel('WIND',?color='blue')

????ax3.plot(df.visibility,?marker='o',?linestyle='--',?linewidth=1,?markersize=3,?color='r')
????maxi?=?round(df.visibility.max()?+?3)
????ax3.set_xlim([START,?END])
????ax3.set_ylim([0,?maxi])
????ax3.set_ylabel('VISIBILITY',?color='red')

frames?=?[]
for?date?in?pd.date_range(start=df.index[0],?end=df.index[-1],?freq='1M'):
????frame?=?plot(df,?date)
????frames.append(frame)

gif.save(frames,?"文件名稱.gif",?duration=0.5,?unit='s')
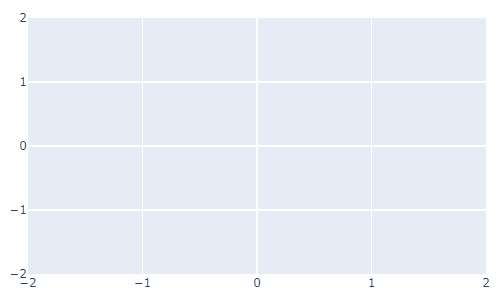
動態(tài)氣泡圖
plotly模塊來繪制一個動態(tài)的氣泡圖,代碼如下import?gif
import?plotly.graph_objects?as?go
import?numpy?as?np
np.random.seed(1)
N?=?100
x?=?np.random.rand(N)
y?=?np.random.rand(N)
colors?=?np.random.rand(N)
sz?=?np.random.rand(N)?*?30
layout?=?go.Layout(
????xaxis={'range':?[-2,?2]},
????yaxis={'range':?[-2,?2]},
????margin=dict(l=10,?r=10,?t=10,?b=10)
)
@gif.frame
def?plot(i):
????fig?=?go.Figure(layout=layout)
????fig.add_trace(go.Scatter(
????????x=x[:i],
????????y=y[:i],
????????mode="markers",
????????marker=go.scatter.Marker(
????????????size=sz[:i],
????????????color=colors[:i],
????????????opacity=0.6,
????????????colorscale="Viridis"
????????)
????))
????fig.update_layout(width=500,?height=300)
????return?fig
frames?=?[]
for?i?in?range(100):
????frame?=?plot(i)
????frames.append(frame)
gif.save(frames,?"bubble.gif")
往期精彩回顧
評論
圖片
表情