
CICD:CentOS 下 GitLab 安裝
GitLab 是一個利用 Ruby on Rails 開發(fā)的開源應用程序,實現(xiàn)一個自托管的Git項目倉庫,可通過 Web 界面進行訪問公開的或者私有的項目。GitLab 擁有與 Github 類似的功能,能夠瀏覽源代碼,管理缺陷和注釋。可以管理團隊對倉庫的訪問,它非常易于瀏覽提交過的版本并提供一個文件歷史庫。它還提供一個代碼片段收集功能可以輕松實現(xiàn)代碼復用,便于日后有需要的時候進行查找。
0x01:yum 方式安裝
基礎依賴庫安裝
yum -y install curl policycoreutils openssh-server openssh-clients postfix
啟動ssh服務 & 設置為開機啟動
systemctl enable sshd && systemctl start sshd
設置 postfix 開機自啟,并啟動,postfix 支持 GitLab 發(fā)信功能
systemctl enable postfix && systemctl start postfix
開放 ssh 和 http服務,然后重新加載防火墻列表
firewall-cmd --add-service=ssh --permanent
firewall-cmd --add-service=http --permanent
firewall-cmd --reload
如果關閉防火墻就不需要進行以上配置
安裝 gitlab-ce
curl -sS https://packages.gitlab.com/install/repositories/gitlab/gitlab-ce/script.rpm.sh | sudo bash

yum install -y gitlab-ce
GitLab 分為 gitlab-ce 社區(qū)版與 gitlab-ee 企業(yè)收費版兩個版本,這里安裝社區(qū)版。由于網絡問題,國內用戶,建議使用清華大學的鏡像源進行安裝。
添加 yum 源
vim /etc/yum.repos.d/gitlab-ce.repo
再打開的 /etc/yum.repos.d/gitlab-ce.repo 文件中添加以下內容
#在編輯器中輸入如下內容保存
[gitlab-ce]
name=gitlab-ce
baseurl=http://mirrors.tuna.tsinghua.edu.cn/gitlab-ce/yum/el7
repo_gpgcheck=0
gpgcheck=0
enabled=1
gpgkey=https://packages.gitlab.com/gpg.key
建立元數(shù)據(jù)緩存,并再次安裝 GitLab
yum makecache
yum -y install gitlab-ce
安裝成功出現(xiàn)以下信息
                                                                                                                                                           1/1 It looks like GitLab has not been configured yet; skipping the upgrade script.

       *.                  *.
      ***                 ***
     *****               *****
    .******             *******
    ********            ********
   ,,,,,,,,,***********,,,,,,,,,
  ,,,,,,,,,,,*********,,,,,,,,,,,
  .,,,,,,,,,,,*******,,,,,,,,,,,,
      ,,,,,,,,,*****,,,,,,,,,.
         ,,,,,,,****,,,,,,
            .,,,***,,,,
                ,*,.


     _______ __  __          __
    / ____(_) /_/ /   ____ _/ /_
   / / __/ / __/ /   / __ `/ __ \
  / /_/ / / /_/ /___/ /_/ / /_/ /
  \____/_/\__/_____/\__,_/_.___/


Thank you for installing GitLab!
GitLab was unable to detect a valid hostname for your instance.
Please configure a URL for your GitLab instance by setting `external_url`
configuration in /etc/gitlab/gitlab.rb file.
Then, you can start your GitLab instance by running the following command:
  sudo gitlab-ctl reconfigure

For a comprehensive list of configuration options please see the Omnibus GitLab readme
https://gitlab.com/gitlab-org/omnibus-gitlab/blob/master/README.md

Help us improve the installation experience, let us know how we did with a 1 minute survey:
https://gitlab.fra1.qualtrics.com/jfe/form/SV_6kVqZANThUQ1bZb?installation=omnibus&release=13-10

  驗證中      : gitlab-ce-13.10.2-ce.0.el7.x86_64                                                                                                                                                              1/1

已安裝:
  gitlab-ce.x86_64 0:13.10.2-ce.0.el7

完畢!
修改 GitLab 配置
vi /etc/gitlab/gitlab.rb
修改 GitLab 訪問地址和端口,默認為80,改為8082
external_url 'http://192.168.56.9:8082'
nginx['listen_port'] = 8082
重新加載配置及啟動 GitLab
gitlab-ctl reconfigure
gitlab-ctl restart
把 8082 端口添加到防火墻
firewall-cmd --zone=public --add-port=8082/tcp --permanent
firewall-cmd --reload
啟動成功后,使用以下命令查看 GitLab 的啟動狀態(tài)
gitlab-ctl status
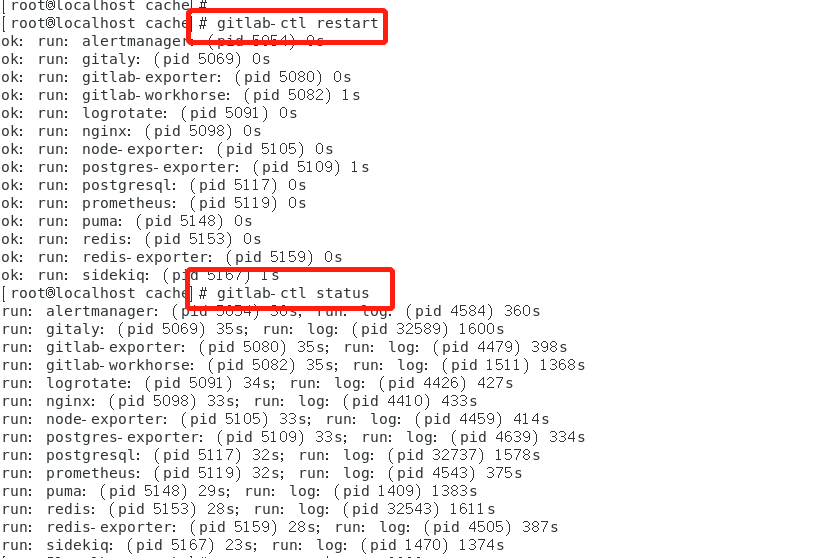
看到以上輸出說明啟動成功
訪問 http://192.168.56.9:8082
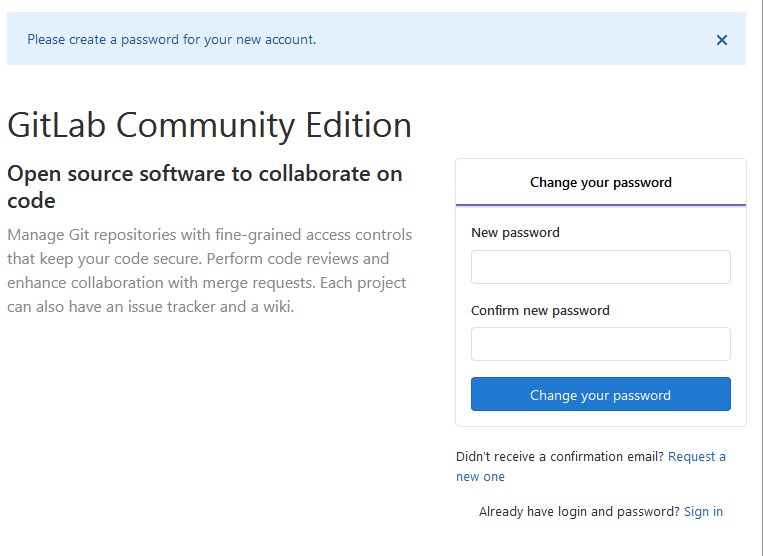
隨后進入修改管理員 root 密碼的頁面,修改密碼后,然后登錄即可。
0x02:docker 方式安裝
Docker 安裝服務實在是太方便,通過 docker 來安裝 Gitlab,運行如下命令查看 Gitlab 的鏡像文件
docker search gitlab

看到鏡像有很多,第四個鏡像是中文版的,英語不好可以安裝中文版的。其實,中文版也就是安裝了一個語言包而已,有興趣可以自己安裝第一個,然后再手動配置中文包。
獲取 GitLab 鏡像
docker pull gitlab/gitlab-ce
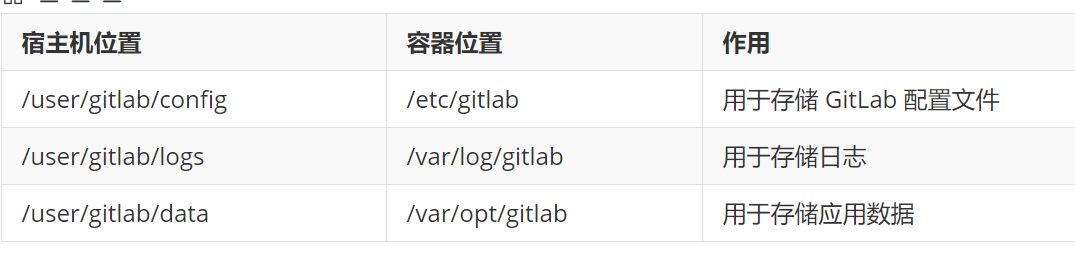
下載完畢后,先不急著運行 GitLab,為了避免容器運行時數(shù)據(jù)丟失,需要使用Docker volume(容器卷)方式來將數(shù)據(jù)映射到本地,這里創(chuàng)建 /usr/gitlab 目錄來存放相應的數(shù)據(jù),具體對應關系如下:
啟動服務
docker run  -d \
    --publish 8443:443 --publish 8090:80 --publish 8022:22 \
    --name gitlab \
    --volume /usr/gitlab/config:/etc/gitlab \
    --volume /usr/gitlab/logs:/var/log/gitlab \
    --volume /usr/gitlab/data:/var/opt/gitlab \
    gitlab/gitlab-ce
-d 在后臺啟動
-publish 8443:443 把容器中應用的端口443映射為外部的8443端口
-publish 8090:80 把容器中應用的端口80映射為外部的8090端口
--name 容器啟動之后的名字
-volume 把容器中的配置,日志,數(shù)據(jù)映射到容器外部
通過 --name 配置了 GitLab 的名字之后,后續(xù)可以通過這個 name 對容器進行相關的啟動和停止操作
查看啟動情況
# 添加-a 參數(shù),把啟動的,沒有啟動的都列出來
docker ps -a

配置Gitlab
配置時,需要進入容器當中配置,如果直接修改映射到容器外部的配置文件,總會出現(xiàn)一些奇怪的問題,為了避免出現(xiàn)問題所以直接修改容器里的配置文件。
進入容器
docker exec -it gitlab bash
修改 /etc/gitlab/gitlab.rb 文件
vi /etc/gitlab/gitlab.rb
修改 IP 和端口
該部分內容的修改是為了解決,在 GitLab 創(chuàng)建項目時,項目訪問地址是容器id 的問題
# 可以使用/ 來查找關鍵字,找到指定的內容,然后通過n來下一個查找
# 在gitlab創(chuàng)建項目時候http地址的host(不用添加端口)
external_url 'http://192.168.56.9:80'
# 在gitlab創(chuàng)建項目時候ssh地址的host
gitlab_rails['gitlab_ssh_host'] = '192.168.56.9'(不用添加端口)
# docker run 的時候我們把22端口映射為外部的8022了,這里修改下
gitlab_rails['gitlab_shell_ssh_port'] = 8022
另外,對應 ssh 的 22 端口的映射問題,第一種方案就是在 docker 啟動 gitlab-ce 把 ssh 的 22 端口映射成另外的端口,然后修改 gitlab_shell_ssh_port 配置項為映射時的端口;另一種方案就是修改 ssh 的默認端口。修改 ssh 默認端口 22 的操作方案如下:
通常 gitlab 會與 gi t配置使用,而 git 會采用 ssh 協(xié)議來操作 git 倉庫,而 gitlab-ce 連接宿主機時也使用 ssh,如果不修改默認 sshd 端口,git 使用默認配置就會出現(xiàn)問題,這里將主機的 sshd 端口從 22 端口改為其他端口,比如 2280。
1. 編輯 sshd_config 配置文件
vi /etc/ssh/sshd_config
將 #Port 22 注釋去掉,將數(shù)字 22 更改為 2280。
2. 重啟sshd服務
systemctl restart sshd
3. 配置firewall,使 2280 端口可以對外提供服務,否則無法使用 ssh 進行遠程登錄了。
semanage port -a -t ssh_port_t -p tcp 2280
firewall-cmd --permanent --add-port=2280/tcp
firewall-cmd --reload
簡單來說一種就是修改 GitLab 容器相應的端口;另外一種就是修改宿主機 sshd 端端口。但生產環(huán)境通常會不啟用 22 端口,避免被人惡意暴力嘗試。
在 gitlab.rb 文件的最后添加如下配置 [ 也可以不添加 ]
# 是否啟用
gitlab_rails['smtp_enable'] = true
# SMTP服務的地址
gitlab_rails['smtp_address'] = "smtp.qq.com"
# 端口
gitlab_rails['smtp_port'] = 465
# 你的QQ郵箱(發(fā)送賬號)
gitlab_rails['smtp_user_name'] = "[email protected]"
# 授權碼
gitlab_rails['smtp_password'] = "kx1x@123dd"
# 域名
gitlab_rails['smtp_domain'] = "smtp.qq.com"
# 登錄驗證
gitlab_rails['smtp_authentication'] = "login"

# 使用了465端口,就需要配置下面三項
gitlab_rails['smtp_enable_starttls_auto'] = true
gitlab_rails['smtp_tls'] = true
gitlab_rails['smtp_openssl_verify_mode'] = 'none'

# 你的QQ郵箱(發(fā)送賬號)
gitlab_rails['gitlab_email_from'] = '[email protected]'
重新加載 GitLab 配置
gitlab-ctl reconfigure
修改 gitlab.yml 文件
cd /opt/gitlab/embedded/service/gitlab-rails/config
#修改port 為8090
vim gitlab.yml
重啟 GitLab 服務
gitlab-ctl restart
GitLab 容器啟動后,訪問 http://92.168.56.9:8090 就可以進入 GitLab 訪問頁面,第一步要做的就是給 root 用戶設置密碼;設置完后,通過 root + 設置的密碼就可以登錄。為了方便管理,經常創(chuàng)建不同的組,然后通過不同的組來管理組下的成員。
一些常用命令
gitlab-ctl reconfigure    # 重載配置
gitlab-ctl check-config    # 檢查配置并啟動
gitlab-ctl diff-config    # 將用戶配置與包可用配置進行比較
gitlab-ctl status    # 查看所有啟動組件的進程和狀態(tài)
gitlab-ctl service-list    # 查看所有服務
gitlab-ctl stop    # 停止GitLab服務
gitlab-ctl start    # 啟動GitLab服務
gitlab-ctl restart    # 重啟GitLab服務
gitlab-ctl once    # 如果GitLab服務已停止則啟動服務,如果GitLab服務已啟動則重啟GitLab服務
喜歡,在看