
Kubernetes 實(shí)戰(zhàn):使用 k8s+jenkins 實(shí)現(xiàn) CICD
 來(lái)源:feixiang.blog.csdn.net/article/details/131568925
?? 歡迎加入小哈的星球 ,你將獲得: 專(zhuān)屬的項(xiàng)目實(shí)戰(zhàn)/ Java 學(xué)習(xí)路線 / 一對(duì)一提問(wèn) / 學(xué)習(xí)打卡
目前, 正在星球內(nèi)部帶小伙伴做第一個(gè)項(xiàng)目:前后端分離博客,手摸手,后端 + 前端全棧開(kāi)發(fā),從 0 到 1 講解每個(gè)功能點(diǎn)開(kāi)發(fā)步驟,1v1 答疑,直到項(xiàng)目上線。目前已更新了90小節(jié),累計(jì)12w+字,講解圖:612張,還在持續(xù)爆肝中.. 后續(xù)還會(huì)上新更多項(xiàng)目,如秒殺系統(tǒng), 在線商城, IM即時(shí)通訊等,戳我加入學(xué)習(xí),已有280+小伙伴加入(目前最低價(jià))
1什么是CICD
CIDI(Continuous Integration,Continuous Delivery & Deployment),持續(xù)集成,持續(xù)部署,持續(xù)發(fā)布。
也就是說(shuō),在本地開(kāi)發(fā)完代碼之后,push到遠(yuǎn)程倉(cāng)庫(kù),然后代碼打包、部署的這個(gè)過(guò)程完全是自動(dòng)化完成的。
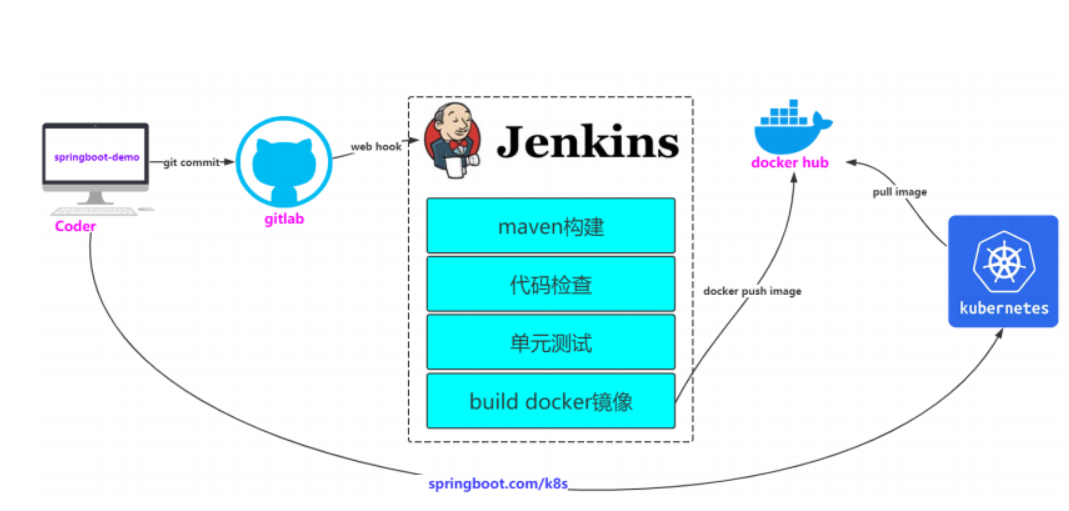
但是我們不要進(jìn)入一個(gè)誤區(qū),CICD并不意味著一定就是這一套流程,只要實(shí)現(xiàn)了代碼提交后自動(dòng)部署即可,不管是部署在k8s還是tomcat中,這是由應(yīng)用規(guī)模和使用的工具來(lái)決定的。
2準(zhǔn)備k8s環(huán)境
傳送門(mén):https://feixiang.blog.csdn.net/article/details/131513900
3jenkins環(huán)境準(zhǔn)備(選擇一臺(tái)服務(wù)器)
1、安裝java(最新版jenkins只支持jdk11以上)
1)找到j(luò)dk資源上傳到指定機(jī)器
# 解壓
tar -zxvf jdk-17_linux-x64_bin.tar.gz
2)配置環(huán)境變量
vi /etc/profile
# 在最后添加上
export JAVA_HOME=/root/jenkins/jdk-17.0.7
export CLASSPATH=.:${JAVA_HOME}/jre/lib/rt.jar:${JAVA_HOME}/lib/dt.jar:${JAVA_HOME}/lib/tools.jar
export PATH=$PATH:${JAVA_HOME}/bin
# 保存后執(zhí)行
source /etc/profile
# 確保安裝完成
java -version
2、安裝maven
1)找到maven資源上傳到指定機(jī)器
# 解壓
tar -zxvf apache-maven-3.6.2-bin.tar.gz
2)配置環(huán)境變量
vi /etc/profile
# 在最后添加
export MAVEN_HOME=/root/jenkins/apache-maven-3.6.2
export PATH=$PATH:$JAVA_HOME/bin:$MAVEN_HOME/bin
# 保存后執(zhí)行
source /etc/profile
# 確保安裝完成
mvn -version
3)配置maven的阿里云鏡像
apache-maven-3.6.2/conf/settings.xml中,修改鏡像
<mirror>
    <id>alimaven</id>
    <name>aliyun maven</name>
    <url>http://maven.aliyun.com/nexus/content/groups/public/</url>
    <mirrorOf>central</mirrorOf>
</mirror>
3、安裝和配置git(使用gitee)
1)安裝git
# 下載安裝
yum install git
# 配置git
git config --global user.name "cxf"
git config --global user.email "[email protected]"
2)在服務(wù)器上生成公鑰
# -t key 類(lèi)型 -C 注釋 中間三次enter即可
ssh-keygen -t ed25519 -C "Gitee SSH Key"
# 查看公鑰 私鑰文件 id_ed25519 公鑰文件 id_ed25519.pub
ls ~/.ssh/
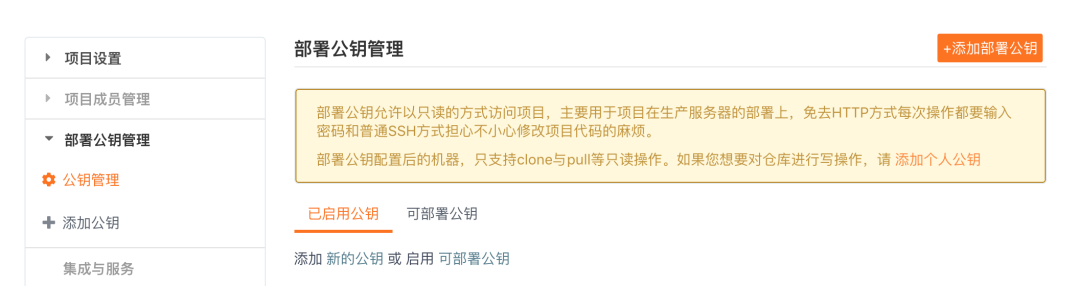
復(fù)制生成后的 ssh key,通過(guò)倉(cāng)庫(kù)主頁(yè) 「管理」->「部署公鑰管理」->「添加部署公鑰」 ,將生成的公鑰添加到倉(cāng)庫(kù)中。
3)驗(yàn)證
# 通過(guò) ssh -T 測(cè)試時(shí),輸出 Anonymous:添加成功后,就可以使用 SSH 協(xié)議對(duì)倉(cāng)庫(kù)進(jìn)行拉取。
$ ssh -T [email protected]
Hi Anonymous! You've successfully authenticated, but GITEE.COM does not provide shell access.
4、準(zhǔn)備springboot項(xiàng)目
1)編寫(xiě)springboot項(xiàng)目
@RestController
public class K8SController {
    @RequestMapping("/k8s")
    public String k8s(){
        return "hello K8s <br/>111222 ";
    }
}
2)將springboot項(xiàng)目提交到gitee
3)git clone測(cè)試
git clone [email protected]:xiangno1/springboot-demo.git
拉下來(lái)代碼,說(shuō)明服務(wù)器配置沒(méi)問(wèn)題。
5、安裝jenkins
jenkins官網(wǎng):
-
https://jenkins.io/
入門(mén)指南:
-
https://www.jenkins.io/zh/doc/pipeline/tour/getting-started/
必須在k8s集群中,因?yàn)楹竺嫘枰趈enkins的目錄下創(chuàng)建文件執(zhí)行,比如這里選用m1節(jié)點(diǎn)。
1)下載jenkinx
wget http://mirrors.jenkins.io/war-stable/latest/jenkins.war
2)啟動(dòng)jenkins(需要java環(huán)境)
# 啟動(dòng)報(bào)錯(cuò),需要先安裝字體
# java.lang.NullPointerException: Cannot load from short array because "sun.awt.FontConfiguration.head" is null
yum install fontconfig
fc-cache --force

# 后臺(tái)啟動(dòng)
nohup java -jar jenkins.war --httpPort=8080 &
tail -f nohup.out

# 啟動(dòng)日志會(huì)提示密碼
#4c7341496d044ef7849576ccddc20d11
#This may also be found at: /root/.jenkins/secrets/initialAdminPassword
3)windows訪問(wèn)192.168.56.101:8080
jenkins啟動(dòng)時(shí)會(huì)打印一串密碼,需要填上
點(diǎn)擊【安裝推薦的插件】,需要等一段時(shí)間自動(dòng)完成。
下載完插件之后,需要?jiǎng)?chuàng)建第一個(gè) 管理員用戶(hù) 我們?cè)O(shè)置為admin/admin。
4)配置jenkins的get、maven、java
在全局配置,新版的在tools中,配置maven。默認(rèn)是使用系統(tǒng)環(huán)境變量中的。
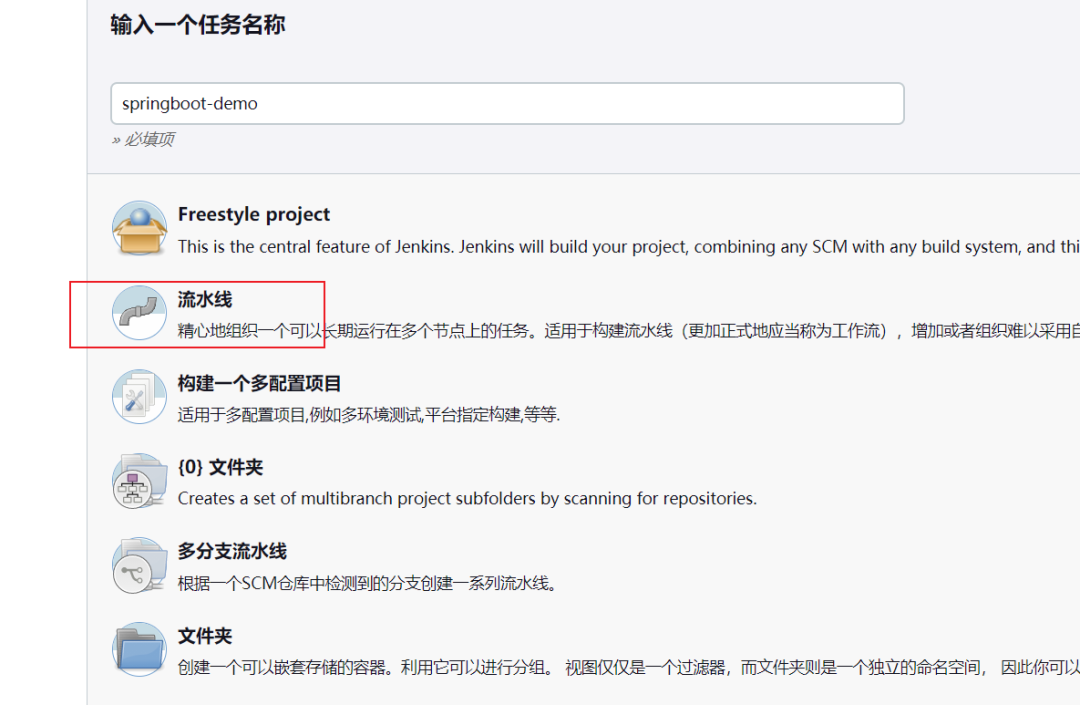
5)新建任務(wù)測(cè)試
新建一個(gè)任務(wù)(item),輸入名稱(chēng)(springboot-demo),選擇流水線
配置springboot-demo的task,修改pipeline內(nèi)容 ,增加maven構(gòu)建,然后“保存和立即構(gòu)建“,同時(shí)可以查看“Console Output”
因?yàn)槲覀冎鞍惭bgit的時(shí)候已經(jīng)配置了公鑰,所以拉取的時(shí)候并不需要用戶(hù)密碼了!
node {
   def mvnHome
   stage('Preparation') {
      git '[email protected]:xiangno1/springboot-demo.git'
   }

   stage('Maven Build') {
      sh "mvn clean package"
   }
}
編寫(xiě)完之后保存,然后點(diǎn)擊【立即構(gòu)建】。
在/root/.jenkins/workspace 中,會(huì)下載springboot-demo,并使用maven打成一個(gè)jar包。
6)設(shè)置push之后自動(dòng)構(gòu)建
當(dāng)用戶(hù)進(jìn)行g(shù)it commit/push提交代碼到github時(shí),能夠通知jenkins自動(dòng)構(gòu)建
注意:jenkins的ip一定要是github能夠訪問(wèn)到的地址
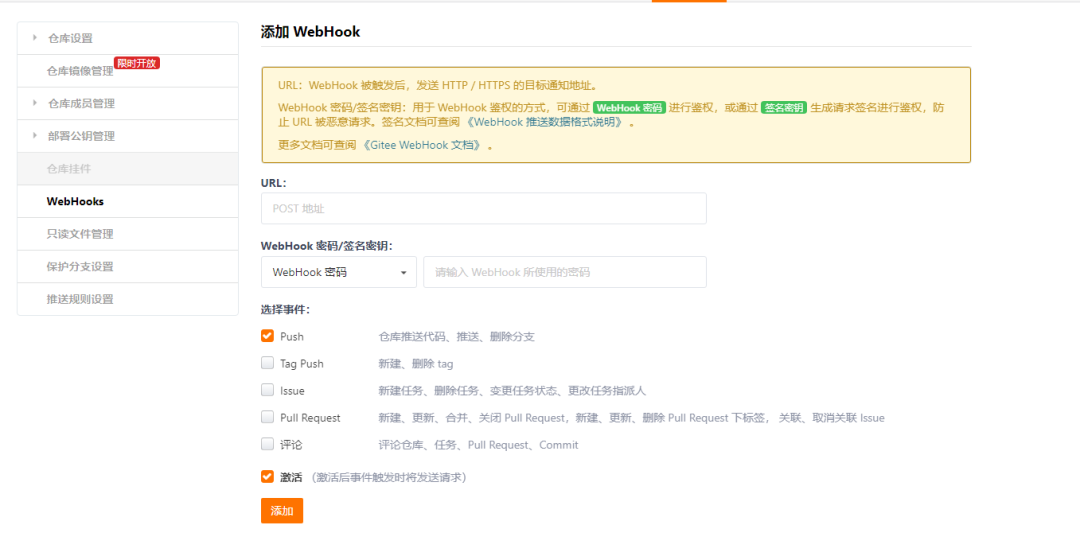
在gitee上配置jenkins的webhook地址:http://192.168.56.101:8080/springboot-demo
生成Personal access tokens
Jenkins訪問(wèn)github需要授權(quán),所以在github上生成token交給jenkins使用,即Personal access tokens
github的Settings[個(gè)人信息右上角]–>Developer settings–>Personal access tokens–>Generate new token
最后保存好該token,比如:**72f048b514e95d6fe36f86d84374f2dcce402b43
jenkins安裝插件
-
安裝github plugin插件:[系統(tǒng)管理]->[插件管理]->[可選插件] -
安裝gitlab插件和gitlab hook插件:[系統(tǒng)管理]->[插件管理]->[可選插件]
配置GitHub Server
[系統(tǒng)管理]->[系統(tǒng)配置]->[找到github服務(wù)器]->[添加github服務(wù)器]
在流水線觸發(fā)器勾選GitHub hook trigger for GITScm polling
6、dockerhub準(zhǔn)備(阿里云)
1)創(chuàng)建一個(gè)springboot-demo 的鏡像倉(cāng)庫(kù)
# 登錄 ,需要輸入密碼
docker login --username=沙里溝第二小學(xué)扛把子 registry.cn-hangzhou.aliyuncs.com
# 私有云的話,需要在k8s添加憑證
kubectl create secret docker-registry <secret-name> \
     --docker-username=<username> \
     --docker-password=<password> \
     --docker-email=<email> \
     --docker-server=<registry>
<secret-name> 是您為 secret 指定的名稱(chēng),例如 my-registry-secret。
<username> 是您在鏡像倉(cāng)庫(kù)的用戶(hù)名。
<password> 是您在鏡像倉(cāng)庫(kù)的密碼。
<email> 是與您在鏡像倉(cāng)庫(kù)的賬號(hào)相關(guān)聯(lián)的電子郵件。
<registry> 是您的鏡像倉(cāng)庫(kù)地址。
接下來(lái),您需要在使用該憑證的部署(deployment)或其他相關(guān)資源中引用該 secret。可以在相關(guān)資源的定義文件中添加以下部分
spec:
     template:
       spec:
         imagePullSecrets:
         - name: <secret-name>
2)準(zhǔn)備shell腳本實(shí)現(xiàn)docker push
# mkdir /root/.jenkins/workspace/scripts/
# vi /root/.jenkins/workspace/scripts/springboot-demo-build-image.sh
# 記得chmod +x /root/.jenkins/workspace/scripts/springboot-demo-build-image.sh
# 腳本開(kāi)始
# 進(jìn)入到springboot-demo目錄
cd ../springboot-demo

# 編寫(xiě)Dockerfile文件

cat <<EOF > Dockerfile
FROM openjdk:8-jre-alpine
COPY target/springboot-demo-0.0.1-SNAPSHOT.jar /springboot-demo.jar
ENTRYPOINT ["java","-jar","/springboot-demo.jar"]
EOF

echo "Dockerfile created successfully!"

# 基于指定目錄下的Dockerfile構(gòu)建鏡像
docker build -t registry.cn-hangzhou.aliyuncs.com/cxf01/springboot-demo:v1.0 .

# push鏡像,這邊需要阿里云鏡像倉(cāng)庫(kù)登錄,在w1上登錄
docker push registry.cn-hangzhou.aliyuncs.com/cxf01/springboot-demo:v1.0
3)jenkins的pipeline增加步驟
node {
   def mvnHome
   stage('Preparation') {
      git '[email protected]:xiangno1/springboot-demo.git'
   }

   stage('Maven Build') {
      sh "mvn clean package"
   }

   stage('Build Image') {
      sh "/root/.jenkins/workspace/scripts/springboot-demo-build-image.sh"
   }
}
4)再次執(zhí)行jenkins的構(gòu)建
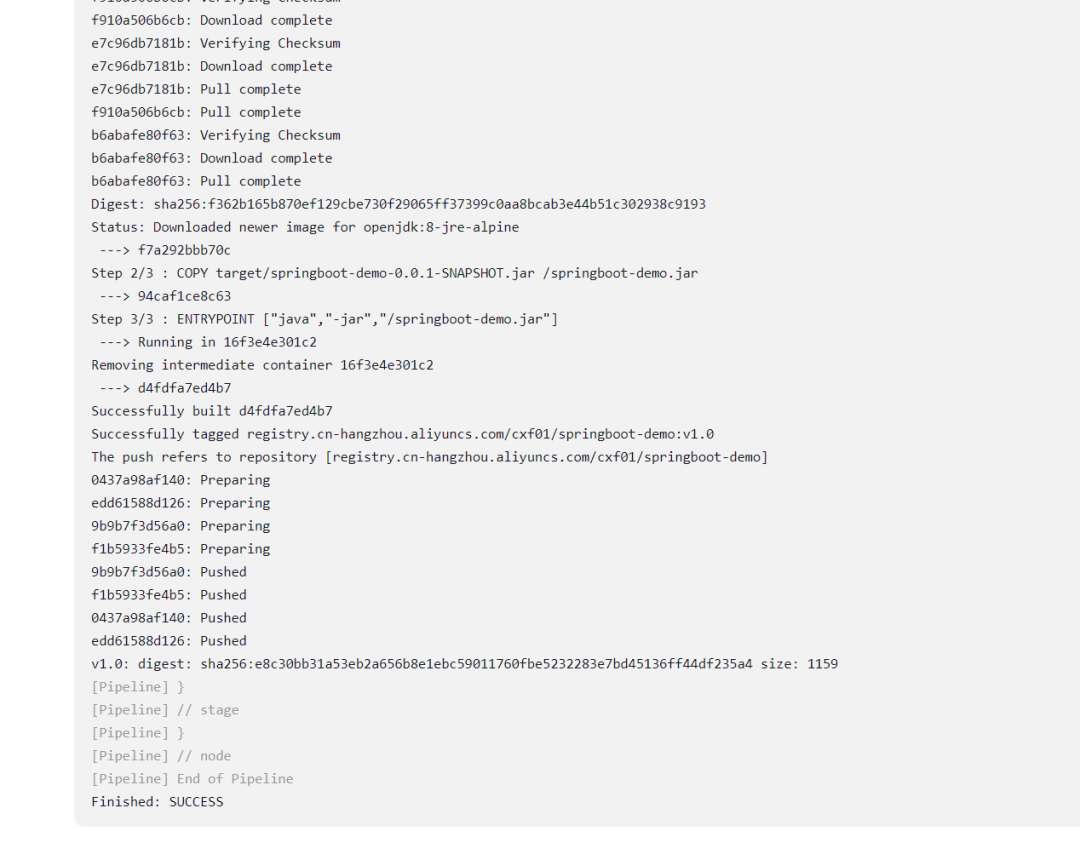
構(gòu)建成功!并且上傳阿里云docker鏡像成功!

4Kubernetes拉取鏡像運(yùn)行
1、準(zhǔn)備springboot-demo.yaml文件
在/root/.jenkins/workspace/scripts/目錄下創(chuàng)建springboot-demo.yaml
# 以Deployment部署Pod
apiVersion: apps/v1
kind: Deployment
metadata:
  name: springboot-demo
spec:
  selector:
    matchLabels:
      app: springboot-demo
  replicas: 1
  template:
    metadata:
      labels:
        app: springboot-demo
    spec:
      imagePullSecrets: # 私有云憑證
      - name: springboot-demo
      containers:
      - name: springboot-demo
        image: registry.cn-hangzhou.aliyuncs.com/cxf01/springboot-demo:v1.0
        ports:
        - containerPort: 8080
---
# 創(chuàng)建Pod的Service
apiVersion: v1
kind: Service
metadata:
  name: springboot-demo
spec:
  ports:
  - port: 80
    protocol: TCP
    targetPort: 8080
  selector:
    app: springboot-demo
---
# 創(chuàng)建Ingress,定義訪問(wèn)規(guī)則
apiVersion: extensions/v1beta1
kind: Ingress
metadata:
  name: springboot-demo
spec:
  rules:
  - host: springboot.cxf.com
    http:
      paths:
      - path: /
        backend:
          serviceName: springboot-demo
          servicePort: 80
2、準(zhǔn)備shell文件,用于k8s自動(dòng)拉取鏡像部署
編寫(xiě)k8s-deploy-springboot-demo.sh文件
# vi /root/.jenkins/workspace/scripts/k8s-deploy-springboot-demo.sh
# chmod +x /root/.jenkins/workspace/scripts/k8s-deploy-springboot-demo.sh
kubectl delete -f springboot-demo.yaml
kubectl apply -f /root/.jenkins/workspace/scripts/springboot-demo.yaml
echo "k8s deploy success!"
3、修改jenkins的pipeline
node {
   def mvnHome
   stage('Preparation') {
      git '[email protected]:xiangno1/springboot-demo.git'
   }

   stage('Maven Build') {
      sh "mvn clean package"
   }

   stage('Build Image') {
      sh "/root/.jenkins/workspace/scripts/springboot-demo-build-image.sh"
   }

   stage('K8S Deploy') {
      sh "/root/.jenkins/workspace/scripts/k8s-deploy-springboot-demo.sh"
   }
}
4、w1執(zhí)行不了kubectl 命令
切換到master上,cd ~  --->   cat ~/.kube/config  --->復(fù)制內(nèi)容
切換到worker02上   cd ~  ---> mkdir ~/.kube   vi ~/.kube/config   --->粘貼內(nèi)容
大功告成 !
?? 歡迎加入小哈的星球 ,你將獲得: 專(zhuān)屬的項(xiàng)目實(shí)戰(zhàn) / Java 學(xué)習(xí)路線 / 一對(duì)一提問(wèn) / 學(xué)習(xí)打卡
目前, 正在星球內(nèi)部帶小伙伴做第一個(gè)項(xiàng)目:前后端分離博客,手摸手,后端 + 前端全棧開(kāi)發(fā),從 0 到 1 講解每個(gè)功能點(diǎn)開(kāi)發(fā)步驟,1v1 答疑,直到項(xiàng)目上線。目前已更新了90小節(jié),累計(jì)12w+字,講解圖:612張,還在持續(xù)爆肝中.. 后續(xù)還會(huì)上新更多項(xiàng)目,如秒殺系統(tǒng), 在線商城, IM即時(shí)通訊等,戳我加入學(xué)習(xí),已有280+小伙伴加入(目前最低價(jià))

最近面試BAT,整理一份面試資料《Java面試BATJ通關(guān)手冊(cè)》,覆蓋了Java核心技術(shù)、JVM、Java并發(fā)、SSM、微服務(wù)、數(shù)據(jù)庫(kù)、數(shù)據(jù)結(jié)構(gòu)等等。
獲取方式:點(diǎn)“在看”,關(guān)注公眾號(hào)并回復(fù) Java 領(lǐng)取,更多內(nèi)容陸續(xù)奉上。
PS:因公眾號(hào)平臺(tái)更改了推送規(guī)則,如果不想錯(cuò)過(guò)內(nèi)容,記得讀完點(diǎn)一下“在看”,加個(gè)“星標(biāo)”,這樣每次新文章推送才會(huì)第一時(shí)間出現(xiàn)在你的訂閱列表里。
點(diǎn)“在看”支持小哈呀,謝謝啦