Springboot集成SpringSecurity
點(diǎn)擊上方藍(lán)色字體,選擇“標(biāo)星公眾號(hào)”
優(yōu)質(zhì)文章,第一時(shí)間送達(dá)
? 作者?|??cainame?
來(lái)源 |? urlify.cn/7Jn6jm
66套java從入門(mén)到精通實(shí)戰(zhàn)課程分享?
一、Spring security 是什么?
Spring Security是一個(gè)能夠?yàn)榛赟pring的企業(yè)應(yīng)用系統(tǒng)提供聲明式的安全訪(fǎng)問(wèn)控制解決方案的安全框架。
它提供了一組可以在Spring應(yīng)用上下文中配置的Bean,充分利用了Spring IoC,DI(控制反轉(zhuǎn)Inversion of Control ,DI:Dependency Injection 依賴(lài)注入)和AOP(面向切面編程)功能,為應(yīng)用系統(tǒng)提供聲明式的安全訪(fǎng)問(wèn)控制功能,減少了為企業(yè)系統(tǒng)安全控制編寫(xiě)大量重復(fù)代碼的工作。
二、Spring security 怎么使用?
使用Spring Security很簡(jiǎn)單,只要在pom.xml文件中,引入spring security的依賴(lài)就可以了。? ?
<dependency>
????<groupId>org.springframework.bootgroupId>
????<artifactId>spring-boot-starter-securityartifactId>
dependency>
什么都不做,直接運(yùn)行程序,這時(shí)你訪(fǎng)問(wèn)任何一個(gè)URL,都會(huì)彈出一個(gè)“需要授權(quán)”的驗(yàn)證框,如圖:
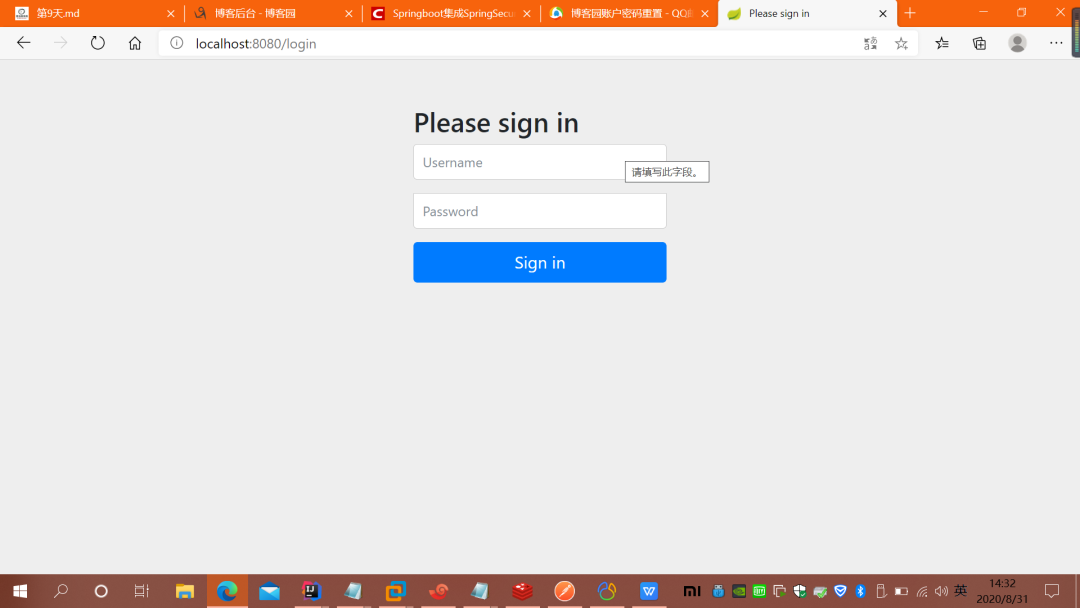
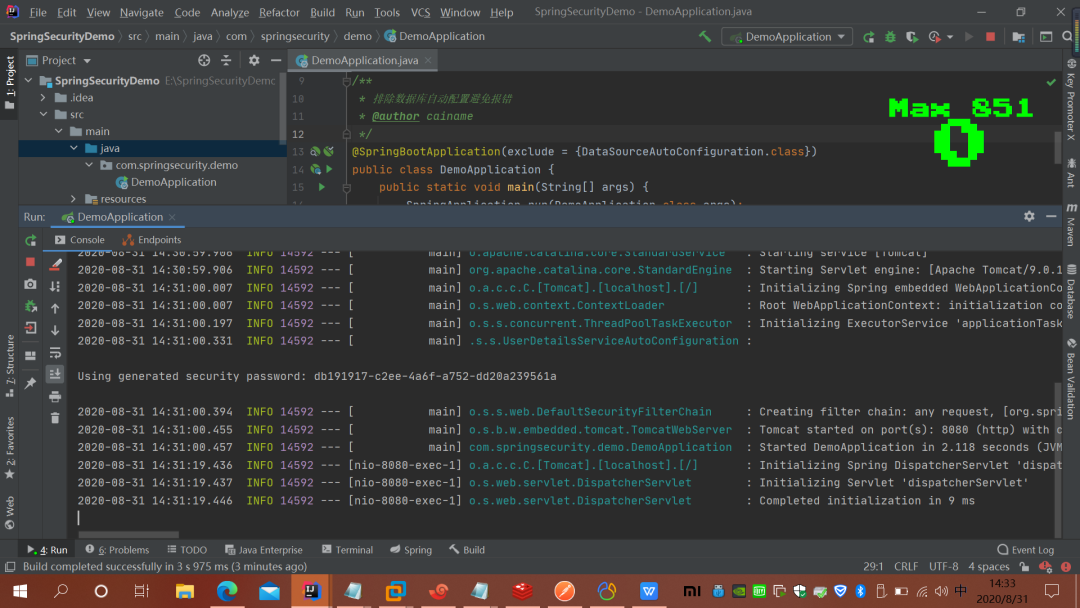
?spring security 會(huì)默認(rèn)使用一個(gè)用戶(hù)名為:user 的用戶(hù),密碼就是 啟動(dòng)的時(shí)候生成的(通過(guò)控制臺(tái)console中查看),如圖
?很顯然這根本不是我們想要的,接下來(lái)我們需要一步一步的改造
改造1 使用頁(yè)面表單登錄
@Override
????protected void configure(HttpSecurity http) throws Exception {
????????/**
?????????* loginPage("/login")表示登錄時(shí)跳轉(zhuǎn)的頁(yè)面,因?yàn)榈卿涰?yè)面我們不需要登錄認(rèn)證,所以我們需要添加 permitAll() 方法
?????????* permitAll()表示這個(gè)不需要驗(yàn)證 登錄頁(yè)面,登錄失敗頁(yè)面
?????????* loginProcessingUrl處理登陸的url
?????????* failureUrl:失敗的處理url
?????????*/
????????http.formLogin()
????????????????.loginPage("/login")
????????????????.loginProcessingUrl("/login/form")
????????????????.failureUrl("/login-error")
????????????????.permitAll().
????????????????and().authorizeRequests().anyRequest().authenticated().
????????????????and().csrf().disable();
????}
改造2、自定義用戶(hù)名和密碼
很顯然,這樣改造之后,雖然登錄頁(yè)面是好看了,但還遠(yuǎn)遠(yuǎn)不能滿(mǎn)足我們的應(yīng)用需求,所以第二步,我們改造自定義的用戶(hù)名和密碼。
自定義用戶(hù)名和密碼有2種方式,一種是在代碼中寫(xiě)死,這也是官方的demo,另一種是使用數(shù)據(jù)庫(kù)
/**
?????* 自定義密碼
?????* @param?auth
?????* @throws?Exception
?????*/
????@Override
????public?void?configure(AuthenticationManagerBuilder auth)throws?Exception {
????????auth.inMemoryAuthentication().passwordEncoder(new?BCryptPasswordEncoder())
????????????????.withUser("admin").password(new?BCryptPasswordEncoder().encode("123456")).roles("USER");
????}
spring security的原理就是使用很多的攔截器對(duì)URL進(jìn)行攔截,以此來(lái)管理登錄驗(yàn)證和用戶(hù)權(quán)限驗(yàn)證
用戶(hù)登陸,會(huì)被AuthenticationProcessingFilter攔截,調(diào)用AuthenticationManager的實(shí)現(xiàn),而且AuthenticationManager會(huì)調(diào)用ProviderManager來(lái)獲取用戶(hù)驗(yàn)證信息(不同的Provider調(diào)用的服務(wù)不同,因?yàn)檫@些信息可以是在數(shù)據(jù)庫(kù)上,可以是在LDAP服務(wù)器上,可以是xml配置文件上等),如果驗(yàn)證通過(guò)后會(huì)將用戶(hù)的權(quán)限信息封裝一個(gè)User放到spring的全局緩存SecurityContextHolder中,以備后面訪(fǎng)問(wèn)資源時(shí)使用。
所以我們要自定義用戶(hù)的校驗(yàn)機(jī)制的話(huà),我們只要實(shí)現(xiàn)自己的AuthenticationProvider就可以了。
在用AuthenticationProvider 這個(gè)之前,我們需要提供一個(gè)獲取用戶(hù)信息的服務(wù),實(shí)現(xiàn) ?UserDetailsService 接口
用戶(hù)名密碼->Authentication(未認(rèn)證)? -> ?AuthenticationManager ->AuthenticationProvider->UserDetailService->UserDetails->Authentication(已認(rèn)證)
public?class?UserInfo implements?Serializable, UserDetails {
?
????private?static?final long serialVersionUID = 1L;
????/**
?????* 用戶(hù)名
?????*/
????private?String?username;
????/**
?????* 用戶(hù)密碼
?????*/
????private?String?password;
????/**
?????* 用戶(hù)角色
?????*/
????private?String?role;
????private?boolean?accountNonExpired;
????private?boolean?accountNonLocked;
????private?boolean?credentialsNonExpired;
????private?boolean?enabled;
?
????public?UserInfo(String?username, String?password, String?role, boolean?accountNonExpired, boolean?accountNonLocked,
????????????????????boolean?credentialsNonExpired, boolean?enabled) {
????????// TODO Auto-generated constructor stub
????????this.username = username;
????????this.password = password;
????????this.role = role;
????????this.accountNonExpired = accountNonExpired;
????????this.accountNonLocked = accountNonLocked;
????????this.credentialsNonExpired = credentialsNonExpired;
????????this.enabled = enabled;
????}
?
????/**
?????* 權(quán)限
?????* @return
?????*/
????@Override
????public?Collectionextends?GrantedAuthority> getAuthorities() {
????????return?AuthorityUtils.commaSeparatedStringToAuthorityList(role);
????}
?
????@Override
????public?String?getPassword() {
????????return?password;
????}
?
????@Override
????public?String?getUsername() {
????????return?username;
????}
?
????@Override
????public?boolean?isAccountNonExpired() {
????????return?accountNonExpired;
????}
?
????@Override
????public?boolean?isAccountNonLocked() {
????????return?accountNonLocked;
????}
?
????@Override
????public?boolean?isCredentialsNonExpired() {
????????return?credentialsNonExpired;
????}
?
????@Override
????public?boolean?isEnabled() {
????????return?enabled;
????}
}
然后實(shí)現(xiàn)第2個(gè)類(lèi) UserService 來(lái)返回這個(gè)UserInfo的對(duì)象實(shí)例
package?com.springsecurity.demo.service;
?
import?com.springsecurity.demo.entity.UserInfo;
import?org.springframework.security.core.userdetails.UserDetails;
import?org.springframework.security.core.userdetails.UserDetailsService;
import?org.springframework.security.core.userdetails.UsernameNotFoundException;
import?org.springframework.security.crypto.bcrypt.BCryptPasswordEncoder;
import?org.springframework.stereotype.Component;
import?sun.security.rsa.RSASignature;
?
/**
?* @author?cainame
?*/
?
@Component
public?class?MyUserDetailsService?implements?UserDetailsService?{
?
????/**
?????* 這里可以可以通過(guò)username(登錄時(shí)輸入的用戶(hù)名)然后到數(shù)據(jù)庫(kù)中找到對(duì)應(yīng)的用戶(hù)信息,并構(gòu)建成我們自己的UserInfo來(lái)返回
?????* @param?username
?????* @return
?????* @throws?UsernameNotFoundException
?????*/
????@Override
????public?UserDetails loadUserByUsername(String username)?throws?UsernameNotFoundException {
????????if(username.equals("admin"))
????????{
????????????UserInfo userInfo=new?UserInfo("admin", "123456", "ROLE_ADMIN", true,true,true, true);
????????????return?userInfo;
????????}
????????return?null;
????}
}
到這里為止,我們自己定義的UserInfo類(lèi)和從數(shù)據(jù)庫(kù)中返回具體的用戶(hù)信息已經(jīng)實(shí)現(xiàn),接下來(lái)我們要實(shí)現(xiàn)的,我們自己的?AuthenticationProvider
@Component
public?class?MyAuthenticationProvider implements?AuthenticationProvider {
?
????@Autowired
????private?MyUserDetailsService userDetailService;
?
????@Override
????public?Authentication authenticate(Authentication authentication) throws AuthenticationException {
????????/**
?????????* 這個(gè)獲取表單輸入中返回的用戶(hù)名;
?????????*/
????????String?userName = authentication.getName();
????????/**
?????????* 這個(gè)是表單中輸入的密碼;
?????????*/
????????String?password = (String) authentication.getCredentials();
?
????????/**
?????????* 調(diào)用服務(wù)獲取用戶(hù)信息
?????????*/
????????UserInfo userInfo = (UserInfo) userDetailService.loadUserByUsername(userName);
?
?
????????if?(userInfo == null) {
????????????throw?new?BadCredentialsException("用戶(hù)名不存在");
????????}
?
?
?
????????if?(!userInfo.getPassword().equals("123456")) {
????????????throw?new?BadCredentialsException("密碼不正確");
????????}
?
????????/**
?????????* 獲取權(quán)限
?????????*/
????????Collectionextends?GrantedAuthority> authorities = userInfo.getAuthorities();
?
????????return?new?UsernamePasswordAuthenticationToken(userInfo, password, authorities);
?
????}
?
????@Override
????public?boolean?supports(Class aClass) {
????????return?true;
????}
}
到此為止,我們的用戶(hù)信息的獲取,校驗(yàn)部分已經(jīng)完成了。接下來(lái)要讓它起作用,則我們需要在配置文件中修改,讓他起作用。回到我的SecurityConfig代碼文件,修改如下:
1、注入我們自己的AuthenticationProvider
2、修改配置的方法:
@Override
???public?void?configure(AuthenticationManagerBuilder auth)throws?Exception {
???????auth.authenticationProvider(provider);
???}
3.獲取當(dāng)前登陸的用戶(hù)
Object object?= SecurityContextHolder.getContext().getAuthentication().getPrincipal();改造3、自定義登錄成功和失敗的處理邏輯
在現(xiàn)在的大多數(shù)應(yīng)用中,一般都是前后端分離的,所以我們登錄成功或失敗都需要用json格式返回,或者登錄成功之后,跳轉(zhuǎn)到某個(gè)具體的頁(yè)面。
為了實(shí)現(xiàn)這個(gè)功能,我們需要寫(xiě)2個(gè)類(lèi),分別繼承SavedRequestAwareAuthenticationSuccessHandler和SimpleUrlAuthenticationFailureHandler2個(gè)類(lèi),并重寫(xiě)其中的部分方法即可。
校驗(yàn)成功
@Component("myAuthenticationSuccessHandler")
public?class?MyAuthenticationSuccessHandler?extends?SavedRequestAwareAuthenticationSuccessHandler?{
?
????@Autowired
????private?ObjectMapper objectMapper;
?
????/**
?????* 登陸成功之后的處理方法
?????* @param?request
?????* @param?response
?????* @param?authentication
?????* @throws?ServletException
?????* @throws?IOException
?????*/
????@Override
????public?void?onAuthenticationSuccess(HttpServletRequest request, HttpServletResponse response, Authentication authentication)?throws?ServletException, IOException {
?
????????SecurityContextHolder.getContext().setAuthentication(authentication);
????????Map map=new?HashMap<>();
????????map.put("code", "200");
????????map.put("msg", "登錄成功");
????????map.put("user",SecurityContextHolder.getContext());
????????response.setContentType("application/json;charset=UTF-8");
????????response.getWriter().write(objectMapper.writeValueAsString(map));
????????new?DefaultRedirectStrategy().sendRedirect(request, response, "/index");
????}
}
error:
package?com.springsecurity.demo.config;
?
import?com.fasterxml.jackson.databind.ObjectMapper;
?
import?org.slf4j.Logger;
import?org.slf4j.LoggerFactory;
import?org.springframework.beans.factory.annotation.Autowired;
import?org.springframework.http.HttpStatus;
import?org.springframework.security.core.AuthenticationException;
import?org.springframework.security.web.authentication.SimpleUrlAuthenticationFailureHandler;
import?org.springframework.stereotype.Component;
?
import?javax.servlet.ServletException;
import?javax.servlet.http.HttpServletRequest;
import?javax.servlet.http.HttpServletResponse;
import?java.io.IOException;
import?java.util.HashMap;
import?java.util.Map;
?
?
/**
?* @author?cainame
?*/
?
@Component("myAuthenticationFailHander")
public?class?MyAuthenticationFailHander?extends?SimpleUrlAuthenticationFailureHandler?{
?
????@Autowired
????private?ObjectMapper objectMapper;
????private?Logger logger = LoggerFactory.getLogger(getClass());
?
????@Override
????public?void?onAuthenticationFailure(HttpServletRequest request, HttpServletResponse response, AuthenticationException exception)?throws?IOException, ServletException {
????????logger.info("登錄失敗");
????????//以Json格式返回
????????Map map=new?HashMap<>();
????????map.put("code", "201");
????????map.put("msg", "登錄失敗");
????????response.setStatus(HttpStatus.INTERNAL_SERVER_ERROR.value());
????????response.setContentType("application/json");
????????response.setCharacterEncoding("UTF-8");
????????response.getWriter().write(objectMapper.writeValueAsString(map));
????}
} 配置:@Override
????protected void configure(HttpSecurity http) throws Exception {
????????/**
?????????* loginPage("/login")表示登錄時(shí)跳轉(zhuǎn)的頁(yè)面,因?yàn)榈卿涰?yè)面我們不需要登錄認(rèn)證,所以我們需要添加 permitAll() 方法
?????????* permitAll()表示這個(gè)不需要驗(yàn)證 登錄頁(yè)面,登錄失敗頁(yè)面
?????????* loginProcessingUrl處理登陸的url
?????????* failureUrl:失敗的處理url
?????????*/
????????http.formLogin()
????????????????.loginPage("/login")
????????????????.loginProcessingUrl("/login/form")
????????????????.failureUrl("/login-error")
????????????????.successHandler(myAuthenticationSuccessHandler)
????????????????.failureHandler(myAuthenticationFailHander)
????????????????.permitAll().
????????????????and().authorizeRequests().anyRequest().authenticated().
????????????????and().csrf().disable();
????}改造4、添加權(quán)限控制
之前的代碼我們用戶(hù)的權(quán)限沒(méi)有加以利用,現(xiàn)在我們添加權(quán)限的用法。
之前的登錄驗(yàn)證通俗的說(shuō),就是來(lái)判斷你是誰(shuí)(認(rèn)證),而權(quán)限控制就是用來(lái)確定:你能做什么或者不能做什么(權(quán)限)
在講這個(gè)之前,我們簡(jiǎn)單說(shuō)下,對(duì)于一些資源不需要權(quán)限認(rèn)證的,那么就可以在Config中添加 過(guò)濾條件,如:
.and().authorizeRequests().antMatchers("/index").permitAll()那么我們直接訪(fǎng)問(wèn) /index 就不會(huì)跳轉(zhuǎn)到登錄頁(yè)面,這樣我們就可以把一些不需要驗(yàn)證的資源以這種方式過(guò)濾,比如圖片,腳本,樣式文件之類(lèi)的。
我們先來(lái)看第一種:在編碼中寫(xiě)死的。
那其實(shí)權(quán)限控制也是通過(guò)這種方式來(lái)實(shí)現(xiàn)
.antMatchers("/whoim").hasRole("ADMIN")這個(gè)用戶(hù)的角色哪里來(lái),就是我們自己的UserDetailsService中返回的用戶(hù)信息中的角色權(quán)限信息,這里需要注意一下就是 .hasRole("ADMIN"),那么給用戶(hù)的角色時(shí)就要用:ROLE_ADMIN?
.antMatchers 這里也可以限定HttpMethod的不同要求不同的權(quán)限(用于適用于Restful風(fēng)格的API).
.antMatchers("/whoim").hasRole("ADMIN").antMatchers(HttpMethod.POST,"/user/*").hasRole("ADMIN")
.antMatchers(HttpMethod.GET,"/user/*").hasRole("USER")
Spring Security 的校驗(yàn)的原理:左手配置信息,右手登錄后的用戶(hù)信息,中間投票器。
從我們的配置信息中獲取相關(guān)的URL和需要的權(quán)限信息,然后獲得登錄后的用戶(hù)信息
然后經(jīng)過(guò):AccessDecisionManager?來(lái)驗(yàn)證,這里面有多個(gè)投票器:
AccessDecisionVoter,(默認(rèn)有幾種實(shí)現(xiàn):比如:1票否決(只要有一個(gè)不同意,就沒(méi)有權(quán)限),全票通過(guò),才算通過(guò);只要有1個(gè)通過(guò),就全部通過(guò)。類(lèi)似這種的。
WebExpressionVoter?是Spring Security默認(rèn)提供的的web開(kāi)發(fā)的投票器。(表達(dá)式的投票器)
Spring Security 默認(rèn)的是 AffirmativeBased ? 只要有一個(gè)通過(guò),就通過(guò)。
有興趣的可以 從FilterSecurityInterceptor這個(gè)過(guò)濾器入口,來(lái)查看這個(gè)流程。
內(nèi)嵌的表達(dá)式有:permitAll? denyAll? ?等等。
每一個(gè)權(quán)限表達(dá)式都對(duì)應(yīng)一個(gè)方法。
如果需要同時(shí)滿(mǎn)足多個(gè)要求的,不能連寫(xiě)如 ,我們有個(gè)URL需要管理員權(quán)限也同時(shí)要限定IP的話(huà),不能:.hasRole("ADMIN").hasIPAddress("192.168.1.1");?
而是需要用access方法 ? ?.access("hasRole('ADMIN') and hasIpAddress('192.168.1.1')");這種。
.antMatchers("/whoim").access("hasRole('ADMIN') and hasIpAddress('192.168.119.1')")那我們可以自己寫(xiě)權(quán)限表達(dá)式嗎? 可以,稍后。。。這些都是硬編碼的實(shí)現(xiàn),都是在代碼中寫(xiě)入的,這樣的靈活性不夠。所以我們接下來(lái)繼續(xù)改造
改造4、添加基于RBAC(role-Based-access control)權(quán)限控制
這個(gè)大家可以去百度一下,一般都是由 3個(gè)部分組成,一個(gè)是用戶(hù),一個(gè)是角色 ,一個(gè)是資源(菜單,按鈕),然后就是 用戶(hù)和角色的關(guān)聯(lián)表,角色和資源的關(guān)聯(lián)表
核心就是判斷當(dāng)前的用戶(hù)所擁有的URL是否和當(dāng)前訪(fǎng)問(wèn)的URL是否匹配。
首先我們自己提供一個(gè)判斷的接口和實(shí)現(xiàn),代碼如下:
public?interface?RbacService?{
????boolean?hasPermission(HttpServletRequest request, Authentication authentication);
}
實(shí)現(xiàn):
@Component("rbacService")
public?class?RbacServiceImpl implements?RbacService {
?
????private?AntPathMatcher antPathMatcher = new?AntPathMatcher();
????@Override
????public?boolean?hasPermission(HttpServletRequest request, Authentication authentication) {
????????Object?principal = authentication.getPrincipal();
????????boolean?hasPermission = false;
????????if?(principal instanceof?UserDetails) { //首先判斷先當(dāng)前用戶(hù)是否是我們UserDetails對(duì)象。
????????????String?userName = ((UserDetails) principal).getUsername();
????????????Set<String> urls = new?HashSet<>();
????????????urls.add("/whoim");// 數(shù)據(jù)庫(kù)讀取 //讀取用戶(hù)所擁有權(quán)限的所有URL
????????????// 注意這里不能用equal來(lái)判斷,因?yàn)橛行︰RL是有參數(shù)的,所以要用AntPathMatcher來(lái)比較
????????????for?(String?url : urls) {
????????????????if?(antPathMatcher.match(url, request.getRequestURI())) {
????????????????????hasPermission = true;
????????????????????break;
????????????????}
????????????}
????????}
????????return?hasPermission;
????}
}
修改配置文件:
.anyRequest().access("@rbacService.hasPermission(request,authentication)")其中 @rbacService 就是我們自己聲明的bean,在RbacServiceImpl實(shí)現(xiàn)類(lèi)的頭部注解中。
改造5、記住我的功能Remeber me
本質(zhì)是通過(guò)token來(lái)讀取用戶(hù)信息,所以服務(wù)端需要存儲(chǔ)下token信息
根據(jù)官方的文檔,token可以通過(guò)數(shù)據(jù)庫(kù)存儲(chǔ)? 數(shù)據(jù)庫(kù)腳本
CREATE?TABLE?persistent_logins (
????username VARCHAR(64) NOT?NULL,
????series VARCHAR(64) NOT?NULL,
????token VARCHAR(64) NOT?NULL,
????last_used TIMESTAMP?NOT?NULL,
????PRIMARY KEY?(series)
);
然后,配置好token 的存儲(chǔ) 及數(shù)據(jù)源 引入jdbc啟動(dòng)器
<dependency>
????<groupId>org.springframework.bootgroupId>
????<artifactId>spring-boot-starter-jdbcartifactId>
dependency>
增加前端checkbox
<tr>
?????<td>記住我td>
?????<td><input?type="checkbox"?name="remember-me"?value="true"/>td>
tr>
配置
@Bean
????public?PersistentTokenRepository persistentTokenRepository()?{
????????JdbcTokenRepositoryImpl tokenRepository = new?JdbcTokenRepositoryImpl();
????????tokenRepository.setDataSource(dataSource);
????????return?tokenRepository;
????}
設(shè)置
.rememberMe()
???????????.rememberMeParameter("remember-me").userDetailsService(myUserDetailsService)
???????????.tokenRepository(persistentTokenRepository())
???????????.tokenValiditySeconds(60)
粉絲福利:108本java從入門(mén)到大神精選電子書(shū)領(lǐng)取
???
?長(zhǎng)按上方鋒哥微信二維碼?2 秒 備注「1234」即可獲取資料以及 可以進(jìn)入java1234官方微信群
感謝點(diǎn)贊支持下哈?