
前端工程化知識(shí)點(diǎn)梳理
前言
子奕大佬整理的這份知識(shí)點(diǎn)挺不錯(cuò)的,小伙伴們遇到有不明白的點(diǎn),可以找找相關(guān)的文章,研究一下,橫向提升自己知識(shí)面。
知識(shí)點(diǎn)
6、簡單描述一下 Babel 的編譯過程?
溫馨提示:如果某種高級(jí)語言或者應(yīng)用語言(例如用于人工智能的計(jì)算機(jī)設(shè)計(jì)語言)轉(zhuǎn)換的目標(biāo)語言不是特定計(jì)算機(jī)的匯編語言,而是面向另一種高級(jí)程序語言(很多研究性的編譯器將 C 作為目標(biāo)語言),那么還需要將目標(biāo)高級(jí)程序語言再進(jìn)行一次額外的編譯才能得到最終的目標(biāo)程序,這種編譯器可稱為源到源的轉(zhuǎn)換器。

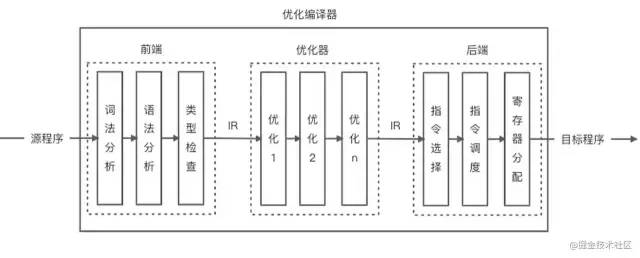
解析(Parse):包括詞法分析和語法分析。詞法分析主要把字符流源代碼(Char Stream)轉(zhuǎn)換成令牌流( Token Stream),語法分析主要是將令牌流轉(zhuǎn)換成抽象語法樹(Abstract Syntax Tree,AST)。 轉(zhuǎn)換(Transform):通過 Babel 的插件能力,將高版本語法的 AST 轉(zhuǎn)換成支持低版本語法的 AST。當(dāng)然在此過程中也可以對(duì) AST 的 Node 節(jié)點(diǎn)進(jìn)行優(yōu)化操作,比如添加、更新以及移除節(jié)點(diǎn)等。 生成(Generate):將 AST 轉(zhuǎn)換成字符串形式的低版本代碼,同時(shí)也能創(chuàng)建 Source Map 映射。
具體的流程如下所示:
舉個(gè)栗子,如果要將 TypeScript 語法轉(zhuǎn)換成 ES5 語法:
// 源代碼
let a: string = 1;
// 目標(biāo)代碼
var a = 1;
6.1 解析(Parser)
支持解析最新的 ES2020 支持解析 JSX、Flow & TypeScript 支持解析實(shí)驗(yàn)性的語法提案(支持任何 Stage 0 的 PRS)
import { parse } from '@babel/parser';
const source = `let a: string = 1;`;

enum ParseSourceTypeEnum {
  Module = 'module',
  Script = 'script',
  Unambiguous = 'unambiguous',
}

enum ParsePluginEnum {
  Flow = 'flow',
  FlowComments = 'flowComments',
  TypeScript = 'typescript',
  Jsx = 'jsx',
  V8intrinsic = 'v8intrinsic',
}

// 解析(Parser)階段
const ast = parse(source, {
  // 嚴(yán)格模式下解析并且允許模塊定義
  sourceType: ParseSourceTypeEnum.Module,
  // 支持解析 TypeScript 語法(注意,這里只是支持解析,并不是轉(zhuǎn)換 TypeScript)
  plugins: [ParsePluginEnum.TypeScript],
});6.2 轉(zhuǎn)換(Transform)
import { parse } from '@babel/parser';
import traverse from '@babel/traverse';

enum ParseSourceTypeEnum {
  Module = 'module',
  Script = 'script',
  Unambiguous = 'unambiguous',
}

enum ParsePluginEnum {
  Flow = 'flow',
  FlowComments = 'flowComments',
  TypeScript = 'typescript',
  Jsx = 'jsx',
  V8intrinsic = 'v8intrinsic',
}

const source = `let a: string = 1;`;

// 解析(Parser)階段
const ast = parse(source, {
  // 嚴(yán)格模式下解析并且允許模塊定義
  sourceType: ParseSourceTypeEnum.Module,
  // 支持解析 TypeScript 語法(注意,這里只是可以解析,并不是轉(zhuǎn)換 TypeScript)
  plugins: [ParsePluginEnum.TypeScript],
});

// 轉(zhuǎn)換(Transform) 階段
traverse(ast, {
  // 訪問變量聲明標(biāo)識(shí)符
  VariableDeclaration(path) {
    // 將 const 和 let 轉(zhuǎn)換為 var
    path.node.kind = 'var';
  },
  // 訪問 TypeScript 類型聲明標(biāo)識(shí)符
  TSTypeAnnotation(path) {
    // 移除 TypeScript 的聲明類型
    path.remove();
  },
});溫馨提示:這里只是簡單的一個(gè) Demo 示例,在真正轉(zhuǎn)換 let、const 等變量聲明的過程中,還會(huì)遇到處理暫時(shí)性死區(qū)(Temporal Dead Zone, TDZ)的情況,更多詳細(xì)信息可以查看官方的插件 babel-plugin-transform-block-scoping。
6.3 生成(Generate)
Babel 的代碼生成過程(AST 到目標(biāo)代碼的轉(zhuǎn)換)主要使用 @babel/generator,如下所示:
import { parse } from '@babel/parser';
import traverse from '@babel/traverse';
import generate from '@babel/generator';
enum ParseSourceTypeEnum {
Module = 'module',
Script = 'script',
Unambiguous = 'unambiguous',
}
enum ParsePluginEnum {
Flow = 'flow',
FlowComments = 'flowComments',
TypeScript = 'typescript',
Jsx = 'jsx',
V8intrinsic = 'v8intrinsic',
}
const source = `let a: string = 1;`;
// 解析(Parser)階段
const ast = parse(source, {
// 嚴(yán)格模式下解析并且允許模塊定義
sourceType: ParseSourceTypeEnum.Module,
// 支持解析 TypeScript 語法(注意,這里只是可以解析,并不是轉(zhuǎn)換 TypeScript)
plugins: [ParsePluginEnum.TypeScript],
});
// 轉(zhuǎn)換(Transform) 階段
traverse(ast, {
// 訪問詞法規(guī)則
VariableDeclaration(path) {
path.node.kind = 'var';
},
// 訪問詞法規(guī)則
TSTypeAnnotation(path) {
// 移除 TypeScript 的聲明類型
path.remove();
},
});
// 生成(Generate)階段
const { code } = generate(ast);
// code: var a = 1;
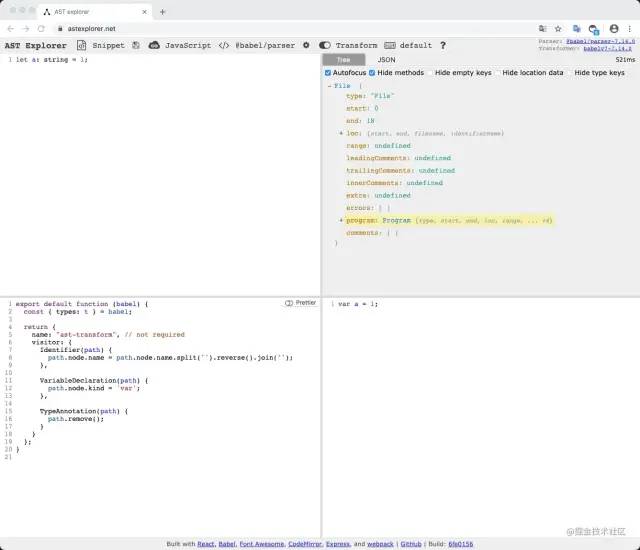
console.log('code: ', code);如果你想了解上述輸入源對(duì)應(yīng)的 AST 數(shù)據(jù)或者嘗試自己編譯,可以使用工具 AST Explorer (也可以使用 Babel 官網(wǎng)自帶的 Try It Out ),具體如下所示:
溫馨提示:上述第三個(gè)框是以插件的 API 形式進(jìn)行調(diào)用,如果想了解 Babel 的插件開發(fā),可以查看 Babel 插件手冊(cè) / 編寫你的第一個(gè) Babel 插件。
閱讀鏈接: Babel 用戶手冊(cè)、Babel 插件手冊(cè)
9、ES6 Module 相對(duì)于 CommonJS 的優(yōu)勢是什么?
溫馨提示:如果你只是想知道本題的答案,那么直接進(jìn)入傳送門 16.8.2 Static module structure 。除此之外,以下 ES Module 的代碼只在 Node.js 環(huán)境中進(jìn)行了測試,感興趣的同學(xué)可以使用瀏覽器進(jìn)行再測試。對(duì)不同規(guī)范模塊的代碼編譯選擇了 Webpack,感興趣的同學(xué)也可以采用 Rollup 進(jìn)行編譯測試。
| 類型 | ES Module | CommonJS |
|---|---|---|
| 加載方式 | 編譯時(shí) | 運(yùn)行時(shí) |
| 引入性質(zhì) | 引用 / 只讀 | 淺拷貝 / 可讀寫 |
| 模塊作用域 | this | this / __filename / __dirname... |
9.1 加載方式
// 編譯時(shí):VS Code 鼠標(biāo) hover 到 b 時(shí)可以顯示出 b 的類型信息
import { b } from './b';

const a = 1;
// WARNING: 具有邏輯
if(a === 1) {
   // 編譯時(shí):ESLint: Parsing error: 'import' and 'export' may only appear at the top level
   // 運(yùn)行時(shí):SyntaxError: Unexpected token '{'
   // TIPS: 這里可以使用 import() 進(jìn)行動(dòng)態(tài)導(dǎo)入
   import { b } from './b';
}

const c = 'b';
// WARNING: 含有變量
// 編譯時(shí):ESLint:Parsing error: Unexpected token `
// 運(yùn)行時(shí):SyntaxError: Unexpected template string
import { d } from `./${c}`;
CommonJS 相對(duì)于 ES Module 在加載方式上的特性如下所示:
const a = 1;

if(a === 1) {
  // VS Code 鼠標(biāo) hover 到 b 時(shí),無法顯示出 b 的類型信息
  const b = require('./b');
}

const c = 'b';
const d = require(`./${c}`);
 ES Module 是采用靜態(tài)的加載方式,也就是模塊中導(dǎo)入導(dǎo)出的依賴關(guān)系可以在代碼編譯時(shí)就確定下來。如上圖所示,代碼在編譯的過程中可以做的事情包含詞法和語法分析、類型檢查以及代碼優(yōu)化等等。因此采用 ES Module 進(jìn)行代碼設(shè)計(jì)時(shí)可以在編譯時(shí)通過 ESLint 快速定位出模塊的詞法語法錯(cuò)誤以及類型信息等。ES Module 中會(huì)產(chǎn)生一些錯(cuò)誤的加載方式,是因?yàn)檫@些加載方式含有邏輯和變量的運(yùn)行時(shí)判斷,只有在代碼的運(yùn)行時(shí)階段才能確定導(dǎo)入導(dǎo)出的依賴關(guān)系,這明顯和 ES Module 的加載機(jī)制不相符。
溫馨提示:注意 import 語法和 import() 的區(qū)別,import() 是 tc39 中的一種提案,該提案允許你可以使用類似于 import(`${path}/foo.js`) 的導(dǎo)入語句(估計(jì)是借鑒了 CommonJS 可以動(dòng)態(tài)加載模塊的特性),因此也允許你在運(yùn)行時(shí)進(jìn)行條件加載,也就是所謂的懶加載。除此之外,import 和 import() 還存在其他一些重要的區(qū)別,大家還是自行谷歌一下。
9.2 編譯優(yōu)化
由于 ES Module 是在編譯時(shí)就能確定模塊之間的依賴關(guān)系,因此可以在編譯的過程中進(jìn)行代碼優(yōu)化。例如:
// hello.js
export function a() {
  console.log('a');
}

export function b() {
  console.log('b');
}

// index.js
// TIPS: Webpack 編譯入口文件
// 這里不引入 function b
import { a } from './hello';
console.log(a);
使用 Webpack 5.47.1 (Webpack Cli 4.7.2)進(jìn)行代碼編譯,生成的編譯產(chǎn)物如下所示:
(()=>{"use strict";console.log((function(){console.log("a")}))})();可以發(fā)現(xiàn)編譯生成的產(chǎn)物沒有 function b 的代碼,這是在編譯階段對(duì)代碼進(jìn)行了優(yōu)化,移除了未使用的代碼(Dead Code),這種優(yōu)化的術(shù)語被叫做 Tree Shaking。
溫馨提示:你可以將應(yīng)用程序想象成一棵樹。綠色表示實(shí)際用到的 Source Code(源碼)和 Library(庫),是樹上活的樹葉。灰色表示未引用代碼,是秋天樹上枯萎的樹葉。為了除去死去的樹葉,你必須搖動(dòng)這棵樹,使它們落下。
溫馨提示:在 ES Module 中可能會(huì)因?yàn)榇a具有副作用(例如操作原型方法以及添加全局對(duì)象的屬性等)導(dǎo)致優(yōu)化失敗,如果想深入了解 Tree Shaking 的更多優(yōu)化注意事項(xiàng),可以深入閱讀你的 Tree-Shaking 并沒什么卵用。
為了對(duì)比 ES Module 的編譯優(yōu)化能力,同樣采用 CommonJS 規(guī)范進(jìn)行模塊導(dǎo)入:
// hello.js
exports.a = function () {
  console.log('a');
};

exports.b = function () {
  console.log('b');
};

// index.js
// TIPS: Webpack 編譯入口文件
const { a } = require('./hello');
console.log(a);
使用 Webpack 進(jìn)行代碼編譯,生成的編譯產(chǎn)物如下所示:
(() => {
  var o = {
      418: (o, n) => {
        (n.a = function () {
          console.log('a');
        }),
          // function b 的代碼并沒有被去除
          (n.b = function () {
            console.log('b');
          });
      },
    },
    n = {};
  function r(t) {
    var e = n[t];
    if (void 0 !== e) return e.exports;
    var s = (n[t] = { exports: {} });
    return o[t](s, s.exports, r), s.exports;
  }
  (() => {
    const { a: o } = r(418);
    console.log(o);
  })();
})();溫馨提示:在 Node.js 環(huán)境中一般不需要編譯 CommonJS 模塊代碼,除非你使用了當(dāng)前 Node 版本所不能兼容的一些新語法特性。
溫馨提示:如果你想了解如何使發(fā)布的 Npm 庫包支持 Tree Shaking 特性,可以查看 defense-of-dot-js / Typical Usage、 Webpack / Final Steps、pgk.module 以及 rollup.js / Tree Shaki…。
Webpack 對(duì)于 module 字段的支持的描述提示:The module property should point to a script that utilizes ES2015 module syntax but no other syntax features that aren't yet supported by browsers or node. This enables webpack to parse the module syntax itself, allowing for lighter bundles via tree shaking if users are only consuming certain parts of the library.
9.3 加載原理 & 引入性質(zhì)
溫馨提示:下述理論部分以及圖片內(nèi)容均出自于 2018 年的文章 ES modules: A cartoon deep-dive,如果想要了解更多原理信息可以查看 TC39 的 16.2 Modules。
事實(shí)上, ES Module 的加載過程主要分為如下三個(gè)階段:
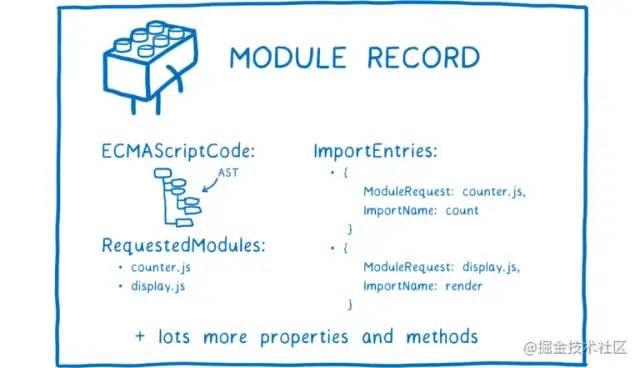
構(gòu)建(Construction):主要分為查找、加載(在瀏覽器中是下載文件,在本地文件系統(tǒng)中是加載文件)、然后把文件解析成 Module Record。
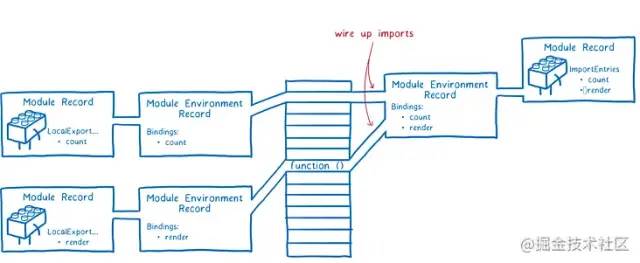
實(shí)例化(Instantiation):給所有的 Module Record 分配內(nèi)存空間(此刻還沒有填充值),并根據(jù)導(dǎo)入導(dǎo)出關(guān)系確定各自之間的引用關(guān)系,確定引用關(guān)系的過程稱為鏈接(Linking)。
運(yùn)行(Evaluation):運(yùn)行代碼,給內(nèi)存地址填充運(yùn)行時(shí)的模塊數(shù)據(jù)。
溫馨提示:import 的上述三個(gè)階段其實(shí)在 import() 中體現(xiàn)的更加直觀(盡管 import 已經(jīng)被多數(shù)瀏覽器支持,但是我們?cè)谡嬲_發(fā)和運(yùn)行的過程中仍然會(huì)使用編譯后的代碼運(yùn)行,而不是采用瀏覽器 script 標(biāo)簽的遠(yuǎn)程地址的動(dòng)態(tài)異步加載方式),而 import() 事實(shí)上如果要實(shí)現(xiàn)懶加載優(yōu)化(例如 Vue 里的路由懶加載,更多的是在瀏覽器的宿主環(huán)境而不是 Node.js 環(huán)境,這里不展開更多編譯后實(shí)現(xiàn)方式的細(xì)節(jié)問題),大概率要完整經(jīng)歷上述三個(gè)階段的異步加載過程,具體再次查看 tc39 動(dòng)態(tài)提案:This proposal adds an import(specifier) syntactic form, which acts in many ways like a function (but see below). It returns a promise for the module namespace object of the requested module, which is created after fetching, instantiating, and evaluating all of the module's dependencies, as well as the module itself.
 ES Module 模塊加載的三個(gè)階段分別需要在編譯時(shí)和運(yùn)行時(shí)進(jìn)行(可能有的同學(xué)會(huì)像我一樣好奇實(shí)例化階段到底是在編譯時(shí)還是運(yùn)行時(shí)進(jìn)行,根據(jù) tc39 動(dòng)態(tài)加載提案里的描述可以得出你想要的答案:
具體如下圖所示: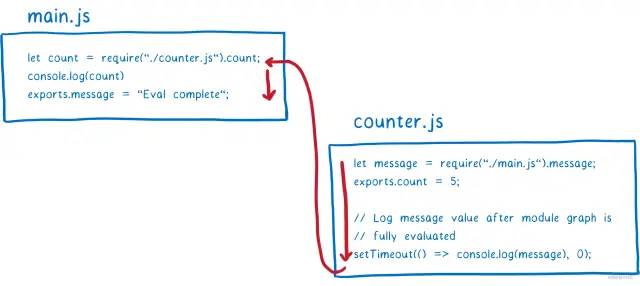 上圖中 main.js 在運(yùn)行加載 counter.js 時(shí),會(huì)先等待 counter.js 運(yùn)行完成后才能繼續(xù)運(yùn)行代碼,因此在 CommonJS 中模塊的加載是阻塞式的。CommonJS 采用同步阻塞式加載模塊是因?yàn)樗恍枰獜谋镜氐奈募到y(tǒng)中加載文件,耗費(fèi)的性能和時(shí)間很少,而 ES Module 在瀏覽器(注意這里說的是瀏覽器)中運(yùn)行的時(shí)候需要下載文件然后才能進(jìn)行實(shí)例化和運(yùn)行,如果這個(gè)過程是同步進(jìn)行,那么會(huì)影響頁面的加載性能。
// hello.js
export let a = 1;

setTimeout(() => {
  a++;
}, 1000);


// index.js
import { a } from './hello.js';

setTimeout(() => {
  console.log(a); // 2
}, 2000);
在 Node (v14.15.4)環(huán)境中運(yùn)行上述代碼得到的執(zhí)行結(jié)果是 2,對(duì)比一下 CommonJS 規(guī)范的執(zhí)行:
// hello.js
exports.a = 1;

setTimeout(() => {
  exports.a++;
}, 1000);


// index.js
let { a } = require('./hello');

setTimeout(() => {
  console.log(a); // 1
}, 2000);
可以發(fā)現(xiàn)打印的結(jié)果信息和 ES Module 的結(jié)果不一樣,這里的執(zhí)行結(jié)果為 1。產(chǎn)生上述差異的根本原因是實(shí)例化的方式不同,如下圖所示: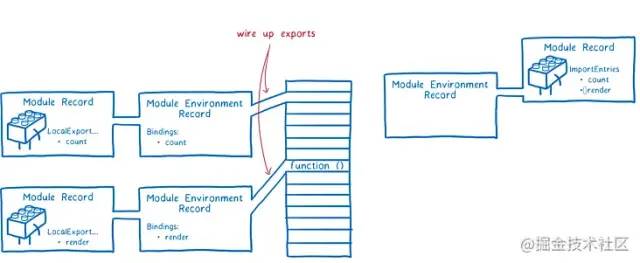
CommonJS 規(guī)范在導(dǎo)出時(shí)事實(shí)上導(dǎo)出的是值拷貝,如下圖所示:

// hello.js
exports.a = {
  value: 1,
};

setTimeout(() => {
  exports.a.value++;
}, 1000);

// index.js
let { a } = require('./hello');

setTimeout(() => {
  console.log(a.value); // 2
}, 2000);
接下來對(duì)比編譯后的差異,將 ES Module 的源碼進(jìn)行編譯(仍然使用 Webpack),編譯之后的代碼如下所示:
(() => {
  'use strict';
  let e = 1;
  setTimeout(() => {
    e++;
  }, 1e3),
    setTimeout(() => {
      console.log(e);
    }, 2e3);
})();
可以看出,將 ES Module 的代碼進(jìn)行編譯后,使用的是同一個(gè)變量值,此時(shí)將 CommonJS 的代碼進(jìn)行編譯:
(() => {
  var e = {
      418: (e, t) => {
        // hello.js 中的模塊代碼
        (t.a = 1),
          setTimeout(() => {
            t.a++;
          }, 1e3);
      },
    },
    t = {};
  function o(r) {
    // 開辟模塊的緩存空間
    var s = t[r];
    // 獲取緩存信息,每次返回相同的模塊對(duì)象信息
    if (void 0 !== s) return s.exports;
    // 開辟模塊對(duì)象的內(nèi)存空間
    var a = (t[r] = { exports: {} });
    // 逗號(hào)運(yùn)算符,先運(yùn)行模塊代碼,賦值模塊對(duì)象的值,然后返回模塊信息
    // 由于緩存,模塊代碼只會(huì)被執(zhí)行一次
    return e[r](a, a.exports, o), a.exports;
  }
  (() => {
    // 淺拷貝
    let { a: e } = o(418);
    setTimeout(() => {
      // 盡管 t.a ++,這里輸出的仍然是 1
      console.log(e);
    }, 2e3);
  })();
})();
可以發(fā)現(xiàn) CommonJS 規(guī)范在編譯后會(huì)緩存模塊的信息,從而使得下一次將從緩存中直接獲取模塊數(shù)據(jù)。除此之外,緩存會(huì)使得模塊代碼只會(huì)被執(zhí)行一次。查看 Node.js 官方文檔對(duì)于 CommonJS 規(guī)范的緩存描述,發(fā)現(xiàn) Webpack 的編譯完全符合 CommonJS 規(guī)范的緩存機(jī)制。了解了這個(gè)機(jī)制以后,你會(huì)發(fā)現(xiàn)多次使用 require 進(jìn)行模塊加載不會(huì)導(dǎo)致代碼被執(zhí)行多次,這是解決無限循環(huán)依賴的一個(gè)重要特征。
除了引入的方式可能會(huì)有區(qū)別之外,引入的代碼可能還存在一些區(qū)別,比如在 ES Module 中:
// hello.js
export function a() {
  console.log('a this: ', this);
}

// index.js
import { a } from './hello.js';

// a = 1;
// TypeError: Assignment to constant variable.
//    ...
//    at ModuleJob.run (internal/modules/esm/module_job.js:152:23)
//    at async Loader.import (internal/modules/esm/loader.js:166:24)
//    at async Object.loadESM (internal/process/esm_loader.js:68:5)
a = 1;
使用 Node.js 直接運(yùn)行上述 ES Module 代碼,是會(huì)產(chǎn)生報(bào)錯(cuò)的,因?yàn)閷?dǎo)入的變量根據(jù)提示可以看出是只讀變量,而如果采用 Webpack 進(jìn)行編譯后運(yùn)行,則沒有上述問題,除此之外 CommonJS 中導(dǎo)入的變量則可讀可寫。當(dāng)然除此之外,你也可以嘗試更多的其他方面,比如:
// hello.js

// 非嚴(yán)格模式
b = 1;

export function a() {
  console.log('a this: ', this);
}

// index.js
import { a } from './hello.js';

console.log('a: ', a);
你會(huì)發(fā)現(xiàn)使用 Node.js 環(huán)境執(zhí)行上述 ES Module 代碼,會(huì)直接拋出下述錯(cuò)誤信息:
ReferenceError: b is not defined
    at file:///Users/ziyi/Desktop/Gitlab/Explore/module-example/esmodule/hello.js:1:3
    at ModuleJob.run (internal/modules/esm/module_job.js:152:23)
    at async Loader.import (internal/modules/esm/loader.js:166:24)
    at async Object.loadESM (internal/process/esm_loader.js:68:5)
9.4 模塊作用域
// https://github.com/nodejs/node/blob/master/lib/internal/modules/cjs/loader.js#L206
const wrapper = [
  '(function (exports, require, module, __filename, __dirname) { ',
  '\n});',
];
索性看到這個(gè)模塊作用域的代碼,我們就繼續(xù)查看一下 require 的源碼:
// https://github.com/nodejs/node/blob/3914354cd7ddc65774f13bbe435978217149793c/lib/internal/modules/cjs/loader.js#L997
Module.prototype.require = function(id) {
  validateString(id, 'id');
  if (id === '') {
    throw new ERR_INVALID_ARG_VALUE('id', id,
                                    'must be a non-empty string');
  }
  requireDepth++;
  try {
    return Module._load(id, this, /* isMain */ false);
  } finally {
    requireDepth--;
  }
};

// https://github.com/nodejs/node/blob/3914354cd7ddc65774f13bbe435978217149793c/lib/internal/modules/cjs/loader.js#L757

// Check the cache for the requested file.
// 1. If a module already exists in the cache: return its exports object.
// 2. If the module is native: call
//    `NativeModule.prototype.compileForPublicLoader()` and return the exports.
// 3. Otherwise, create a new module for the file and save it to the cache.
//    Then have it load  the file contents before returning its exports
//    object.
Module._load = function(request, parent, isMain) {
  let relResolveCacheIdentifier;
  if (parent) {
    debug('Module._load REQUEST %s parent: %s', request, parent.id);
    // Fast path for (lazy loaded) modules in the same directory. The indirect
    // caching is required to allow cache invalidation without changing the old
    // cache key names.
    relResolveCacheIdentifier = `${parent.path}\x00${request}`;
    const filename = relativeResolveCache[relResolveCacheIdentifier];
    // 有緩存,則走緩存
    if (filename !== undefined) {
      const cachedModule = Module._cache[filename];
      if (cachedModule !== undefined) {
        updateChildren(parent, cachedModule, true);
        if (!cachedModule.loaded)
          return getExportsForCircularRequire(cachedModule);
        return cachedModule.exports;
      }
      delete relativeResolveCache[relResolveCacheIdentifier];
    }
  }

  // `node:` 用于檢測核心模塊,例如 fs、path 等
  // Node.js 文檔:http://nodejs.cn/api/modules.html#modules_core_modules
  // 這里主要用于繞過 require 緩存
  const filename = Module._resolveFilename(request, parent, isMain);
  if (StringPrototypeStartsWith(filename, 'node:')) {
    // Slice 'node:' prefix
    const id = StringPrototypeSlice(filename, 5);

    const module = loadNativeModule(id, request);
    if (!module?.canBeRequiredByUsers) {
      throw new ERR_UNKNOWN_BUILTIN_MODULE(filename);
    }

    return module.exports;
  }

 // 緩存處理
  const cachedModule = Module._cache[filename];
  if (cachedModule !== undefined) {
    updateChildren(parent, cachedModule, true);
    if (!cachedModule.loaded) {
      const parseCachedModule = cjsParseCache.get(cachedModule);
      if (!parseCachedModule || parseCachedModule.loaded)
        return getExportsForCircularRequire(cachedModule);
      parseCachedModule.loaded = true;
    } else {
      return cachedModule.exports;
    }
  }

  const mod = loadNativeModule(filename, request);
  if (mod?.canBeRequiredByUsers) return mod.exports;

  // Don't call updateChildren(), Module constructor already does.
  const module = cachedModule || new Module(filename, parent);

  if (isMain) {
    process.mainModule = module;
    module.id = '.';
  }

  Module._cache[filename] = module;
  if (parent !== undefined) {
    relativeResolveCache[relResolveCacheIdentifier] = filename;
  }

  let threw = true;
  try {
    module.load(filename);
    threw = false;
  } finally {
    if (threw) {
      delete Module._cache[filename];
      if (parent !== undefined) {
        delete relativeResolveCache[relResolveCacheIdentifier];
        const children = parent?.children;
        if (ArrayIsArray(children)) {
          const index = ArrayPrototypeIndexOf(children, module);
          if (index !== -1) {
            ArrayPrototypeSplice(children, index, 1);
          }
        }
      }
    } else if (module.exports &&
               !isProxy(module.exports) &&
               ObjectGetPrototypeOf(module.exports) ===
                 CircularRequirePrototypeWarningProxy) {
      ObjectSetPrototypeOf(module.exports, ObjectPrototype);
    }
  }

  return module.exports;
};
溫馨提示:這里沒有將 wrapper 和 _load 的聯(lián)系說清楚(最后如何在 _load 中執(zhí)行 wrapper),大家可以在 Node.js 源碼中跟蹤一下看一下上述代碼是怎么被執(zhí)行的,是否是 eval 呢?不說了,腦殼疼,想要了解更多信息,可以查看 Node.js / vm。除此之外,感興趣的同學(xué)也了解一下 import 語法在 Node.js 中的底層實(shí)現(xiàn),這里腦殼疼,就沒有深入研究了。
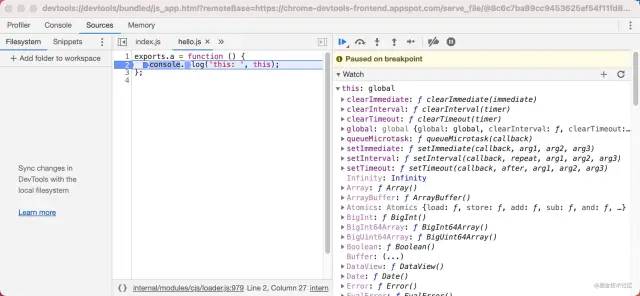
溫馨提示的溫馨提示:比如你在源碼中找不到上述代碼的執(zhí)行鏈路,那最簡單的方式就是引入一個(gè)錯(cuò)誤的模塊,讓錯(cuò)誤信息將錯(cuò)誤棧拋出來,比如如下所示,你會(huì)發(fā)現(xiàn)最底下執(zhí)行了 wrapSafe,好了你又可以開始探索了,因?yàn)槟銓?duì) safe 這樣的字眼一定感到好奇,底下是不是執(zhí)行的時(shí)候用了沙箱隔離呢?
SyntaxError: Cannot use import statement outside a module
    at wrapSafe (internal/modules/cjs/loader.js:979:16)
    at Module._compile (internal/modules/cjs/loader.js:1027:27)
    at Object.Module._extensions..js (internal/modules/cjs/loader.js:1092:10)
    at Module.load (internal/modules/cjs/loader.js:928:32)
    at Function.Module._load (internal/modules/cjs/loader.js:769:14)
    at Function.executeUserEntryPoint [as runMain] (internal/modules/run_main.js:72:12)
    at internal/main/run_main_module.js:17:47
溫馨提示:是不是以前經(jīng)常有面試官詢問 exports 和 module.exports 有什么關(guān)聯(lián),其實(shí)根本不用糾結(jié)這個(gè)問題,因?yàn)閮烧咧赶虻氖峭粋€(gè)引用地址,你如果對(duì) exports 進(jìn)行重新賦值,那么引用發(fā)生了改變,你新引用的部分當(dāng)然就不會(huì)導(dǎo)出了,因?yàn)閺脑创a里可以看出,我們這里導(dǎo)出的是 module.exports。
接下來主要是重點(diǎn)看下 this 執(zhí)行上下文的差異(注意這里只測試 Node.js 環(huán)境,編譯后的代碼可能會(huì)有差異),首先執(zhí)行 ES Module 模塊的代碼:
// hello.js
export function a() {
  console.log('this: ', this); // undefined
}

// index.js
import { a } from './hello.js';
a();
我們接著執(zhí)行 CommonJS 的代碼:
// hello.js
exports.a = function () {
  console.log('this: ', this);
};

// index.js
let { a } = require('./hello');
a();
你會(huì)發(fā)現(xiàn) this 的上下文環(huán)境是有信息的,可能是當(dāng)前模塊的信息,具體沒有深究:
溫馨提示:Node.js 的調(diào)試還能在瀏覽器進(jìn)行?可以查看一下 Node.js 調(diào)試,當(dāng)然你也可以使用 VS Code 進(jìn)行調(diào)試,需要進(jìn)行一些額外的 launch 配置,當(dāng)然如果你覺得 Node.js 自帶的瀏覽器調(diào)試方式太難受了,也可以想想辦法,如何通過 IP 端口在瀏覽器中進(jìn)行調(diào)試,并且可以做到代碼變動(dòng)監(jiān)聽調(diào)試。
const Module = require('module');
const originalRequire = Module.prototype.require;

Module.prototype.require = function(id){
  // 這里加入 path 的邏輯
  return originalRequire.apply(this, id);
};