
【CV】語義分割:最簡單的代碼實(shí)現(xiàn)!
分割對于圖像解釋任務(wù)至關(guān)重要,那就不要落后于流行趨勢,讓我們來實(shí)施它,我們很快就會(huì)成為專業(yè)人士!
什么是語義分割?
它描述了將圖像的每個(gè)像素與類別標(biāo)簽(例如花、人、道路、天空、海洋或汽車)相關(guān)聯(lián)的過程,即我們要輸入圖像,然后為該圖像中的每個(gè)像素輸出一個(gè)類別決策。例如下面這個(gè)輸入圖像,這是一只坐在床上的狗:

因此,在輸出中,我們希望為每個(gè)像素定義一組類別,即狗、床、后面的桌子和櫥柜。在語義分割之后,圖像看起來像這樣:

關(guān)于語義分割的一件有趣的事情是它不區(qū)分實(shí)例,即如果此圖像中有兩只狗,它們將僅被描述為一個(gè)標(biāo)簽,即 dog ,而不是 dog1 和 dog2。
語義分割一般用于:
自動(dòng)駕駛
工業(yè)檢驗(yàn)
衛(wèi)星圖像中值得注意的區(qū)域分類
醫(yī)學(xué)影像監(jiān)查
語義分割實(shí)現(xiàn):
第一種方法是滑動(dòng)窗口,我們將輸入圖像分解成許多小的局部圖像,但是這種方法在計(jì)算上會(huì)很昂貴。所以,我們在實(shí)踐中并沒有真正使用這個(gè)方法。
另一種方法是完全卷積網(wǎng)絡(luò),其中網(wǎng)絡(luò)有一整堆卷積層,沒有完全連接的層,從而保留了輸入的空間大小,這在計(jì)算上也是極其昂貴的。
第三個(gè)也是最好的一個(gè)方法,那就是對圖像進(jìn)行上采樣和下采樣。因此,我們不需要對圖像的完整空間分辨率進(jìn)行所有卷積,我們可能會(huì)在原始分辨率下遍歷少量卷積層,然后對該特征圖進(jìn)行下采樣,然后對其進(jìn)行上采樣。
在這里,我們只想在網(wǎng)絡(luò)的后半部分提高我們預(yù)測的空間分辨率,以便我們的輸出圖像現(xiàn)在可以與我們的輸入圖像具有相同的維度。它的計(jì)算效率要高得多,因?yàn)槲覀兛梢允咕W(wǎng)絡(luò)非常深,并以更便宜的空間分辨率運(yùn)行。

讓我們在代碼中實(shí)現(xiàn)這一點(diǎn):
導(dǎo)入處理所需的必要庫,即
Pytorch 的重要功能,例如數(shù)據(jù)加載器、變量、轉(zhuǎn)換和優(yōu)化器相關(guān)函數(shù)。
導(dǎo)入 VOC12 和 cityscapes 的數(shù)據(jù)集類,從 transform.py 文件導(dǎo)入 Relabel、ToLabel 和 Colorize 類,從 iouEval.py 文件中導(dǎo)入 iouEval 類。
#SSCV IIITH 2K19import randomimport timeimport numpy as npimport torchprint(torch.__version__)import mathfrom PIL import Image, ImageOpsfrom torch.optim import SGD, Adam, lr_schedulerfrom torch.autograd import Variablefrom torch.utils.data import DataLoaderfrom torchvision.transforms import Resizefrom torchvision.transforms import ToTensor, ToPILImagefrom dataset import cityscapesfrom dataset import idd_liteimport sysprint(sys.executable)from transform import Relabel, ToLabel, Colorizeimport matplotlibfrom matplotlib import pyplot as plt%matplotlib inlineimport importlibfrom iouEval import iouEval, getColorEntry #importing iouEval class from the iouEval.py filefrom shutil import copyfile
定義幾個(gè)全局參數(shù):
NUM_CHANNELS = 3 #RGB ImagesNUM_CLASSES = 8 #IDD Lite has 8 labels or Level1 hierarchy of labelsUSE_CUDA = torch.cuda.is_available()IMAGE_HEIGHT = 160DATA_ROOT = ‘/tmp/school/6-segmentation/user/1/6-segmentation/idd1_lite’BATCH_SIZE = 2NUM_WORKERS = 4NUM_EPOCHS = 100ENCODER_ONLY = Truedevice = torch.device(“cuda” )#device = ‘cuda’color_transform = Colorize(NUM_CLASSES)image_transform = ToPILImage()IOUTRAIN = FalseIOUVAL = True
增強(qiáng),即對圖像和目標(biāo)執(zhí)行隨機(jī)增強(qiáng)的不同功能:
class MyCoTransform(object):def __init__(self, enc, augment=True, height=160):self.enc=encself.augment = augmentself.height = heightpassdef __call__(self, input, target):# Resizing data to required sizeinput = Resize((self.height,320), Image.BILINEAR)(input)target = Resize((self.height,320), Image.NEAREST)(target)if(self.augment):# Random horizontal fliphflip = random.random()if (hflip < 0.5):input = input.transpose(Image.FLIP_LEFT_RIGHT)target = target.transpose(Image.FLIP_LEFT_RIGHT)#Random translation 0–2 pixels (fill rest with padding)transX = random.randint(0, 2)transY = random.randint(0, 2)input = ImageOps.expand(input, border=(transX,transY,0,0), fill=0)target = ImageOps.expand(target, border=(transX,transY,0,0), fill=7) #pad label filling with 7input = input.crop((0, 0, input.size[0]-transX, input.size[1]-transY))target = target.crop((0, 0, target.size[0]-transX, target.size[1]-transY))input = ToTensor()(input)target = ToLabel()(target)target = Relabel(255,7)(target)return input, target
加載數(shù)據(jù):我們將遵循 pytorch 推薦的語義,并使用數(shù)據(jù)加載器加載數(shù)據(jù)。
best_acc = 0co_transform = MyCoTransform(ENCODER_ONLY, augment=True, height=IMAGE_HEIGHT)co_transform_val = MyCoTransform(ENCODER_ONLY, augment=False, height=IMAGE_HEIGHT)#train datadataset_train = idd_lite(DATA_ROOT, co_transform, ‘train’)print(len(dataset_train))#test datadataset_val = idd_lite(DATA_ROOT, co_transform_val, ‘val’)print(len(dataset_val))loader_train = DataLoader(dataset_train, num_workers=NUM_WORKERS, batch_size=BATCH_SIZE, shuffle=True)loader_val = DataLoader(dataset_val, num_workers=NUM_WORKERS, batch_size=BATCH_SIZE, shuffle=False)
既然是分類問題,我們就使用交叉熵?fù)p失,但為什么呢?
答案是負(fù)對數(shù),在較小值的時(shí)候效果不好,并且在較大值的時(shí)候效果也不好。因?yàn)槲覀儗p失函數(shù)加到所有正確的類別上,實(shí)際發(fā)生的情況是,每當(dāng)網(wǎng)絡(luò)為正確的類別,分配高置信度時(shí),損失就低,但是當(dāng)網(wǎng)絡(luò)為正確的類別時(shí)分配低置信度,損失就高。
criterion = torch.nn.CrossEntropyLoss()現(xiàn)在讓我們加載模型并優(yōu)化它!
model_file = importlib.import_module(‘erfnet’)model = model_file.Net(NUM_CLASSES).to(device)optimizer = Adam(model.parameters(), 5e-4, (0.9, 0.999), eps=1e-08, weight_decay=1e-4)start_epoch = 1
所以,編碼的最終本質(zhì)就是訓(xùn)練!
import ossteps_loss = 50my_start_time = time.time()for epoch in range(start_epoch, NUM_EPOCHS+1):— — — TRAINING — EPOCH”, epoch, “ — — -”)epoch_loss = []time_train = []doIouTrain = IOUTRAINdoIouVal = IOUVALif (doIouTrain):iouEvalTrain = iouEval(NUM_CLASSES)model.train()for step, (images, labels) in enumerate(loader_train):start_time = time.time()inputs = images.to(device)targets = labels.to(device)outputs = model(inputs, only_encode=ENCODER_ONLY)# zero the parameter gradientsoptimizer.zero_grad()# forward + backward + optimizeloss = criterion(outputs, targets[:, 0])loss.backward()optimizer.step()epoch_loss.append(loss.item())— start_time)if (doIouTrain):#start_time_iou = time.time()targets.data)#print (“Time to add confusion matrix: “, time.time() — start_time_iou)# print statisticsif steps_loss > 0 and step % steps_loss == 0:average = sum(epoch_loss) / len(epoch_loss): {average:0.4} (epoch: {epoch}, step: {step})’, “// Avg time/img: %.4f s” % (sum(time_train) / len(time_train) / BATCH_SIZE))average_epoch_loss_train = sum(epoch_loss) / len(epoch_loss)iouTrain = 0if (doIouTrain):iou_classes = iouEvalTrain.getIoU()iouStr = getColorEntry(iouTrain)+’{:0.2f}’.format(iouTrain*100) + ‘\033[0m’print (“EPOCH IoU on TRAIN set: “, iouStr, “%”)my_end_time = time.time()— my_start_time)
在訓(xùn)練了 100 個(gè) epoch 之后,我們會(huì)看到:

驗(yàn)證:
#Validate on val images after each epoch of training— — — VALIDATING — EPOCH”, epoch, “ — — -”)model.eval()epoch_loss_val = []time_val = []if (doIouVal):iouEvalVal = iouEval(NUM_CLASSES)for step, (images, labels) in enumerate(loader_val):start_time = time.time()inputs = images.to(device)targets = labels.to(device)with torch.no_grad():outputs = model(inputs, only_encode=ENCODER_ONLY)#outputs = model(inputs)loss = criterion(outputs, targets[:, 0])epoch_loss_val.append(loss.item())— start_time)#Add batch to calculate TP, FP and FN for iou estimationif (doIouVal):#start_time_iou = time.time()targets.data)#print (“Time to add confusion matrix: “, time.time() — start_time_iou)if steps_loss > 0 and step % steps_loss == 0:average = sum(epoch_loss_val) / len(epoch_loss_val)loss: {average:0.4} (epoch: {epoch}, step: {step})’,Avg time/img: %.4f s” % (sum(time_val) / len(time_val) / BATCH_SIZE))average_epoch_loss_val = sum(epoch_loss_val) / len(epoch_loss_val)iouVal = 0if (doIouVal):iou_classes = iouEvalVal.getIoU()print(iou_classes)iouStr = getColorEntry(iouVal)+’{:0.2f}’.format(iouVal*100) + ‘\033[0m’print (“EPOCH IoU on VAL set: “, iouStr, “%”)

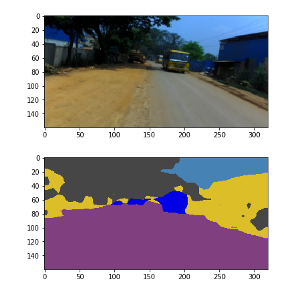
可視化輸出:
# Qualitative Analysisdataiter = iter(loader_val)images, labels = dataiter.next()if USE_CUDA:images = images.to(device)inputs = images.to(device)with torch.no_grad():outputs = model(inputs, only_encode=ENCODER_ONLY)label = outputs[0].max(0)[1].byte().cpu().datalabel_color = Colorize()(label.unsqueeze(0))label_save = ToPILImage()(label_color)plt.figure()plt.imshow(ToPILImage()(images[0].cpu()))plt.figure()plt.imshow(label_save)
很快我們就可以準(zhǔn)備好我們的模型了!
隨意使用我們新設(shè)計(jì)的模型,嘗試增加更多的 epoch 并觀察我們的模型表現(xiàn)得更好!
因此,簡而言之,現(xiàn)在我們將能夠輕松地將圖像的每個(gè)像素與類標(biāo)簽相關(guān)聯(lián),并可以調(diào)整超參數(shù)以查看顯示的更改。本文展示了語義分割的基礎(chǔ)知識,要對實(shí)例進(jìn)行分類,我們需要進(jìn)行實(shí)例分割,這是語義分割的高級版本。
往期精彩回顧