
基于OpenCV的網(wǎng)絡實時視頻流傳輸
點擊上方“小白學視覺”,選擇加"星標"或“置頂”
重磅干貨,第一時間送達
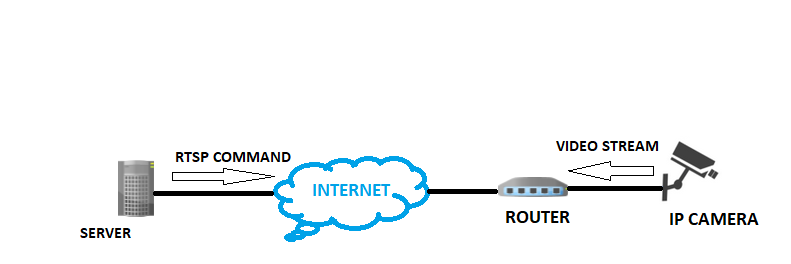
01.如何使用Web瀏覽器查看實時流媒體
02.操作步驟
第1步-安裝Flask和OpenCV:
第2步-導入必要的庫,初始化flask應用程序:
#Import necessary librariesfrom flask import Flask, render_template, Responseimport cv2#Initialize the Flask appapp = Flask(__name__)
第3步-使用OpenCV捕獲視頻:
camera = cv2.VideoCapture(0)'''for ip camera use - rtsp://username:password@ip_address:554/user=username_password='password'_channel=channel_number_stream=0.sdp'for local webcam use cv2.VideoCapture(0)'''
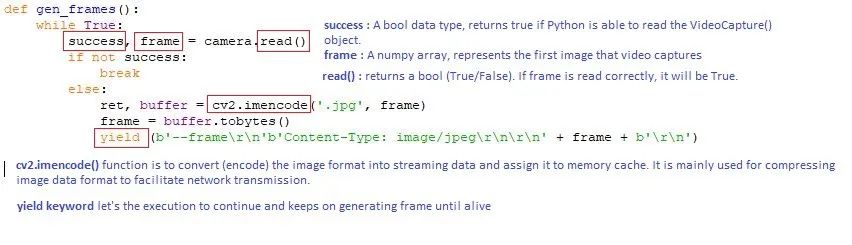
def gen_frames():while True:success, frame = camera.read() # read the camera frameif not success:breakelse:ret, buffer = cv2.imencode('.jpg', frame)frame = buffer.tobytes()yield (b'--frame\r\n'b'Content-Type: image/jpeg\r\n\r\n' + frame + b'\r\n') # concat frame one by one and show result
第5步-為網(wǎng)絡應用的默認頁面定義應用路由:
@app.route('/')def index():return render_template('index.html')
第6步-定義視頻供稿的應用路由:
@app.route('/video_feed')def video_feed():return Response(gen_frames(), mimetype='multipart/x-mixed-replace; boundary=frame')
<body><div class="container"><div class="row"><div class="col-lg-8 offset-lg-2"><h3 class="mt-5">Live Streamingh3><img src="{{ url_for('video_feed') }}" width="100%">div>div>div>body>
第7步-啟動Flask服務器:
if __name__ == "__main__":app.run(debug=True)
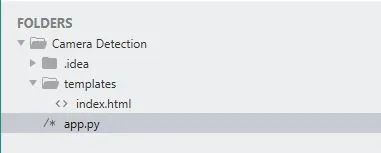
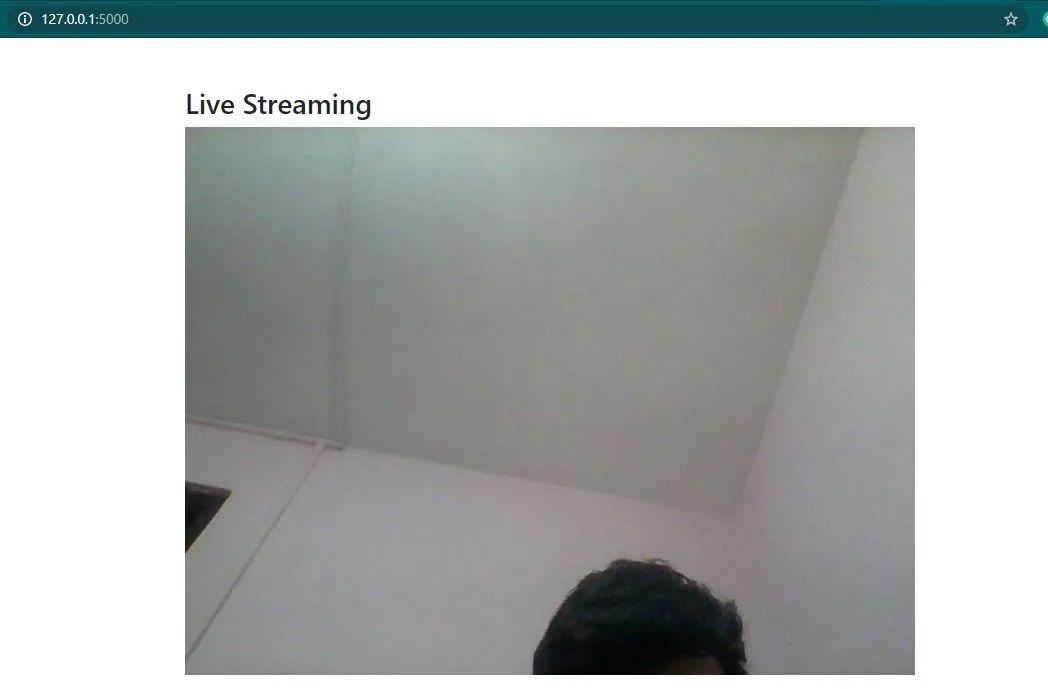
只需在運行“ app.py”后在網(wǎng)絡瀏覽器中鍵入“ localhost:5000”即可打開您的網(wǎng)絡應用程序 app.py —這是我們在上面創(chuàng)建的Flask應用程序 模板-此文件夾包含我們的“ index.html”文件。在渲染模板時,這在Flask中是必需的。所有HTML文件都放在此文件夾下。
交流群
歡迎加入公眾號讀者群一起和同行交流,目前有SLAM、三維視覺、傳感器、自動駕駛、計算攝影、檢測、分割、識別、醫(yī)學影像、GAN、算法競賽等微信群(以后會逐漸細分),請掃描下面微信號加群,備注:”昵稱+學校/公司+研究方向“,例如:”張三?+?上海交大?+?視覺SLAM“。請按照格式備注,否則不予通過。添加成功后會根據(jù)研究方向邀請進入相關微信群。請勿在群內(nèi)發(fā)送廣告,否則會請出群,謝謝理解~
評論
圖片
表情