
從零實現(xiàn)一個迷你 Webpack
本文為來自 字節(jié)跳動-國際化電商-S項目 的文章,已授權 ELab 發(fā)布。
webpack 是當前使用較多的一個打包工具,將眾多代碼組織到一起使得在瀏覽器下可以正常運行,下面以打包為目的,實現(xiàn)一個簡易版 webpack,支持單入口文件的打包,不涉及插件、分包等。
前置知識
舉個??,先來看看下面這個 demo,例子很簡單,一個 index.js,里面引用了一個文件 a.js,a.js 內(nèi)部引入了 b.js,通過 webpack 最簡單的配置,將 index.js 文件作為入口進行打包。
來看看打包后的內(nèi)容是怎樣的
// index.js
require('./a.js');
console.log('entry load');

// a.js
require("./b.js");
const a = 1;
console.log("a load");
module.exports = a;

// b.js
console.log("b load");
const b = 1;
module.exports = b;
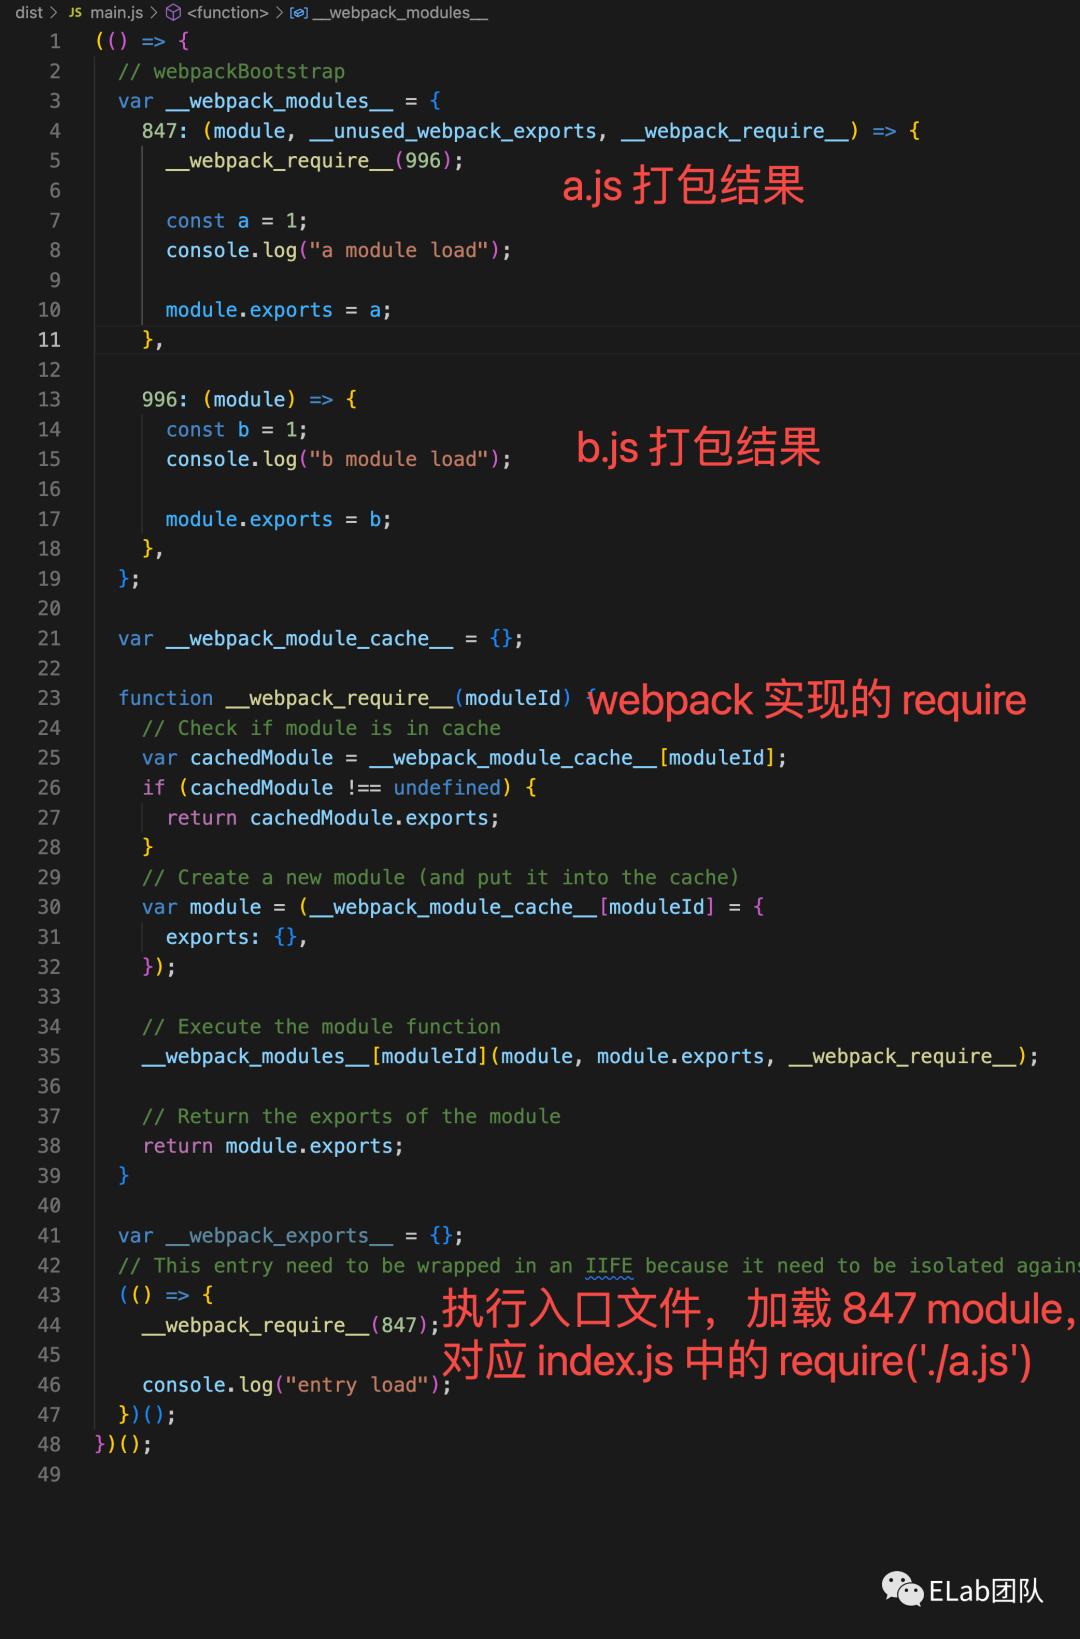
可以看到打包產(chǎn)物是一個立即執(zhí)行函數(shù),函數(shù)初始先定義了多個 module,每個 module 是實際代碼中被 require 的文件內(nèi)容,同時由于瀏覽器不支持 require 方法,webpack 內(nèi)部自行實現(xiàn)了一個 __webpack__require__,并將代碼中的 require 全部替換為該函數(shù)(從打包結果可看出)。
在 webpack__require 定義之后,便開始執(zhí)行入口文件,同時可以看出,webpack 的打包過程便是通過入口文件,將直接依賴和間接依賴以 module 的形式組織到一起,并通過自行實現(xiàn)的 require 實現(xiàn)模塊的同步加載。
了解了打包產(chǎn)物后,便可以開始實現(xiàn)簡易版的 webpack ,最終打包產(chǎn)物與 webpack 保持一致。
初始化參數(shù)
根據(jù) Node 接口 | webpack 中文文檔[1] 可以知道,webpack node api 對外暴露出了 webpack 方法,通過調(diào)用 webpack 方法傳入配置,返回 compiler 對象,compiler 對象包含 run 方法可執(zhí)行編譯,即
const webpack = require('webpack'); // 引用 webpack

const compiler = webpack(options); // 傳入配置生成 compiler 對象

compiler.run((err, stats) => {  // 執(zhí)行編譯, 傳入回調(diào)

});
因此,首先需要實現(xiàn)一個 webpack 方法,同時該方法支持傳入 webpack 配置,返回 compiler 實例,webpack 官方支持了以 cli 的形式運行 webpack 命令和指定參數(shù)、配置文件,這一部分暫時簡單實現(xiàn),我們暴露出一個方法,方法接收用戶的配置。
// mini-webpack/core/index.js

function webpack() {
  // 創(chuàng)建compiler對象
  const compiler = new Compiler(options);
}

module.exports = webpack;
如上,實現(xiàn)了一個 webpack 方法,可傳入一個 options 參數(shù),包括用戶指定的打包入口 entry、output 等。
webpack({
    entry: './index.js',
    output: {
        path: path.resolve(__dirname, "dist"),
        filename: "[name].js",
    },
    module: {
        rules: []
    }
})
編譯
上面已經(jīng)實現(xiàn)了 webpack 配置的傳入,compiler 的創(chuàng)建,接下來還需要實現(xiàn) Compiler 類,該類內(nèi)部暴露一個 run 方法,用于執(zhí)行編譯。
首先需要明確編譯過程需要做的事情。
讀取入口文件,將入口文件交給匹配的 loader 處理,返回處理后的代碼
開始編譯 loader 處理完的代碼
若代碼中依賴了其他文件,則對 require 函數(shù)替換為 webpack 自行實現(xiàn)的 __webpack__require__, 保存該文件的處理結果,同時讓其他文件回到第 1 步進行處理,不斷循環(huán)。
編譯結束后,每個文件都有其對應的處理結果,將這些文件的編譯結果從初始的入口文件開始組織到一起。
入口文件 loader 處理
讀取入口文件,將入口文件交給 匹配的 loader 處理
// mini-webpack compiler.js

const fs = require('fs');
class Compiler {
  constructor(options) {
    this.options = options || {};

    // 保存編譯過程編譯的 module
    this.modules = new Set();
  }

  run(callback) {
    const entryChunk = this.build(path.join(process.cwd(), this.options.entry));
  }

  build(modulePath) {
    let originCode = fs.readFileSync(modulePath);
    originCode = this.dealWidthLoader(modulePath, originCode.toString());
    return this.dealDependencies(originCode, modulePath);
  }

  // 將源碼交給匹配的 loader 處理
  dealWidthLoader(modulePath, originCode) {
    [...this.options.module.rules].reverse().forEach(item => {
        if (item.test(modulePath)) {
            const loaders = [...item.use].reverse();
            loaders.forEach(loader => originCode = loader(originCode))
        }
    })
    return originCode
  }
}

module.exports = Compiler;
入口文件處理
這里需要開始處理入口文件的依賴,將其 require 轉(zhuǎn)換成 自定義的 __webpack_require__,同時將其依賴收集起來,后續(xù)需要不斷遞歸處理其直接依賴和間接依賴,這里用到了 babel 進行處理。
 // 調(diào)用 webpack 處理依賴的代碼
  dealDependencies(code, modulePath) {

    const fullPath = path.relative(process.cwd(), modulePath);
    // 創(chuàng)建模塊對象
    const module = {
      id: fullPath,
      dependencies: [] // 該模塊所依賴模塊絕對路徑地址
    };

    // 處理 require 語句,同時記錄依賴了哪些文件
    const ast = parser.parse(code, {
      sourceType: "module",
      ast: true,
    });
    // 深度優(yōu)先 遍歷語法Tree
    traverse(ast, {

      CallExpression: (nodePath) => {
        const node = nodePath.node;
        if (node.callee.name === "require") {

          // 獲得依賴的路徑
          const requirePath = node.arguments[0].value;

          const moduleDirName = path.dirname(modulePath);
          const fullPath = path.relative(path.join(moduleDirName, requirePath), requirePath);

          // 替換 require 語句為 webpack 自定義的 require 方法
          node.callee = t.identifier("__webpack_require__");
          // 將依賴的路徑修改成以當前路行為基準
          node.arguments = [t.stringLiteral(fullPath)];

          const exitModule = [...this.modules].find(item => item.id === fullPath)
          // 該文件可能已經(jīng)被處理過,這里判斷一下
          if (!exitModule) {
            // 記錄下當前處理的文件所依賴的文件(后續(xù)需逐一處理)
            module.dependencies.push(fullPath);
          }
        }
      },
    });
    // 根據(jù)新的 ast 生成代碼
    const { code: compilerCode } = generator(ast);
    // 保存處理后的代碼
    module._source = compilerCode;
    // 返回當前模塊對象
    return module;
  }
依賴處理
到這里為止便處理完了入口文件,但是在處理文件過程,還收集了入口文件依賴的其他文件未處理,因此,在 dealDependencies 尾部,加入以下代碼
 // 調(diào)用 webpack 處理依賴的代碼
  dealDependencies(code, modulePath) {
    ...
    ...
    ...
    // 為當前模塊掛載新的生成的代碼
    module._source = compilerCode;

    // 遞歸處理其依賴
    module.dependencies.forEach((dependency) => {
      const depModule = this.build(dependency);

      // 同時保存下編譯過的依賴
      this.modules.add(depModule);
    });

    ...
    ...
    ...

    // 返回當前模塊對象
    return module;
  }
Chunk
在上面的步驟中,已經(jīng)處理了入口文件、依賴文件,但目前它們還是分散開來,在 webpack 中,是支持多個入口,每個入口是一個 chunk,這個 chunk 將包含入口文件及其依賴的 module
// mini-webpack compiler.js

const fs = require('fs');
class Compiler {
  constructor(options) {
    this.options = options || {};

    // 保存編譯過程編譯的 module
    this.modules = new Set();
  }

  run(callback) {
    const entryModule = this.build(path.join(process.cwd(), this.options.entry));
    const entryChunk = this.buildChunk("entry", entryModule);
  }

  build(modulePath) {
  }

  // 將源碼交給匹配的 loader 處理
  dealWidthLoader(modulePath, originCode) {
  }

  // 調(diào)用 webpack 處理依賴的代碼
  dealDependencies(code, modulePath) {
  }

  buildChunk(entryName, entryModule) {
    return {
      name: entryName,
      // 入口文件編譯結果
      entryModule: entryModule,
      // 所有直接依賴和間接依賴編譯結果
      modules: this.modules,
    };
  }
}

module.exports = Compiler;
文件生成
至此我們已經(jīng)將入口文件和其所依賴的所有文件編譯完成,現(xiàn)在需要將編譯后的代碼生成對應的文件。
根據(jù)最上面利用官方 webpack 打包出來的產(chǎn)物,保留其基本結構,將構造的 chunk 內(nèi)部的 entryModule 的 source 以及 modules 的 souce 替換進去,并根據(jù)初始配置的 output 生成對應文件。
// mini-webpack compiler.js

const fs = require('fs');
class Compiler {
  constructor(options) {
    this.options = options || {};

    // 保存編譯過程編譯的 module,下面會講解到
    this.modules = new Set();
  }

  run(callback) {
    const entryModule = this.build(path.join(process.cwd(), this.options.entry));
    const entryChunk = this.buildChunk("entry", entryModule);
    this.generateFile(entryChunk);
  }

  build(modulePath) {
  }

  // 將源碼交給匹配的 loader 處理
  dealWidthLoader(modulePath, originCode) {
  }

  // 調(diào)用 webpack 處理依賴的代碼
  dealDependencies(code, modulePath) {
  }

  buildChunk(entryName, entryModule) {
  }

  generateFile(entryChunk) {

    // 獲取打包后的代碼
    const code = this.getCode(entryChunk);
    if (!fs.existsSync(this.options.output.path)) {
      fs.mkdirSync(this.options.output.path);
    }

    // 寫入文件
    fs.writeFileSync(
      path.join(
        this.options.output.path,
        this.options.output.filename.replace("[name]", entryChunk.name)
      ),
      code
    );
  }

  getCode(entryChunk) {
    return `
      (() => {
      // webpackBootstrap
      var __webpack_modules__ = {
        ${entryChunk.modules.map(module => `
            "${module.id}": (module, __unused_webpack_exports, __webpack_require__) => {
            ${module._source}
          }
        `).join(',')}
      };

      var __webpack_module_cache__ = {};

      function __webpack_require__(moduleId) {
        // Check if module is in cache
        var cachedModule = __webpack_module_cache__[moduleId];
        if (cachedModule !== undefined) {
          return cachedModule.exports;
        }
        // Create a new module (and put it into the cache)
        var module = (__webpack_module_cache__[moduleId] = {
          exports: {},
        });

        // Execute the module function
        __webpack_modules__[moduleId](
          module,
          module.exports,
          __webpack_require__
        );

        // Return the exports of the module
        return module.exports;
      }

      var __webpack_exports__ = {};
      // This entry need to be wrapped in an IIFE because it need to be isolated against other modules in the chunk.
      (() => {
       ${entryChunk.entryModule._source};
      })();
    })()
    `;
  }
}

module.exports = Compiler;
試試在瀏覽器下跑一下生成的代碼
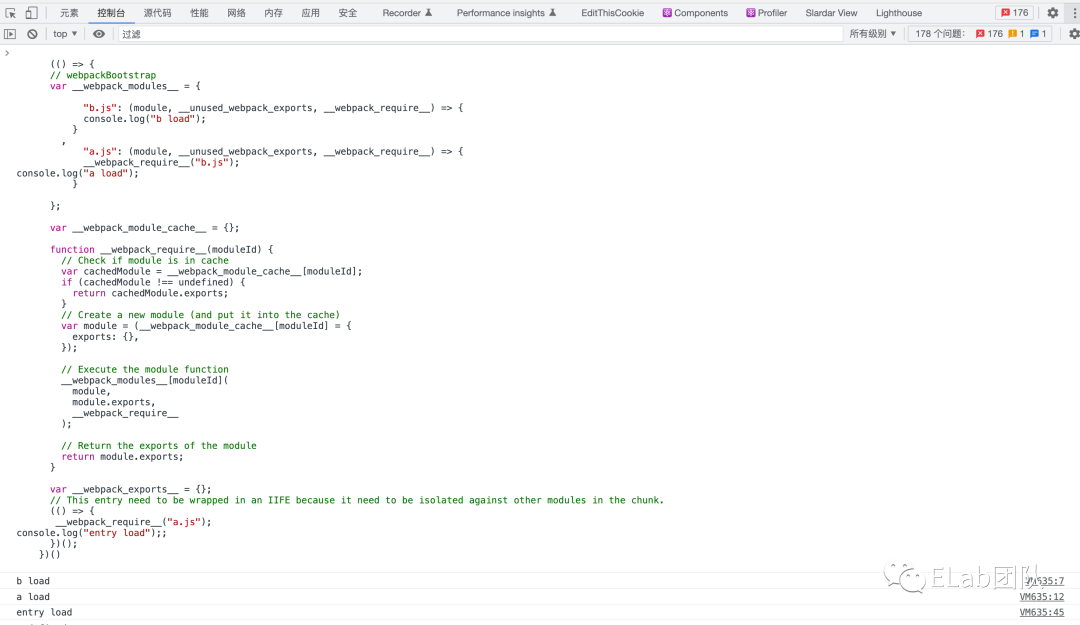
符合預期,至此便完成了一個極簡的 webpack,針對單入口文件進行打包。當然真正的 webpack 遠非如此簡單,這里僅僅只是實現(xiàn)其一個打包思路。
?? 謝謝支持
以上便是本次分享的全部內(nèi)容,希望對你有所幫助^_^
喜歡的話別忘了 分享、點贊、收藏 三連哦~。
歡迎關注公眾號 ELab團隊 收貨大廠一手好文章~
字節(jié)跳動校/社招內(nèi)推碼: WWCM1TA 投遞鏈接: https://job.toutiao.com/s/rj1fwQW 可憑內(nèi)推碼投遞 字節(jié)跳動-國際化電商-S項目 團隊 相關崗位哦~
參考資料
Node 接口 | webpack 中文文檔: https://webpack.docschina.org/api/node/#webpack