
真香!?MyBatis-Plus 從入門到上手干事!
MyBatis 是一款優(yōu)秀的持久層框架,它支持定制化 SQL、存儲過程以及高級映射,而實際開發(fā)中,我們都會選擇使用 MyBatisPlus,它是對 MyBatis 框架的進一步增強,能夠極大地簡化我們的持久層代碼,下面就一起來看看 MyBatisPlus 中的一些奇淫巧技吧。
說明:本篇文章需要一定的
MyBatis與MyBatisPlus基礎(chǔ)
MyBatis-Plus 官網(wǎng)地址 :https://baomidou.com/ 。
本文已經(jīng)收錄進:https://github.com/CodingDocs/springboot-guide (SpringBoot2.0+從入門到實戰(zhàn)!)
CRUD
使用 MyBatisPlus 實現(xiàn)業(yè)務(wù)的增刪改查非常地簡單,一起來看看吧。
1.首先新建一個 SpringBoot 工程,然后引入依賴:
<dependency>
  <groupId>com.baomidou</groupId>
  <artifactId>mybatis-plus-boot-starter</artifactId>
  <version>3.4.2</version>
</dependency>
<dependency>
  <groupId>mysql</groupId>
  <artifactId>mysql-connector-java</artifactId>
  <scope>runtime</scope>
</dependency>
<dependency>
  <groupId>org.projectlombok</groupId>
  <artifactId>lombok</artifactId>
</dependency>
2.配置一下數(shù)據(jù)源:
spring:
  datasource:
    driver-class-name: com.mysql.cj.jdbc.Driver
    username: root
    url: jdbc:mysql:///mybatisplus?serverTimezone=UTC
    password: 123456
3.創(chuàng)建一下數(shù)據(jù)表:
CREATE DATABASE `mybatisplus`;

USE `mybatisplus`;

DROP TABLE IF EXISTS `tbl_employee`;

CREATE TABLE `tbl_employee` (
  `id` bigint(20) NOT NULL,
  `last_name` varchar(255) DEFAULT NULL,
  `email` varchar(255) DEFAULT NULL,
  `gender` char(1) DEFAULT NULL,
  `age` int(11) DEFAULT NULL,
  PRIMARY KEY (`id`)
) ENGINE=InnoDB AUTO_INCREMENT=8 DEFAULT CHARSET=gbk;

insert  into `tbl_employee`(`id`,`last_name`,`email`,`gender`,`age`) values (1,'jack','[email protected]','1',35),(2,'tom','[email protected]','1',30),(3,'jerry','[email protected]','1',40);
4.創(chuàng)建對應(yīng)的實體類:
@Data
public class Employee {

    private Long id;
    private String lastName;
    private String email;
    private Integer age;
}
4.編寫 Mapper 接口:
public interface EmployeeMapper extends BaseMapper<Employee> {
}
我們只需繼承 MyBatisPlus 提供的 BaseMapper 接口即可,現(xiàn)在我們就擁有了對 Employee 進行增刪改查的 API,比如:
@SpringBootTest
@MapperScan("com.wwj.mybatisplusdemo.mapper")
class MybatisplusDemoApplicationTests {

    @Autowired
    private EmployeeMapper employeeMapper;

    @Test
    void contextLoads() {
        List<Employee> employees = employeeMapper.selectList(null);
        employees.forEach(System.out::println);
    }
}
運行結(jié)果:
org.springframework.jdbc.BadSqlGrammarException:
### Error querying database.  Cause: java.sql.SQLSyntaxErrorException: Table 'mybatisplus.employee' doesn't exist
程序報錯了,原因是不存在 employee 表,這是因為我們的實體類名為 Employee,MyBatisPlus 默認是以類名作為表名進行操作的,可如果類名和表名不相同(實際開發(fā)中也確實可能不同),就需要在實體類中使用 @TableName 注解來聲明表的名稱:
@Data
@TableName("tbl_employee") // 聲明表名稱
public class Employee {

    private Long id;
    private String lastName;
    private String email;
    private Integer age;
}
重新執(zhí)行測試代碼,結(jié)果如下:
Employee(id=1, lastName=jack, email=jack@qq.com, age=35)
Employee(id=2, lastName=tom, email=tom@qq.com, age=30)
Employee(id=3, lastName=jerry, email=jerry@qq.com, age=40)
BaseMapper 提供了常用的一些增刪改查方法:
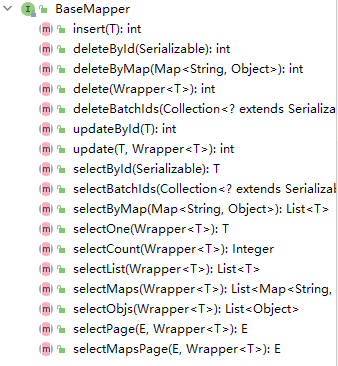
具體細節(jié)可以查閱其源碼自行體會,注釋都是中文的,非常容易理解。
在開發(fā)過程中,我們通常會使用 Service 層來調(diào)用 Mapper 層的方法,而 MyBatisPlus 也為我們提供了通用的 Service:
public interface EmployeeService extends IService<Employee> {
}

@Service
public class EmployeeServiceImpl extends ServiceImpl<EmployeeMapper, Employee> implements EmployeeService {
}
事實上,我們只需讓 EmployeeServiceImpl 繼承 ServiceImpl 即可獲得 Service 層的方法,那么為什么還需要實現(xiàn) EmployeeService 接口呢?
這是因為實現(xiàn) EmployeeService 接口能夠更方便地對業(yè)務(wù)進行擴展,一些復(fù)雜場景下的數(shù)據(jù)處理,MyBatisPlus 提供的 Service 方法可能無法處理,此時我們就需要自己編寫代碼,這時候只需在 EmployeeService 中定義自己的方法,并在 EmployeeServiceImpl 中實現(xiàn)即可。
先來測試一下 MyBatisPlus 提供的 Service 方法:
@SpringBootTest
@MapperScan("com.wwj.mybatisplusdemo.mapper")
class MybatisplusDemoApplicationTests {

    @Autowired
    private EmployeeService employeeService;

    @Test
    void contextLoads() {
        List<Employee> list = employeeService.list();
        list.forEach(System.out::println);
    }
}
運行結(jié)果:
Employee(id=1, lastName=jack, email=jack@qq.com, age=35)
Employee(id=2, lastName=tom, email=tom@qq.com, age=30)
Employee(id=3, lastName=jerry, email=jerry@qq.com, age=40)
接下來模擬一個自定義的場景,我們來編寫自定義的操作方法,首先在 EmployeeMapper 中進行聲明:
public interface EmployeeMapper extends BaseMapper<Employee> {

    List<Employee> selectAllByLastName(@Param("lastName") String lastName);
}
此時我們需要自己編寫配置文件實現(xiàn)該方法,在 resource 目錄下新建一個 mapper 文件夾,然后在該文件夾下創(chuàng)建 EmployeeMapper.xml 文件:
<!DOCTYPE mapper
        PUBLIC "-//mybatis.org//DTD Mapper 3.0//EN"
        "http://mybatis.org/dtd/mybatis-3-mapper.dtd">

<mapper namespace="com.wwj.mybatisplusdemo.mapper.EmployeeMapper">

    <sql id="Base_Column">
        id, last_name, email, gender, age
    </sql>

    <select id="selectAllByLastName" resultType="com.wwj.mybatisplusdemo.bean.Employee">
        select <include refid="Base_Column"/>
        from tbl_employee
        where last_name = #{lastName}
    </select>
</mapper>
MyBatisPlus 默認掃描的是類路徑下的 mapper 目錄,這可以從源碼中得到體現(xiàn):
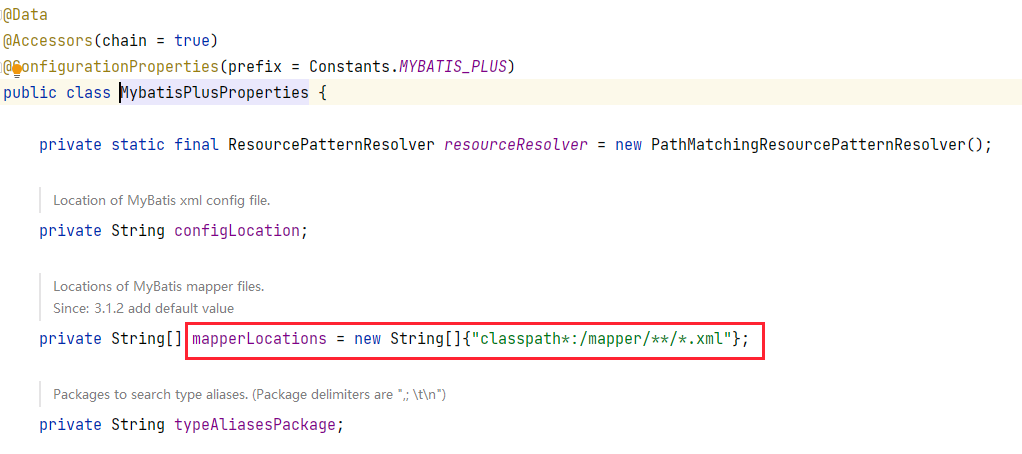
所以我們直接將 Mapper 配置文件放在該目錄下就沒有任何問題,可如果不是這個目錄,我們就需要進行配置,比如:
mybatis-plus:
  mapper-locations: classpath:xml/*.xml
編寫好 Mapper 接口后,我們就需要定義 Service 方法了:
public interface EmployeeService extends IService<Employee> {

    List<Employee> listAllByLastName(String lastName);
}

@Service
public class EmployeeServiceImpl extends ServiceImpl<EmployeeMapper, Employee> implements EmployeeService {

    @Override
    public List<Employee> listAllByLastName(String lastName) {
        return baseMapper.selectAllByLastName(lastName);
    }
}
在 EmployeeServiceImpl 中我們無需將 EmployeeMapper 注入進來,而是使用 BaseMapper,查看 ServiceImpl 的源碼:
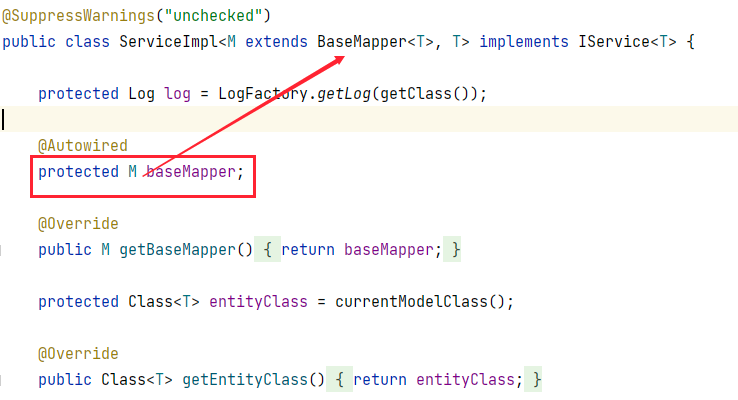
可以看到它為我們注入了一個 BaseMapper 對象,而它是第一個泛型類型,也就是 EmployeeMapper 類型,所以我們可以直接使用這個 baseMapper 來調(diào)用 Mapper 中的方法,此時編寫測試代碼:
@SpringBootTest
@MapperScan("com.wwj.mybatisplusdemo.mapper")
class MybatisplusDemoApplicationTests {

    @Autowired
    private EmployeeService employeeService;

    @Test
    void contextLoads() {
        List<Employee> list = employeeService.listAllByLastName("tom");
        list.forEach(System.out::println);
    }
}
運行結(jié)果:
Employee(id=2, lastName=tom, email=tom@qq.com, age=30)
ID 策略
在創(chuàng)建表的時候我故意沒有設(shè)置主鍵的增長策略,現(xiàn)在我們來插入一條數(shù)據(jù),看看主鍵是如何增長的:
@Test
void contextLoads() {
    Employee employee = new Employee();
    employee.setLastName("lisa");
    employee.setEmail("[email protected]");
    employee.setAge(20);
    employeeService.save(employee);
}
插入成功后查詢一下數(shù)據(jù)表:
mysql> select * from tbl_employee;
+---------------------+-----------+--------------+--------+------+
| id                  | last_name | email        | gender | age  |
+---------------------+-----------+--------------+--------+------+
|                   1 | jack      | [email protected]  | 1      |   35 |
|                   2 | tom       | [email protected]   | 1      |   30 |
|                   3 | jerry     | [email protected] | 1      |   40 |
| 1385934720849584129 | lisa      | [email protected]  | NULL   |   20 |
+---------------------+-----------+--------------+--------+------+
4 rows in set (0.00 sec)
可以看到 id 是一串相當(dāng)長的數(shù)字,這是什么意思呢?提前劇透一下,這其實是分布式 id,那又何為分布式 id 呢?
我們知道,對于一個大型應(yīng)用,其訪問量是非常巨大的,就比如說一個網(wǎng)站每天都有人進行注冊,注冊的用戶信息就需要存入數(shù)據(jù)表,隨著日子一天天過去,數(shù)據(jù)表中的用戶越來越多,此時數(shù)據(jù)庫的查詢速度就會受到影響,所以一般情況下,當(dāng)數(shù)據(jù)量足夠龐大時,數(shù)據(jù)都會做分庫分表的處理。
然而,一旦分表,問題就產(chǎn)生了,很顯然這些分表的數(shù)據(jù)都是屬于同一張表的數(shù)據(jù),只是因為數(shù)據(jù)量過大而分成若干張表,那么這幾張表的主鍵 id 該怎么管理呢?每張表維護自己的 id?那數(shù)據(jù)將會有很多的 id 重復(fù),這當(dāng)然是不被允許的,其實,我們可以使用算法來生成一個絕對不會重復(fù)的 id,這樣問題就迎刃而解了,事實上,分布式 id 的解決方案有很多:
UUID SnowFlake TinyID Uidgenerator Leaf Tinyid ......
以 UUID 為例,它生成的是一串由數(shù)字和字母組成的字符串,顯然并不適合作為數(shù)據(jù)表的 id,而且 id 保持遞增有序會加快表的查詢效率,基于此,MyBatisPlus 使用的就是 SnowFlake(雪花算法)。
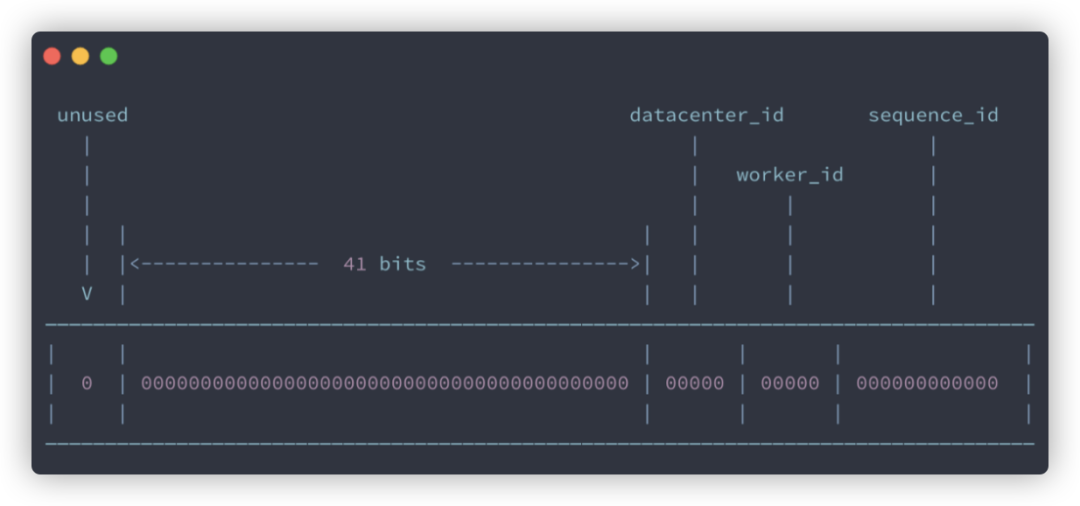
Snowflake 是 Twitter 開源的分布式 ID 生成算法。Snowflake 由 64 bit 的二進制數(shù)字組成,這 64bit 的二進制被分成了幾部分,每一部分存儲的數(shù)據(jù)都有特定的含義:
第 0 位:符號位(標(biāo)識正負),始終為 0,沒有用,不用管。 第 1~41 位 :一共 41 位,用來表示時間戳,單位是毫秒,可以支撐 2 ^41 毫秒(約 69 年) 第 42~52 位 :一共 10 位,一般來說,前 5 位表示機房 ID,后 5 位表示機器 ID(實際項目中可以根據(jù)實際情況調(diào)整)。這樣就可以區(qū)分不同集群/機房的節(jié)點。 第 53~64 位 :一共 12 位,用來表示序列號。序列號為自增值,代表單臺機器每毫秒能夠產(chǎn)生的最大 ID 數(shù)(2^12 = 4096),也就是說單臺機器每毫秒最多可以生成 4096 個 唯一 ID。
這也就是為什么插入數(shù)據(jù)后新的數(shù)據(jù) id 是一長串?dāng)?shù)字的原因了,我們可以在實體類中使用 @TableId 來設(shè)置主鍵的策略:
@Data
@TableName("tbl_employee")
public class Employee {

    @TableId(type = IdType.AUTO) // 設(shè)置主鍵策略
    private Long id;
    private String lastName;
    private String email;
    private Integer age;
}
MyBatisPlus 提供了幾種主鍵的策略: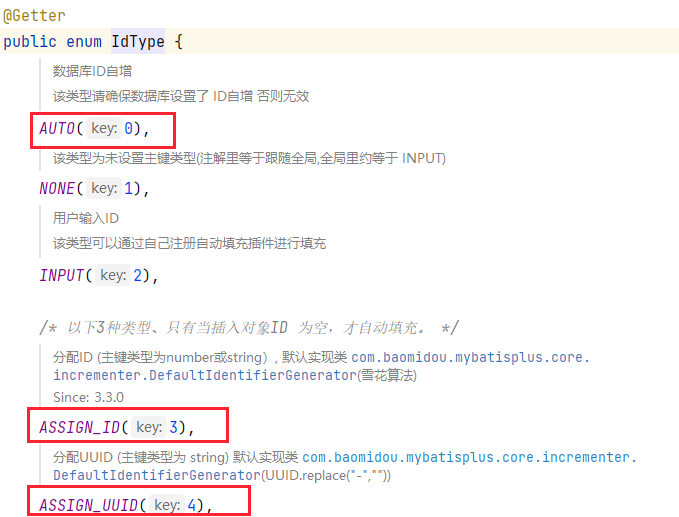 其中
其中 AUTO 表示數(shù)據(jù)庫自增策略,該策略下需要數(shù)據(jù)庫實現(xiàn)主鍵的自增(auto_increment),ASSIGN_ID 是雪花算法,默認使用的是該策略,ASSIGN_UUID 是 UUID 策略,一般不會使用該策略。
這里多說一點, 當(dāng)實體類的主鍵名為 id,并且數(shù)據(jù)表的主鍵名也為 id 時,此時 MyBatisPlus 會自動判定該屬性為主鍵 id,倘若名字不是 id 時,就需要標(biāo)注 @TableId 注解,若是實體類中主鍵名與數(shù)據(jù)表的主鍵名不一致,則可以進行聲明:
@TableId(value = "uid",type = IdType.AUTO) // 設(shè)置主鍵策略
private Long id;
還可以在配置文件中配置全局的主鍵策略:
mybatis-plus:
  global-config:
    db-config:
      id-type: auto
這樣能夠避免在每個實體類中重復(fù)設(shè)置主鍵策略。
屬性自動填充
翻閱《阿里巴巴 Java 開發(fā)手冊》,在第 5 章 MySQL 數(shù)據(jù)庫可以看到這樣一條規(guī)范: 對于一張數(shù)據(jù)表,它必須具備三個字段:
id: 唯一 IDgmt_create: 保存的是當(dāng)前數(shù)據(jù)創(chuàng)建的時間gmt_modified: 保存的是更新時間
我們改造一下數(shù)據(jù)表:
alter table tbl_employee add column gmt_create datetime not null;
alter table tbl_employee add column gmt_modified datetime not null;
然后改造一下實體類:
@Data
@TableName("tbl_employee")
public class Employee {

    @TableId(type = IdType.AUTO) // 設(shè)置主鍵策略
    private Long id;
    private String lastName;
    private String email;
    private Integer age;
    private LocalDateTime gmtCreate;
    private LocalDateTime gmtModified;
}
此時我們在插入數(shù)據(jù)和更新數(shù)據(jù)的時候就需要手動去維護這兩個屬性:
@Test
void contextLoads() {
    Employee employee = new Employee();
    employee.setLastName("lisa");
    employee.setEmail("[email protected]");
    employee.setAge(20);
    // 設(shè)置創(chuàng)建時間
    employee.setGmtCreate(LocalDateTime.now());
    employee.setGmtModified(LocalDateTime.now());
    employeeService.save(employee);
}

@Test
void contextLoads() {
    Employee employee = new Employee();
    employee.setId(1385934720849584130L);
    employee.setAge(50);
    // 設(shè)置創(chuàng)建時間
    employee.setGmtModified(LocalDateTime.now());
    employeeService.updateById(employee);
}
每次都需要維護這兩個屬性未免過于麻煩,好在 MyBatisPlus 提供了字段自動填充功能來幫助我們進行管理,需要使用到的是 @TableField 注解:
@Data
@TableName("tbl_employee")
public class Employee {

    @TableId(type = IdType.AUTO)
    private Long id;
    private String lastName;
    private String email;
    private Integer age;
    @TableField(fill = FieldFill.INSERT) // 插入的時候自動填充
    private LocalDateTime gmtCreate;
    @TableField(fill = FieldFill.INSERT_UPDATE) // 插入和更新的時候自動填充
    private LocalDateTime gmtModified;
}
然后編寫一個類實現(xiàn) MetaObjectHandler 接口:
@Component
@Slf4j
public class MyMetaObjectHandler implements MetaObjectHandler {

    /**
     * 實現(xiàn)插入時的自動填充
     * @param metaObject
     */
    @Override
    public void insertFill(MetaObject metaObject) {
        log.info("insert開始屬性填充");
        this.strictInsertFill(metaObject,"gmtCreate", LocalDateTime.class,LocalDateTime.now());
        this.strictInsertFill(metaObject,"gmtModified", LocalDateTime.class,LocalDateTime.now());
    }

    /**
     * 實現(xiàn)更新時的自動填充
     * @param metaObject
     */
    @Override
    public void updateFill(MetaObject metaObject) {
        log.info("update開始屬性填充");
        this.strictInsertFill(metaObject,"gmtModified", LocalDateTime.class,LocalDateTime.now());
    }
}
該接口中有兩個未實現(xiàn)的方法,分別為插入和更新時的填充方法,在方法中調(diào)用 strictInsertFill() 方法 即可實現(xiàn)屬性的填充,它需要四個參數(shù):
metaObject:元對象,就是方法的入?yún)?/section>fieldName:為哪個屬性進行自動填充fieldType:屬性的類型fieldVal:需要填充的屬性值
此時在插入和更新數(shù)據(jù)之前,這兩個方法會先被執(zhí)行,以實現(xiàn)屬性的自動填充,通過日志我們可以進行驗證:
@Test
void contextLoads() {
    Employee employee = new Employee();
    employee.setId(1385934720849584130L);
    employee.setAge(15);
    employeeService.updateById(employee);
}
運行結(jié)果:
INFO 15584 --- [           main] c.w.m.handler.MyMetaObjectHandler        : update開始屬性填充
2021-04-24 21:32:19.788  INFO 15584 --- [           main] com.zaxxer.hikari.HikariDataSource       : HikariPool-1 - Starting...
2021-04-24 21:32:21.244  INFO 15584 --- [           main] com.zaxxer.hikari.HikariDataSource       : HikariPool-1 - Start completed.
屬性填充其實可以進行一些優(yōu)化,考慮一些特殊情況,對于一些不存在的屬性,就不需要進行屬性填充,對于一些設(shè)置了值的屬性,也不需要進行屬性填充,這樣可以提高程序的整體運行效率:
@Component
@Slf4j
public class MyMetaObjectHandler implements MetaObjectHandler {

    @Override
    public void insertFill(MetaObject metaObject) {
        boolean hasGmtCreate = metaObject.hasSetter("gmtCreate");
        boolean hasGmtModified = metaObject.hasSetter("gmtModified");
        if (hasGmtCreate) {
            Object gmtCreate = this.getFieldValByName("gmtCreate", metaObject);
            if (gmtCreate == null) {
                this.strictInsertFill(metaObject, "gmtCreate", LocalDateTime.class, LocalDateTime.now());
            }
        }
        if (hasGmtModified) {
            Object gmtModified = this.getFieldValByName("gmtModified", metaObject);
            if (gmtModified == null) {
                this.strictInsertFill(metaObject, "gmtModified", LocalDateTime.class, LocalDateTime.now());
            }
        }
    }

    @Override
    public void updateFill(MetaObject metaObject) {
        boolean hasGmtModified = metaObject.hasSetter("gmtModified");
        if (hasGmtModified) {
            Object gmtModified = this.getFieldValByName("gmtModified", metaObject);
            if (gmtModified == null) {
                this.strictInsertFill(metaObject, "gmtModified", LocalDateTime.class, LocalDateTime.now());
            }
        }
    }
}
邏輯刪除
邏輯刪除對應(yīng)的是物理刪除,分別介紹一下這兩個概念:
物理刪除 :指的是真正的刪除,即:當(dāng)執(zhí)行刪除操作時,將數(shù)據(jù)表中的數(shù)據(jù)進行刪除,之后將無法再查詢到該數(shù)據(jù) 邏輯刪除 :并不是真正意義上的刪除,只是對于用戶不可見了,它仍然存在與數(shù)據(jù)表中
在這個數(shù)據(jù)為王的時代,數(shù)據(jù)就是財富,所以一般并不會有哪個系統(tǒng)在刪除某些重要數(shù)據(jù)時真正刪掉了數(shù)據(jù),通常都是在數(shù)據(jù)庫中建立一個狀態(tài)列,讓其默認為 0,當(dāng)為 0 時,用戶可見;當(dāng)執(zhí)行了刪除操作,就將狀態(tài)列改為 1,此時用戶不可見,但數(shù)據(jù)還是在表中的。
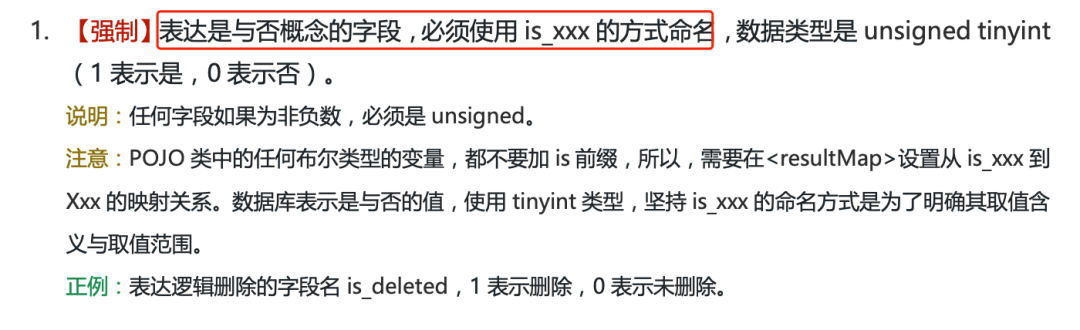
按照《阿里巴巴 Java 開發(fā)手冊》第 5 章 MySQL 數(shù)據(jù)庫相關(guān)的建議,我們來為數(shù)據(jù)表新增一個is_deleted 字段:
alter table tbl_employee add column is_deleted tinyint not null;
在實體類中也要添加這一屬性:
@Data
@TableName("tbl_employee")
public class Employee {

    @TableId(type = IdType.AUTO)
    private Long id;
    private String lastName;
    private String email;
    private Integer age;
    @TableField(fill = FieldFill.INSERT)
    private LocalDateTime gmtCreate;
    @TableField(fill = FieldFill.INSERT_UPDATE)
    private LocalDateTime gmtModified;
    /**
     * 邏輯刪除屬性
     */
    @TableLogic
    @TableField("is_deleted")
    private Boolean deleted;
}
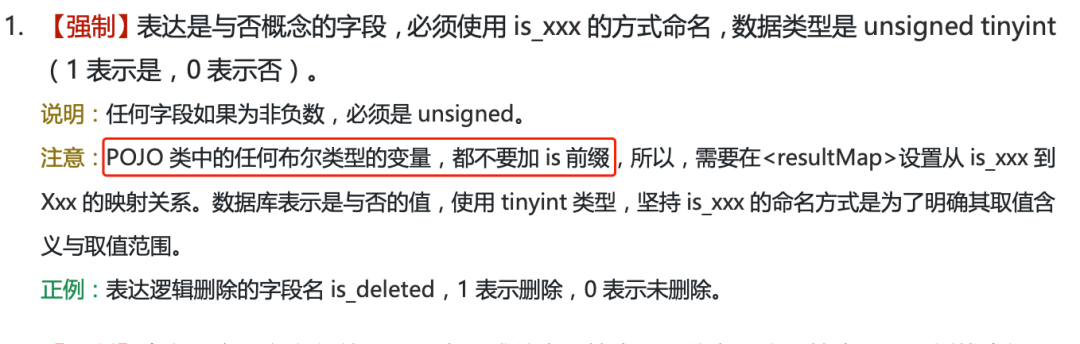
還是參照《阿里巴巴 Java 開發(fā)手冊》第 5 章 MySQL 數(shù)據(jù)庫相關(guān)的建議,對于布爾類型變量,不能加 is 前綴,所以我們的屬性被命名為 deleted,但此時就無法與數(shù)據(jù)表的字段進行對應(yīng)了,所以我們需要使用 @TableField 注解來聲明一下數(shù)據(jù)表的字段名,而 @TableLogin 注解用于設(shè)置邏輯刪除屬性;此時我們執(zhí)行刪除操作:
@Test
void contextLoads() {
    employeeService.removeById(3);
}
查詢數(shù)據(jù)表:
mysql> select * from tbl_employee;
+---------------------+-----------+--------------+--------+------+---------------------+---------------------+------------+
| id                  | last_name | email        | gender | age  | gmt_create          | gmt_modified        | is_deleted |
+---------------------+-----------+--------------+--------+------+---------------------+---------------------+------------+
|                   1 | jack      | [email protected]  | 1      |   35 | 0000-00-00 00:00:00 | 0000-00-00 00:00:00 |          0 |
|                   2 | tom       | [email protected]   | 1      |   30 | 0000-00-00 00:00:00 | 0000-00-00 00:00:00 |          0 |
|                   3 | jerry     | [email protected] | 1      |   40 | 0000-00-00 00:00:00 | 0000-00-00 00:00:00 |          1 |
| 1385934720849584129 | lisa      | [email protected]  | NULL   |   20 | 0000-00-00 00:00:00 | 0000-00-00 00:00:00 |          0 |
| 1385934720849584130 | lisa      | [email protected]  | NULL   |   15 | 2021-04-24 21:14:18 | 2021-04-24 21:32:19 |          0 |
+---------------------+-----------+--------------+--------+------+---------------------+---------------------+------------+
5 rows in set (0.00 sec)
可以看到數(shù)據(jù)并沒有被刪除,只是 is_deleted 字段的屬性值被更新成了 1,此時我們再來執(zhí)行查詢操作:
@Test
void contextLoads() {
    List<Employee> list = employeeService.list();
    list.forEach(System.out::println);
}
執(zhí)行結(jié)果:
Employee(id=1, lastName=jack, email=jack@qq.com, age=35, gmtCreate=2021-04-24T21:14:18, gmtModified=2021-04-24T21:14:18, deleted=false)
Employee(id=2, lastName=tom, email=tom@qq.com, age=30, gmtCreate=2021-04-24T21:14:18, gmtModified=2021-04-24T21:14:18, deleted=false)
Employee(id=1385934720849584129, lastName=lisa, email=lisa@qq.com, age=20, gmtCreate=2021-04-24T21:14:18, gmtModified=2021-04-24T21:14:18, deleted=false)
Employee(id=1385934720849584130, lastName=lisa, email=lisa@qq.com, age=15, gmtCreate=2021-04-24T21:14:18, gmtModified=2021-04-24T21:32:19, deleted=false)
會發(fā)現(xiàn)第三條數(shù)據(jù)并沒有被查詢出來,它是如何實現(xiàn)的呢?我們可以輸出 MyBatisPlus 生成的 SQL 來分析一下,在配置文件中進行配置:
mybatis-plus:
  configuration:
    log-impl: org.apache.ibatis.logging.stdout.StdOutImpl # 輸出SQL日志
運行結(jié)果:
==>  Preparing: SELECT id,last_name,email,age,gmt_create,gmt_modified,is_deleted AS deleted FROM tbl_employee WHERE is_deleted=0
==> Parameters:
<==    Columns: id, last_name, email, age, gmt_create, gmt_modified, deleted
<==        Row: 1, jack, jack@qq.com, 35, 2021-04-24 21:14:18, 2021-04-24 21:14:18, 0
<==        Row: 2, tom, tom@qq.com, 30, 2021-04-24 21:14:18, 2021-04-24 21:14:18, 0
<==        Row: 1385934720849584129, lisa, lisa@qq.com, 20, 2021-04-24 21:14:18, 2021-04-24 21:14:18, 0
<==        Row: 1385934720849584130, lisa, lisa@qq.com, 15, 2021-04-24 21:14:18, 2021-04-24 21:32:19, 0
<==      Total: 4
原來它在查詢時攜帶了一個條件:is_deleted=0 ,這也說明了 MyBatisPlus 默認 0 為不刪除,1 為刪除。若是你想修改這個規(guī)定,比如設(shè)置-1 為刪除,1 為不刪除,也可以進行配置:
mybatis-plus:
  global-config:
    db-config:
      id-type: auto
      logic-delete-field: deleted # 邏輯刪除屬性名
      logic-delete-value: -1 # 刪除值
      logic-not-delete-value: 1 # 不刪除值
但建議使用默認的配置,阿里巴巴開發(fā)手冊也規(guī)定 1 表示刪除,0 表示未刪除。
分頁插件
對于分頁功能,MyBatisPlus 提供了分頁插件,只需要進行簡單的配置即可實現(xiàn):
@Configuration
public class MyBatisConfig {

    /**
     * 注冊分頁插件
     * @return
     */
    @Bean
    public MybatisPlusInterceptor mybatisPlusInterceptor() {
        MybatisPlusInterceptor interceptor = new MybatisPlusInterceptor();
        interceptor.addInnerInterceptor(new PaginationInnerInterceptor(DbType.MYSQL));
        return interceptor;
    }
}
接下來我們就可以使用分頁插件提供的功能了:
@Test
void contextLoads() {
    Page<Employee> page = new Page<>(1,2);
    employeeService.page(page, null);
    List<Employee> employeeList = page.getRecords();
    employeeList.forEach(System.out::println);
    System.out.println("獲取總條數(shù):" + page.getTotal());
    System.out.println("獲取當(dāng)前頁碼:" + page.getCurrent());
    System.out.println("獲取總頁碼:" + page.getPages());
    System.out.println("獲取每頁顯示的數(shù)據(jù)條數(shù):" + page.getSize());
    System.out.println("是否有上一頁:" + page.hasPrevious());
    System.out.println("是否有下一頁:" + page.hasNext());
}
其中的 Page 對象用于指定分頁查詢的規(guī)則,這里表示按每頁兩條數(shù)據(jù)進行分頁,并查詢第一頁的內(nèi)容,運行結(jié)果:
Employee(id=1, lastName=jack, email=jack@qq.com, age=35, gmtCreate=2021-04-24T21:14:18, gmtModified=2021-04-24T21:14:18, deleted=0)
Employee(id=2, lastName=tom, email=tom@qq.com, age=30, gmtCreate=2021-04-24T21:14:18, gmtModified=2021-04-24T21:14:18, deleted=0)
獲取總條數(shù):4
獲取當(dāng)前頁碼:1
獲取總頁碼:2
獲取每頁顯示的數(shù)據(jù)條數(shù):2
是否有上一頁:false
是否有下一頁:true
倘若在分頁過程中需要限定一些條件,我們就需要構(gòu)建 QueryWrapper 來實現(xiàn):
@Test
void contextLoads() {
    Page<Employee> page = new Page<>(1, 2);
    employeeService.page(page, new QueryWrapper<Employee>()
                         .between("age", 20, 50)
                         .eq("gender", 1));
    List<Employee> employeeList = page.getRecords();
    employeeList.forEach(System.out::println);
}
此時分頁的數(shù)據(jù)就應(yīng)該是年齡在 20~50 歲之間,且 gender 值為 1 的員工信息,然后再對這些數(shù)據(jù)進行分頁。
樂觀鎖
當(dāng)程序中出現(xiàn)并發(fā)訪問時,就需要保證數(shù)據(jù)的一致性。以商品系統(tǒng)為例,現(xiàn)在有兩個管理員均想對同一件售價為 100 元的商品進行修改,A 管理員正準備將商品售價改為 150 元,但此時出現(xiàn)了網(wǎng)絡(luò)問題,導(dǎo)致 A 管理員的操作陷入了等待狀態(tài);此時 B 管理員也進行修改,將商品售價改為了 200 元,修改完成后 B 管理員退出了系統(tǒng),此時 A 管理員的操作也生效了,這樣便使得 A 管理員的操作直接覆蓋了 B 管理員的操作,B 管理員后續(xù)再進行查詢時會發(fā)現(xiàn)商品售價變?yōu)榱?150 元,這樣的情況是絕對不允許發(fā)生的。
要想解決這一問題,可以給數(shù)據(jù)表加鎖,常見的方式有兩種:
樂觀鎖 悲觀鎖
悲觀鎖認為并發(fā)情況一定會發(fā)生,所以在某條數(shù)據(jù)被修改時,為了避免其它人修改,會直接對數(shù)據(jù)表進行加鎖,它依靠的是數(shù)據(jù)庫本身提供的鎖機制(表鎖、行鎖、讀鎖、寫鎖)。
而樂觀鎖則相反,它認為數(shù)據(jù)產(chǎn)生沖突的情況一般不會發(fā)生,所以在修改數(shù)據(jù)的時候并不會對數(shù)據(jù)表進行加鎖的操作,而是在提交數(shù)據(jù)時進行校驗,判斷提交上來的數(shù)據(jù)是否會發(fā)生沖突,如果發(fā)生沖突,則提示用戶重新進行操作,一般的實現(xiàn)方式為 設(shè)置版本號字段 。
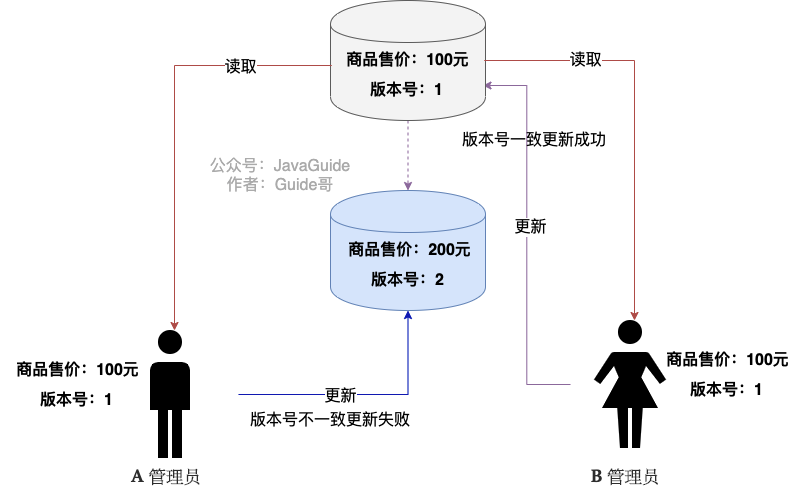
就以商品售價為例,在該表中設(shè)置一個版本號字段,讓其初始為 1,此時 A 管理員和 B 管理員同時需要修改售價,它們會先讀取到數(shù)據(jù)表中的內(nèi)容,此時兩個管理員讀取到的版本號都為 1,此時 B 管理員的操作先生效了,它就會將當(dāng)前數(shù)據(jù)表中對應(yīng)數(shù)據(jù)的版本號與最開始讀取到的版本號作一個比對,發(fā)現(xiàn)沒有變化,于是修改就生效了,此時版本號加 1。
而 A 管理員馬上也提交了修改操作,但是此時的版本號為 2,與最開始讀取到的版本號并不對應(yīng),這就說明數(shù)據(jù)發(fā)生了沖突,此時應(yīng)該提示 A 管理員操作失敗,并讓 A 管理員重新查詢一次數(shù)據(jù)。
樂觀鎖的優(yōu)勢在于采取了更加寬松的加鎖機制,能夠提高程序的吞吐量,適用于讀操作多的場景。
那么接下來我們就來模擬這一過程。
1.創(chuàng)建一張新的數(shù)據(jù)表:
create table shop(
 id bigint(20) not null auto_increment,
  name varchar(30) not null,
  price int(11) default 0,
  version int(11) default 1,
  primary key(id)
);

insert into shop(id,name,price) values(1,'筆記本電腦',8000);
2.創(chuàng)建實體類:
@Data
public class Shop {

    private Long id;
    private String name;
    private Integer price;
    private Integer version;
}
3.創(chuàng)建對應(yīng)的 Mapper 接口:
public interface ShopMapper extends BaseMapper<Shop> {
}
4.編寫測試代碼:
@SpringBootTest
@MapperScan("com.wwj.mybatisplusdemo.mapper")
class MybatisplusDemoApplicationTests {

    @Autowired
    private ShopMapper shopMapper;

    /**
     * 模擬并發(fā)場景
     */
    @Test
    void contextLoads() {
        // A、B管理員讀取數(shù)據(jù)
        Shop A = shopMapper.selectById(1L);
        Shop B = shopMapper.selectById(1L);
        // B管理員先修改
        B.setPrice(9000);
        int result = shopMapper.updateById(B);
        if (result == 1) {
            System.out.println("B管理員修改成功!");
        } else {
            System.out.println("B管理員修改失敗!");
        }
        // A管理員后修改
        A.setPrice(8500);
        int result2 = shopMapper.updateById(A);
        if (result2 == 1) {
            System.out.println("A管理員修改成功!");
        } else {
            System.out.println("A管理員修改失敗!");
        }
        // 最后查詢
        System.out.println(shopMapper.selectById(1L));
    }
}
執(zhí)行結(jié)果:
B管理員修改成功!
A管理員修改成功!
Shop(id=1, name=筆記本電腦, price=8500, version=1)
問題出現(xiàn)了,B 管理員的操作被 A 管理員覆蓋,那么該如何解決這一問題呢?
其實 MyBatisPlus 已經(jīng)提供了樂觀鎖機制,只需要在實體類中使用 @Version 聲明版本號屬性:
@Data
public class Shop {

    private Long id;
    private String name;
    private Integer price;
    @Version // 聲明版本號屬性
    private Integer version;
}
然后注冊樂觀鎖插件:
@Configuration
public class MyBatisConfig {

    /**
     * 注冊插件
     * @return
     */
    @Bean
    public MybatisPlusInterceptor mybatisPlusInterceptor() {
        MybatisPlusInterceptor interceptor = new MybatisPlusInterceptor();
        // 分頁插件
        interceptor.addInnerInterceptor(new PaginationInnerInterceptor(DbType.MYSQL));
        // 樂觀鎖插件
        interceptor.addInnerInterceptor(new OptimisticLockerInnerInterceptor());
        return interceptor;
    }
}
重新執(zhí)行測試代碼,結(jié)果如下:
B管理員修改成功!
A管理員修改失敗!
Shop(id=1, name=筆記本電腦, price=9000, version=2)
此時 A 管理員的修改就失敗了,它需要重新讀取最新的數(shù)據(jù)才能再次進行修改。
條件構(gòu)造器
在分頁插件中我們簡單地使用了一下條件構(gòu)造器(Wrapper),下面我們來詳細了解一下。先來看看 Wrapper 的繼承體系: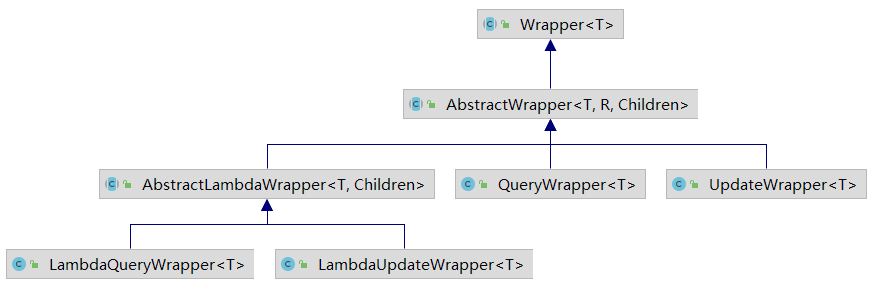 分別介紹一下它們的作用:
Wrapper:條件構(gòu)造器抽象類,最頂端的父類LambdaQueryWrapper:用于對象封裝,使用 Lambda 語法LambdaUpdateWrapper:用于條件封裝,使用 Lambda 語法QueryWrapper:用于對象封裝UpdateWrapper:用于條件封裝AbstractWrapper:查詢條件封裝抽象類,生成 SQL 的 where 條件AbstractLambdaWrapper:Lambda 語法使用 Wrapper
通常我們使用的都是 QueryWrapper 和 UpdateWrapper,若是想使用 Lambda 語法來編寫,也可以使用 LambdaQueryWrapper 和 LambdaUpdateWrapper,通過這些條件構(gòu)造器,我們能夠很方便地來實現(xiàn)一些復(fù)雜的篩選操作,比如:
@SpringBootTest
@MapperScan("com.wwj.mybatisplusdemo.mapper")
class MybatisplusDemoApplicationTests {

    @Autowired
    private EmployeeMapper employeeMapper;

    @Test
    void contextLoads() {
        // 查詢名字中包含'j',年齡大于20歲,郵箱不為空的員工信息
        QueryWrapper<Employee> wrapper = new QueryWrapper<>();
        wrapper.like("last_name", "j");
        wrapper.gt("age", 20);
        wrapper.isNotNull("email");
        List<Employee> list = employeeMapper.selectList(wrapper);
        list.forEach(System.out::println);
    }
}
運行結(jié)果:
Employee(id=1, lastName=jack, email=jack@qq.com, age=35, gmtCreate=2021-04-24T21:14:18, gmtModified=2021-04-24T21:14:18, deleted=0)
條件構(gòu)造器提供了豐富的條件方法幫助我們進行條件的構(gòu)造,比如 like 方法會為我們建立模糊查詢,查看一下控制臺輸出的 SQL:
==>  Preparing: SELECT id,last_name,email,age,gmt_create,gmt_modified,is_deleted AS deleted FROM tbl_employee WHERE is_deleted=0 AND (last_name LIKE ? AND age > ? AND email IS NOT NULL)
==> Parameters: %j%(String), 20(Integer)
可以看到它是對 j 的前后都加上了 % ,若是只想查詢以 j 開頭的名字,則可以使用 likeRight 方法,若是想查詢以 j 結(jié)尾的名字,,則使用 likeLeft 方法。
年齡的比較也是如此, gt 是大于指定值,若是小于則調(diào)用 lt ,大于等于調(diào)用 ge ,小于等于調(diào)用 le ,不等于調(diào)用 ne ,還可以使用 between 方法實現(xiàn)這一過程,相關(guān)的其它方法都可以查閱源碼進行學(xué)習(xí)。
因為這些方法返回的其實都是自身實例,所以可使用鏈式編程:
@Test
void contextLoads() {
    // 查詢名字中包含'j',年齡大于20歲,郵箱不為空的員工信息
    QueryWrapper<Employee> wrapper = new QueryWrapper<Employee>()
        .likeLeft("last_name", "j")
        .gt("age", 20)
        .isNotNull("email");
    List<Employee> list = employeeMapper.selectList(wrapper);
    list.forEach(System.out::println);
}
也可以使用 LambdaQueryWrapper 實現(xiàn):
@Test
void contextLoads() {
    // 查詢名字中包含'j',年齡大于20歲,郵箱不為空的員工信息
    LambdaQueryWrapper<Employee> wrapper = new LambdaQueryWrapper<Employee>()
        .like(Employee::getLastName,"j")
        .gt(Employee::getAge,20)
        .isNotNull(Employee::getEmail);
    List<Employee> list = employeeMapper.selectList(wrapper);
    list.forEach(System.out::println);
}
這種方式的好處在于對字段的設(shè)置不是硬編碼,而是采用方法引用的形式,效果與 QueryWrapper 是一樣的。
UpdateWrapper 與 QueryWrapper 不同,它的作用是封裝更新內(nèi)容的,比如:
@Test
void contextLoads() {
    UpdateWrapper<Employee> wrapper = new UpdateWrapper<Employee>()
        .set("age", 50)
        .set("email", "[email protected]")
        .like("last_name", "j")
        .gt("age", 20);
    employeeMapper.update(null, wrapper);
}
將名字中包含 j 且年齡大于 20 歲的員工年齡改為 50,郵箱改為 [email protected],UpdateWrapper 不僅能夠封裝更新內(nèi)容,也能作為查詢條件,所以在更新數(shù)據(jù)時可以直接構(gòu)造一個 UpdateWrapper 來設(shè)置更新內(nèi)容和條件。
本文已經(jīng)收錄進:https://github.com/CodingDocs/springboot-guide (SpringBoot2.0+從入門到實戰(zhàn)!)
推薦?? :1049天,100K!簡單復(fù)盤!
推薦?? :年薪 40W Java 開發(fā)是什么水平?
推薦?? :Github掘金計劃:Github上的一些優(yōu)質(zhì)項目搜羅