
多行人計(jì)數(shù)與跟蹤
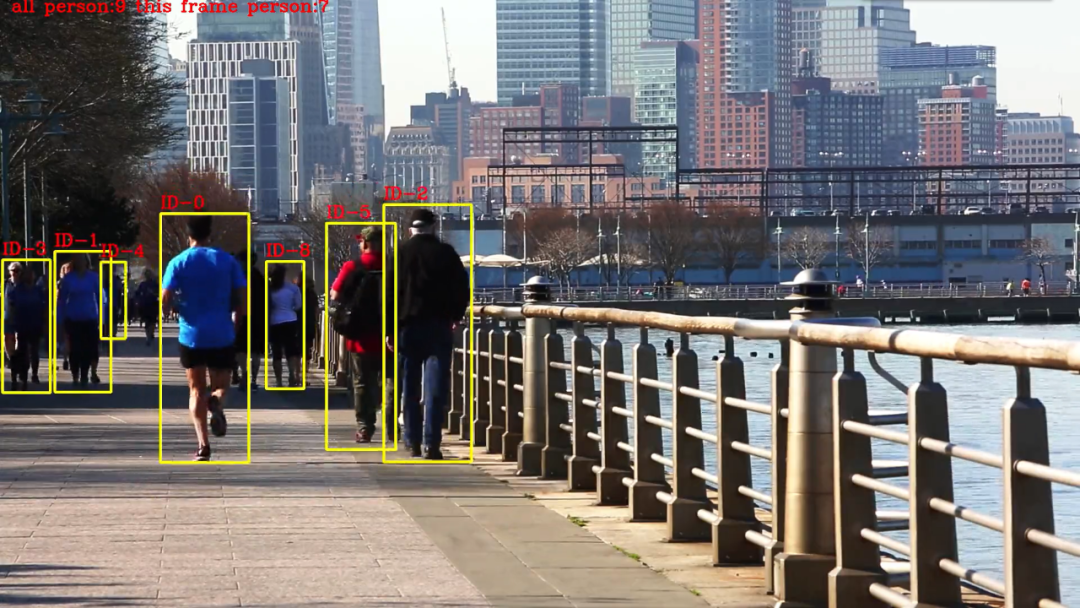
先來看看效果,在視頻中我們可以看到,行人都被黃色的框框住了,框的左上角用了紅色的字體顯示當(dāng)前行人的id,而整幅畫面的左上角是當(dāng)前的識(shí)別到的行人數(shù)量。
概述
SUMMER.TIME
看到這個(gè)效果,是否感覺有點(diǎn)熟悉,這不就是yolo+deepsort嗎?其實(shí)不然,deepsort的算法較為復(fù)雜,我這里使用了我自己的想法,看起來效果還可以,以下是deepsort算法以及本文中的算法的思路:
deepsort:
目標(biāo)檢測模型:用來檢測圖片中行人的位置,常用yolo,ssd,faster-rcnn等算法。
卡爾曼濾波:得到由前面幀box產(chǎn)生的狀態(tài)預(yù)測和協(xié)方差預(yù)測。
IOU計(jì)算:求跟蹤器所有目標(biāo)狀態(tài)預(yù)測與本幀檢測的box的IOU。
reID算法:用來提取外觀信息的深度模型,最后輸出128D向量。
匈牙利算法:得到IOU最大的唯一匹配(數(shù)據(jù)關(guān)聯(lián)部分),再去掉匹配值小于iou_threshold的匹配對(duì)。
本文中的算法:
目標(biāo)檢測模型:用來檢測圖片中行人的位置,常用yolo,ssd,faster-rcnn等算法。
記錄第一幀中所有行人的特征信息以及位置信息
IOU計(jì)算:計(jì)算相鄰幀的所有目標(biāo)的IOU(物理距離)
reID計(jì)算:計(jì)算相鄰幀的所有目標(biāo)的特征(特征距離)
距離匹配:融合物理距離以及特征距離,匹配小于某個(gè)閾值的id
編碼
SUMMER.TIME
接下來,我們進(jìn)行代碼的編寫,目標(biāo)檢測部分與前面推文中的一致,這里不再贅述,我們直接進(jìn)入正題
01
# 導(dǎo)入依賴庫
from utils.datasets import *from utils.utils import *import osimport torchfrom models.create_model import Create_Modelos.environ['CUDA_VISIBLE_DEVICES'] = "0"print(torch.cuda.is_available())
02
# 編寫提取特征以及判斷閾值的函數(shù)
# 獲得特征距離def person_distance(person_encodings, person_unknow):if len(person_encodings) == 0:return np.empty((0))l1 = np.sqrt(np.sum(np.square(person_encodings - person_unknow), axis=-1))return l1#判斷閾值def com_person(person_list, person, tolerance=1):dis = person_distance(person_list, person)# print(dis)return dis,list(dis <= tolerance)
03
# 編寫距離組合矩陣
代碼較長,無法就是組合上文中提到的物理距離(IOU)以及特征距離(reID),不過這里當(dāng)IOU距離較大時(shí),我們直接賦予一個(gè)很大的值,方便后續(xù)進(jìn)行過濾匹配。
# 組合距離矩陣def get_iou(boxes1,boxes2,arr_frame):boxes1 = np.array(boxes1,dtype=np.float32)boxes2 = np.array(boxes2,dtype=np.float32)# 求左上角右下角坐標(biāo)b1 = np.expand_dims(boxes1, -2)b1_xy = b1[..., :2]b1_wh = b1[..., 2:4]b1_half = b1_wh / 2.b1_mins = b1_xy - b1_halfb1_maxs = b1_xy + b1_halfb2 = np.expand_dims(boxes2, 0)b2_xy = b2[..., :2]b2_wh = b2[..., 2:4]b2_half = b2_wh / 2.b2_mins = b2_xy - b2_halfb2_maxs = b2_xy + b2_half# 求交集面積intersction_min = np.maximum(b1_mins, b2_mins)intersction_max = np.minimum(b1_maxs, b2_maxs)intersction_wh = np.maximum(intersction_max - intersction_min, 0.)intersction_area = intersction_wh[..., 0] * intersction_wh[..., 1]# 求交并比b1_area = b1_wh[..., 0] * b1_wh[..., 1]b2_area = b2_wh[..., 0] * b2_wh[..., 1]# 理論上 交并比越大說明 越接近,不過為了 和 特征距離統(tǒng)一,這里使用1-,確保距離矩陣只拿最小值即可iou = 1-intersction_area / (b1_area + b2_area - intersction_area)# 當(dāng)1-交并比 過大 ,直接設(shè)置一個(gè)很大的數(shù),方便過濾=10086+1e-5# 調(diào)整特征矩陣的維度arr_frame=arr_frame.reshape(arr_frame.shape[0],arr_frame.shape[1])# 將 iou矩陣與特征矩陣相加 得到最終的距離矩陣iou = iou+arr_framereturn iou
04
# 主函數(shù)編寫
大量代碼警告,這里是完成所有邏輯的程序,為了方便直接寫到一起了,代碼中也有注釋,相信你可以讀懂的,具體邏輯如下:
加載目標(biāo)檢測模型
加載行人重識(shí)別模型
初始化參數(shù)
通過while True 讀取視頻流中的每一幀圖片
第一幀:數(shù)據(jù)標(biāo)準(zhǔn)化,進(jìn)行目標(biāo)檢測獲取行人目標(biāo),將獲取到的行人目標(biāo)進(jìn)行特征提取。并將特征與坐標(biāo)記錄下來。
第二幀以后:數(shù)據(jù)標(biāo)準(zhǔn)化,,進(jìn)行目標(biāo)檢測獲取行人目標(biāo),將獲取到的行人目標(biāo)進(jìn)行特征提取,并將特征與坐標(biāo)與上一幀的特征與坐標(biāo)進(jìn)行距離匹配(物理距離+特征距離)
第二幀以及以后幀獲取到距離匹配結(jié)果后:獲取與目標(biāo),距離最為相似的3個(gè)備選目標(biāo),并判斷每一個(gè)備選目標(biāo)是否已經(jīng)被標(biāo)記,如果已被標(biāo)記,則順位到下一個(gè)備選目標(biāo)。
如果行人匹配成功,則跟新該行人的特征與坐標(biāo)。
如果前面的步驟都匹配失敗,則說明這是一個(gè)新的行人目標(biāo),直接記錄坐標(biāo)與特征。
將匹配結(jié)果顯示到圖像中。
def run():# 加載目標(biāo)檢測模型device = torch_utils.select_device('cpu')# google_utils.attempt_download(model_path)model = torch.load(model_path, map_location=device)['model']model.to(device).eval()names = model.names if hasattr(model, 'names') else model.modules.names# 加載reid 識(shí)別模型input_size = (215, 90, 3)model_, pred_model = Create_Model(inpt=input_size, num_classes=1812)model_.load_weights('weights\ep039-loss0.066.h5')video_capture = cv2.VideoCapture(Cam_num)# 寫入視頻video_FourCC = int(video_capture.get(cv2.CAP_PROP_FOURCC))video_fps = video_capture.get(cv2.CAP_PROP_FPS)video_size = (int(video_capture.get(cv2.CAP_PROP_FRAME_WIDTH)),int(video_capture.get(cv2.CAP_PROP_FRAME_HEIGHT)))out = cv2.VideoWriter('output.mp4', video_FourCC, video_fps, video_size)index = 0# 行人特征 行人坐標(biāo)unknow_person_emb =[]xyxy_all = []# person_state = []while True:ret, im0 = video_capture.read()# im0 = cv2.flip(im0, 1, dst=None)iimage = im0.copy()img = letterbox(im0, new_shape=image_size)[0]img = img[:, :, ::-1].transpose(2, 0, 1)img = np.ascontiguousarray(img)img = torch.from_numpy(img).to(device)img = img.half() if half else img.float() # uint8 to fp16/32img /= 255.0 # 0 - 255 to 0.0 - 1.0if img.ndimension() == 3:img = img.unsqueeze(0)# print(img.shape)# Inferencepred = model(img, augment=False)[0]if half:pred = pred.float()# Apply NMSpred = non_max_suppression(pred, conf_thres, iou_thres,fast=True, classes=None, agnostic=False)this_frame_xyxy =[]this_frame_emb=[]for i, det in enumerate(pred):if det is not None and len(det):# Rescale boxes from img_size to im0 sizedet[:, :4] = scale_coords(img.shape[2:], det[:, :4], im0.shape).round()for *xyxy, conf, cls in det:if names[int(cls)] == 'person':c1, c2 = (int(xyxy[0]), int(xyxy[1])), (int(xyxy[2]), int(xyxy[3]))# 獲得ROI 區(qū)域x_min, y_min = c1x_max, y_max = c2roi = iimage[y_min:y_max, x_min:x_max]roi = cv2.resize(roi,(90,215))# cv2.imwrite('person.jpg',roi)image_1 = np.asarray(roi).astype(np.float64) / 255photo1 = np.expand_dims(image_1 ,0)output1 = pred_model.predict(photo1)# centerx = x_min+(x_max-x_min)/2# centery = y_min+(y_max-y_min)/2# w , h = (x_max-x_min) , (y_max-y_min)# if 0.2<w/h<0.5:# 提取每一幀的行人this_frame_xyxy.append([x_min,y_min,x_max,y_max])this_frame_emb.append(output1)# 第一幀只進(jìn)行 特征提取if index == 0:for index_, xyxy_ in enumerate(this_frame_xyxy):unknow_person_emb.append(this_frame_emb[index_])xyxy_all.append(xyxy_)# 開始特征匹配else:# 當(dāng)前幀的每個(gè)行人 與 上一幀的行人的 特征距離this_frame_emb_arr=[]for i in this_frame_emb:dit, com_p = com_person(unknow_person_emb, i, tolerance=0.7)# print(dit)this_frame_emb_arr.append(dit)arr_frame = np.array(this_frame_emb_arr)# 獲得距離矩陣 (物理距離+特征距離)ious= get_iou(this_frame_xyxy, xyxy_all,arr_frame)# 當(dāng)前幀已有的行人id 確保不出現(xiàn)重復(fù)idthis_person_index_no_state=[]# 當(dāng)前幀索引,for index_,iou in enumerate(ious):# 查找距離最近的3個(gè)行人 (物理距離+特征距離)ind = np.argpartition(iou, (0,3))[:3]# ind = [iou.argmin()]# 最小的 距離小于1.4 特征距離0.7 + 物理距離0.7if iou[ind[0]]<1.4:person_index = ind[0]i= 0match_person = True# 當(dāng) 行人id 已經(jīng)出現(xiàn)時(shí),取第二 第三個(gè)id 進(jìn)行匹配while person_index in this_person_index_no_state:person_index =ind[i+1]# 匹配失敗則認(rèn)為該行人 是新出現(xiàn)的行人if iou[person_index]>1.4:match_person = Falseif i == 1:breaki+=1# 匹配行人成功 畫框、更新特征以及坐標(biāo)if match_person:# while iou.argmin() not in this_person_index_no_state:x1, y1, x2, y2 = this_frame_xyxy[index_]person_id = 'ID-%s' % person_indexcv2.rectangle(im0, (x1, y1), (x2, y2), (0, 255, 255), 3)cv2.putText(im0,person_id,(x1,y1-10),cv2.FONT_HERSHEY_COMPLEX,1,(0,0,255),2)unknow_person_emb[person_index]=this_frame_emb[index_]xyxy_all[person_index]=this_frame_xyxy[index_]this_person_index_no_state.append(person_index)# 行人匹配失敗 添加 特征和坐標(biāo)else:unknow_person_emb.append(this_frame_emb[index_])xyxy_all.append(this_frame_xyxy[index_])# 行人匹配失敗 添加 特征和坐標(biāo)else:unknow_person_emb.append(this_frame_emb[index_])xyxy_all.append(this_frame_xyxy[index_])index+=1log = 'all person:%s this frame person:%s '%(len(unknow_person_emb),len(this_frame_emb))cv2.putText(im0, log, (20, 20), cv2.FONT_HERSHEY_COMPLEX, 1, (0, 0, 255), 2)cv2.namedWindow('image',cv2.WINDOW_NORMAL)cv2.imshow('image', im0)out.write(im0)if cv2.waitKey(1) == ord('q'):breakvideo_capture.release()out.release()cv2.destroyAllWindows()
05
# Main函數(shù)編寫
if __name__ == '__main__':model_path = 'weights\yolov5m.pt'hand_model_path = 'weights\hand_pose.h5'Cam_num = r'test_video\Running - 294.mp4'image_size = 416conf_thres = 0.4iou_thres = 0.4device = 'cpu'half = Falsewith torch.no_grad():run()
運(yùn)行
SUMMER.TIME
運(yùn)行程序,就可以得到文章開頭的效果啦:
以上就是本推文的全部內(nèi)容啦,行人跟蹤與檢測的內(nèi)容就到此一段落了,不過通過這個(gè)算法,我們還可以做一些更有意思的程序,如以圖搜圖、聲紋識(shí)別、語音喚醒詞識(shí)別等。喜歡的同學(xué)可以關(guān)注一波噢