
Rocketmq源碼分析05:broker 消息接收流程
注:本系列源碼分析基于RocketMq 4.8.0,gitee倉庫鏈接:https://gitee.com/funcy/rocketmq.git.
從本文開始,我們來分析rocketMq消息接收、分發(fā)以及投遞流程。
RocketMq消息處理整個流程如下:

消息接收:消息接收是指接收 producer的消息,處理類是SendMessageProcessor,將消息寫入到commigLog文件后,接收流程處理完畢;消息分發(fā): broker處理消息分發(fā)的類是ReputMessageService,它會啟動一個線程,不斷地將commitLong分到到對應的consumerQueue,這一步操作會寫兩個文件:consumerQueue與indexFile,寫入后,消息分發(fā)流程處理 完畢;消息投遞:消息投遞是指將消息發(fā)往 consumer的流程,consumer會發(fā)起獲取消息的請求,broker收到請求后,調用PullMessageProcessor類處理,從consumerQueue文件獲取消息,返回給consumer后,投遞流程處理完畢。
以上就是rocketMq處理消息的流程了,接下來我們就從源碼來看相關流程的實現。
1. remotingServer的啟動流程
在正式分析接收與投遞流程前,我們來了解下remotingServer的啟動。
remotingServer是一個netty服務,他開啟了一個端口用來處理producer與consumer的網絡請求。
remotingServer是在BrokerController#start中啟動的,代碼如下:
    public void start() throws Exception {
        // 啟動各組件
        ...

        if (this.remotingServer != null) {
            this.remotingServer.start();
        }

        ...
    }
繼續(xù)查看remotingServer的啟動流程,進入NettyRemotingServer#start方法:
public void start() {
    ...

    ServerBootstrap childHandler =
        this.serverBootstrap.group(this.eventLoopGroupBoss, this.eventLoopGroupSelector)
            ...
            .childHandler(new ChannelInitializer<SocketChannel>() {
                @Override
                public void initChannel(SocketChannel ch) throws Exception {
                    ch.pipeline()
                        .addLast(defaultEventExecutorGroup,
                            HANDSHAKE_HANDLER_NAME, handshakeHandler)
                        .addLast(defaultEventExecutorGroup,
                            encoder,
                            new NettyDecoder(),
                            new IdleStateHandler(0, 0,
                                nettyServerConfig.getServerChannelMaxIdleTimeSeconds()),
                            connectionManageHandler,
                            // 處理業(yè)務請求的handler
                            serverHandler
                        );
                }
            });

    ...

}
這就是一個標準的netty服務啟動流程了,套路與nameServer的啟動是一樣的。關于netty的相關內容,這里我們僅關注pipeline上的channelHandler,在netty中,處理讀寫請求的操作為一個個ChannelHandler,remotingServer中處理讀寫請求的ChanelHandler為NettyServerHandler,代碼如下:
 @ChannelHandler.Sharable
class NettyServerHandler extends SimpleChannelInboundHandler<RemotingCommand> {

    @Override
    protected void channelRead0(ChannelHandlerContext ctx, RemotingCommand msg) throws Exception {
        processMessageReceived(ctx, msg);
    }
}
這塊的操作與nameServer對外提供的服務極相似(就是同一個類),最終調用的是NettyRemotingAbstract#processRequestCommand方法:
 public void processRequestCommand(final ChannelHandlerContext ctx, final RemotingCommand cmd) {
     // 根據 code 從 processorTable 獲取 Pair
    final Pair<NettyRequestProcessor, ExecutorService> matched
        = this.processorTable.get(cmd.getCode());
    // 找不到默認值
    final Pair<NettyRequestProcessor, ExecutorService> pair =
        null == matched ? this.defaultRequestProcessor : matched;

    ...

    // 從 pair 中拿到 Processor 進行處理
    NettyRequestProcessor processor = pair.getObject1();
    // 處理請求
    RemotingCommand response = processor.processRequest(ctx, cmd);

    ....
 }
如果進入源碼去看,會發(fā)現這個方法非常長,這里省略了異步處理、異常處理及返回值構造等,僅列出了關鍵步驟:
根據 code從processorTable拿到對應的Pair從 Pair里獲取Processor
最終處理請求的就是Processor了。
2. Processor的注冊
從上面的分析中可知, Processor是處理消息的關鍵,它是從processorTable中獲取的,這個processorTable是啥呢?
processorTable是NettyRemotingAbstract成員變量,里面的內容是BrokerController在初始化時(執(zhí)行BrokerController#initialize方法)注冊的。之前在分析BrokerController的初始化流程時,就提到過Processor的提供操作,這里再回顧下:
BrokerController的初始化方法initialize會調用 BrokerController#registerProcessor,Processor的注冊操作就在這個方法里:
public class BrokerController {

    private final PullMessageProcessor pullMessageProcessor;

    /**
     * 構造方法
     */
    public BrokerController(...) {
        // 處理 consumer 拉消息請求的
        this.pullMessageProcessor = new PullMessageProcessor(this);
    }

    /**
     * 注冊操作
     */
    public void registerProcessor() {
        // SendMessageProcessor
        SendMessageProcessor sendProcessor = new SendMessageProcessor(this);
        sendProcessor.registerSendMessageHook(sendMessageHookList);
        sendProcessor.registerConsumeMessageHook(consumeMessageHookList);
        // 處理 Processor
        this.remotingServer.registerProcessor(RequestCode.SEND_MESSAGE,
            sendProcessor, this.sendMessageExecutor);
        this.remotingServer.registerProcessor(RequestCode.SEND_MESSAGE_V2,
            sendProcessor, this.sendMessageExecutor);
        this.remotingServer.registerProcessor(RequestCode.SEND_BATCH_MESSAGE,
            sendProcessor, this.sendMessageExecutor);

        // PullMessageProcessor
        this.remotingServer.registerProcessor(RequestCode.PULL_MESSAGE,
            this.pullMessageProcessor, this.pullMessageExecutor);

        // 省略其他許許多多的Processor注冊
        ...

    }

    ...
需要指明的是,sendProcessor用來處理producer請求過來的消息,pullMessageProcessor用來處理consumer拉取消息的請求。
3. 接收producer消息
了解完remotingServer的啟動與Processor的注冊內容后,接下來我們就可以分析接收producer消息的流程了。
producer發(fā)送消息到broker時,發(fā)送的請求code為SEND_MESSAGE(這塊內容在后面分析producer時再分析,暫時先當成一個結論吧),根據上面的分析,當消息過來時,會使用NettyServerHandler這個ChannelHandler來處理,之后會調用到NettyRemotingAbstract#processRequestCommand方法。
在NettyRemotingAbstract#processRequestCommand方法中,會根據消息的code獲取對應的Processor來處理,從Processor的注冊流程來看,處理該SEND_MESSAGE的Processor為SendMessageProcessor,我們進入SendMessageProcessor#processRequest看看它的流程:
public RemotingCommand processRequest(ChannelHandlerContext ctx,
        RemotingCommand request) throws RemotingCommandException {
    RemotingCommand response = null;
    try {
        // broker處理接收消息
        response = asyncProcessRequest(ctx, request).get();
    } catch (InterruptedException | ExecutionException e) {
        log.error("process SendMessage error, request : " + request.toString(), e);
    }
    return response;
}
沒干啥事,一路跟下去,直接看普通消息的流程,進入SendMessageProcessor#asyncSendMessage方法:
private CompletableFuture<RemotingCommand> asyncSendMessage(ChannelHandlerContext ctx,
        RemotingCommand request, SendMessageContext mqtraceContext,
        SendMessageRequestHeader requestHeader) {
    final RemotingCommand response = preSend(ctx, request, requestHeader);
    final SendMessageResponseHeader responseHeader
        = (SendMessageResponseHeader)response.readCustomHeader();

    if (response.getCode() != -1) {
        return CompletableFuture.completedFuture(response);
    }

    final byte[] body = request.getBody();

    int queueIdInt = requestHeader.getQueueId();
    TopicConfig topicConfig = this.brokerController.getTopicConfigManager()
        .selectTopicConfig(requestHeader.getTopic());

    // 如果沒指定隊列,就隨機指定一個隊列
    if (queueIdInt < 0) {
        queueIdInt = randomQueueId(topicConfig.getWriteQueueNums());
    }

    // 將消息包裝為 MessageExtBrokerInner
    MessageExtBrokerInner msgInner = new MessageExtBrokerInner();
    msgInner.setTopic(requestHeader.getTopic());
    msgInner.setQueueId(queueIdInt);

    // 省略處理 msgInner 的流程
    ...

    CompletableFuture<PutMessageResult> putMessageResult = null;
    Map<String, String> origProps = MessageDecoder
        .string2messageProperties(requestHeader.getProperties());
    String transFlag = origProps.get(MessageConst.PROPERTY_TRANSACTION_PREPARED);
    // 發(fā)送事務消息
    if (transFlag != null && Boolean.parseBoolean(transFlag)) {
        ...
        // 發(fā)送事務消息
        putMessageResult = this.brokerController.getTransactionalMessageService()
            .asyncPrepareMessage(msgInner);
    } else {
        // 發(fā)送普通消息
        putMessageResult = this.brokerController.getMessageStore().asyncPutMessage(msgInner);
    }
    return handlePutMessageResultFuture(putMessageResult, response, request, msgInner,
        responseHeader, mqtraceContext, ctx, queueIdInt);
}
這個方法是在準備消息的發(fā)送數據,所做的工作如下:
如果沒指定隊列,就隨機指定一個隊列,一般情況下不會給消息指定隊列的,但如果要發(fā)送順序消息,就需要指定隊列了,這點后面再分析。 構造 MessageExtBrokerInner對象,就是將producer上送的消息包裝下,加上一些額外的信息,如消息標識msgId、發(fā)送時間、topic、queue等。發(fā)送消息,這里只是分為兩類:事務消息與普通消息,這里我們主要關注普通消息,事務消息后面再分析。
進入普通消息的發(fā)送方法DefaultMessageStore#asyncPutMessage:
public CompletableFuture<PutMessageResult> asyncPutMessage(MessageExtBrokerInner msg) {
    ...
    // 保存到 commitLog
    CompletableFuture<PutMessageResult> putResultFuture = this.commitLog.asyncPutMessage(msg);
    ...
}
繼續(xù)進入CommitLog#asyncPutMessage方法:
public CompletableFuture<PutMessageResult> asyncPutMessage(final MessageExtBrokerInner msg) {
    msg.setStoreTimestamp(System.currentTimeMillis());
    msg.setBodyCRC(UtilAll.crc32(msg.getBody()));
    AppendMessageResult result = null;
    StoreStatsService storeStatsService = this.defaultMessageStore.getStoreStatsService();
    String topic = msg.getTopic();
    int queueId = msg.getQueueId();

    final int tranType = MessageSysFlag.getTransactionValue(msg.getSysFlag());
    if (tranType == MessageSysFlag.TRANSACTION_NOT_TYPE
            || tranType == MessageSysFlag.TRANSACTION_COMMIT_TYPE) {
        // 延遲消息
        if (msg.getDelayTimeLevel() > 0) {
            // 延遲級別
            if (msg.getDelayTimeLevel() > this.defaultMessageStore
                    .getScheduleMessageService().getMaxDelayLevel()) {
                msg.setDelayTimeLevel(this.defaultMessageStore
                    .getScheduleMessageService().getMaxDelayLevel());
            }
            topic = TopicValidator.RMQ_SYS_SCHEDULE_TOPIC;
            queueId = ScheduleMessageService.delayLevel2QueueId(msg.getDelayTimeLevel());
            // 保存真正的 topic 與 queueId
            MessageAccessor.putProperty(msg, MessageConst.PROPERTY_REAL_TOPIC, msg.getTopic());
            MessageAccessor.putProperty(msg, MessageConst.PROPERTY_REAL_QUEUE_ID,
                String.valueOf(msg.getQueueId()));
            msg.setPropertiesString(MessageDecoder.messageProperties2String(msg.getProperties()));
            // 換了一個topic與隊列
            msg.setTopic(topic);
            msg.setQueueId(queueId);
        }
    }

    long elapsedTimeInLock = 0;
    MappedFile unlockMappedFile = null;
    MappedFile mappedFile = this.mappedFileQueue.getLastMappedFile();

    putMessageLock.lock();
    try {
        long beginLockTimestamp = this.defaultMessageStore.getSystemClock().now();
        this.beginTimeInLock = beginLockTimestamp;

        ...

        // 追加到文件中
        result = mappedFile.appendMessage(msg, this.appendMessageCallback);
        ...

        elapsedTimeInLock = this.defaultMessageStore.getSystemClock().now() - beginLockTimestamp;
        beginTimeInLock = 0;
    } finally {
        putMessageLock.unlock();
    }

    ...
}
在源碼里,這個方法也是非常長,這里刪減了大部分,只看關鍵點:
如果發(fā)送的是延遲消息,先保存原始的 topic與queueId,然后使用延遲隊列專有的topic與queueId將消息寫入到文件中
將消息寫入到文件的操作是在MappedFile#appendMessage(...)方法中進行,關于這塊就不過多分析了,我們直接看官方的描述(鏈接:https://github.com/apache/rocketmq/blob/master/docs/cn/design.md):
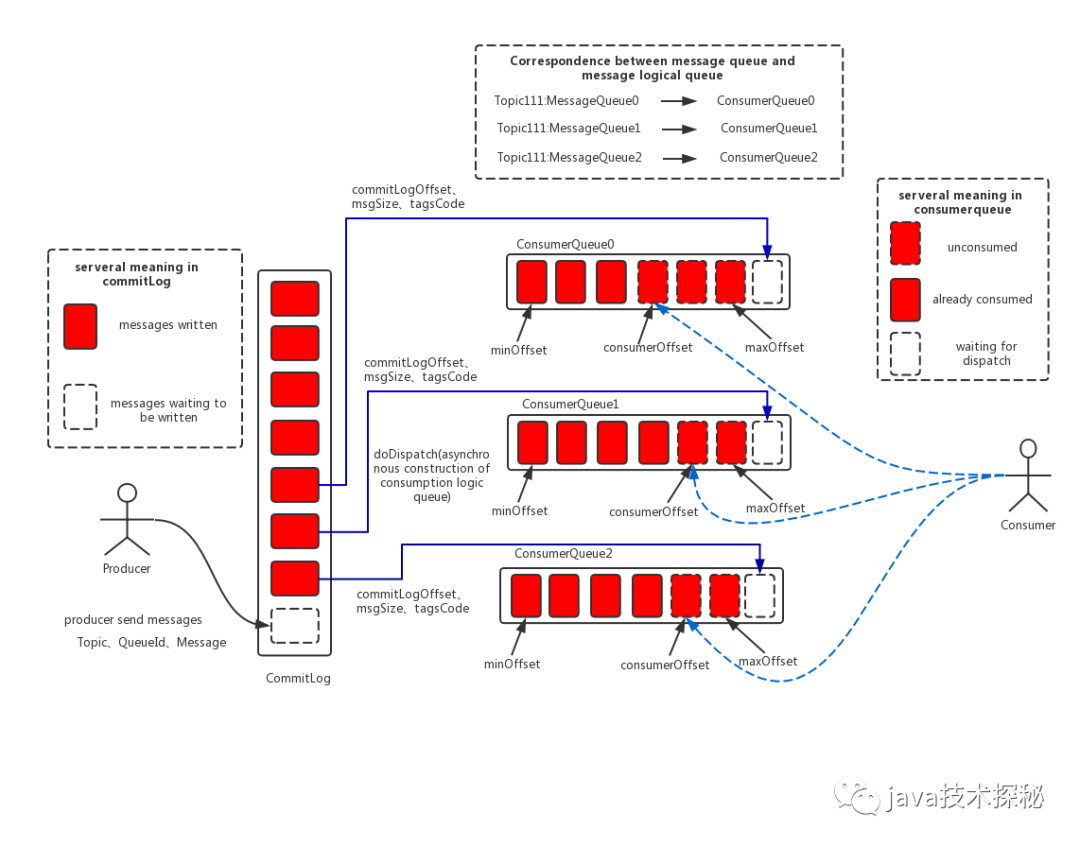
rocketMq消息存儲架構圖消息存儲架構圖中主要有下面三個跟消息存儲相關的文件構成。
(1)
CommitLog:消息主體以及元數據的存儲主體,存儲Producer端寫入的消息主體內容,消息內容不是定長的。單個文件大小默認1G ,文件名長度為20位,左邊補零,剩余為起始偏移量,比如00000000000000000000代表了第一個文件,起始偏移量為0,文件大小為1G=1073741824;當第一個文件寫滿了,第二個文件為00000000001073741824,起始偏移量為1073741824,以此類推。消息主要是順序寫入日志文件,當文件滿了,寫入下一個文件;(2)
ConsumeQueue:消息消費隊列,引入的目的主要是提高消息消費的性能,由于RocketMQ是基于主題topic的訂閱模式,消息消費是針對主題進行的,如果要遍歷commitlog文件中根據topic檢索消息是非常低效的。Consumer即可根據ConsumeQueue來查找待消費的消息。其中,ConsumeQueue(邏輯消費隊列)作為消費消息的索引,保存了指定Topic下的隊列消息在CommitLog中的起始物理偏移量offset,消息大小size和消息Tag的HashCode值。consumequeue文件可以看成是基于topic的commitlog索引文件,故consumequeue文件夾的組織方式如下:topic/queue/file三層組織結構,具體存儲路徑為:$HOME/store/consumequeue/{topic}/{queueId}/{fileName}。同樣consumequeue文件采取定長設計,每一個條目共20個字節(jié),分別為8字節(jié)的commitlog物理偏移量、4字節(jié)的消息長度、8字節(jié)tag hashcode,單個文件由30W個條目組成,可以像數組一樣隨機訪問每一個條目,每個ConsumeQueue文件大小約5.72M;(3)
IndexFile:IndexFile(索引文件)提供了一種可以通過key或時間區(qū)間來查詢消息的方法。Index文件的存儲位置是:HOME\store\index{fileName},文件名fileName是以創(chuàng)建時的時間戳命名的,固定的單個IndexFile文件大小約為400M,一個IndexFile可以保存 2000W個索引,IndexFile的底層存儲設計為在文件系統(tǒng)中實現HashMap結構,故rocketmq的索引文件其底層實現為hash索引。在上面的
RocketMQ的消息存儲整體架構圖中可以看出,RocketMQ采用的是混合型的存儲結構,即為Broker單個實例下所有的隊列共用一個日志數據文件(即為CommitLog)來存儲。RocketMQ的混合型存儲結構(多個Topic的消息實體內容都存儲于一個CommitLog中)針對Producer和Consumer分別采用了數據和索引部分相分離的存儲結構,Producer發(fā)送消息至Broker端,然后Broker端使用同步或者異步的方式對消息刷盤持久化,保存至CommitLog中。只要消息被刷盤持久化至磁盤文件CommitLog中,那么Producer發(fā)送的消息就不會丟失。正因為如此,
Consumer也就肯定有機會去消費這條消息。當無法拉取到消息后,可以等下一次消息拉取,同時服務端也支持長輪詢模式,如果一個消息拉取請求未拉取到消息,Broker允許等待30s的時間,只要這段時間內有新消息到達,將直接返回給消費端。這里,RocketMQ的具體做法是,使用Broker端的后臺服務線程—ReputMessageService不停地分發(fā)請求并異步構建ConsumeQueue(邏輯消費隊列)和IndexFile(索引文件)數據。
當消息寫入commitlog文件后,producer發(fā)送消息的流程就結束了,接下來就是是消息的分發(fā)及消費流程了。
4. 總結
本文主要分析了 broker 接收producer消息的流程,流程如下:
處理消息接收的底層服務為 netty,在 BrokerController#start方法中啟動netty服務中,處理消息接收的 channelHandler為NettyServerHandler,最終會調用SendMessageProcessor#processRequest來處理消息接收消息接收流程的最后, MappedFile#appendMessage(...)方法會將消息內容寫入到commitLog文件中。
本文的分析就到這里了,下一篇我們繼續(xù)分析commitLog文件的后續(xù)處理。
限于作者個人水平,文中難免有錯誤之處,歡迎指正!原創(chuàng)不易,商業(yè)轉載請聯系作者獲得授權,非商業(yè)轉載請注明出處。
本文首發(fā)于微信公眾號 Java技術探秘,如果您喜歡本文,歡迎關注該公眾號,讓我們一起在技術的世界里探秘吧!