
PyTorch 源碼解讀之 torch.cuda.amp: 自動混合精度詳解
 點藍色字關(guān)注“機器學(xué)習(xí)算法工程師”
設(shè)為星標(biāo),干貨直達!
AI編輯:我是小將
本文作者:OpenMMLab?@202011
https://zhuanlan.zhihu.com/p/348554267
本文已由原作者授權(quán)轉(zhuǎn)載
Nvidia 在 Volta 架構(gòu)中引入 Tensor Core 單元,來支持 FP32 和 FP16 混合精度計算。也在 2018 年提出一個 PyTorch 拓展 apex,來支持模型參數(shù)自動混合精度訓(xùn)練。自動混合精度(Automatic Mixed Precision, AMP)訓(xùn)練,是在訓(xùn)練一個數(shù)值精度 FP32 的模型,一部分算子的操作時,數(shù)值精度為 FP16,其余算子的操作精度是 FP32,而具體哪些算子用 FP16,哪些用 FP32,不需要用戶關(guān)心,amp 自動給它們都安排好了。這樣在不改變模型、不降低模型訓(xùn)練精度的前提下,可以縮短訓(xùn)練時間,降低存儲需求,因而能支持更多的 batch size、更大模型和尺寸更大的輸入進行訓(xùn)練。PyTorch 從 1.6 以后(在此之前 OpenMMLab 已經(jīng)支持混合精度訓(xùn)練,即 Fp16OptimizerHook),開始原生支持 amp,即torch.cuda.amp module。2020 ECCV,英偉達官方做了一個?tutorial?推廣 amp。從官方各種文檔網(wǎng)頁 claim 的結(jié)果來看,amp 在分類、檢測、圖像生成、3D CNNs、LSTM,以及 NLP 中機器翻譯、語義識別等應(yīng)用中,都在沒有降低模型訓(xùn)練精度都前提下,加速了模型的訓(xùn)練速度。
本文是對torch.cuda.amp工作機制,和 module 中接口使用方法介紹,以及在算法角度上對 amp 不掉點原因進行分析,最后補充一點對 amp 存儲消耗的解釋。
1. 混合精度訓(xùn)練機制
torch.cuda.amp?給用戶提供了較為方便的混合精度訓(xùn)練機制,“方便”體現(xiàn)在兩個方面:
用戶不需要手動對模型參數(shù) dtype 轉(zhuǎn)換,amp 會自動為算子選擇合適的數(shù)值精度
對于反向傳播的時候,FP16 的梯度數(shù)值溢出的問題,amp 提供了梯度 scaling 操作,而且在優(yōu)化器更新參數(shù)前,會自動對梯度 unscaling,所以,對用于模型優(yōu)化的超參數(shù)不會有任何影響
以上兩點,分別是通過使用amp.autocast和amp.GradScaler來實現(xiàn)的。
autocast可以作為 Python 上下文管理器和裝飾器來使用,用來指定腳本中某個區(qū)域、或者某些函數(shù),按照自動混合精度來運行。混合精度在操作的時候,是先將 FP32 的模型的參數(shù)拷貝一份,拷貝的參數(shù)轉(zhuǎn)換成 FP16,而 amp 規(guī)定了的 FP16 的算子(例如卷積、全連接),對 FP16 的數(shù)值進行操作;FP32 的算子(例如涉及 reduction 的算子,BatchNormalize,softmax...),輸入和輸出是 FP16,計算的精度是 FP32。在反向傳播時,依然是混合精度計算,得到數(shù)值精度為 FP16 的梯度。最后,由于 GPU 中的 Tensor Core 天然支持 FP16 乘積的結(jié)果與 FP32 的累加(Tensor Core math),優(yōu)化器的操作是利用 FP16 的梯度對 FP32 的參數(shù)進行更新。

對于 FP16 不可避免的問題就是:表示的范圍較窄,如下圖所示,大量非 0 梯度會遇到溢出問題。解決辦法是:對梯度乘一個? ?的系數(shù),稱為 scale factor,把梯度 shift 到 FP16 的表示范圍。
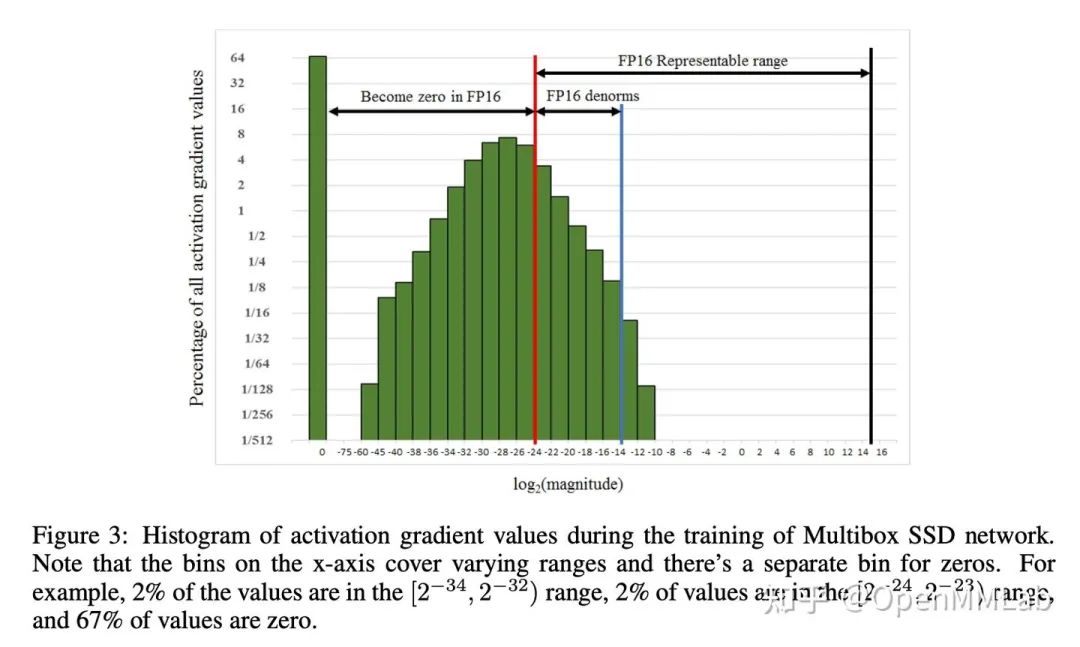
GradScaler的工作就是在反向傳播前給 loss 乘一個 scale factor,所以之后反向傳播得到的梯度都乘了相同的 scale factor。并且為了不影響學(xué)習(xí)率,在梯度更新前將梯度unscale。總結(jié)amp的基本訓(xùn)練流程:
維護一個 FP32 數(shù)值精度模型的副本
在每個iteration
拷貝并且轉(zhuǎn)換成 FP16 模型
前向傳播(FP16 的模型參數(shù))
loss 乘 scale factor?
s反向傳播(FP16 的模型參數(shù)和參數(shù)梯度)
參數(shù)梯度乘?
1/s利用 FP16 的梯度更新 FP32 的模型參數(shù)
但是,這里會有一個問題,scale factor 應(yīng)該如何選取?選一個常量顯然是不合適的,因為 loss 和梯度的數(shù)值在變,scale factor 需要跟隨 loss 動態(tài)變化。健康的 loss 是振蕩中下降,因此GradScaler設(shè)計的 scale factor 每隔? ?個 iteration 乘一個大于 1 的系數(shù),再 scale loss;并且每次更新前檢查溢出問題(檢查梯度中有沒有
inf和nan),如果有,scale factor 乘一個小于 1 的系數(shù)并跳過該 iteration 的參數(shù)更新環(huán)節(jié),如果沒有,就正常更新參數(shù)。動態(tài)更新 scale factor 是 amp 實際操作中的流程。總結(jié) amp 動態(tài) scale factor 的訓(xùn)練流程:
維護一個 FP32 數(shù)值精度模型的副本
初始化?
s在每個 iteration + a 拷貝并且轉(zhuǎn)換成FP16模型 + b 前向傳播(FP16 的模型參數(shù)) + c loss 乘 scale factor?
s?+ d 反向傳播(FP16 的模型參數(shù)和參數(shù)梯度) + e 檢查有沒有inf或者nan的參數(shù)梯度 + 如果有:降低?s,回到步驟a + f 參數(shù)梯度乘?1/s?+ g 利用 FP16 的梯度更新 FP32 的模型參數(shù)
2. amp模塊的API
用戶使用混合精度訓(xùn)練基本操作:
# amp依賴Tensor core架構(gòu),所以model參數(shù)必須是cuda tensor類型
model = Net().cuda()
optimizer = optim.SGD(model.parameters(), ...)
# GradScaler對象用來自動做梯度縮放
scaler = GradScaler()

for epoch in epochs:
    for input, target in data:
        optimizer.zero_grad()
        # 在autocast enable 區(qū)域運行forward
        with autocast():
            # model做一個FP16的副本,forward
            output = model(input)
            loss = loss_fn(output, target)
        # 用scaler,scale loss(FP16),backward得到scaled的梯度(FP16)
        scaler.scale(loss).backward()
        # scaler 更新參數(shù),會先自動unscale梯度
        # 如果有nan或inf,自動跳過
        scaler.step(optimizer)
        # scaler factor更新
        scaler.update()
2.1 autocast類
autocast(enable=True)`` 可以作為上下文管理器和裝飾器來使用,給算子自動安排按照 FP16 或者 FP32 的數(shù)值精度來操作。
2.1.1 autocast算子
PyTorch中,只有 CUDA 算子有資格被 autocast,而且只有 “out-of-place” 才可以被 autocast,例如:a.addmm(b, c)是可以被 autocast,但是a.addmm_(b, c)和a.addmm(b, c, out=d)不可以 autocast。amp autocast 成 FP16 的算子有:

autocast 成 FP32 的算子:
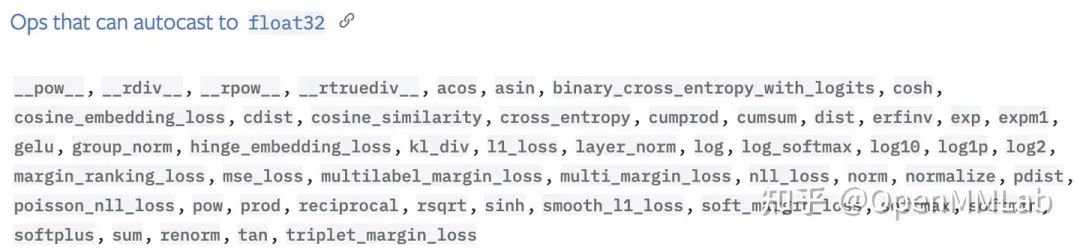
剩下沒有列出的算子,像dot,add,cat...都是按數(shù)據(jù)中較大的數(shù)值精度,進行操作,即有 FP32 參與計算,就按 FP32,全是 FP16 參與計算,就是 FP16。
2.1.2 MisMatch error
作為上下文管理器使用時,混合精度計算 enable 區(qū)域得到的 FP16 數(shù)值精度的變量在 enable 區(qū)域外需要顯式的轉(zhuǎn)成 FP32:
# Creates some tensors in default dtype (here assumed to be float32)
a_float32 = torch.rand((8, 8), device="cuda")
b_float32 = torch.rand((8, 8), device="cuda")
c_float32 = torch.rand((8, 8), device="cuda")
d_float32 = torch.rand((8, 8), device="cuda")

with autocast():
    # torch.mm is on autocast's list of ops that should run in float16.
    e_float16 = torch.mm(a_float32, b_float32)
    # Also handles mixed input types
    f_float16 = torch.mm(d_float32, e_float16)

# After exiting autocast, calls f_float16.float() to use with d_float32
g_float32 = torch.mm(d_float32, f_float16.float())
2.1.3 autocast 嵌套使用
# Creates some tensors in default dtype (here assumed to be float32)
a_float32 = torch.rand((8, 8), device="cuda")
b_float32 = torch.rand((8, 8), device="cuda")
c_float32 = torch.rand((8, 8), device="cuda")
d_float32 = torch.rand((8, 8), device="cuda")

with autocast():
    e_float16 = torch.mm(a_float32, b_float32)

    with autocast(enabled=False):

        f_float32 = torch.mm(c_float32, e_float16.float())

    g_float16 = torch.mm(d_float32, f_float32)
2.1.4 autocast 作為裝飾器
這種情況一般用于 data parallel 的模型的,autocast 設(shè)計為 “thread local” 的,所以只在 main thread 上設(shè) autocast 區(qū)域是不 work 的:
model = MyModel()
dp_model = nn.DataParallel(model)

with autocast():     # dp_model's internal threads won't autocast.
     #The main thread's autocast state has no effect.
     output = dp_model(input)     # loss_fn still autocasts, but it's too late...
     loss = loss_fn(output)
正確姿勢是對 forward 裝飾:
MyModel(nn.Module):
    ...
    @autocast()
    def forward(self, input):
       ...
另一個正確姿勢是在 forward 的里面設(shè) autocast 區(qū)域:
MyModel(nn.Module):
    ...
    def forward(self, input):
        with autocast():
            ...
forward 函數(shù)處理之后,在 main thread 里 autocast
model = MyModel()
dp_model = nn.DataParallel(model)

with autocast():
    output = dp_model(input)
    loss = loss_fn(output)
2.1.5 autocast 自定義函數(shù)
對于用戶自定義的 autograd 函數(shù),需要用amp.custom_fwd裝飾 forward 函數(shù),amp.custom_bwd裝飾 backward 函數(shù):
class MyMM(torch.autograd.Function):
    @staticmethod
    @custom_fwd
    def forward(ctx, a, b):
        ctx.save_for_backward(a, b)
        return a.mm(b)
    @staticmethod
    @custom_bwd
    def backward(ctx, grad):
        a, b = ctx.saved_tensors
        return grad.mm(b.t()), a.t().mm(grad)
調(diào)用時再 autocast
mymm = MyMM.apply

with autocast():
    output = mymm(input1, input2)
2.1.6 源碼分析
autocast主要實現(xiàn)接口有:
A.?__enter__
def __enter__(self):
    self.prev = torch.is_autocast_enabled()
    torch.set_autocast_enabled(self._enabled)
torch.autocast_increment_nesting()B.?__exit__
def __exit__(self, *args):

    if torch.autocast_decrement_nesting() == 0:
        torch.clear_autocast_cache()
    torch.set_autocast_enabled(self.prev)
return FalseC.?__call__
def __call__(self, func):
    @functools.wraps(func)
    def decorate_autocast(*args, **kwargs):
        with self:
            return func(*args, **kwargs)
return decorate_autocast其中torch.*autocast*函數(shù)是在 pytorch/aten/src/ATen/autocast_mode.cpp 里實現(xiàn)。PyTorch ATen 是 A TENsor library for C++11,ATen 部分有大量的代碼是來聲明和定義 Tensor 運算相關(guān)的邏輯的。autocast_mode.cpp?實現(xiàn)策略是 “ cache fp16 casts of fp32 model weights”。
2.2 GradScaler 類
torch.cuda.amp.GradScaler(init_scale=65536.0, growth_factor=2.0, backoff_factor=0.5, growth_interval=2000, enabled=True)用于動態(tài) scale 梯度
+.?init_scale: scale factor 的初始值 +.?growth_factor: 每次 scale factor 的增長系數(shù) +.?backoff_factor: scale factor 下降系數(shù) +.?growth_interval: 每隔多個 interval 增長 scale factor +.?enabled: 是否做 scale
2.2.1?scale(output)方法
對outputs乘 scale factor,并返回,如果enabled=False就原樣返回。
2.2.3?step(optimizer, *args, **kwargs)方法
step?方法在做兩件事情:
對梯度 unscale,如果之前沒有手動調(diào)用
unscale方法的話檢查梯度溢出,如果沒有
nan/inf,就執(zhí)行 optimizer 的 step,如果有就跳過
注意:GradScaler的step不支持傳 closure。
2.2.4?update(new_scale=None)方法
update方法在每個 iteration 結(jié)束前都需要調(diào)用,如果參數(shù)更新跳過,會給 scale factor 乘backoff_factor,或者到了該增長的 iteration,就給 scale factor 乘growth_factor。也可以用new_scale直接更新 scale factor。
2.3 舉例
2.3.1 Gradient clipping
scaler = GradScaler()

for epoch in epochs:
    for input, target in data:
        optimizer.zero_grad()
        with autocast():
            output = model(input)
            loss = loss_fn(output, target)
        scaler.scale(loss).backward()

        # unscale 梯度,可以不影響clip的threshold
        scaler.unscale_(optimizer)

        # clip梯度
        torch.nn.utils.clip_grad_norm_(model.parameters(), max_norm)

        # unscale_()已經(jīng)被顯式調(diào)用了,scaler正常執(zhí)行step更新參數(shù),有nan/inf也會跳過
        scaler.step(optimizer)
        scaler.update()
2.3.2 Gradient accumulation
scaler = GradScaler()

for epoch in epochs:
    for i, (input, target) in enumerate(data):
        with autocast():
            output = model(input)
            loss = loss_fn(output, target)
            # loss 根據(jù) 累加的次數(shù)歸一一下
            loss = loss / iters_to_accumulate

        # scale 歸一的loss 并backward
        scaler.scale(loss).backward()

        if (i + 1) % iters_to_accumulate == 0:
            # may unscale_ here if desired
            # (e.g., to allow clipping unscaled gradients)

            # step() and update() proceed as usual.
            scaler.step(optimizer)
            scaler.update()
            optimizer.zero_grad()
2.3.3. Gradient penalty
scaler = GradScaler()

for epoch in epochs:
    for input, target in data:
        optimizer.zero_grad()
        with autocast():
            output = model(input)
            loss = loss_fn(output, target)
        # 防止溢出,在不是autocast 區(qū)域,先用scaled loss 得到 scaled 梯度
        scaled_grad_params = torch.autograd.grad(outputs=scaler.scale(loss),
                                                 inputs=model.parameters(),
                                                 create_graph=True)
        # 梯度unscale
        inv_scale = 1./scaler.get_scale()
        grad_params = [p * inv_scale for p in scaled_grad_params]
        # 在autocast 區(qū)域,loss 加上梯度懲罰項
        with autocast():
            grad_norm = 0
            for grad in grad_params:
                grad_norm += grad.pow(2).sum()
            grad_norm = grad_norm.sqrt()
            loss = loss + grad_norm

        scaler.scale(loss).backward()

        # may unscale_ here if desired
        # (e.g., to allow clipping unscaled gradients)

        # step() and update() proceed as usual.
        scaler.step(optimizer)
        scaler.update()
2.3.4. Multiple models
scaler 一個就夠,但 scale(loss) 和 step(optimizer) 要分別執(zhí)行
scaler = torch.cuda.amp.GradScaler()

for epoch in epochs:
    for input, target in data:
        optimizer0.zero_grad()
        optimizer1.zero_grad()
        with autocast():
            output0 = model0(input)
            output1 = model1(input)
            loss0 = loss_fn(2 * output0 + 3 * output1, target)
            loss1 = loss_fn(3 * output0 - 5 * output1, target)

        # (retain_graph here is unrelated to amp, it's present because in this
        # example, both backward() calls share some sections of graph.)
        scaler.scale(loss0).backward(retain_graph=True)
        scaler.scale(loss1).backward()

        # You can choose which optimizers receive explicit unscaling, if you
        # want to inspect or modify the gradients of the params they own.
        scaler.unscale_(optimizer0)

        scaler.step(optimizer0)
        scaler.step(optimizer1)

        scaler.update()
2.3.5. Multiple GPUs
torch DDP 和 torch DP model 的處理方式一樣
Q1. amp 是如何做到 FP16 和 FP32 混合使用,“還不掉點”
模型量化、模型壓縮的算法挺多的,但都做不 amp 這樣,對多數(shù)模型訓(xùn)練不掉點(但是實操中,聽有經(jīng)驗的大神介紹,完全不到點還是有點難度的)。amp 能做成這樣,因為它對模型沒有壓縮和量化,維護的還是一個 32 位的模型。只是用 16 位去表示原來 32 位的梯度:通常模型訓(xùn)練依賴 FP32 的精度,因為梯度會有一部分 FP16 表示不了,而 scale factor 把梯度 shift 到 FP16 能表示范圍,使得梯度方面精度的損失較小,可能 forward 時候的直接的精度壓縮是訓(xùn)練最大的損失。
Q2. 沒有 Tensor Core 架構(gòu)能否使用 amp
沒有 Tensor Core 架構(gòu)的 GPU 試用 amp,速度反而下降,但顯存會明顯減少。作者在 Turing 架構(gòu)的 GTX 1660 上試用 amp,運算時間增加了一倍,但顯存不到原來的一半。
Q3. 為什么 amp 中有兩份參數(shù),存儲消耗反而更小
相比與模型參數(shù),對中間層結(jié)果的存儲更是 deep learning 的 bottleneck。當(dāng)對中間結(jié)果的存儲砍半,整個存儲消耗就基本上原來的一半。


推薦閱讀
谷歌提出Meta Pseudo Labels,刷新ImageNet上的SOTA!
漲點神器FixRes:兩次超越ImageNet數(shù)據(jù)集上的SOTA
CondInst:性能和速度均超越Mask RCNN的實例分割模型
mmdetection最小復(fù)刻版(十一):概率Anchor分配機制PAA深入分析
MMDetection新版本V2.7發(fā)布,支持DETR,還有YOLOV4在路上!
無需tricks,知識蒸餾提升ResNet50在ImageNet上準(zhǔn)確度至80%+
不妨試試MoCo,來替換ImageNet上pretrain模型!
mmdetection最小復(fù)刻版(七):anchor-base和anchor-free差異分析
mmdetection最小復(fù)刻版(四):獨家yolo轉(zhuǎn)化內(nèi)幕
機器學(xué)習(xí)算法工程師
? ??? ? ? ? ? ? ? ? ? ? ? ??????? ??一個用心的公眾號
?
