
「新生手冊」:PyTorch分布式訓練
點擊上方“程序員大白”,選擇“星標”公眾號
重磅干貨,第一時間送達


極市導讀
本文重點介紹了PyTorch原生的分布式數(shù)據(jù)并行(DDP) 及其用法。
目錄
0X01 分布式并行訓練概述
0X02 Pytorch分布式數(shù)據(jù)并行
0X03 手把手漸進式實戰(zhàn)
A. 單機單卡 B. 單機多卡DP C. 多機多卡DDP D. Launch / Slurm 調(diào)度方式 0X04 完整框架 Distribuuuu
0X05 Reference
文中所有教學代碼和日志見:Tutorialgithub.com
文中提到的框架見:Distribuuuugithub.com
希望本文對你有幫助
0X01 分布式并行訓練概述
最常被提起,容易實現(xiàn)且使用最廣泛的,莫過于數(shù)據(jù)并行(Data Parallelism) 技術(shù),其核心思想是將大batch劃分為若干小barch分發(fā)到不同device并行計算,解決單GPU顯存不足的限制。與此同時,當單GPU無法放下整個模型時,我們還需考慮 模型并行(Model / Pipeline Parallelism)。如考慮將模型進行縱向切割,不同的Layers放在不同的device上。或是將某些模塊進行橫向切割,通過矩陣運算進行加速。當然,還存在一些非并行的技術(shù)或者技巧,用于解決訓練效率或者訓練顯存不足等問題。
本文的重點是介紹PyTorch原生的分布式數(shù)據(jù)并行(DDP) 及其用法,其他的內(nèi)容,我們后面再聊(如果有機會的話qwq)。
這里我草率地將當前深度學習的大規(guī)模分布式訓練技術(shù)分為如下三類:
Data Parallelism (數(shù)據(jù)并行)
Naive:每個worker存儲一份model和optimizer,每輪迭代時,將樣本分為若干份分發(fā)給各個worker,實現(xiàn)并行計算 ZeRO: Zero Redundancy Optimizer,微軟提出的數(shù)據(jù)并行內(nèi)存優(yōu)化技術(shù),核心思想是保持Naive數(shù)據(jù)并行通信效率的同時,盡可能降低內(nèi)存占用(https://arxiv.org/abs/1910.02054) Model/Pipeline Parallelism (模型并行)
Naive: 縱向切割模型,將不同的layers放到不同的device上,按順序進行正/反向傳播(https://pytorch.org/tutorials/intermediate/model_parallel_tutorial.html) GPipe:小批量流水線方式的縱向切割模型并行(https://proceedings.neurips.cc/paper/2019/file/093f65e080a295f8076b1c5722a46aa2-Paper.pdf) Megatron-LM:Tensor-slicing方式的模型并行加速(https://github.com/NVIDIA/Megatron-LM) Non-parallelism approach (非并行技術(shù))
Gradient Accumulation: 通過梯度累加的方式解決顯存不足的問題,常用于模型較大,單卡只能塞下很小的batch的并行訓練中(https://www.zhihu.com/question/303070254) CPU Offload: 同時利用 CPU 和 GPU 內(nèi)存來訓練大型模型,即存在GPU-CPU-GPU的 transfers操作(https://www.deepspeed.ai/tutorials/zero-offload/) etc.:還有很多不一一羅列(如Checkpointing, Memory Efficient Optimizer等)
不過這里我 強推 一下 DeepSpeed,微軟在2020年開源的一個對PyTorch的分布式訓練進行優(yōu)化的庫,讓訓練百億參數(shù)的巨大模型成為可能,其提供的 3D-parallelism (DP+PP+MP)的并行技術(shù)組合,能極大程度降低大模型訓練的硬件條件以及提高訓練的效率
0X02 Pytorch分布式數(shù)據(jù)并行
將時間撥回2017年,我第一次接觸深度學習,早期的TensorFlow使用的是PS(Parameter Server)架構(gòu),在結(jié)點數(shù)量線性增長的情況下,帶寬瓶頸格外明顯。而隨后百度將Ring-Allreduce技術(shù)運用到深度學習分布式訓練,PyTorch1.0之后香起來的原因也是因為在分布式訓練方面做了較大改動,適配多種通信后端,使用RingAllReduce架構(gòu)。
小提醒 ? ,確保你對PyTorch有一定的熟悉程度,此前提下,對如下內(nèi)容進行學習和了解,基本上就能夠handle住大部分的數(shù)據(jù)并行任務(wù)了:
DataParallel 和 DistributedDataParallel 的原理和使用 進程組 和 torch.distributed.init_process_group 的原理和使用 集體通信(Collective Communication) 的原理和使用
關(guān)于理論的東西,我寫了一大堆,最后又全刪掉了。原因是我發(fā)現(xiàn)已經(jīng)有足夠多的文章介紹 PS/Ring-AllReduce 和 PyTorch DP/DDP 的原理,給出具有代表性的幾篇:
PYTORCH DISTRIBUTED OVERVIEW(https://pytorch.org/tutorials/beginner/dist_overview.html) PyTorch 源碼解讀之 DP & DDP(https://zhuanlan.zhihu.com/p/343951042) Bringing HPC Techniques to Deep Learning(https://andrew.gibiansky.com/blog/machine-learning/baidu-allreduce/)
0X03 手把手漸進式實戰(zhàn)
那么接下來我們以Step by Step的方式進行實踐,你可以直接通過下面的快速索引進行跳轉(zhuǎn),大部分的解釋都包含在代碼中,每份代碼最后也有使用說明和訓練Log記錄:
單機單卡 [snsc.py] https://github.com/BIGBALLON/distribuuuu/blob/master/tutorial/snsc.py
單機多卡 (with DataParallel) [snmc_dp.py] https://github.com/BIGBALLON/distribuuuu/blob/master/tutorial/snmc_dp.py
多機多卡 (with DistributedDataParallel)
torch.distributed.launch [mnmc_ddp_launch.py] https://github.com/BIGBALLON/distribuuuu/blob/master/tutorial/mnmc_ddp_launch.py torch.multiprocessing [mnmc_ddp_mp.py] https://github.com/BIGBALLON/distribuuuu/blob/master/tutorial/mnmc_ddp_mp.py Slurm Workload Manager [mnmc_ddp_slurm.py] https://github.com/BIGBALLON/distribuuuu/blob/master/tutorial/mnmc_ddp_slurm.py ImageNet training example [imagenet.py] https://github.com/BIGBALLON/distribuuuu/blob/master/tutorial/imagenet.py
A. 單機單卡
Single Node Single GPU Card Training, 源碼見 snsc.py,后續(xù)我們會在此代碼上進行修改。簡單看一下,單機單卡要做的就是定義網(wǎng)絡(luò),定義dataloader,定義loss和optimizer,開訓,很簡單的幾個步驟。
"""(SNSC) Single Node Single GPU Card Training"""import torchimport torch.nn as nnimport torchvisionimport torchvision.transforms as transformsBATCH_SIZE = 256EPOCHS = 5if __name__ == "__main__":# 1. define networkdevice = "cuda"net = torchvision.models.resnet18(num_classes=10)net = net.to(device=device)# 2. define dataloadertrainset = torchvision.datasets.CIFAR10(root="./data",train=True,download=True,transform=transforms.Compose([transforms.RandomCrop(32, padding=4),transforms.RandomHorizontalFlip(),transforms.ToTensor(),transforms.Normalize((0.4914, 0.4822, 0.4465), (0.2023, 0.1994, 0.2010)),]),)train_loader = torch.utils.data.DataLoader(trainset,batch_size=BATCH_SIZE,shuffle=True,num_workers=4,pin_memory=True,)# 3. define loss and optimizercriterion = nn.CrossEntropyLoss()optimizer = torch.optim.SGD(net.parameters(),lr=0.01,momentum=0.9,weight_decay=0.0001,nesterov=True,)print(" ======= Training ======= \n")# 4. start to trainnet.train()for ep in range(1, EPOCHS + 1):train_loss = correct = total = 0for idx, (inputs, targets) in enumerate(train_loader):inputs, targets = inputs.to(device), targets.to(device)outputs = net(inputs)loss = criterion(outputs, targets)optimizer.zero_grad()loss.backward()optimizer.step()train_loss += loss.item()total += targets.size(0)correct += torch.eq(outputs.argmax(dim=1), targets).sum().item()if (idx + 1) % 50 == 0 or (idx + 1) == len(train_loader):print(" == step: [{:3}/{}] [{}/{}] | loss: {:.3f} | acc: {:6.3f}%".format(idx + 1,len(train_loader),ep,EPOCHS,train_loss / (idx + 1),100.0 * correct / total,))print("\n ======= Training Finished ======= \n")"""usage:python snsc.pyFiles already downloaded and verified======= Training ========= step: [ 50/196] [1/5] | loss: 1.959 | acc: 28.633%== step: [100/196] [1/5] | loss: 1.806 | acc: 33.996%== step: [150/196] [1/5] | loss: 1.718 | acc: 36.987%== step: [196/196] [1/5] | loss: 1.658 | acc: 39.198%== step: [ 50/196] [2/5] | loss: 1.393 | acc: 49.578%== step: [100/196] [2/5] | loss: 1.359 | acc: 50.473%== step: [150/196] [2/5] | loss: 1.336 | acc: 51.372%== step: [196/196] [2/5] | loss: 1.317 | acc: 52.200%== step: [ 50/196] [3/5] | loss: 1.205 | acc: 56.102%== step: [100/196] [3/5] | loss: 1.185 | acc: 57.254%== step: [150/196] [3/5] | loss: 1.175 | acc: 57.755%== step: [196/196] [3/5] | loss: 1.165 | acc: 58.072%== step: [ 50/196] [4/5] | loss: 1.067 | acc: 60.914%== step: [100/196] [4/5] | loss: 1.061 | acc: 61.406%== step: [150/196] [4/5] | loss: 1.058 | acc: 61.643%== step: [196/196] [4/5] | loss: 1.054 | acc: 62.022%== step: [ 50/196] [5/5] | loss: 0.988 | acc: 64.852%== step: [100/196] [5/5] | loss: 0.983 | acc: 64.801%== step: [150/196] [5/5] | loss: 0.980 | acc: 65.052%== step: [196/196] [5/5] | loss: 0.977 | acc: 65.076%======= Training Finished ======="""
B. 單機多卡DP
Single Node Multi-GPU Crads Training (with DataParallel),源碼見 snmc_dp.py, 和 snsc.py 對比一下,DP只需要花費最小的代價,既可以使用多卡進行訓練(其實就一行???),但是因為GIL鎖的限制,DP的性能是低于DDP的。
"""(SNMC) Single Node Multi-GPU Crads Training (with DataParallel)Try to compare with smsc.py and find out the differences."""import torchimport torch.nn as nnimport torchvisionimport torchvision.transforms as transformsBATCH_SIZE = 256EPOCHS = 5if __name__ == "__main__":# 1. define networkdevice = "cuda"net = torchvision.models.resnet18(pretrained=False, num_classes=10)net = net.to(device=device)# Use single-machine multi-GPU DataParallel,# you would like to speed up training with the minimum code change.net = nn.DataParallel(net)# 2. define dataloadertrainset = torchvision.datasets.CIFAR10(root="./data",train=True,download=True,transform=transforms.Compose([transforms.RandomCrop(32, padding=4),transforms.RandomHorizontalFlip(),transforms.ToTensor(),transforms.Normalize((0.4914, 0.4822, 0.4465), (0.2023, 0.1994, 0.2010)),]),)train_loader = torch.utils.data.DataLoader(trainset,batch_size=BATCH_SIZE,shuffle=True,num_workers=4,pin_memory=True,)# 3. define loss and optimizercriterion = nn.CrossEntropyLoss()optimizer = torch.optim.SGD(net.parameters(),lr=0.01,momentum=0.9,weight_decay=0.0001,nesterov=True,)print(" ======= Training ======= \n")# 4. start to trainnet.train()for ep in range(1, EPOCHS + 1):train_loss = correct = total = 0for idx, (inputs, targets) in enumerate(train_loader):inputs, targets = inputs.to(device), targets.to(device)outputs = net(inputs)loss = criterion(outputs, targets)optimizer.zero_grad()loss.backward()optimizer.step()train_loss += loss.item()total += targets.size(0)correct += torch.eq(outputs.argmax(dim=1), targets).sum().item()if (idx + 1) % 50 == 0 or (idx + 1) == len(train_loader):print(" == step: [{:3}/{}] [{}/{}] | loss: {:.3f} | acc: {:6.3f}%".format(idx + 1,len(train_loader),ep,EPOCHS,train_loss / (idx + 1),100.0 * correct / total,))print("\n ======= Training Finished ======= \n")"""usage: 2GPUs for trainingCUDA_VISIBLE_DEVICES=0,1 python snmc_dp.pyFiles already downloaded and verified======= Training ========= step: [ 50/196] [1/5] | loss: 1.992 | acc: 26.633%== step: [100/196] [1/5] | loss: 1.834 | acc: 32.797%== step: [150/196] [1/5] | loss: 1.742 | acc: 36.201%== step: [196/196] [1/5] | loss: 1.680 | acc: 38.578%== step: [ 50/196] [2/5] | loss: 1.398 | acc: 49.062%== step: [100/196] [2/5] | loss: 1.380 | acc: 49.953%== step: [150/196] [2/5] | loss: 1.355 | acc: 50.810%== step: [196/196] [2/5] | loss: 1.338 | acc: 51.428%== step: [ 50/196] [3/5] | loss: 1.242 | acc: 55.727%== step: [100/196] [3/5] | loss: 1.219 | acc: 56.801%== step: [150/196] [3/5] | loss: 1.200 | acc: 57.195%== step: [196/196] [3/5] | loss: 1.193 | acc: 57.328%== step: [ 50/196] [4/5] | loss: 1.105 | acc: 61.102%== step: [100/196] [4/5] | loss: 1.098 | acc: 61.082%== step: [150/196] [4/5] | loss: 1.087 | acc: 61.354%== step: [196/196] [4/5] | loss: 1.086 | acc: 61.426%== step: [ 50/196] [5/5] | loss: 1.002 | acc: 64.039%== step: [100/196] [5/5] | loss: 1.006 | acc: 63.977%== step: [150/196] [5/5] | loss: 1.009 | acc: 63.935%== step: [196/196] [5/5] | loss: 1.005 | acc: 64.024%======= Training Finished ======="""
C. 多機多卡DDP
Okay, 下面進入正題,來看一下多機多卡怎么做,雖然上面給出的文章都講得很明白,但有些概念還是有必要提一下:
進程組的相關(guān)概念
GROUP:進程組,大部分情況下DDP的各個進程是在同一個進程組下 WORLD_SIZE:總的進程數(shù)量 (原則上一個process占用一個GPU是較優(yōu)的) RANK:當前進程的序號,用于進程間通訊,rank = 0 的主機為 master 節(jié)點 LOCAL_RANK:當前進程對應(yīng)的GPU號
舉個栗子 :4臺機器(每臺機器8張卡)進行分布式訓練
通過 init_process_group() 對進程組進行初始化
初始化后 可以通過 get_world_size() 獲取到 world size
在該例中為32, 即有32個進程,其編號為0-31<br/>通過 get_rank() 函數(shù)可以進行獲取 在每臺機器上,local rank均為0-8,這是 local rank 與 rank 的區(qū)別, local rank 會對應(yīng)到實際的 GPU ID 上
(單機多任務(wù)的情況下注意CUDA_VISIBLE_DEVICES的使用
控制不同程序可見的GPU devices)
DDP的基本用法 (代碼編寫流程)
使用 torch.distributed.init_process_group 初始化進程組 使用 torch.nn.parallel.DistributedDataParallel 創(chuàng)建 分布式模型 使用 torch.utils.data.distributed.DistributedSampler 創(chuàng)建 DataLoader 調(diào)整其他必要的地方(tensor放到指定device上,S/L checkpoint,指標計算等) 使用 torch.distributed.launch / torch.multiprocessing 或 slurm 開始訓練 集體通信的使用
torch.distributed NCCL-Woolley scaled_all_reduce 將各卡的信息進行匯總,分發(fā)或平均等操作,需要使用集體通訊操作(如算accuracy或者總loss時候需要用到allreduce),可參考:
不同啟動方式的用法
torch.distributed.launch:mnmc_ddp_launch.py torch.multiprocessing:mnmc_ddp_mp.py Slurm Workload Manager:mnmc_ddp_slurm.py
"""(MNMC) Multiple Nodes Multi-GPU Cards Trainingwith DistributedDataParallel and torch.distributed.launchTry to compare with [snsc.py, snmc_dp.py & mnmc_ddp_mp.py] and find out the differences."""import osimport torchimport torch.distributed as distimport torch.nn as nnimport torchvisionimport torchvision.transforms as transformsfrom torch.nn.parallel import DistributedDataParallel as DDPBATCH_SIZE = 256EPOCHS = 5if __name__ == "__main__":# 0. set up distributed devicerank = int(os.environ["RANK"])local_rank = int(os.environ["LOCAL_RANK"])torch.cuda.set_device(rank % torch.cuda.device_count())dist.init_process_group(backend="nccl")device = torch.device("cuda", local_rank)print(f"[init] == local rank: {local_rank}, global rank: {rank} ==")# 1. define networknet = torchvision.models.resnet18(pretrained=False, num_classes=10)net = net.to(device)# DistributedDataParallelnet = DDP(net, device_ids=[local_rank], output_device=local_rank)# 2. define dataloadertrainset = torchvision.datasets.CIFAR10(root="./data",train=True,download=False,transform=transforms.Compose([transforms.RandomCrop(32, padding=4),transforms.RandomHorizontalFlip(),transforms.ToTensor(),transforms.Normalize((0.4914, 0.4822, 0.4465), (0.2023, 0.1994, 0.2010)),]),)# DistributedSampler# we test single Machine with 2 GPUs# so the [batch size] for each process is 256 / 2 = 128train_sampler = torch.utils.data.distributed.DistributedSampler(trainset,shuffle=True,)train_loader = torch.utils.data.DataLoader(trainset,batch_size=BATCH_SIZE,num_workers=4,pin_memory=True,sampler=train_sampler,)# 3. define loss and optimizercriterion = nn.CrossEntropyLoss()optimizer = torch.optim.SGD(net.parameters(),lr=0.01 * 2,momentum=0.9,weight_decay=0.0001,nesterov=True,)if rank == 0:print(" ======= Training ======= \n")# 4. start to trainnet.train()for ep in range(1, EPOCHS + 1):train_loss = correct = total = 0# set samplertrain_loader.sampler.set_epoch(ep)for idx, (inputs, targets) in enumerate(train_loader):inputs, targets = inputs.to(device), targets.to(device)outputs = net(inputs)loss = criterion(outputs, targets)optimizer.zero_grad()loss.backward()optimizer.step()train_loss += loss.item()total += targets.size(0)correct += torch.eq(outputs.argmax(dim=1), targets).sum().item()if rank == 0 and ((idx + 1) % 25 == 0 or (idx + 1) == len(train_loader)):print(" == step: [{:3}/{}] [{}/{}] | loss: {:.3f} | acc: {:6.3f}%".format(idx + 1,len(train_loader),ep,EPOCHS,train_loss / (idx + 1),100.0 * correct / total,))if rank == 0:print("\n ======= Training Finished ======= \n")"""usage:>>> python -m torch.distributed.launch --helpexmaple: 1 node, 4 GPUs per node (4GPUs)>>> python -m torch.distributed.launch \--nproc_per_node=4 \--nnodes=1 \--node_rank=0 \--master_addr=localhost \--master_port=22222 \mnmc_ddp_launch.py[init] == local rank: 3, global rank: 3 ==[init] == local rank: 1, global rank: 1 ==[init] == local rank: 0, global rank: 0 ==[init] == local rank: 2, global rank: 2 ========= Training ========= step: [ 25/49] [0/5] | loss: 1.980 | acc: 27.953%== step: [ 49/49] [0/5] | loss: 1.806 | acc: 33.816%== step: [ 25/49] [1/5] | loss: 1.464 | acc: 47.391%== step: [ 49/49] [1/5] | loss: 1.420 | acc: 48.448%== step: [ 25/49] [2/5] | loss: 1.300 | acc: 52.469%== step: [ 49/49] [2/5] | loss: 1.274 | acc: 53.648%== step: [ 25/49] [3/5] | loss: 1.201 | acc: 56.547%== step: [ 49/49] [3/5] | loss: 1.185 | acc: 57.360%== step: [ 25/49] [4/5] | loss: 1.129 | acc: 59.531%== step: [ 49/49] [4/5] | loss: 1.117 | acc: 59.800%======= Training Finished =======exmaple: 1 node, 2tasks, 4 GPUs per task (8GPUs)>>> CUDA_VISIBLE_DEVICES=0,1,2,3 python -m torch.distributed.launch \--nproc_per_node=4 \--nnodes=2 \--node_rank=0 \--master_addr="10.198.189.10" \--master_port=22222 \mnmc_ddp_launch.py>>> CUDA_VISIBLE_DEVICES=4,5,6,7 python -m torch.distributed.launch \--nproc_per_node=4 \--nnodes=2 \--node_rank=1 \--master_addr="10.198.189.10" \--master_port=22222 \mnmc_ddp_launch.py======= Training ========= step: [ 25/25] [0/5] | loss: 1.932 | acc: 29.088%== step: [ 25/25] [1/5] | loss: 1.546 | acc: 43.088%== step: [ 25/25] [2/5] | loss: 1.424 | acc: 48.032%== step: [ 25/25] [3/5] | loss: 1.335 | acc: 51.440%== step: [ 25/25] [4/5] | loss: 1.243 | acc: 54.672%======= Training Finished =======exmaple: 2 node, 8 GPUs per node (16GPUs)>>> python -m torch.distributed.launch \--nproc_per_node=8 \--nnodes=2 \--node_rank=0 \--master_addr="10.198.189.10" \--master_port=22222 \mnmc_ddp_launch.py>>> python -m torch.distributed.launch \--nproc_per_node=8 \--nnodes=2 \--node_rank=1 \--master_addr="10.198.189.10" \--master_port=22222 \mnmc_ddp_launch.py[init] == local rank: 5, global rank: 5 ==[init] == local rank: 3, global rank: 3 ==[init] == local rank: 2, global rank: 2 ==[init] == local rank: 4, global rank: 4 ==[init] == local rank: 0, global rank: 0 ==[init] == local rank: 6, global rank: 6 ==[init] == local rank: 7, global rank: 7 ==[init] == local rank: 1, global rank: 1 ========= Training ========= step: [ 13/13] [0/5] | loss: 2.056 | acc: 23.776%== step: [ 13/13] [1/5] | loss: 1.688 | acc: 36.736%== step: [ 13/13] [2/5] | loss: 1.508 | acc: 44.544%== step: [ 13/13] [3/5] | loss: 1.462 | acc: 45.472%== step: [ 13/13] [4/5] | loss: 1.357 | acc: 49.344%======= Training Finished ======="""
D. Launch / Slurm 調(diào)度方式
這里單獨用代碼 imagenet.py 講一下不同的啟動方式,更詳細的內(nèi)容請看源碼。
我們來看一下這個 setup_distributed 函數(shù):
通過 srun 產(chǎn)生的程序在環(huán)境變量中會有 SLURM_JOB_ID, 以判斷是否為slurm的調(diào)度方式 rank 通過 SLURM_PROCID 可以拿到 world size 實際上就是進程數(shù), 通過 SLURM_NTASKS 可以拿到 IP地址通過 subprocess.getoutput(f"scontrol show hostname {node_list} | head -n1")巧妙得到,栗子來源于 MMCV否則,就使用launch進行調(diào)度,直接通過 os.environ["RANK"] 和 os.environ["WORLD_SIZE"] 即可拿到 rank 和 world size
# 此函數(shù)可以直接移植到你的程序中,動態(tài)獲取IP,使用很方便# 默認支持launch 和 srun 兩種方式def setup_distributed(backend="nccl", port=None):"""Initialize distributed training environment.support both slurm and torch.distributed.launchsee torch.distributed.init_process_group() for more details"""num_gpus = torch.cuda.device_count()if "SLURM_JOB_ID" in os.environ:rank = int(os.environ["SLURM_PROCID"])world_size = int(os.environ["SLURM_NTASKS"])node_list = os.environ["SLURM_NODELIST"]addr = subprocess.getoutput(f"scontrol show hostname {node_list} | head -n1")# specify master portif port is not None:os.environ["MASTER_PORT"] = str(port)elif "MASTER_PORT" not in os.environ:os.environ["MASTER_PORT"] = "29500"if "MASTER_ADDR" not in os.environ:os.environ["MASTER_ADDR"] = addros.environ["WORLD_SIZE"] = str(world_size)os.environ["LOCAL_RANK"] = str(rank % num_gpus)os.environ["RANK"] = str(rank)else:rank = int(os.environ["RANK"])world_size = int(os.environ["WORLD_SIZE"])torch.cuda.set_device(rank % num_gpus)dist.init_process_group(backend=backend,world_size=world_size,rank=rank,)
那提交任務(wù)就可以靈活切換,下面給出32卡使用Slurm調(diào)度,以及8卡單結(jié)點的Launch調(diào)度:
slurm example:32GPUs (batch size: 8192)128k / (256*32) -> 157 itertaion>>> srun --partition=openai -n32 --gres=gpu:8 --ntasks-per-node=8 --job-name=slrum_test \python -u imagenet.py[] == local rank: 7, global rank: 7 ==[] == local rank: 1, global rank: 1 ==[] == local rank: 4, global rank: 4 ==[] == local rank: 2, global rank: 2 ==[] == local rank: 6, global rank: 6 ==[] == local rank: 3, global rank: 3 ==[] == local rank: 5, global rank: 5 ==[] == local rank: 4, global rank: 12 ==[] == local rank: 1, global rank: 25 ==[] == local rank: 5, global rank: 13 ==[] == local rank: 6, global rank: 14 ==[] == local rank: 0, global rank: 8 ==[] == local rank: 1, global rank: 9 ==[] == local rank: 2, global rank: 10 ==[] == local rank: 3, global rank: 11 ==[] == local rank: 7, global rank: 15 ==[] == local rank: 5, global rank: 29 ==[] == local rank: 2, global rank: 26 ==[] == local rank: 3, global rank: 27 ==[] == local rank: 0, global rank: 24 ==[] == local rank: 7, global rank: 31 ==[] == local rank: 6, global rank: 30 ==[] == local rank: 4, global rank: 28 ==[] == local rank: 0, global rank: 16 ==[] == local rank: 5, global rank: 21 ==[] == local rank: 7, global rank: 23 ==[] == local rank: 1, global rank: 17 ==[] == local rank: 6, global rank: 22 ==[] == local rank: 3, global rank: 19 ==[] == local rank: 2, global rank: 18 ==[] == local rank: 4, global rank: 20 ==[] == local rank: 0, global rank: 0 ========= Training ========= step: [ 40/157] [0/1] | loss: 6.781 | acc: 0.703%== step: [ 80/157] [0/1] | loss: 6.536 | acc: 1.260%== step: [120/157] [0/1] | loss: 6.353 | acc: 1.875%== step: [157/157] [0/1] | loss: 6.207 | acc: 2.465%distributed.launch example:8GPUs (batch size: 2048)128k / (256*8) -> 626 itertaion>>> python -m torch.distributed.launch \--nproc_per_node=8 \--nnodes=1 \--node_rank=0 \--master_addr=localhost \--master_port=22222 \imagenet.py[] == local rank: 0, global rank: 0 ==[] == local rank: 2, global rank: 2 ==[] == local rank: 6, global rank: 6 ==[] == local rank: 5, global rank: 5 ==[] == local rank: 7, global rank: 7 ==[] == local rank: 4, global rank: 4 ==[] == local rank: 3, global rank: 3 ==[] == local rank: 1, global rank: 1 ========= Training ========= step: [ 40/626] [0/1] | loss: 6.821 | acc: 0.498%== step: [ 80/626] [0/1] | loss: 6.616 | acc: 0.869%== step: [120/626] [0/1] | loss: 6.448 | acc: 1.351%== step: [160/626] [0/1] | loss: 6.294 | acc: 1.868%== step: [200/626] [0/1] | loss: 6.167 | acc: 2.443%== step: [240/626] [0/1] | loss: 6.051 | acc: 3.003%== step: [280/626] [0/1] | loss: 5.952 | acc: 3.457%== step: [320/626] [0/1] | loss: 5.860 | acc: 3.983%== step: [360/626] [0/1] | loss: 5.778 | acc: 4.492%== step: [400/626] [0/1] | loss: 5.700 | acc: 4.960%== step: [440/626] [0/1] | loss: 5.627 | acc: 5.488%== step: [480/626] [0/1] | loss: 5.559 | acc: 6.013%== step: [520/626] [0/1] | loss: 5.495 | acc: 6.520%== step: [560/626] [0/1] | loss: 5.429 | acc: 7.117%== step: [600/626] [0/1] | loss: 5.371 | acc: 7.580%== step: [626/626] [0/1] | loss: 5.332 | acc: 7.907%
0X04 完整框架 Distribuuuu
Distribuuuu 是我閑(沒)來(事)無(找)事(事)寫的一個完整的純DDP分類訓練框架,足夠精簡且足夠有效率。支持launch和srun兩種啟動方式,可以作為新手學習和魔改的樣板工程。
# 1 node, 8 GPUspython -m torch.distributed.launch \--nproc_per_node=8 \--nnodes=1 \--node_rank=0 \--master_addr=localhost \--master_port=29500 \train_net.py --cfg config/resnet18.yaml# see srun --help# and https://slurm.schedmd.com/ for details# example: 64 GPUs# batch size = 64 * 128 = 8192# itertaion = 128k / 8192 = 156# lr = 64 * 0.1 = 6.4srun --partition=openai-a100 \-n 64 \--gres=gpu:8 \--ntasks-per-node=8 \--job-name=Distribuuuu \python -u train_net.py --cfg config/resnet18.yaml \TRAIN.BATCH_SIZE 128 \OUT_DIR ./resnet18_8192bs \OPTIM.BASE_LR 6.4
下面是用 Distribuuuu 做的一些簡單的實驗,botnet50 是復現(xiàn)了今年比較火的 Transformer+CNN 的文章 Bottleneck Transformers for Visual 的精度,主要是證明這個框架的可用性, resnet18最后小測了 64卡/16384BS 的訓練, 精度尚可。另外稍微強調(diào)一下SyncBN不要隨便亂用,如果單卡Batch已經(jīng)足夠大的情況下不需要開SyncBN。
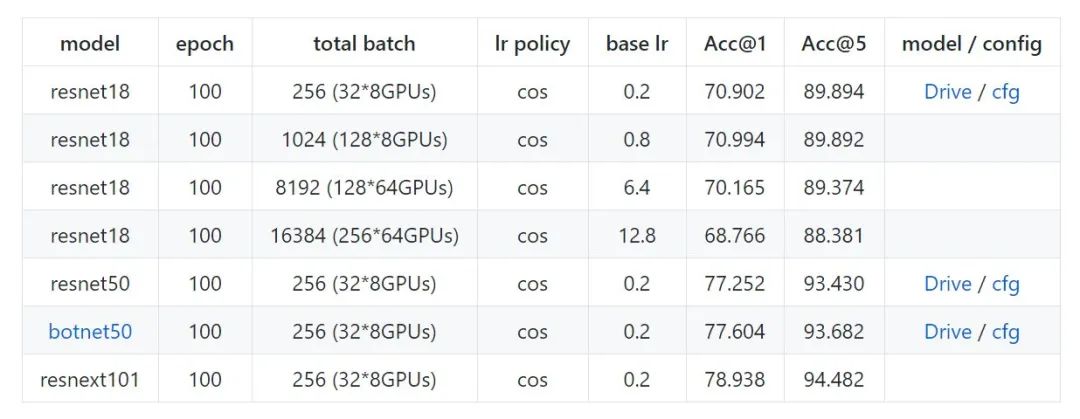
Distribuuuu benchmark (ImageNet)
如果是出于學習目的,想進行一些魔改和測試,可以試試我的Distribuuuu(https://github.com/BIGBALLON/distribuuuu),因為足夠簡單很容易改吖 ,如果你想做research的話推薦用FAIR的 pycls, 有model zoo 而且代碼足夠優(yōu)雅。另外,打比賽的話就不建議自己造輪子了,分類可直接魔改 pycls 或 MMClassification, 檢測就魔改 MMDetection 和 Detectron2 就完事啦
Reference
PYTORCH DISTRIBUTED OVERVIEW PyTorch 源碼解讀之 DP & DDP Bringing HPC Techniques to Deep Learning Parameter Servers Ring-Allreduce:Launching and configuring distributed data parallel applications PyTorch Distributed Training Kill PyTorch Distributed Training Processes NCCL: ACCELERATED MULTI-GPUCOLLECTIVE COMMUNICATIONS WRITING DISTRIBUTED APPLICATIONS WITH PYTORCH PyTorch Distributed: Experiences on Accelerating Data Parallel Training Pytorch多機多卡分布式訓練 Launching and configuring distributed data parallel applications
推薦閱讀
國產(chǎn)小眾瀏覽器因屏蔽視頻廣告,被索賠100萬(后續(xù))
年輕人“不講武德”:因看黃片上癮,把網(wǎng)站和786名女主播起訴了
關(guān)于程序員大白
程序員大白是一群哈工大,東北大學,西湖大學和上海交通大學的碩士博士運營維護的號,大家樂于分享高質(zhì)量文章,喜歡總結(jié)知識,歡迎關(guān)注[程序員大白],大家一起學習進步!