
從 0 到 1 帶你搭建 Java 并發(fā)爬蟲框架(全文)
溫馨提示:有效閱讀本文大概需要15min
文章目錄
前言
爬蟲的原理與流程
爬蟲框架搭建
一、新建 Spring Boot 項(xiàng)目
二、免費(fèi)代理服務(wù)
三、HTTP 請求封裝
四、業(yè)務(wù)爬取邏輯
五、云數(shù)據(jù)庫
六、任務(wù)調(diào)度
前言
“數(shù)據(jù)是新一輪技術(shù)革命最重要的生產(chǎn)資料”,在互聯(lián)網(wǎng)行業(yè)可以近似的說擁有了數(shù)據(jù)就擁有了市場。爬蟲在互聯(lián)網(wǎng)上無處不在,國內(nèi)外的各大搜索引擎都是基于爬蟲抓取信息后檢索的,所以說 “互聯(lián)網(wǎng)上 50% 的流量都是爬蟲創(chuàng)造的” 這一點(diǎn)都不為過。近 2 年爬蟲技術(shù)跟隨著大數(shù)據(jù)的火熱逐漸從臺后走到臺前,被越來越多的人所熟知,也被應(yīng)用的越來越廣泛,小到個(gè)人利用爬蟲抓取數(shù)據(jù)分析建模,大到利用爬蟲構(gòu)建公司的內(nèi)容和數(shù)據(jù)生態(tài)圈。所以爬蟲已經(jīng)成為一門 “平民化” 的技術(shù),大家在工作和學(xué)習(xí)中都有用得著的地方。
爬蟲的原理與流程
本場 Chat 重點(diǎn)是要講述如何構(gòu)建爬蟲框架,但考慮到大家的對爬蟲的了解程度不同,所以還是稍微帶一下爬蟲的原理和流程。
爬蟲的原理其實(shí)很簡單,其實(shí)跟在瀏覽器中輸入一串 URL 地址并按下回車鍵后發(fā)生的事情是一樣的(對于這個(gè)問題的理解有興趣的童鞋可以參看:在瀏覽器中輸入 URL 地址并回車后都發(fā)生了什么?),只不過爬蟲的這些操作是用代碼來實(shí)現(xiàn)的。
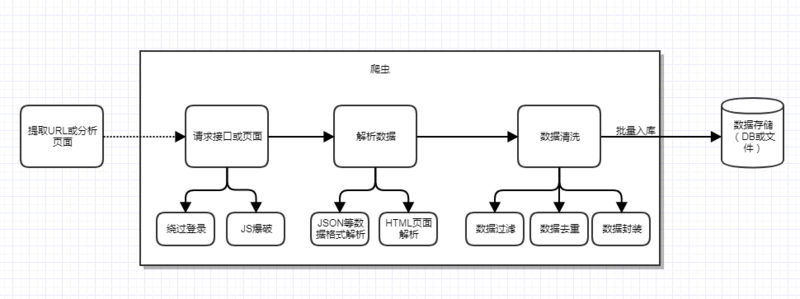
爬蟲的主要目的就是爬取目標(biāo)數(shù)據(jù),但是為了達(dá)到這個(gè)目的,還需要很多輔助工作要做,比如前期的目標(biāo) URL 提取或頁面分析,繞過登錄限制,以及爬蟲身份的隱藏、爬蟲的調(diào)度和容錯(cuò)處理等,還有最后的數(shù)據(jù)清洗和入庫。一個(gè)完整的爬蟲程序應(yīng)該是包含分析、爬取到入庫等一系列流程的,為了直觀我就畫一個(gè)圖來表示:
當(dāng)然上面只是一個(gè)單線的爬蟲流程,如果考慮到分布式和并發(fā)功能等,還需要繼續(xù)加上任務(wù)調(diào)度功能。比如前期已經(jīng)解析出了 URL,并發(fā)現(xiàn)了 URL 的數(shù)據(jù)分頁關(guān)系,假定用 pageNumber 來表示分頁 index,那么完全可以一次并發(fā) 10 個(gè)線程去跑 10 個(gè)任務(wù),每個(gè)任務(wù)就是爬取指定 URL 的的數(shù)據(jù),這樣就可以大大提高爬取效率。
此外,前面還提到過容錯(cuò)處理,這里也說明一下,爬蟲在爬取過程中有時(shí)可能會遇到突發(fā)異常,比如目標(biāo)服務(wù)器異常、網(wǎng)絡(luò)異常、對方實(shí)施了反扒策略等,這種情況我們也需要分別考慮到,通常需要加入重試機(jī)制,你可以自己定義什么類型的異常需要加入重試,比如請求失敗,這可能被對方屏蔽了,也可能網(wǎng)絡(luò)出現(xiàn)了震蕩。所以這時(shí)候重試 2 次看看,如果重試還是失敗,那么就可以放棄這次爬取任務(wù)了,你可以將失敗的任務(wù)記錄下來,后面等空閑或等實(shí)現(xiàn)失敗任務(wù)定時(shí)調(diào)度功能,等待下一次的再次調(diào)度;并設(shè)置一個(gè)最大的調(diào)度失敗次數(shù)(比如 3),超過這個(gè)次數(shù),移除這個(gè)任務(wù),以后都不用考慮了。
另外對于頁面數(shù)據(jù)解析,要分 2 種情況,提取的種子 URL 請求后返回的是 JSON 或 XML 格式的,直接用 FastJson 來解析 JSON 即可,可是通常沒有這么方便,很多時(shí)候需要我們?nèi)ソ馕鲰撁娴?HTML 文檔,這時(shí)候就需要用到 jsoup 來解析頁面,從而拿到我們需要的數(shù)據(jù)。這些流程中具體的功能和問題都會在后面的框架搭建時(shí)體現(xiàn)。
爬蟲框架搭建
主體框架采用現(xiàn)在比較火熱的微服務(wù)框架 Spring Boot,HTTP 請求部分基于 HttpClient 封裝,頁面解析部分使用 FastJson + jsoup,數(shù)據(jù)儲存采用 Bmob 后端云數(shù)據(jù)庫。項(xiàng)目的整體架構(gòu)如下圖:
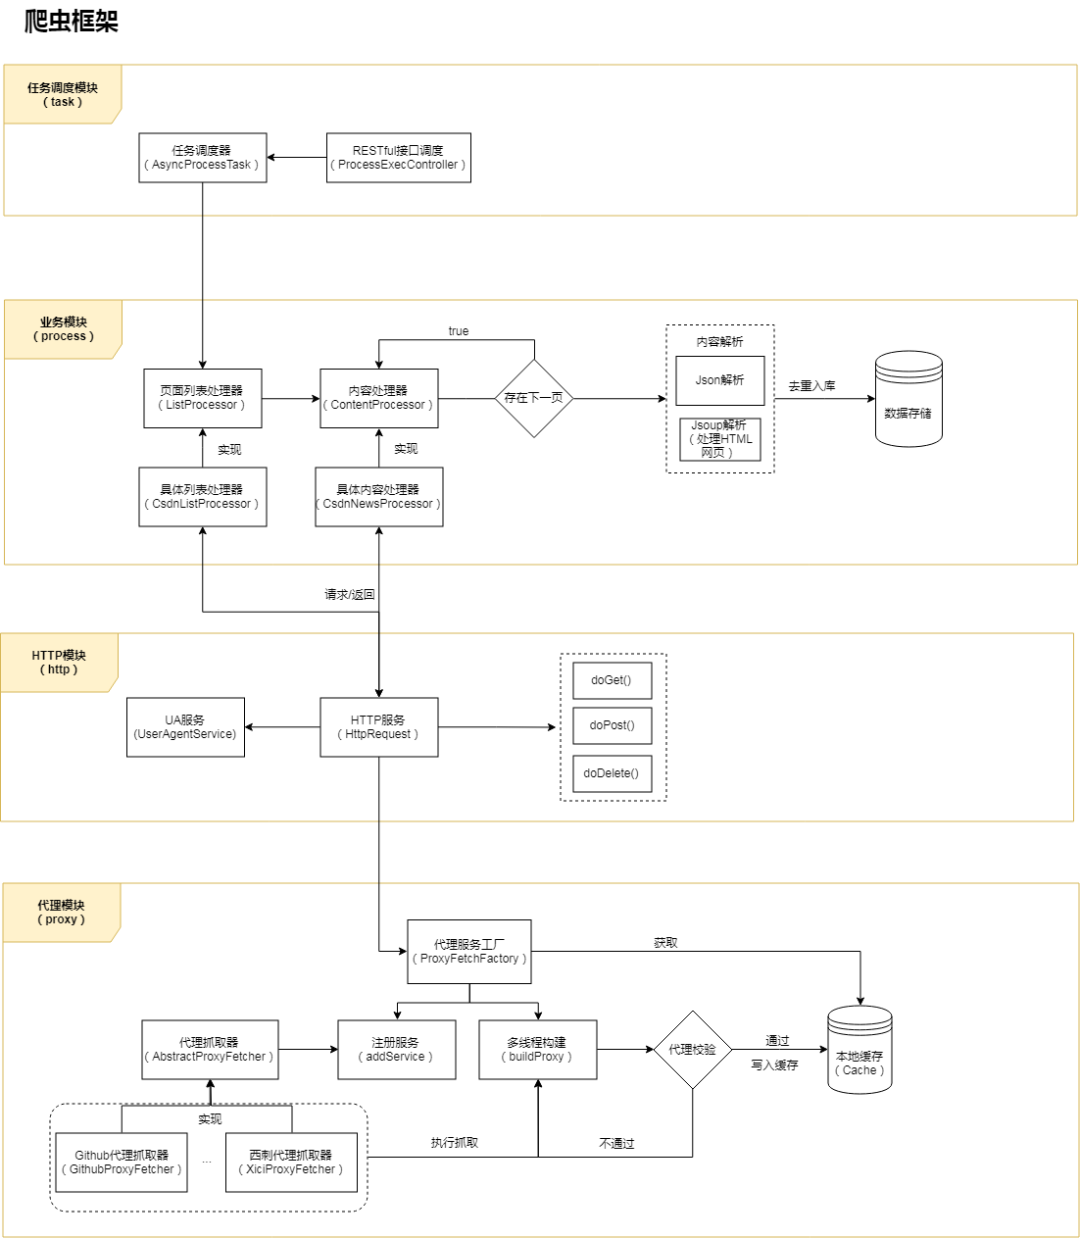
整個(gè)框架根據(jù)功能或業(yè)務(wù)分為 4 層 / 模塊:代理層、HTTP 請求層、業(yè)務(wù)層、調(diào)度層。后面會依次介紹每一層的實(shí)現(xiàn)邏輯,首先我們從創(chuàng)建項(xiàng)目開始。
注:在學(xué)習(xí)和實(shí)踐爬蟲框架搭建時(shí),建議將源碼項(xiàng)目也在編輯器中打開,參考著源碼看文章效果更好,因?yàn)槲闹胁豢赡馨阉写a都貼出來,未貼出的部分可以在源碼中了解,這樣更方便理解框架。
框架源碼地址:
https://github.com/AlanYangs/spiders/tree/master/spider-framework
一、新建 Spring Boot 項(xiàng)目
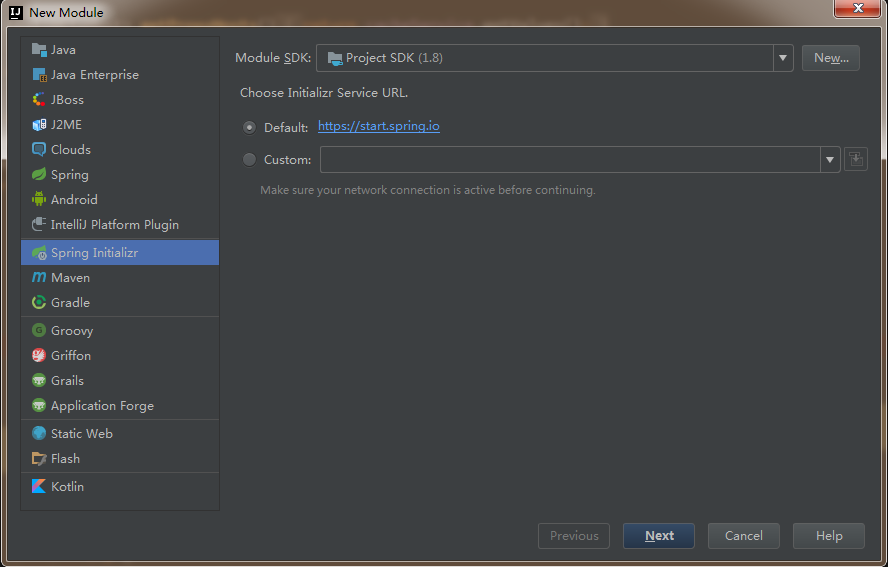
本項(xiàng)目采用宇宙最強(qiáng)的 IDEA 開發(fā)工具,新建 Spring Boot 項(xiàng)目,JDK 建議選擇 1.8(熟悉的同學(xué)可以跳過本小節(jié)):
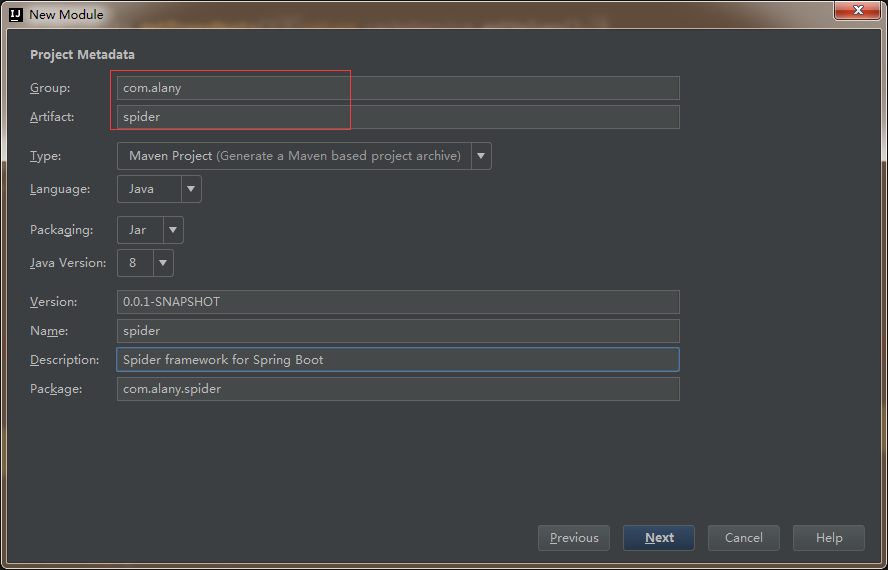
下一步,輸入項(xiàng)目的 group 和 artifact:
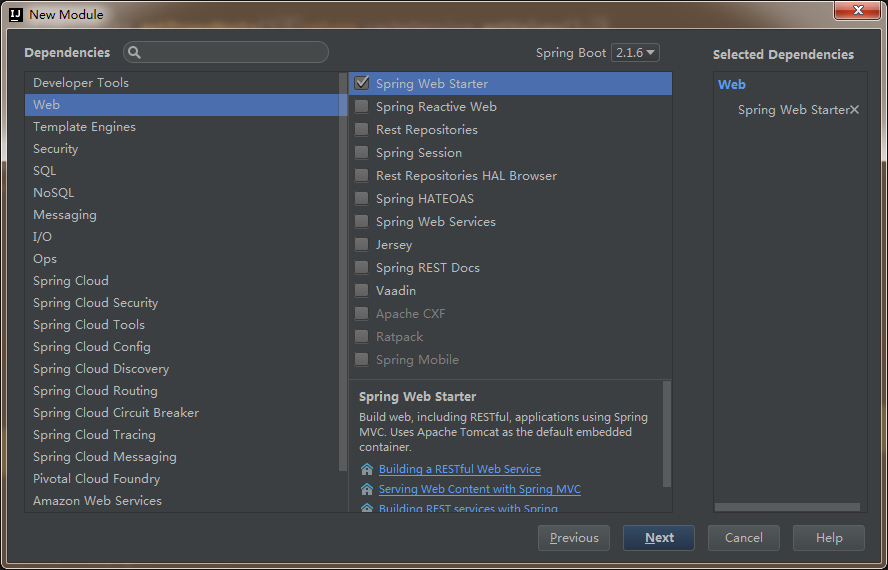
下一步,選擇依賴,這里暫時(shí)就選擇 Web:
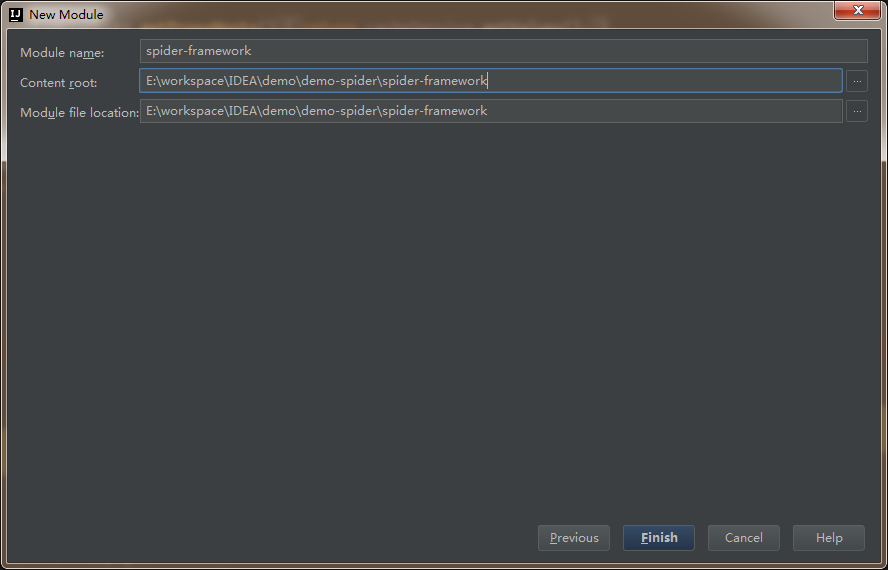
下一步,輸入 module 名稱,項(xiàng)目創(chuàng)建完成。
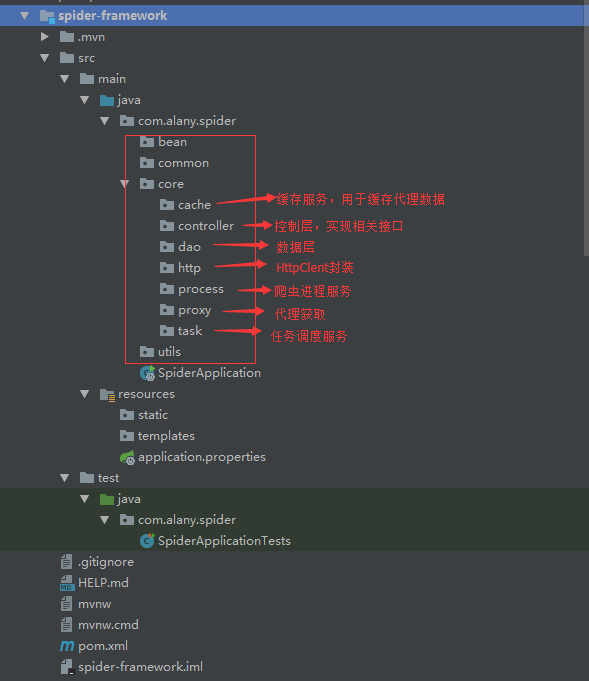
接著再新建一些后面需要用的包,整體的項(xiàng)目結(jié)構(gòu)及核心包名的說明如下圖所示:
再貼一下項(xiàng)目中所需要用到的依賴,這里就直接給出對應(yīng)的 pom:
        org.springframework.boot
        spring-boot-starter-web


        org.apache.httpcomponents
        httpclient
        4.5.5


        com.google.guava
        guava
        18.0


        org.jsoup
        jsoup
        1.11.2


        com.alibaba
        fastjson
        1.2.51


        commons-io
        commons-io
        2.6


        org.springframework.boot
        spring-boot-starter-test
        test
下面按架構(gòu)圖中分層的功能和模塊來逐步實(shí)現(xiàn)對應(yīng)的功能和服務(wù)。
二、免費(fèi)代理服務(wù)
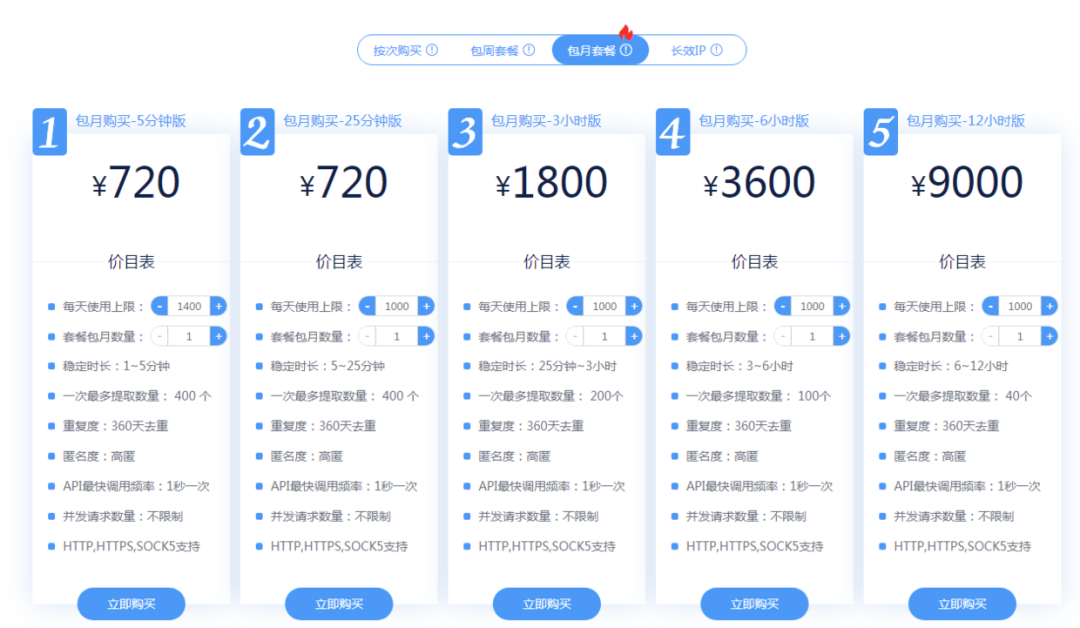
要想爬蟲健壯長久,肯定不能直接暴露本機(jī) IP 去跑,這時(shí)候就需要用到代理池,每次請求都從帶上代理去請求,從而隱藏爬蟲的身份。市面上有不少專門做代理的公司,都是要收費(fèi)的,價(jià)格還不便宜,每天 1000 個(gè) IP 使用上限,按穩(wěn)定時(shí)長區(qū)分,來感受一下包月的價(jià)格吧:
這價(jià)格一點(diǎn)都不美麗,所以我才想通過獲取免費(fèi) IP 代理的方式來自己構(gòu)建一個(gè)代理池。構(gòu)建的思路就是參看各大代理網(wǎng)站上面都有提供一些免費(fèi)的 IP 列表(舉例:快代理),我們可以抓取一些下來然后校驗(yàn)一下它的可用性,加入到自己的代理池中。考慮到在代碼實(shí)現(xiàn)中,IP 的抓取和校驗(yàn)都需要一定的時(shí)間,所以需要有一個(gè)緩存機(jī)制來存儲,可以用 Redis 等,但考慮部署的問題,這里就用 Google 的 Guava Cache 來作為本地緩存存儲代理 IP。
我們來封裝一個(gè) CacheService 服務(wù),方便使用,代碼如下:
@Service
public class CacheService {
    private static final Logger LOGGER = LoggerFactory.getLogger(CacheService.class);

    private int cacheMaxSize = 3000;

    public void setCacheMaxSize(int cacheMaxSize) {
        this.cacheMaxSize = cacheMaxSize;
    }

    // 緩存
    private Cache cache = CacheBuilder.newBuilder()
            .maximumSize(cacheMaxSize)
            .removalListener(new RemovalListener() { //移出緩存時(shí)執(zhí)行的操作
                @Override
                public void onRemoval(RemovalNotification notification) {
                    if (notification.wasEvicted()) {
                        LOGGER.debug("key[" + notification.getKey() + "] was removed with expired.");
                    } else {
                        LOGGER.debug("key[" + notification.getKey() + "] was updated with put operation.");
                    }
                }
            })
            .build();

    public boolean containsKey(K key) {
        try {
            return cache.getIfPresent(key) != null;
        } catch (Exception e) {
            return false;
        }
    }

    public long size() {
        return cache.size();
    }

    public V get(K key) {
        return cache.getIfPresent(key);
    }

    public ConcurrentMap getAll() {
        return cache.asMap();
    }

    public List getValues(){
        return new ArrayList(getAll().values());
    }

    public void put(K key, V value) {
        cache.put(key, value);
        LOGGER.debug(String.format("put key %s with value %s to cache...", key, JSON.toJSONString(value)));
    }

    public void remove(K key) {
        if (containsKey(key)) {
            cache.invalidate(key);
        }
    }
}
由于需要從多個(gè)免費(fèi)代理網(wǎng)站上獲取代理,所以這里采用 Factory 工廠模式,類之間的繼承關(guān)系如下圖:
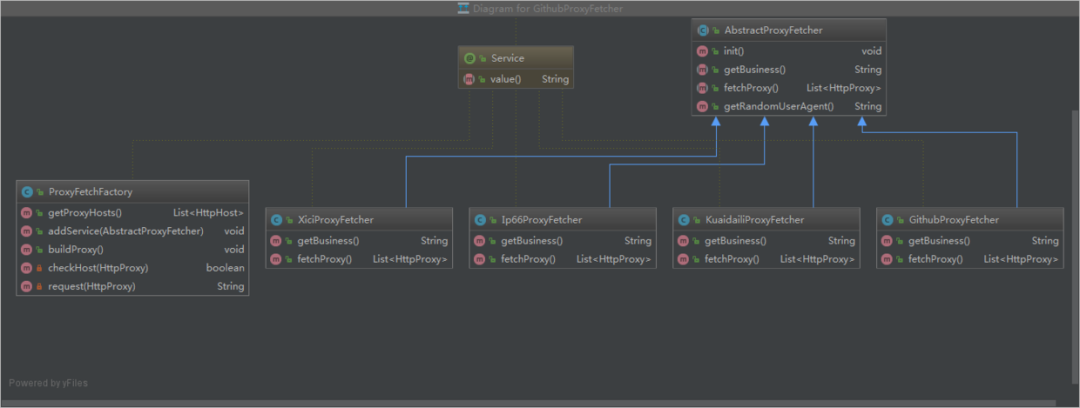
各具體的代理抓取實(shí)現(xiàn)類會實(shí)現(xiàn)各自的爬取方法,并會在初始化時(shí)自動注冊到工廠類 ProxyFetchFactory 中,然后在工廠類中統(tǒng)一構(gòu)建和多線程執(zhí)行。下面看一下工廠類 ProxyFetchFactory 的實(shí)現(xiàn)代碼:
@Service
public class ProxyFetchFactory {
    private static final Logger LOGGER = LoggerFactory.getLogger(ProxyFetchFactory.class);

    private static final int MAX_TIMEOUT_MS = 2000;//ms

    private List proxyServices = new ArrayList<>();

    private CacheService cacheService = SpringContext.getBean(CacheService.class);

    public List getProxyHosts() {
        return cacheService.getValues();
    }

    public void addService(AbstractProxyFetcher proxyService) {
        proxyServices.add(proxyService);
    }

    public void buildProxy() {
        List proxies = null;
        List> futures = new ArrayList<>();
        for (AbstractProxyFetcher proxyService : proxyServices) {
            if (!proxyService.getBusiness().equals("github")){
                continue;
            }
            try {
                proxies = proxyService.fetchProxy();
            } catch (Exception e) {
                LOGGER.error("fetch " + proxyService.getBusiness() + " proxy meet error", e);
                continue;
            }
            if (proxies != null && !proxies.isEmpty()) {
                ExecutorService es = Executors.newFixedThreadPool(10);
                for (final HttpProxy proxy : proxies) {
                    futures.add((Future) es.submit(new Runnable() {
                        @Override
                        public void run() {
                            proxy.setValid(checkHost(proxy));
                        }
                    }));
                }
                es.shutdown();
                for (Future future : futures) {
                    try {
                        future.get();
                    } catch (Exception e) {
                    }
                }
            }
        }
        LOGGER.info("valid host total size: " + getProxyHosts().size());
    }

    private boolean checkHost(final HttpProxy httpProxy) {
        boolean isValid = false;
        ExecutorService executor = Executors.newSingleThreadExecutor();
        FutureTask future = new FutureTask(new Callable() {//使用Callable接口作為構(gòu)造參數(shù)
            public String call() {
                //搜索任務(wù)異步處理
                return request(httpProxy);
            }
        });
        executor.execute(future);
        String content = null;
        try {
            content = future.get(MAX_TIMEOUT_MS, TimeUnit.MILLISECONDS); //在執(zhí)行超時(shí)時(shí)間內(nèi)獲取結(jié)果
        } catch (Exception e) {
            future.cancel(true);
        } finally {
            executor.shutdown();
        }
        isValid = StringUtils.isNotBlank(content) && content.indexOf("百度") > 0;

        LOGGER.info(httpProxy.getProvider() + " - " + httpProxy.getAddress() + " : " + isValid);
        if (isValid) {
            cacheService.put(httpProxy.getAddress() + ":" + httpProxy.getPort(), httpProxy.toHost());
            LOGGER.info("cache size:" + cacheService.size());
        }
        return isValid;
    }

    private String request(HttpProxy httpProxy) {
        String content = null;
        InetSocketAddress addr = null;
        URLConnection conn = null;
        InputStream in = null;
        try {
            //Proxy類代理方法
            URL url = new URL("http://www.baidu.com");
            // 創(chuàng)建代理服務(wù)器
            addr = new InetSocketAddress(httpProxy.getAddress(), httpProxy.getPort());
            Proxy proxy = new Proxy(Proxy.Type.HTTP, addr); // http 代理
            conn = url.openConnection(proxy);
            in = conn.getInputStream();
            content = IOUtils.toString(in);
        } catch (Exception e) {
            return null;
        } finally {
            if (in != null) {
                try {
                    in.close();
                } catch (IOException e) {
                    e.printStackTrace();
                }
            }
        }
        return content;
    }
}
代理的構(gòu)建和多線程爬取是在 buildProxy() 方法中實(shí)現(xiàn)的,對于抓取下來的免費(fèi)代理,我們還需要驗(yàn)證一下可用性,有些代理已經(jīng)失效或本身就不可用,這種我們需要排除掉,通過 checkHost() 來驗(yàn)證,驗(yàn)證邏輯其實(shí)就是用抓取的代理加到 HTTP 請求,看能不能跑通,超時(shí)或不通則可以判定該代理無效。
具體實(shí)現(xiàn)類的抓取邏輯其實(shí)就是一個(gè)簡單的爬蟲邏輯,根據(jù)種子 URL 作為入口,抓取頁面所需的內(nèi)容,這里舉例快代理的頁面解析邏輯(KuaidailiProxyFetcher 類),代碼如下:
@Service("kuaidailiNewProxyService")
public class KuaidailiProxyFetcher extends AbstractProxyFetcher {
    private static final Logger LOGGER = LoggerFactory.getLogger(KuaidailiProxyFetcher.class);

    private static final String KUAIDAILI_FREE_PROXY_URL = "https://www.kuaidaili.com/proxylist/%d";

    @Override
    public String getBusiness() {
        return "kuaidaili";
    }

    @Override
    public List fetchProxy() {
        Document doc = null;
        List list = new ArrayList<>();
        Random random = new Random();
        for (int i = 1; i < 10; i++) {
            String url = String.format(KUAIDAILI_FREE_PROXY_URL, i);
            String refererUrl = i > 1 ?  String.format(KUAIDAILI_FREE_PROXY_URL, i-1) : "";
            try {
                doc = jsoup.connect(url)
                        .header("Accept", "text/html,application/xhtml+xml,application/xml;q=0.9,image/webp,image/apng,*/*;q=0.8,application/signed-exchange;v=b3")
                        .header("Accept-Encoding", "gzip, deflate, br")
                        .header("Accept-Language", "zh-CN,zh;q=0.9")
                        .header("User-Agent", getRandomUserAgent())
                        .header("Host", "www.kuaidaili.com")
                        .header("Referer", refererUrl)
                        .timeout(30 * 1000)
                        .get();

                Elements ipElms = doc.select("td[data-title=\"IP\"]");
                Elements portElms = doc.select("td[data-title=\"PORT\"]");
                Elements typeElms = doc.select("td[data-title=\"類型\"]");
                if (ipElms != null) {
                    for (int j = 0, length = ipElms.size(); j < length; j++) {
                        String ip = ipElms.get(j).text();
                        String port = portElms.get(j).text();
                        if (StringUtil.isBlank(ip) || StringUtil.isBlank(port)) {
                            continue;
                        }
                        HttpProxy httpProxy = new HttpProxy(ip, Integer.parseInt(port));
                        String type = typeElms.get(j).text();
                        if (StringUtils.isNotBlank(type) && !type.contains(",")) {
                            httpProxy.setType(type.toLowerCase());
                        }
                        httpProxy.setProvider(getBusiness());
                        list.add(httpProxy);
                    }
                }
                Thread.sleep(random.nextInt(5) * 1000);
            } catch (Exception e) {
                LOGGER.error("fetch proxy meet error with url["+ url +"]: ", e);
            }
        }
        LOGGER.info("fetch [" + getBusiness() + "] proxy list size=" + list.size());
        return list;
    }
}
代碼主要在 fetchProxy() 方法,拿到返回結(jié)果后使用的是 jsoup 來解析,鑒于篇幅關(guān)系,關(guān)于 jsoup 的使用我就詳細(xì)介紹了,不熟悉的同學(xué)請參看?jsoup 中文文檔,關(guān)鍵就在于查找 DOM 文檔的元素,然后拿到對應(yīng)的值。
這一部分搭建完以后,我們起一個(gè) Test 來測試一下:
@RunWith(SpringRunner.class)
@SpringBootTest
public class SpiderApplicationTests {

    @Autowired
    private ProxyFetchFactory proxyFetchFactory;

    @Test
    public void testProxyFetch() {
        proxyFetchFactory.buildProxy();
    }

}
下面貼一下結(jié)果,總共跑了 12 分鐘,抓取到了 346 個(gè)有用的代理 IP,耗時(shí) 12 分鐘主要是檢驗(yàn)代理有效性上面的耗時(shí)較多,所以才需要用緩存或者隊(duì)列來存儲代理數(shù)據(jù)從而避免后續(xù)任務(wù)的阻塞,不然后面的業(yè)務(wù)爬取就要阻塞等待,等代理抓取完了才能跑。

三、HTTP 請求封裝
爬蟲就是基于網(wǎng)絡(luò)請求的業(yè)務(wù),那么當(dāng)然需要進(jìn)行大量 HTTP 請求,為了方便使用,這里需要對 HttpClient 做一下封裝。按照鏈?zhǔn)秸{(diào)用的方式封裝參數(shù)和方法,下面給出 HTTP 請求的 HttpRequest 類代碼參考:
@Service("httpRequest")
public class HttpRequest {
    private static Logger logger = LoggerFactory.getLogger(HttpRequest.class);

    private boolean useProxy = true; //默認(rèn)請求時(shí)使用代理

    private String url;

    private Map headers;
    private Map params;
    private String content;
    private ContentType contentType;

    private ProxyFetchFactory proxyFetchFactory = SpringContext.getBean(ProxyFetchFactory.class);

    public HttpRequest() {
    }

    public HttpRequest(String url) {
        this.url = url;
    }

    public HttpRequest setUrl(String url) {
        this.url = url;
        return this;
    }

    public HttpRequest setHeaders(Map headers) {
        this.headers = headers;
        return this;
    }

    public HttpRequest setParams(Map params) {
        this.params = params;
        return this;
    }

    public HttpRequest setContent(String content, ContentType contentType) {
        this.content = content;
        this.contentType = contentType;
        return this;
    }

    public HttpRequest setUseProxy(boolean useProxy) {
        this.useProxy = useProxy;
        return this;
    }

    public CloseableHttpClient getSSLHttpClient() throws Exception {
        //設(shè)置代理IP、端口、協(xié)議
        RequestConfig config = null;
        if (useProxy && proxyFetchFactory != null){
            List proxyHosts = proxyFetchFactory.getProxyHosts();
            if (proxyHosts != null && !proxyHosts.isEmpty()) {
                int index = new Random().nextInt(proxyHosts.size());
                HttpHost host = proxyHosts.get(index);
                logger.info("url: " + url + ", proxy: " + host.toHostString());
                //請求配置,設(shè)置鏈接超時(shí)和讀取超時(shí)
                config = RequestConfig.custom().setProxy(host).setConnectTimeout(30000).setSocketTimeout(30000).build();
            }
        }

        if (config == null) {
            config = RequestConfig.custom().setConnectTimeout(30000).setSocketTimeout(30000).build();
        }

        try {
            SSLContext sslContext = new SSLContextBuilder().loadTrustMaterial(null, new TrustStrategy() {
                public boolean isTrusted(X509Certificate[] paramArrayOfX509Certificate, String paramString) throws CertificateException {
                    return true;
                }
            }).build();
            SSLConnectionSocketFactory sslsf = new SSLConnectionSocketFactory(sslContext, SSLConnectionSocketFactory.ALLOW_ALL_HOSTNAME_VERIFIER);
            return HttpClients.custom().setSSLSocketFactory(sslsf).setDefaultRequestConfig(config).build();
        } catch (Exception e) {
            throw e;
        }
    }

    public HttpResult doGet() {
        try {
            //HttpClient client = HttpClients.createDefault();
            HttpClient client = getSSLHttpClient();
            //發(fā)送get請求
            HttpGet request = new HttpGet(url);
            if (headers != null && headers.size() > 0) {
                for (Map.Entry header : headers.entrySet()) {
                    request.setHeader(header.getKey(), String.valueOf(header.getValue()));
                }
            }

            if (params != null && params.size() > 0) {
                StringBuilder sb = new StringBuilder();
                if (!url.contains("?")) {
                    sb.append("?");
                }
                for (Map.Entry param : params.entrySet()) {
                    sb.append(param.getKey() + "=" + param.getValue() + "&");
                }
                sb.deleteCharAt(sb.lastIndexOf("&"));
                url = url + sb.toString();
            }
            HttpResponse response = client.execute(request, new BasicHttpContext());
            return new HttpResult(response.getStatusLine().getStatusCode(), EntityUtils.toString(response.getEntity()));
        } catch (Exception e) {
            e.printStackTrace();
        }
        return null;
    }

    public HttpResult doPost() {
        try {
            //HttpClient client = HttpClients.createDefault();
            HttpClient client = getSSLHttpClient();
            //發(fā)送get請求
            HttpPost request = new HttpPost(url);

            //設(shè)置url
            request.setURI(new URI(url));

            setParams(request);

            HttpResponse response = client.execute(request);
            return new HttpResult(response.getStatusLine().getStatusCode(), EntityUtils.toString(response.getEntity()));
        } catch (Exception e) {
            e.printStackTrace();
        }
        return null;
    }

    public HttpResult doPut(){
        //參看項(xiàng)目源碼
    }

    public HttpResult doDelete() {
        //參看項(xiàng)目源碼
    }

    private void setParams(HttpEntityEnclosingRequestBase request) throws UnsupportedEncodingException {
        if (headers != null && headers.size() > 0) {
            for (Map.Entry header : headers.entrySet()) {
                request.setHeader(header.getKey(), String.valueOf(header.getValue()));
            }
        }

        List nvps = new ArrayList();

        //設(shè)置參數(shù)
        if (params != null && params.size() > 0) {
            for (Iterator iter = params.keySet().iterator(); iter.hasNext(); ) {
                String name = (String) iter.next();
                String value = String.valueOf(params.get(name));
                nvps.add(new BasicNameValuePair(name, value));
            }
            request.setEntity(new UrlEncodedFormEntity(nvps, HTTP.UTF_8));
        }
        //設(shè)置內(nèi)容
        if (content != null) {
            contentType = contentType == null ? ContentType.APPLICATION_JSON : contentType;
            request.setEntity(new StringEntity(content, contentType));
        }
    }
}
定義了各種參數(shù)的 setter 方法,調(diào)用的時(shí)候就非常簡單了,按照鏈?zhǔn)秸{(diào)用即可:
httpRequest.setUrl(url).setHeaders(headers).doGet();
另外,有一點(diǎn)需要注意,請求的時(shí)候 header 需要帶上 UserAgent 信息,這是一個(gè)最簡單的爬蟲偽裝,不加直接就被判定為爬蟲或機(jī)器人了,這里采用簡單的一點(diǎn)的做法,搜集一些已知的 UA 信息寫到一個(gè) TXT 文件中,然后初始化的時(shí)候?qū)?UA 信息加載到 List 中,后面在請求的時(shí)候隨機(jī)遍歷 List 的值即可。代碼就不貼了,可以參看源碼的 UserAgentService 類。
四、業(yè)務(wù)爬取邏輯
這一部分是爬蟲的業(yè)務(wù)部分,也就是說跟你爬取的數(shù)據(jù)對象有關(guān)系,有時(shí)候我們需要爬取網(wǎng)頁的全部內(nèi)容,比如資訊類的文章信息;而有時(shí)候我們需要爬取網(wǎng)頁里面的特定內(nèi)容,比如京東淘寶的商品價(jià)格信息,這時(shí)候就需要對頁面內(nèi)容進(jìn)行定位和過濾。文中我們就以爬取 CSDN 的熱門文章來舉例。首先,我們還是來看一下各類之間的關(guān)系,如下圖:
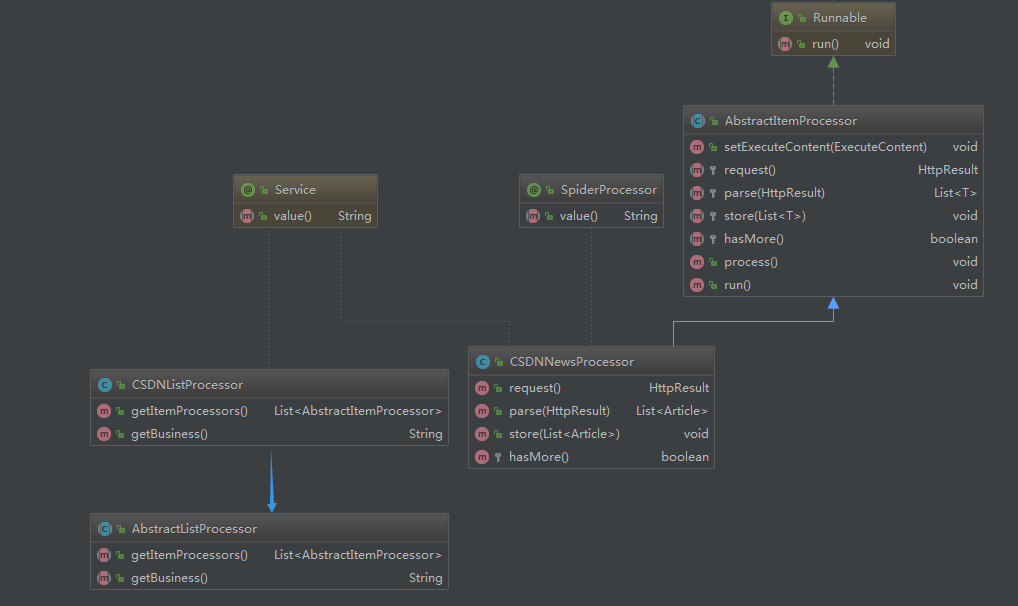
從上面類圖中可以看到有 2 個(gè)抽象類,這是便于業(yè)務(wù)擴(kuò)展用的,后面如果還需寫其他頁面的爬蟲,比如需要爬取知乎熱榜的文章,直接套著當(dāng)前框架就能寫,加 2 個(gè)對應(yīng)的實(shí)現(xiàn)類,實(shí)現(xiàn)知乎熱榜具體的頁面解析即可。下面具體解釋一下這 2 個(gè)類的用法。
1. AbstractListProcessor 類
抽象頁面列表處理器,目的就是構(gòu)建多個(gè)頁面內(nèi)容處理器,通常是按分頁來構(gòu)建。
public abstract class AbstractListProcessor {

    /**
     * 內(nèi)容處理器列表
     * @return
     */
    public abstract List getItemProcessors();

    /**
     * 業(yè)務(wù)名稱
     * @return
     */
    public abstract String getBusiness();
}
定義了 2 個(gè)抽象方法,需要子類去實(shí)現(xiàn),下面我們看一下它的實(shí)現(xiàn)類:
@Service
public class CSDNListProcessor extends AbstractListProcessor {

    private static final String API_NEWS_URL = "https://www.csdn.net/api/articles?type=more&category=news&shown_offset=%s";

    private long offset = System.currentTimeMillis() * 1000; //初始o(jì)ffset值,16位

    private int maxPageNumber = 10; //最大的分頁數(shù)

    @Override
    public List getItemProcessors() {
        List list = new ArrayList<>();
        for (int i = 0; i < maxPageNumber; i++) {
            ExecuteContent executeContent = new ExecuteContent();
            long currOffset = offset + i * 10; //由于接口每次返回10條記錄,所以offset按10遞增
            executeContent.setUrl(String.format(API_NEWS_URL, ""));//多次調(diào)試發(fā)現(xiàn)這種方式可以不傳offset,接口每次會自動更新
            executeContent.setBusiness(getBusiness());
            Map params = new HashMap();
            params.put("offset", currOffset);
            executeContent.setParams(JSON.toJSONString(params));
            CSDNNewsProcessor csdnNewsProcessor = new CSDNNewsProcessor();
            csdnNewsProcessor.setExecuteContent(executeContent);
            list.add(csdnNewsProcessor);
        }
        return list;
    }

    @Override
    public String getBusiness() {
        return "CSDN";
    }
}
代碼說明:
在實(shí)現(xiàn)類中就比較清晰的能看出來,在 getItemProcessors() 方法中是需要構(gòu)建一個(gè)后面頁面內(nèi)容處理器所需要的一些參數(shù),包括入口 URL、業(yè)務(wù)名稱、一些后面需要用到的參數(shù)等,然后通過 ExecuteContent 對象進(jìn)行傳遞;
這里的循環(huán)邏輯,也可以在具體內(nèi)容處理器的 hasMore() 方法中實(shí)現(xiàn),后面對應(yīng)內(nèi)容時(shí)會提到;
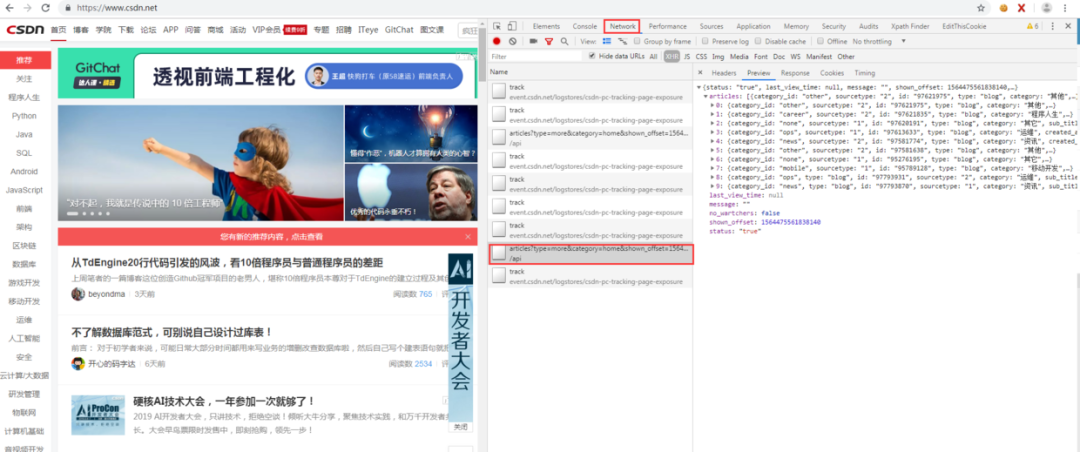
照顧一下基礎(chǔ)較差的同學(xué),怕有些同學(xué)不知道這個(gè)入口 URL 是怎么來的,其實(shí)就是爬蟲流程中的前期階段需要做的工作,對頁面進(jìn)行分析提取出入口 URL,如下圖,在分析 CSDN 首頁時(shí) F12 打開 Chrome 瀏覽器的調(diào)試器,在網(wǎng)絡(luò)那個(gè) tab 可以看到頁面的請求信息,可以看到這個(gè) URL 就是后臺的獲取文章信息的接口:
2. AbstractItemProcessor 類
抽象頁面內(nèi)容處理器,這里面定義了爬取頁面所需要的一系列操作,包括請求、解析、入庫等,此外它還是一個(gè)線程類,用于在任務(wù)調(diào)度時(shí)多線程并發(fā)執(zhí)行。
public abstract class AbstractItemProcessor implements Runnable{
    private static final Logger LOGGER = LoggerFactory.getLogger(AbstractItemProcessor.class);

    public List userAgentList = new ArrayList<>();

    public SimpleDateFormat sdf = new SimpleDateFormat("yyyy-MM-dd HH:mm:ss");

    public ExecuteContent executeContent;

    public void setExecuteContent(ExecuteContent executeContent) {
        this.executeContent = executeContent;
    }

    /**
     * 請求
     *
     * @return
     */
    protected abstract HttpResult request();

    /**
     * 解析
     */
    protected abstract List parse(HttpResult result);

    /**
     * 入庫
     */
    protected abstract void store(List list);

    /**
     * 是否有下一頁
     */
    protected abstract boolean hasMore();

    /**
     * 入口:整合流程
     */
    public void process() throws InterruptedException {
        UserAgentService userAgentService = SpringContext.getBean(UserAgentService.class);
        userAgentList = userAgentService.getUserAgentList();
        HttpResult result = null;
        List list = null;
        int retryTimes = 0;
        do {
            while (result == null && retryTimes < 3) { //請求失敗重試3次
                result = request();
                retryTimes ++;
                Thread.sleep(5000);
            }

            list = parse(result);
            store(list);
        } while (hasMore());
    }

    @Override
    public void run() {
        LOGGER.info("executing processor: " + executeContent.toString());
        try {
            process();
        } catch (InterruptedException e) {
            e.printStackTrace();
        }
    }
}
將請求、解析、入庫和分頁判斷,這些按業(yè)務(wù)可能有差異的過程抽象出來,讓業(yè)務(wù)實(shí)現(xiàn)類自己去實(shí)現(xiàn),其中請求的過程加了失敗重試(默認(rèn) 3 次)機(jī)制,此外該類實(shí)現(xiàn)了 Runnable 接口,也就是說它及其子類都是一個(gè)線程類,用于后續(xù)任務(wù)的多線程執(zhí)行。下面看一個(gè)業(yè)務(wù)實(shí)現(xiàn)類 CSDNNewsProcessor:
@SpiderProcessor
@Service("csdnNewsProcessor")
public class CSDNNewsProcessor extends AbstractItemProcessor {

    private static Logger logger = LoggerFactory.getLogger(CSDNNewsProcessor.class);

    private ArticleCouldDBService articleCouldDBService = SpringContext.getBean(ArticleCouldDBService.class);

    private HttpRequest httpRequest = SpringContext.getBean(HttpRequest.class);

    @Override
    public HttpResult request() {
        Map headers = new HashMap<>();
        if (userAgentList != null && !userAgentList.isEmpty()) {
            int index = new Random().nextInt(userAgentList.size());
            headers.put("User-Agent", userAgentList.get(index));
        }

        HttpResult result = httpRequest.setUrl(executeContent.getUrl()).setHeaders(headers).doGet();
        return result;
    }

    @Override
    public List parse(HttpResult result) {
        List list = new ArrayList<>();
        if (result != null && StringUtils.isNotEmpty(result.getContent())) {
            try {
                JSONObject root = JSON.parseObject(result.getContent());
                JSONArray articles = root.getJSONArray("articles");
                if (articles != null && !articles.isEmpty()) {
                    for (int i = 0, length = articles.size(); i < length; i++) {
                        JSONObject item = articles.getJSONObject(i);
                        Article article = new Article();
                        article.setSourceName(executeContent.getBusiness());
                        article.setTitle(item.getString("title"));
                        article.setArticleId(item.getString("id"));
                        article.setAuthor(item.getString("nickname"));
                        article.setUrl(item.getString("url"));
                        String category = item.getString("category");
                        if (StringUtils.isEmpty(category)) {
                            category = item.getString("tag");
                        }
                        article.setCategory(category);
                        article.setDescription(item.getString("desc"));
                        article.setImgUrl(item.getString("avatar"));
                        Date now = new Date();
                        article.setPublishTime(sdf.format(now));

                        if (StringUtils.isNotBlank(article.getTitle()) && StringUtils.isNotBlank(article.getUrl())) {
                            list.add(article);
                        }
                    }
                }
            } catch (Exception e) {
                logger.error("parse json to bean meet error:", e);
            }
        }
        return list;
    }

    @Override
    public void store(List list) {
        if (list != null && !list.isEmpty()) {
            for (Article article : list) {
                articleCouldDBService.insert(article);
            }
        }
    }

    @Override
    protected boolean hasMore() {
//        long currMs = System.currentTimeMillis();
//        Map paramsMap = (Map) JSON.parse(executeContent.getParams());
//        long offset = Long.parseLong(String.valueOf(paramsMap.get("offset")).substring(0,Long.toString(currMs).length()));//就取毫秒級別的時(shí)間戳作為比較
//        return offset < currMs;
        return false;
    }
}
代碼說明:
上面內(nèi)容處理器的類名前面加了一個(gè)自定義的注解 @SpiderProcessor ,也是為了后面任務(wù)調(diào)度的需要;
request() 方法對應(yīng)的是請求過程,唯一需要注意的就是 header 中需要加入隨機(jī)的 UserAagent;
parse() 方法對應(yīng)的是頁面數(shù)據(jù)解析過程,解析的是請求返回的結(jié)果,剛好上面的 CSDN 中的例子返回的是 JSON 數(shù)據(jù),所以我們直接用 FastJson 來解析就 ok 了(如果返回的是 HTML 文本數(shù)據(jù),就用 jsoup 來處理,可以參考之前的代理模塊),就是簡單的 JSON 解析過程,就不多說了;
store() 方法對應(yīng)的是數(shù)據(jù)存儲過程,這里應(yīng)用的是云數(shù)據(jù)庫存儲,后面一節(jié)會具體介紹;
hasMore() 方法是判斷當(dāng)前爬蟲是否結(jié)束?類似于是否存在分頁,由于前面列表處理器中已經(jīng)加入了 offset 自增,所以這里直接返回 false 即可,如果列表處理器沒有處理自增邏輯,那么可以按照 hasMore() 方法代碼注釋部分來實(shí)現(xiàn)循環(huán)爬取。
五、云數(shù)據(jù)庫
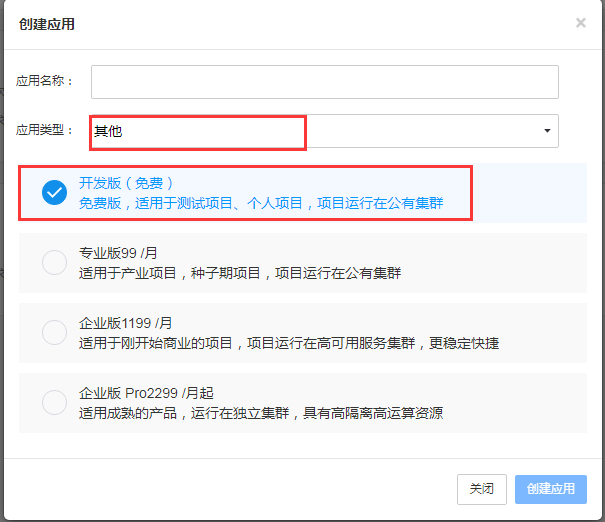
數(shù)據(jù)入庫,你當(dāng)然可以入庫到本地的 MySQL 數(shù)據(jù)庫,甚至寫入到文件中,可是這里我想介紹一下云數(shù)據(jù)庫,顧名思義,就是數(shù)據(jù)存儲在第三方云服務(wù)器上,對于個(gè)人開發(fā)者自己因?yàn)榕d趣或?qū)W習(xí)去開發(fā) App 或小程序應(yīng)用,最煩惱的就是后端,自己去寫一個(gè)后端服務(wù)成本太高,服務(wù)器成本和運(yùn)維成本都得不償失,所以這時(shí)候就想到了云數(shù)據(jù)庫,這里推薦 Bmob(官網(wǎng)地址)的云數(shù)據(jù)庫,我從 17 年開始使用的,App 和小程序的后臺數(shù)據(jù)都存在 Bmob 的云數(shù)據(jù)庫上,暫時(shí)還有免費(fèi)版,下面簡要說一下 Bmob 云數(shù)據(jù)庫的使用步驟:
1. 去 Bmob?官網(wǎng)申請賬號。
2. 創(chuàng)建應(yīng)用,選擇開發(fā)版,應(yīng)用類型選其他:
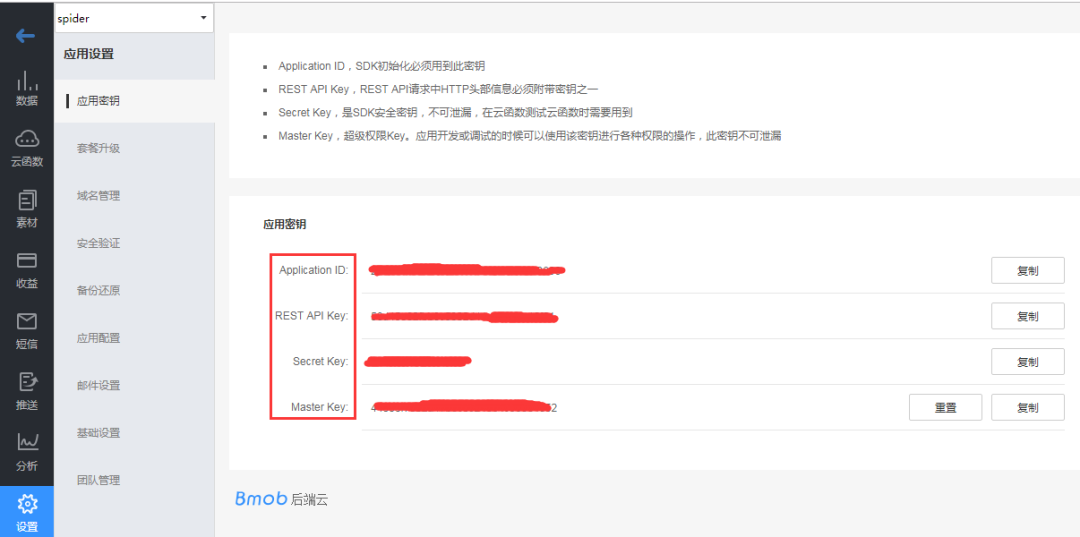
3. 進(jìn)入應(yīng)用設(shè)置的應(yīng)用秘鑰頁面,可以看到有 AppId 和幾個(gè) key,后面代碼時(shí)需要用到:
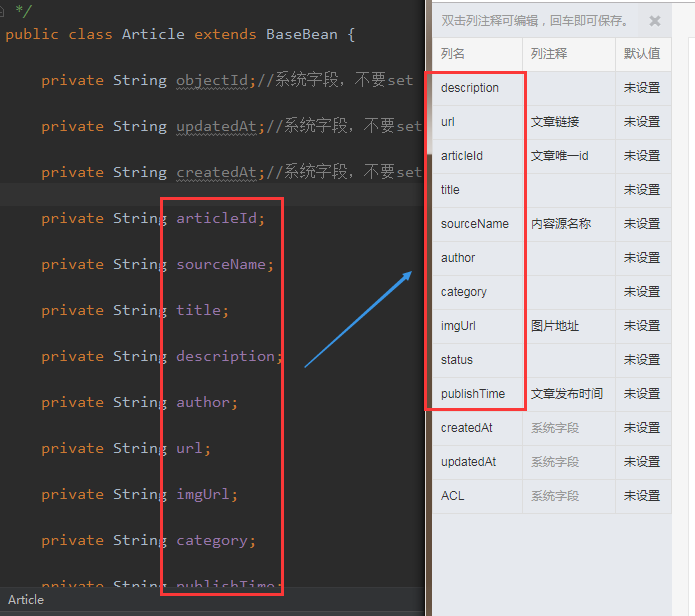
4. 創(chuàng)建表結(jié)構(gòu),需要注意下在 Bmob 后臺創(chuàng)建表結(jié)構(gòu)時(shí)字段要和代碼中的表 bean 對象的屬性要一致;
5. 前面準(zhǔn)備工作做好后,就可以開始編碼了,下面就參考 API 文檔(文檔地址),來封裝代碼,類關(guān)系圖如下:
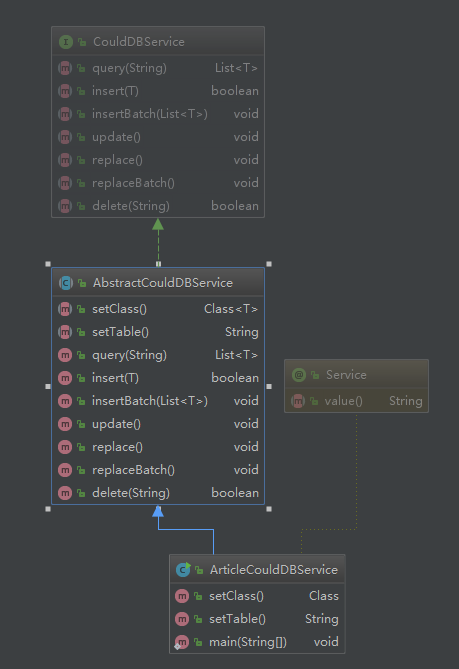
CouldDBService 是一個(gè)接口,定義了需要實(shí)現(xiàn)的方法
AbstractCouldDBService 是一個(gè)實(shí)現(xiàn)了通用方法的業(yè)務(wù)抽象類
ArticleCouldDBService 是一個(gè)具體的表實(shí)現(xiàn)類,主要功能在 AbstractCouldDBService 類中:
public abstract class AbstractCouldDBService implements CouldDBService {
    private static Logger logger = LoggerFactory.getLogger(AbstractCouldDBService.class);

    private static final String APP_ID = "68ab2056a549e0f640dfc1e801bf6915"; //對應(yīng)應(yīng)用秘鑰的Application ID
    private static final String API_KEY = "f8eee065e9e011ecd7e98e4256373629"; //對應(yīng)應(yīng)用秘鑰的REST API Key

    private static final String API_HOST_BASE = "https://api2.bmob.cn/1/";

    private static final String API_TABLE_URL = API_HOST_BASE + "classes/%s";

    private HttpRequest httpRequest = SpringContext.getBean(HttpRequest.class);

    private static Map headers;

    static {
        headers = new HashMap<>();
        headers.put("X-Bmob-Application-Id", APP_ID);
        headers.put("X-Bmob-REST-API-Key", API_KEY);
        headers.put("Content-Type", "application/json");
    }

    public abstract Class setClass();

    public abstract String setTable();

    @Override
    public List query(String whereAs) {
        String url = String.format(API_TABLE_URL, setTable());
        if (whereAs != null && !whereAs.isEmpty()) {
            try {
                whereAs = URLEncoder.encode(whereAs, "utf-8");
            } catch (UnsupportedEncodingException e) {
                logger.error("encode params["+ whereAs +"] meet error: ", e);
            }
            url += "?where=" + whereAs;
        }
        logger.info("query url: " + url);
        HttpResult response = httpRequest.setUrl(url).setHeaders(headers).setUseProxy(false).doGet();
        if (response == null) {
            throw new RuntimeException("request error: response is null");
        }

        if (200 == response.getCode()) {
            try {
                String res = response.getContent();
                JSONArray dataArray = JSON.parseObject(res).getJSONArray("results");
                if (dataArray != null && !dataArray.isEmpty()) {
                    List list = new ArrayList();
                    for (int i = 0, length = dataArray.size(); i < length; i++) {
                        JSONObject data = dataArray.getJSONObject(i);
                        list.add(data.toJavaObject(setClass()));
                    }
                    logger.info("query success and result size=" + list.size());
                    return list;
                }
            } catch (Exception e) {
                logger.error("parse response meet error: ", e);
            }
        } else {
            logger.error("request error: response=" + response.toString());
        }
        return null;
    }

    @Override
    public boolean insert(T bean) {
        String url = String.format(API_TABLE_URL, setTable());

        if (bean == null) {
            logger.error("insert failed: bean is null");
            return false;
        }

        Map beanMap = bean.toMap();

        HttpResult response = httpRequest.setUrl(url).setUseProxy(false).setHeaders(headers)
                .setContent(JSON.toJSONString(beanMap), ContentType.APPLICATION_JSON).doPost();

        if (response == null) {
            throw new RuntimeException("request error: response is null");
        }

        if (201 == response.getCode()) {
            logger.info("success to insert bean ["+ JSON.toJSONString(beanMap) +"]");
            return true;
        } else {
            logger.error("failed to insert bean ["+ JSON.toJSONString(beanMap) +"], msg:" + response.getContent());
            return false;
        }
    }

    @Override
    public void insertBatch(List list) {
        String url = API_HOST_BASE + "batch";
        if (list == null || list.isEmpty()) {
            return;
        }

        JSONArray reqArray = new JSONArray();
        for (T t : list) {
            JSONObject item = new JSONObject();
            item.put("method", "POST");
            item.put("path", "1/classes/" + setTable());
            item.put("body", JSON.toJSONString(t.toMap()));
            reqArray.add(item);
        }
        JSONObject contentJson = new JSONObject();
        contentJson.put("requests", reqArray);
        HttpResult response = httpRequest.setUrl(url).setUseProxy(false).setHeaders(headers)
                .setContent(contentJson.toJSONString(), ContentType.APPLICATION_JSON).doPost();

        if (response == null) {
            throw new RuntimeException("request error: response is null");
        }
        System.out.println(response.toString());
    }

    @Override
    public void update() {

    }

    @Override
    public void replace() {

    }

    @Override
    public void replaceBatch() {

    }

    @Override
    public boolean delete(String objectId) {
        if (objectId == null || "".equals(objectId)) {
            return false;
        }
        String url = String.format(API_TABLE_URL, setTable()) + "/" + objectId;

        HttpResult response = httpRequest.setUrl(url).setUseProxy(false).setHeaders(headers).doDelete();
        if (response == null) {
            throw new RuntimeException("request error: response is null");
        }

        JSONObject retJson = JSON.parseObject(response.getContent());
        boolean isSuccess = "ok".equalsIgnoreCase(retJson.getString("msg"));
        if (isSuccess) {
            logger.info("success to delete row [objectId="+ objectId +"]");
        } else {
            logger.error("failed to delete row [objectId="+ objectId +"], msg:" + response.getContent());
        }
        return isSuccess;
    }
}
代碼說明:
記得將上面的 APPID 和 key 換成自己在 Bmob 上面創(chuàng)建的
這里封裝了一個(gè)支持泛型的抽象云數(shù)據(jù)服務(wù)類,這樣設(shè)計(jì)的好處就是可以支持多個(gè)表
原 API 文檔中只提供了 RESTful 接口供調(diào)用,這里通過 HTTP 請求封裝了增刪查方法
下面再看一個(gè)具體表的實(shí)現(xiàn)類:
@Service("articleCouldDBService")
public class ArticleCouldDBService extends AbstractCouldDBService {

    @Override
    public Class setClass() {
        return Article.class;
    }

    @Override
    public String setTable() {
        return "t_articles";
    }
}
表的實(shí)現(xiàn)類非常簡單,只需要指定表名和對象類型,這樣設(shè)計(jì)的好處,在有多個(gè)表的時(shí)候就體現(xiàn)出來了,無需額外修改代碼,只需要增加表的實(shí)現(xiàn)類即可。
下面寫一個(gè)測試方法來測試一下 ArticleCouldDBService 類:
@Test
public void testArticleCouldDBSeervice(){
    List articles = new ArrayList<>();
    Article article = new Article();
    article.setArticleId("test12345678");
    article.setTitle("insert test");
    article.setSourceName("測試數(shù)據(jù)");
    articles.add(article);
    articleCouldDBService.insert(article);

    articles.clear();
    articles = articleCouldDBService.query("{\"articleId\":\"test12345678\"}");
    System.out.println(articles);
}
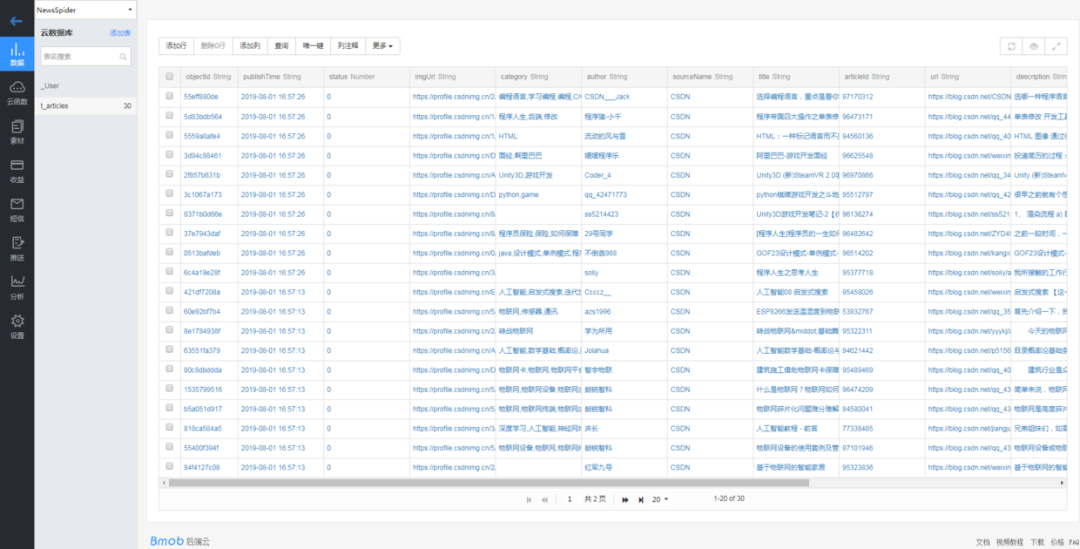
從打印的 log 中可以看到插入和查詢都正常,再去 Bmob 的后臺表中可以看到記錄成功插入。
六、任務(wù)調(diào)度
一個(gè)多層的爬蟲任務(wù)架構(gòu)應(yīng)該至少是下圖這樣的(有興趣的同學(xué),可以按此架構(gòu)去試著搭一個(gè) task 模塊或者微服務(wù),那樣架構(gòu)更加完整和清晰),但是考慮到實(shí)施的復(fù)雜程度,所以本 Chat 就不對任務(wù)做分層和分庫處理了,處理簡單一點(diǎn),就按照之前上面的項(xiàng)目整體架構(gòu)圖來實(shí)施,把任務(wù)調(diào)度簡單化。

先忘掉上面的任務(wù)架構(gòu),我們還是按照最開始前面說的架構(gòu)圖(不記得了?翻回去再加深一下記憶),我們需要實(shí)現(xiàn)一個(gè)任務(wù)調(diào)度器,可以按業(yè)務(wù)調(diào)起任務(wù),可以定時(shí)調(diào)度任務(wù),這里需要用到 Spring 相關(guān)知識,先看代碼:
@Service("asyncProcessTask")
public class AsyncProcessTask {
    private static final Logger LOGGER = LoggerFactory.getLogger(AsyncProcessTask.class);

    private static SimpleDateFormat sdf = new SimpleDateFormat("yyyy-MM-dd HH:mm:ss");

    private ApplicationContext context = SpringContext.getApplicationContext();

    /**
     * 初始化代理爬取,觸發(fā)代理爬取
     */
    public void initProxy() {
        Map serviceBeanMap = context.getBeansOfType(ProxyFetchFactory.class);
        if (serviceBeanMap != null && !serviceBeanMap.isEmpty()) {
            for (Object serviceBean : serviceBeanMap.values()) {
                ProxyFetchFactory service = (ProxyFetchFactory) serviceBean;
                service.buildProxy();
            }
        }
    }

    /**
     * 按定時(shí)調(diào)度觸發(fā)所有業(yè)務(wù)爬取任務(wù)
     */
    @Scheduled(cron = "0 0 0 1 * ?") //每天凌晨0點(diǎn)執(zhí)行一次
    public void scheduleAllProcessors() {
        LOGGER.info("schedule task start with " + sdf.format(new Date()));
        startAllProcessors();
        LOGGER.info("schedule task end with " + sdf.format(new Date()));
    }

    /**
     * 觸發(fā)所有業(yè)務(wù)爬取任務(wù)
     */
    public void startAllProcessors() {
        ExecutorService es = Executors.newFixedThreadPool(10);
        List processors = getAllListProcessors();
        if (processors == null || processors.isEmpty()) {
            return;
        }
        for (AbstractListProcessor listProcessor : processors) {
            for (AbstractItemProcessor itemProcessor : listProcessor.getItemProcessors()) {
                es.execute(itemProcessor);
            }
        }
        try {
            es.awaitTermination(60, TimeUnit.SECONDS);//最大等待60s
        } catch (InterruptedException e) {
        } finally {
            es.shutdown();
        }
    }

    /**
     * 按業(yè)務(wù)名稱觸發(fā)爬取任務(wù)
     *
     * @param business
     */
    public void startProcessorsByBusiness(String business) {
        List processors = getAllListProcessors();
        if (processors == null || processors.isEmpty()) {
            return;
        }
        ExecutorService es = Executors.newFixedThreadPool(10);
        for (AbstractListProcessor listProcessor : processors) {
            if (business.equalsIgnoreCase(listProcessor.getBusiness())) {
                for (AbstractItemProcessor itemProcessor : listProcessor.getItemProcessors()) {
                    es.execute(itemProcessor);
                }
                break;
            }
        }
        try {
            es.awaitTermination(60, TimeUnit.SECONDS);//最大等待60s
        } catch (InterruptedException e) {
        } finally {
            es.shutdown();
        }
    }

    private List getAllListProcessors() {
        List processors = new ArrayList<>();
        Map serviceBeanMap = context.getBeansOfType(AbstractListProcessor.class);
        if (serviceBeanMap != null && !serviceBeanMap.isEmpty()) {
            for (Object serviceBean : serviceBeanMap.values()) {
                AbstractListProcessor processor = (AbstractListProcessor) serviceBean;
                processors.add(processor);
            }
        }
        LOGGER.info("fetch list processor size=" + processors.size());
        return processors;
    }

    private List getAllItemProcessors() {
        List processors = new ArrayList<>();
        Map serviceBeanMap = context.getBeansWithAnnotation(SpiderProcessor.class);
        if (serviceBeanMap != null && !serviceBeanMap.isEmpty()) {
            for (Object serviceBean : serviceBeanMap.values()) {
                AbstractItemProcessor processor = (AbstractItemProcessor) serviceBean;
                processors.add(processor);
            }
        }
        LOGGER.info("fetch processor size=" + processors.size());
        return processors;
    }
}
主要方法的說明已經(jīng)在代碼中注釋,定義了代理爬取任務(wù)和業(yè)務(wù)爬取任務(wù)等方法,還記得前面有提到過業(yè)務(wù)的內(nèi)容處理器是一個(gè)線程類,所以在上面調(diào)度時(shí),就是直接在線程池中加入了對應(yīng)的內(nèi)容處理器,從而實(shí)現(xiàn)并發(fā)爬取。
具體的項(xiàng)目全過程調(diào)用我準(zhǔn)備放在 Spring Boot 的 Application 類中來實(shí)現(xiàn),不過原則上,代理的爬取任務(wù)是要先于業(yè)務(wù)爬取任務(wù)的,不然業(yè)務(wù)爬取時(shí)沒有足夠的代理使用。下面我們來實(shí)現(xiàn) Spring Boot 的 Application 類的內(nèi)容:
@ComponentScan(basePackages = {"com.alany.spider"}) //掃描該包路徑下的所有Spring組件
@SpringBootApplication
public class SpiderApplication {

    public static void main(String[] args) throws InterruptedException {
        SpringApplication.run(SpiderApplication.class, args);
        AsyncProcessTask asyncProcessTask = SpringContext.getBean(AsyncProcessTask.class);
        asyncProcessTask.initProxy();
        Thread.sleep(1000 * 60); //等60s
        asyncProcessTask.startAllProcessors();
    }

}
代碼說明:
由于 Spring Boot 運(yùn)行時(shí)當(dāng)前上下文 Context 是在 Tomcat 的 Web 容器中,所以這里需要再實(shí)現(xiàn)一個(gè) Spring 的上下文 ApplicationContext 工具類來獲取 Spring 容器中的組件,代碼如下:
@Component
public class SpringContext implements ApplicationContextAware {

    private static ApplicationContext context;

    @Override
    public void setApplicationContext(ApplicationContext applicationContext) throws BeansException {
        if (context == null) {
            context = applicationContext;
        }
        //startAllItemProcessors();
    }

    //獲取applicationContext
    public static ApplicationContext getApplicationContext() {
        return context;
    }

    //通過name獲取 Bean.
    public static Object getBean(String name){
        return getApplicationContext().getBean(name);
    }

    //通過class獲取Bean.
    public static  T getBean(Class clazz){
        return getApplicationContext().getBean(clazz);
    }

    //通過name,以及Clazz返回指定的Bean
    public static  T getBean(String name,Class clazz){
        return getApplicationContext().getBean(name, clazz);
    }
}
運(yùn)行 SpiderApplication 的 main 方法可以看到爬蟲歡快的跑起來了,并且成功入庫云數(shù)據(jù)庫。貼一小段爬取成功的 log 來證明框架是真的可以跑起來的 :
2019-08-01 16:56:32.786  INFO 9020 --- [pool-1-thread-3] c.a.spider.core.proxy.ProxyFetchFactory  : github - 185.6.138.28 : false
2019-08-01 16:56:32.925  INFO 9020 --- [pool-1-thread-8] c.a.spider.core.proxy.ProxyFetchFactory  : github - 78.186.237.112 : false
2019-08-01 16:56:32.944  INFO 9020 --- [pool-1-thread-2] c.a.spider.core.proxy.ProxyFetchFactory  : github - 78.186.237.112 : false
2019-08-01 16:56:32.947  INFO 9020 --- [           main] c.a.spider.core.proxy.ProxyFetchFactory  : valid host total size: 299
2019-08-01 16:57:02.951  INFO 9020 --- [           main] c.a.spider.core.task.AsyncProcessTask    : fetch list processor size=1
2019-08-01 16:57:02.960  INFO 9020 --- [l-3809-thread-2] c.a.s.c.process.AbstractItemProcessor    : executing processor: ExecuteContent{start=0, end=0, business='CSDN', url='https://www.csdn.net/api/articles?type=more&category=news&shown_offset=', params='{"offset":1564649090524010}', httpResult=null}
2019-08-01 16:57:02.960  INFO 9020 --- [l-3809-thread-3] c.a.s.c.process.AbstractItemProcessor    : executing processor: ExecuteContent{start=0, end=0, business='CSDN', url='https://www.csdn.net/api/articles?type=more&category=news&shown_offset=', params='{"offset":1564649090524020}', httpResult=null}
2019-08-01 16:57:02.961  INFO 9020 --- [l-3809-thread-4] c.a.s.c.process.AbstractItemProcessor    : executing processor: ExecuteContent{start=0, end=0, business='CSDN', url='https://www.csdn.net/api/articles?type=more&category=news&shown_offset=', params='{"offset":1564649090524030}', httpResult=null}
2019-08-01 16:57:02.962  INFO 9020 --- [l-3809-thread-5] c.a.s.c.process.AbstractItemProcessor    : executing processor: ExecuteContent{start=0, end=0, business='CSDN', url='https://www.csdn.net/api/articles?type=more&category=news&shown_offset=', params='{"offset":1564649090524040}', httpResult=null}
2019-08-01 16:57:02.962  INFO 9020 --- [l-3809-thread-6] c.a.s.c.process.AbstractItemProcessor    : executing processor: ExecuteContent{start=0, end=0, business='CSDN', url='https://www.csdn.net/api/articles?type=more&category=news&shown_offset=', params='{"offset":1564649090524050}', httpResult=null}
2019-08-01 16:57:02.960  INFO 9020 --- [l-3809-thread-1] c.a.s.c.process.AbstractItemProcessor    : executing processor: ExecuteContent{start=0, end=0, business='CSDN', url='https://www.csdn.net/api/articles?type=more&category=news&shown_offset=', params='{"offset":1564649090524000}', httpResult=null}
2019-08-01 16:57:02.964  INFO 9020 --- [l-3809-thread-9] c.a.s.c.process.AbstractItemProcessor    : executing processor: ExecuteContent{start=0, end=0, business='CSDN', url='https://www.csdn.net/api/articles?type=more&category=news&shown_offset=', params='{"offset":1564649090524080}', httpResult=null}
2019-08-01 16:57:02.964  INFO 9020 --- [l-3809-thread-7] c.a.s.c.process.AbstractItemProcessor    : executing processor: ExecuteContent{start=0, end=0, business='CSDN', url='https://www.csdn.net/api/articles?type=more&category=news&shown_offset=', params='{"offset":1564649090524060}', httpResult=null}
2019-08-01 16:57:02.965  INFO 9020 --- [-3809-thread-10] c.a.s.c.process.AbstractItemProcessor    : executing processor: ExecuteContent{start=0, end=0, business='CSDN', url='https://www.csdn.net/api/articles?type=more&category=news&shown_offset=', params='{"offset":1564649090524090}', httpResult=null}
2019-08-01 16:57:02.966  INFO 9020 --- [l-3809-thread-3] com.alany.spider.core.http.HttpRequest   : url: https://www.csdn.net/api/articles?type=more&category=news&shown_offset=, proxy: 51.158.99.51:8811
2019-08-01 16:57:02.966  INFO 9020 --- [l-3809-thread-5] com.alany.spider.core.http.HttpRequest   : url: https://www.csdn.net/api/articles?type=more&category=news&shown_offset=, proxy: 39.137.107.98:8080
2019-08-01 16:57:02.966  INFO 9020 --- [l-3809-thread-9] com.alany.spider.core.http.HttpRequest   : url: https://www.csdn.net/api/articles?type=more&category=news&shown_offset=, proxy: 49.48.144.160:8080
2019-08-01 16:57:02.966  INFO 9020 --- [l-3809-thread-8] c.a.s.c.process.AbstractItemProcessor    : executing processor: ExecuteContent{start=0, end=0, business='CSDN', url='https://www.csdn.net/api/articles?type=more&category=news&shown_offset=', params='{"offset":1564649090524070}', httpResult=null}
2019-08-01 16:57:02.967  INFO 9020 --- [l-3809-thread-8] com.alany.spider.core.http.HttpRequest   : url: https://www.csdn.net/api/articles?type=more&category=news&shown_offset=, proxy: 178.128.229.122:8080
2019-08-01 16:57:02.968  INFO 9020 --- [l-3809-thread-7] com.alany.spider.core.http.HttpRequest   : url: https://www.csdn.net/api/articles?type=more&category=news&shown_offset=, proxy: 92.49.188.250:8080
2019-08-01 16:57:02.969  INFO 9020 --- [-3809-thread-10] com.alany.spider.core.http.HttpRequest   : url: https://www.csdn.net/api/articles?type=more&category=news&shown_offset=, proxy: 36.90.158.178:8080
2019-08-01 16:57:02.970  INFO 9020 --- [l-3809-thread-2] com.alany.spider.core.http.HttpRequest   : url: https://www.csdn.net/api/articles?type=more&category=news&shown_offset=, proxy: 159.138.22.112:80
2019-08-01 16:57:02.972  INFO 9020 --- [l-3809-thread-6] com.alany.spider.core.http.HttpRequest   : url: https://www.csdn.net/api/articles?type=more&category=news&shown_offset=, proxy: 110.74.199.125:35604
2019-08-01 16:57:02.972  INFO 9020 --- [l-3809-thread-1] com.alany.spider.core.http.HttpRequest   : url: https://www.csdn.net/api/articles?type=more&category=news&shown_offset=, proxy: 13.115.109.245:8080
2019-08-01 16:57:02.973  INFO 9020 --- [l-3809-thread-4] com.alany.spider.core.http.HttpRequest   : url: https://www.csdn.net/api/articles?type=more&category=news&shown_offset=, proxy: 185.80.130.17:80
2019-08-01 16:57:10.161  INFO 9020 --- [l-3809-thread-1] c.a.s.c.dao.impl.AbstractCouldDBService  : success to insert bean [{"imgUrl":"https://profile.csdnimg.cn/B/0/7/1_l659292998","publishTime":"2019-08-01 16:57:09","author":"恒指交易指導(dǎo)","articleId":"95589302","description":"恒指7.12號開盤前瞻:美股再創(chuàng)新高,恒指能否踏上新臺階。\n美國減息預(yù)期持續(xù)升溫,推動道指和標(biāo)普500再創(chuàng)新高。周四(7月11日)美國三大股指漲跌不一,道指收報(bào)27088點(diǎn),升227點(diǎn)或0.85%,歷史首次突破27000點(diǎn)大關(guān),創(chuàng)收市新高;標(biāo)指收報(bào)2999點(diǎn),升6點(diǎn)或0.23%,同創(chuàng)收市新高;以科技股為主的納指微跌6點(diǎn)或0.08%,收報(bào)8196點(diǎn)。\n近日,美聯(lián)儲主席鮑威爾一展“鴿”喉,7月降息之門...","sourceName":"CSDN","title":"進(jìn)退博弈:恒指7.12號早盤資訊及交易計(jì)劃","category":"恒指,恒指早盤,進(jìn)退博弈","url":"https://blog.csdn.net/L659292998/article/details/95589302","status":0}]
2019-08-01 16:57:10.381  INFO 9020 --- [l-3809-thread-1] c.a.s.c.dao.impl.AbstractCouldDBService  : success to insert bean [{"imgUrl":"https://profile.csdnimg.cn/F/1/1/1_win_le","publishTime":"2019-08-01 16:57:09","author":"吾昂王","articleId":"94658782","description":"linux目錄結(jié)構(gòu):\n類似倒掛的樹.   \n/ : 根目錄,所有數(shù)據(jù)都在此目錄下(Windows中,通常說文件夾,文件. LINUX中通常為 目錄 和 文件 )\nlinux中 一切 皆文件!!!!\n例 : /dev : 存放系統(tǒng)設(shè)備相關(guān)的數(shù)據(jù)\n\nlinux磁盤表示:\nhd,表示IDE設(shè)備\nsd:表示SCSI設(shè)備\n\n命令行提示符:\n[當(dāng)前用戶名@當(dāng)前主機(jī)名 當(dāng)前所在位置] # $ (#為此用戶為超級...","sourceName":"CSDN","title":"Linux基礎(chǔ)中的基礎(chǔ) 一","url":"https://blog.csdn.net/Win_Le/article/details/94658782","status":0}]
2019-08-01 16:57:10.590  INFO 9020 --- [l-3809-thread-1] c.a.s.c.dao.impl.AbstractCouldDBService  : success to insert bean [{"imgUrl":"https://profile.csdnimg.cn/0/E/1/1_qq_42391904","publishTime":"2019-08-01 16:57:09","author":"Maker星蔚","articleId":"95529565","description":"Android四大組件分別為:1.活動Activity,2.服務(wù)Service,3.廣播Broadcast Receiver,4.內(nèi)容提供器Content Provider\n1.Service概念與要點(diǎn)\n1.定義:服務(wù)(Service)是Android中使程序在后臺運(yùn)行的方法。\n(1) 服務(wù)適合去執(zhí)行不需要用戶交互卻要長期執(zhí)行的任務(wù),例如一個(gè)音樂app可在當(dāng)程序在后臺時(shí)仍然播放音樂,用戶使用其他程...","sourceName":"CSDN","title":"Android基礎(chǔ)-四大組件之Service(基礎(chǔ))","category":"安卓開發(fā),Android四大組件,Android入門","url":"https://blog.csdn.net/qq_42391904/article/details/95529565","status":0}]
此外,之前在架構(gòu)圖中還提到過一種通過 RESTful 接口的方式觸發(fā)任務(wù),那么把對應(yīng)的控制器也實(shí)現(xiàn)下,代碼如下:
@RestController
@RequestMapping("/exec")
public class ProcessExecController {

    private AsyncProcessTask asyncProcessTask = SpringContext.getBean(AsyncProcessTask.class);

    @RequestMapping(value = "/all")
    public void execAll(){
        asyncProcessTask.startAllProcessors();
    }

    @RequestMapping(value = "/biz")
    public void execByBiz(String business){
        asyncProcessTask.startProcessorsByBusiness(business);
    }

}
代碼非常簡單,就是對 AsyncProcessTask 類的簡單調(diào)用,項(xiàng)目啟動后在瀏覽器中輸入 URL——http://localhost:8080/exec/all,也可以觸發(fā)所有業(yè)務(wù)的爬取任務(wù)。
至此,整個(gè)爬蟲項(xiàng)目的框架就搭建完畢,內(nèi)容和代碼較多,涉及到 Spring、SpringBoot、Java 并發(fā)編程、HTTP、JSON 解析、jsoup 頁面解析、設(shè)計(jì)模式等多方面的知識,所以存在不熟悉的知識點(diǎn)需要額外補(bǔ)一下短板哈,此外在閱讀文章的同時(shí)邊上機(jī)實(shí)踐效果會更好,最后祝愿大家都能有所收獲。