
使用 Python 和 Facenet 在 CPU 上進行實時人臉識別
在本文中,將介紹一種通過自定義框架構建和使用任何自定義人臉識別模型的簡單方法。完成本教程后,你將學習如何使用預訓練模型創(chuàng)建具有任意 CPU 的實時人臉識別系統(tǒng)。
官方將人臉識別定義為驗證或識別圖像中的人臉的問題。但通常有一個問題,我們?nèi)绾螠蚀_識別圖像中的人臉?
人臉識別過程可以分為多個步驟。下圖是一個人臉識別管道的示例:

人臉識別流程步驟:
人臉檢測——檢測圖像中的一張或多張臉; 特征提取——從圖片中檢測到的人臉中提取基本特征; 人臉匹配——將人臉匹配到錨人臉特征。
有很多方法可以實現(xiàn)人臉識別管道中的每個步驟。在本文中,我們將重點介紹使用第一個教程中介紹的 MediaPipe 人臉檢測模型進行人臉檢測的流行深度學習技術、使用 FaceNet 進行特征提取以及使用余弦或歐幾里德距離進行人臉匹配。
讓我們一步一步地完成這項任務。在每一步中,我們將學習不同的機器學習算法。我將向你展示每一個背后的主要思想。你將學習使用 MediaPipe 人臉檢測器和 FaceNet 人臉特征提取器在 Python 中構建你的人臉識別系統(tǒng)。
使用 MediaPipe 進行人臉檢測:
我們?nèi)四樧R別流程的第一步是人臉檢測。我們需要先定位圖像中的人臉,然后才能嘗試將它們區(qū)分開!

人臉檢測是當今大多數(shù)相機使用的一項很棒的功能。例如,當相機可以自動定位人臉時,它可以確保在拍照之前將所有人臉都對焦。
但現(xiàn)在,我們將把它用于另一個目的——找到面部區(qū)域,然后將其傳遞到管道中的另一個步驟“面部特征提取程序”。
這篇文章將使用超輕型 MedaPipe 探測器。但是假設你有興趣應用提到的任何其他檢測方法。
我探索了多個面部檢測器。其中包括 MTCNN、Dlib、MediaPipe、pure CNN 以及最近發(fā)布的其他一些人臉檢測器。
讓我們開始吧!
FaceNet人臉特征提取
FaceNet 與其他人臉識別模型類似,是一種用于提取人臉圖像特征的深度神經(jīng)網(wǎng)絡。它由谷歌研究人員 Schroff 等人發(fā)表。
論文地址:https://arxiv.org/abs/1503.03832
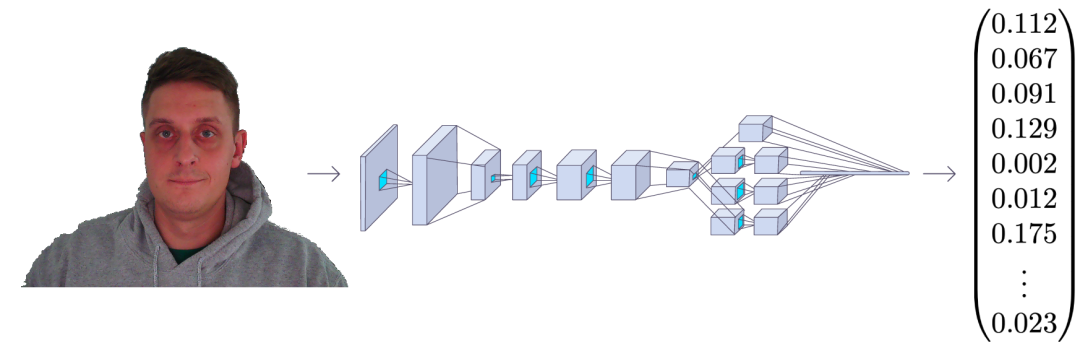
FaceNet 以一張人臉圖像作為輸入,輸出是一個由 128 個數(shù)字組成的向量,表示人臉的基本特征。這個向量被稱為嵌入,因為來自面部圖像的所有相關信息都嵌入到這個向量中。
基本上,F(xiàn)aceNet 采用人臉并將其壓縮成 128 個數(shù)字的向量。但是如果我們只觀察這個向量,我們不可能知道那個人的臉是什么樣的。
如今,在機器學習中將高維數(shù)據(jù)(例如圖像)與低維圖像(向量嵌入)相關聯(lián)已成為一種相當普遍的做法。
在一張沒見過的圖像中識別一個人物A的一種常見方法是,獲取圖像嵌入并計算與已知人臉A的圖片的距離。我們通常使用余弦或歐幾里得距離數(shù)學公式計算距離。如果計算出的人臉距離與人 物A 的嵌入足夠接近,我們就假設這張臉是同一個人的。
聽起來很容易,對吧?
’我們通過 FaceNet 輸入圖像,得到一個向量數(shù),并檢查計算出的距離是否足夠接近我們擁有的任何已知人臉。
盡管如此,還是有一個問題,F(xiàn)aceNet 如何知道從人臉圖像中提取什么東西呢?嵌入向量中的這些數(shù)字意味著什么?雖然這不是本教程的目的,但我們可以簡要介紹一下,以便我們熟悉它。
為了訓練一個人臉識別器,我們需要很多人臉圖像。像每個機器學習問題一樣,訓練通常需要數(shù)千張不同的圖像。當我們開始訓練過程時,模型會為每張圖像生成隨機向量,這意味著圖像是隨機分布的。
學習步驟:
隨機選擇一個錨點圖像; 隨機選擇同一個人的正樣本圖像作為基礎圖像; 隨機選擇與主圖像不同的人的負樣本圖像; 調整 FaceNet 神經(jīng)網(wǎng)絡參數(shù),使正樣本比負樣本更靠近錨點。
我們重復這四個步驟,直到不再需要更改或這些更改非常小以至于沒有影響。訓練完成后,同一個人的所有面孔在距離上都彼此靠近,而與不同的面孔相距很遠。
你可能會問,嵌入向量中的數(shù)字是什么意思?事實上,我們不知道這些數(shù)字代表什么,也很難解釋它們。我們知道這些特征對于人臉識別來說似乎是必不可少的,而且它確實有效。
如果你是軟件開發(fā)人員,你可以將人臉匹配器視為一個哈希函數(shù)。它將同一個人的面部映射到坐標系中嵌入是哈希碼的相同位置。
讓我們來看看我們的代碼。我專門為面部識別編寫了整個對象,我們將與引擎對象一起使用。這個對象有它需要做的一切,從運行推理、加載錨圖像、測量距離、在幀上繪制識別等等;你可以隨時添加你需要的功能。
這是faceNet.py完整的對象代碼:
# faceNet.py
import cv2import cv2
import stow
import typing
import numpy as np
import onnxruntime as ort

class FaceNet:
    """FaceNet class object, which can be used for simplified face recognition
    """
    def __init__(
        self,
        detector: object,
        onnx_model_path: str = "models/faceNet.onnx",
        anchors: typing.Union[str, dict] = 'faces',
        force_cpu: bool = False,
        threshold: float = 0.5,
        color: tuple = (255, 255, 255),
        thickness: int = 2,
        ) -> None:

        """Object for face recognition
        Params:
            detector: (object) - detector object to detect faces in image
            onnx_model_path: (str) - path to onnx model
            force_cpu: (bool) - if True, onnx model will be run on CPU
            anchors: (str or dict) - path to directory with faces or dictionary with anchor names as keys and anchor encodings as values
            threshold: (float) - threshold for face recognition
            color: (tuple) - color of bounding box and text
            thickness: (int) - thickness of bounding box and text
        """

        if not stow.exists(onnx_model_path):
            raise Exception(f"Model doesn't exists in {onnx_model_path}")

        self.detector = detector
        self.threshold = threshold
        self.color = color
        self.thickness = thickness

        providers = ['CUDAExecutionProvider', 'CPUExecutionProvider']

        providers = providers if ort.get_device() == "GPU" and not force_cpu else providers[::-1]

        self.ort_sess = ort.InferenceSession(onnx_model_path, providers=providers)

        self.input_shape = self.ort_sess._inputs_meta[0].shape[1:3]

        self.anchors = self.load_anchors(anchors) if isinstance(anchors, str) else anchors

    def normalize(self, img: np.ndarray) -> np.ndarray:

        """Normalize image
        Args:
            img: (np.ndarray) - image to be normalized
        Returns:
            img: (np.ndarray) - normalized image
        """

        mean, std = img.mean(), img.std()
        return (img - mean) / std

    def l2_normalize(self, x: np.ndarray, axis: int = -1, epsilon: float = 1e-10) -> np.ndarray:

        """l2 normalization function
        Args:
            x: (np.ndarray) - input array
            axis: (int) - axis to normalize
            epsilon: (float) - epsilon to avoid division by zero
        Returns:
            x: (np.ndarray) - normalized array
        """

        output = x / np.sqrt(np.maximum(np.sum(np.square(x), axis=axis, keepdims=True), epsilon))
        return output

    def detect_save_faces(self, image: np.ndarray, output_dir: str = "faces"):

        """Detect faces in given image and save them to output_dir
        Args:
            image: (np.ndarray) - image to be processed
            output_dir: (str) - directory where faces will be saved
        Returns:
            bool: (bool) - True if faces were detected and saved
        """

        face_crops = [image[t:b, l:r] for t, l, b, r in self.detector(image, return_tlbr=True)]

        if face_crops == []:
            return False

        stow.mkdir(output_dir)

        for index, crop in enumerate(face_crops):
            output_path = stow.join(output_dir, f"face_{str(index)}.png")
            cv2.imwrite(output_path, crop)
            print("Crop saved to:", output_path)

        self.anchors = self.load_anchors(output_dir)

        return True


    def load_anchors(self, faces_path: str):

        """Generate anchors for given faces path
        Args:
            faces_path: (str) - path to directory with faces
        Returns:
            anchors: (dict) - dictionary with anchor names as keys and anchor encodings as values
        """

        anchors = {}
        if not stow.exists(faces_path):
            return {}

        for face_path in stow.ls(faces_path):
            anchors[stow.basename(face_path)] = self.encode(cv2.imread(face_path.path))

        return anchors

    def encode(self, face_image: np.ndarray) -> np.ndarray:
        """Encode face image with FaceNet model
        Args
            face_image: (np.ndarray) - face image to be encoded

        Returns:
            face_encoding: (np.ndarray) - face encoding
        """
        face = self.normalize(face_image)
        face = cv2.resize(face, self.input_shape).astype(np.float32)

        encode = self.ort_sess.run(None, {self.ort_sess._inputs_meta[0].name: np.expand_dims(face, axis=0)})[0][0]
        normalized_encode = self.l2_normalize(encode)

        return normalized_encode

    def cosine_distance(self, a: np.ndarray, b: typing.Union[np.ndarray, list]) -> np.ndarray:

        """Cosine distance between wectors a and b
        Args:
            a: (np.ndarray) - first vector
            b: (np.ndarray) - second list of vectors
        Returns:
            distance: (float) - cosine distance
        """

        if isinstance(a, list):
            a = np.array(a)

        if isinstance(b, list):
            b = np.array(b)

        return np.dot(a, b.T) / (np.linalg.norm(a) * np.linalg.norm(b))

    def draw(self, image: np.ndarray, face_crops: dict):

        """Draw face crops on image
        Args:
            image: (np.ndarray) - image to be drawn on
            face_crops: (dict) - dictionary with face crops as values and face names as keys
        Returns:
            image: (np.ndarray) - image with drawn face crops
        """

        for value in face_crops.values():
            t, l, b, r = value["tlbr"]
            cv2.rectangle(image, (l, t), (r, b), self.color, self.thickness)
            cv2.putText(image, stow.name(value['name']), (l, t - 10), cv2.FONT_HERSHEY_SIMPLEX, 0.9, self.color, self.thickness)

        return image

    def __call__(self, frame: np.ndarray) -> np.ndarray:

        """Face recognition pipeline
        Args:
            frame: (np.ndarray) - image to be processed
        Returns:
            frame: (np.ndarray) - image with drawn face recognition results
        """

        face_crops = {index: {"name": "Unknown", "tlbr": tlbr} for index, tlbr in enumerate(self.detector(frame, return_tlbr=True))}
        for key, value in face_crops.items():
            t, l, b, r = value["tlbr"]
            face_encoding = self.encode(frame[t:b, l:r])
            distances = self.cosine_distance(face_encoding, list(self.anchors.values()))
            if np.max(distances) > self.threshold:
                face_crops[key]["name"] = list(self.anchors.keys())[np.argmax(distances)]

        frame = self.draw(frame, face_crops)

        return frame
我不會一步一步地處理這個對象;我將在我的 YouTube 視頻教程中介紹這一點。但我必須提到,這里我們正在加載.onnx模型,我們可以使用faceNet/convert_to_onnx.py腳本進行轉換:
# faceNet/convert_to_onnx.py
import os
import tensorflow as tf
import tf2onnx
from architecture import InceptionResNetV2

if __name__ == '__main__':
    """ weights can be downloaded from https://drive.google.com/drive/folders/1scGoVCQp-cNwKTKOUqevCP1N2LlyXU3l?usp=sharing
    Put facenet_keras_weights.h5 file in model folder
    """
    facenet_weights_path = "models/facenet_keras_weights.h5"
    onnx_model_output_path = "models/faceNet.onnx"

    if not os.path.exists(facenet_weights_path):
        raise Exception(f"Model doesn't exists in {facenet_weights_path}, download weights from \
            https://drive.google.com/drive/folders/1scGoVCQp-cNwKTKOUqevCP1N2LlyXU3l?usp=sharing")

    faceNet = InceptionResNetV2()
    faceNet.load_weights(facenet_weights_path)

    spec = (tf.TensorSpec(faceNet.inputs[0].shape, tf.float32, name="image_input"),)
    tf2onnx.convert.from_keras(faceNet, output_path=onnx_model_output_path, input_signature=spec)
view raw
首先,你必須從代碼中的給定鏈接下載權重并將它們放在模型文件夾中。然后使用python 運行 faceNet/convert_to_onnx.py代碼,它應該將模型轉換為.onnx格式。
有了模型后,我們可以打開main.py腳本并使用以下代碼運行網(wǎng)絡攝像頭實時人臉識別:
# main.py
from utils import FPSmetric
from engine import Engine
from faceDetection import MPFaceDetection
from faceNet.faceNet import FaceNet

if __name__ == '__main__':
    facenet = FaceNet(
        detector = MPFaceDetection(),
        onnx_model_path = "models/faceNet.onnx",
        anchors = "faces",
        force_cpu = True,
    )
    engine = Engine(webcam_id=0, show=True, custom_objects=[facenet, FPSmetric()])

    # save first face crop as anchor, otherwise don't use
    while not facenet.detect_save_faces(engine.process_webcam(return_frame=True), output_dir="faces"):
        continue

    engine.run()
正如我所提到的,要提取人臉嵌入,首先,在定義 FaceNet 對象時,我們需要在幀上定位人臉。
然后我們告訴模型我們保存的模型的路徑。然后我們給它保存anchors的路徑;它必須是帶有面部裁剪的圖像。例如,我在我裁剪的臉所在的圖像“Rokas.png”上有我的。這意味著模型將加載此錨點并在找到匹配項時顯示我的名字。
接下來,我們需要創(chuàng)建一個引擎對象,負責處理圖像、視頻或網(wǎng)絡攝像頭流;我選擇處理網(wǎng)絡攝像頭。使用“show”參數(shù),我告訴對象在屏幕上顯示此幀。
另外,我添加了一個 FPSmetric 來了解人臉識別的工作速度。
最后,我必須將我的“facenet”對象傳遞給“custom_objects”參數(shù)。在這里,我們可以添加更多,“pencil sketch”、“background removal”或其他我們想要的實體。
現(xiàn)在,如果我們沒有將裁剪保存在光盤上,我創(chuàng)建了一個函數(shù)來抓取第一個網(wǎng)絡攝像頭幀,如果它在其中找到一張人臉,它就會裁剪并保存它:
while not facenet.detect_save_faces(engine.process_webcam(return_frame=True), output_dir="faces"):
    continue
保存anchor face后,它移動到處理每一幀的“engine.run()”函數(shù),我們應該看到與我下圖類似的結果:
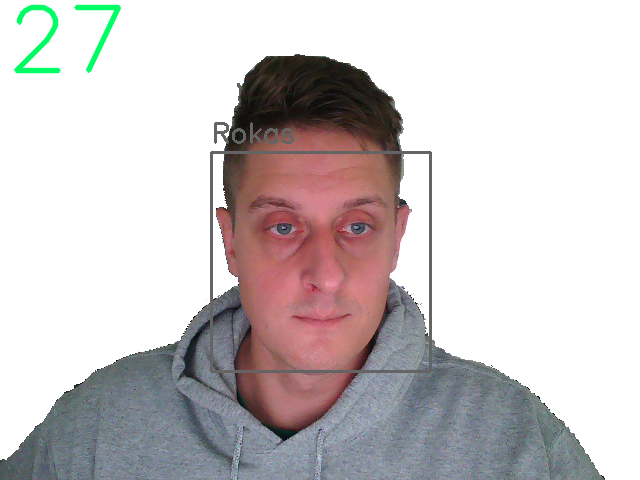
我們可以清楚地看到左上角的 FPS 和我臉上的一個正方形,上面有錨圖像的名稱。太棒了!
結論:
最后,我們創(chuàng)建了一個可以在我們的 CPU 上進行實時人臉識別的系統(tǒng),它的運行速度在 30 fps 左右,這對我們來說已經(jīng)足夠了!
GitHub地址:https://github.com/pythonlessons/background_removal