
Surface 與 SurfaceFlinger 之間的關系

和你一起終身學習,這里是程序員Android
經(jīng)典好文推薦,通過閱讀本文,您將收獲以下知識點:
一、SurfaceFlinger 啟動過程
二、Surface 創(chuàng)建過程
三、Surface 顯示過程
一、SurfaceFlinger 啟動過程
SurfaceFlinger 啟動過程:
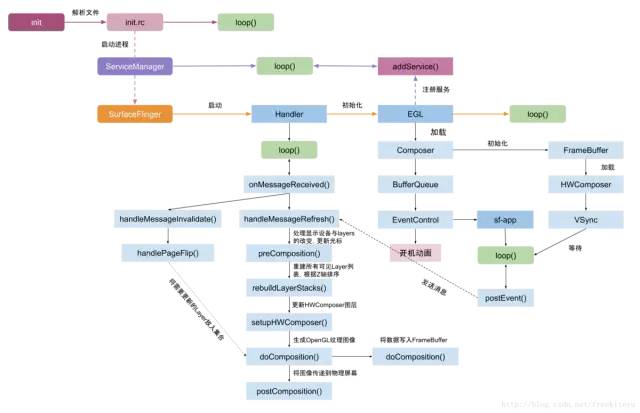
SurfaceFlinger 進程是由 init 進程創(chuàng)建的,運行在獨立的 SurfaceFlinger 進程中。init 進程讀取 init.rc 文件啟動 SurfaceFlinger。
service surfaceflinger /system/bin/surfaceflinger
    class core
    user system
    group graphics drmrpc
    onrestart restart zygote
    writepid /dev/cpuset/system-background/tasks
SurfaceFlinger 的創(chuàng)建會執(zhí)行 main() 方法:
main_surfaceflinger.cpp
int main(int, char**) {
    ProcessState::self()->setThreadPoolMaxThreadCount(4);

    sp<ProcessState> ps(ProcessState::self());
    ps->startThreadPool();

    //實例化 surfaceflinger
    sp<SurfaceFlinger> flinger =  new SurfaceFlinger();

    setpriority(PRIO_PROCESS, 0, PRIORITY_URGENT_DISPLAY);
    set_sched_policy(0, SP_FOREGROUND);

    //初始化
    flinger->init();

    //發(fā)布 surface flinger,注冊到 ServiceManager
    sp<IServiceManager> sm(defaultServiceManager());
    sm->addService(String16(SurfaceFlinger::getServiceName()), flinger, false);

    // 運行在當前線程
    flinger->run();

    return 0;
}
SurfaceFlinger 的實例化會執(zhí)行到:onFirstRef()
void SurfaceFlinger::onFirstRef() {
    mEventQueue.init(this);
}
onFirstRef() 中會創(chuàng)建 Handler 并初始化。
MessageQueue.cpp:
void MessageQueue::init(const sp<SurfaceFlinger>& flinger) {
    mFlinger = flinger;
    mLooper = new Looper(true);
    mHandler = new Handler(*this);
}
然后會執(zhí)行到 SurfaceFlinger::init():
void SurfaceFlinger::init() {
    Mutex::Autolock _l(mStateLock);

    //初始化 EGL,作為默認的顯示
    mEGLDisplay = eglGetDisplay(EGL_DEFAULT_DISPLAY);
    eglInitialize(mEGLDisplay, NULL, NULL);

    // 初始化硬件 composer 對象
    mHwc = new HWComposer(this, *static_cast<HWComposer::EventHandler *>(this));

    //獲取 RenderEngine 引擎
    mRenderEngine = RenderEngine::create(mEGLDisplay, mHwc->getVisualID());

    //檢索創(chuàng)建的 EGL 上下文
    mEGLContext = mRenderEngine->getEGLContext();

    //初始化非虛擬顯示屏
    for (size_t i=0 ; i<DisplayDevice::NUM_BUILTIN_DISPLAY_TYPES ; i++) {
        DisplayDevice::DisplayType type((DisplayDevice::DisplayType)i);
        //建立已連接的顯示設備
        if (mHwc->isConnected(i) || type==DisplayDevice::DISPLAY_PRIMARY) {
            bool isSecure = true;
            createBuiltinDisplayLocked(type);
            wp<IBinder> token = mBuiltinDisplays[i];

            sp<IGraphicBufferProducer> producer;
            sp<IGraphicBufferConsumer> consumer;
            //創(chuàng)建 BufferQueue 的生產(chǎn)者和消費者
            BufferQueue::createBufferQueue(&producer, &consumer,
                    new GraphicBufferAlloc());

            sp<FramebufferSurface> fbs = new FramebufferSurface(*mHwc, i, consumer);
            int32_t hwcId = allocateHwcDisplayId(type);
            //創(chuàng)建顯示設備
            sp<DisplayDevice> hw = new DisplayDevice(this,
                    type, hwcId, mHwc->getFormat(hwcId), isSecure, token,
                    fbs, producer,
                    mRenderEngine->getEGLConfig());
            if (i > DisplayDevice::DISPLAY_PRIMARY) {
                hw->setPowerMode(HWC_POWER_MODE_NORMAL);
            }
            mDisplays.add(token, hw);
        }
    }

    getDefaultDisplayDevice()->makeCurrent(mEGLDisplay, mEGLContext);

    //當應用和 sf 的 vsync 偏移量一致時,則只創(chuàng)建一個 EventThread 線程
    if (vsyncPhaseOffsetNs != sfVsyncPhaseOffsetNs) {
        sp<VSyncSource> vsyncSrc = new DispSyncSource(&mPrimaryDispSync,
                vsyncPhaseOffsetNs, true, "app");
        mEventThread = new EventThread(vsyncSrc);
        sp<VSyncSource> sfVsyncSrc = new DispSyncSource(&mPrimaryDispSync,
                sfVsyncPhaseOffsetNs, true, "sf");
        mSFEventThread = new EventThread(sfVsyncSrc);
        mEventQueue.setEventThread(mSFEventThread);
    } else {
        //創(chuàng)建 DispSyncSource 對象
        sp<VSyncSource> vsyncSrc = new DispSyncSource(&mPrimaryDispSync,
                vsyncPhaseOffsetNs, true, "sf-app");
        //創(chuàng)建線程 EventThread
        mEventThread = new EventThread(vsyncSrc);
        //設置 EventThread
        mEventQueue.setEventThread(mEventThread);
    }

    //創(chuàng)建 EventControl
    mEventControlThread = new EventControlThread(this);
    mEventControlThread->run("EventControl", PRIORITY_URGENT_DISPLAY);

    //當不存在 HWComposer 時,則設置軟件 vsync
    if (mHwc->initCheck() != NO_ERROR) {
        mPrimaryDispSync.setPeriod(16666667);
    }

    //初始化繪圖狀態(tài)
    mDrawingState = mCurrentState;

    //初始化顯示設備
    initializeDisplays();

    //啟動開機動畫
    startBootAnim();
}
該方法主要功能是:
初始化 EGL
創(chuàng)建 HWComposer
初始化非虛擬顯示屏
啟動 EventThread 線程
啟動開機動畫
創(chuàng)建 HWComposer:
HWComposer::HWComposer(const sp<SurfaceFlinger>& flinger, EventHandler& handler):mFlinger(flinger), mFbDev(0), mHwc(0), mNumDisplays(1), mCBContext(new cb_context), mEventHandler(handler), mDebugForceFakeVSync(false) {
    ...
    bool needVSyncThread = true;
    int fberr = loadFbHalModule(); //加載 framebuffer 的 HAL 層模塊
    loadHwcModule(); //加載 HWComposer 模塊

    //標記已分配的 display ID
    for (size_t i=0 ; i<NUM_BUILTIN_DISPLAYS ; i++) {
        mAllocatedDisplayIDs.markBit(i);
    }

    if (mHwc) {
        if (mHwc->registerProcs) {
            mCBContext->hwc = this;
            mCBContext->procs.invalidate = &hook_invalidate;
            //VSYNC 信號的回調方法
            mCBContext->procs.vsync = &hook_vsync;
            if (hwcHasApiVersion(mHwc, HWC_DEVICE_API_VERSION_1_1))
                mCBContext->procs.hotplug = &hook_hotplug;
            else
                mCBContext->procs.hotplug = NULL;
            memset(mCBContext->procs.zero, 0, sizeof(mCBContext->procs.zero));
            //注冊回調函數(shù)
            mHwc->registerProcs(mHwc, &mCBContext->procs);
        }

        //進入此處,說明已成功打開硬件 composer 設備,則不再需要 vsync 線程
        needVSyncThread = false;
        eventControl(HWC_DISPLAY_PRIMARY, HWC_EVENT_VSYNC, 0);
        ...
    }
    ...
    if (needVSyncThread) {
        //不支持硬件的 VSYNC,則會創(chuàng)建線程來模擬定時 VSYNC 信號
        mVSyncThread = new VSyncThread(*this);
    }
}
HWComposer 代表著硬件顯示設備,注冊了 VSYNC 信號的回調。VSYNC 信號本身是由顯示驅動產(chǎn)生的,在不支持硬件的 VSYNC,則會創(chuàng)建“VSyncThread”線程來模擬定時 VSYNC 信號。
當硬件產(chǎn)生VSYNC信號時,則會發(fā)送消息,handler 收到消息進行處理。當 SurfaceFlinger 進程收到 VSync 信號后經(jīng)層層調用,最終調用到該對象的 handleMessageRefresh() 方法。
SurfaceFlinger.cpp:
void SurfaceFlinger::handleMessageRefresh() {
    ATRACE_CALL();
    preComposition();//處理顯示設備與 layers 的改變,更新光標
    rebuildLayerStacks();//重建所有可見 Layer 列表,根據(jù)Z軸排序
    setUpHWComposer();//更新 HWComposer 圖層
    doDebugFlashRegions();
    doComposition();//生成 OpenGL 紋理圖像
    postComposition();//將圖像傳遞到物理屏幕
}
二、Surface 創(chuàng)建過程
Surface 創(chuàng)建過程:

Surface 創(chuàng)建的過程就是 Activity 顯示的過程,在 ActivityThread.handleResumeActivity() 中調用了 Activity.makeVisible(),我們接著看下 Activity 是怎么顯示出來的。
Activity.makeVisible:
void makeVisible() {
    if (!mWindowAdded) {
        ViewManager wm = getWindowManager();//此處 getWindowManager 獲取的是 WindowManagerImpl 對象
        wm.addView(mDecor, getWindow().getAttributes());
        mWindowAdded = true;
    }
    mDecor.setVisibility(View.VISIBLE);
}
WindowManagerImpl.java:
public void addView(@NonNull View view, @NonNull ViewGroup.LayoutParams params) {
    applyDefaultToken(params);
    mGlobal.addView(view, params, mDisplay, mParentWindow);
}
WindowManagerGlobal.java:
public void addView(View view, ViewGroup.LayoutParams params, Display display, Window parentWindow) {
    ...
    final WindowManager.LayoutParams wparams = (WindowManager.LayoutParams) params;
    //創(chuàng)建 ViewRootImpl
    ViewRootImpl root = new ViewRootImpl(view.getContext(), display);
    view.setLayoutParams(wparams);
    mViews.add(view);
    mRoots.add(root);
    mParams.add(wparams);
    //設置 View
    root.setView(view, wparams, panelParentView);
    ...
}
創(chuàng)建 ViewRootImpl:
public final class ViewRootImpl implements ViewParent,
        View.AttachInfo.Callbacks, ThreadedRenderer.DrawCallbacks {
    ...
    final Surface mSurface = new Surface(); //創(chuàng)建 Surface,此時 Surface 創(chuàng)建完什么都沒有,詳見下面分析
    ...
    public ViewRootImpl(Context context, Display display) {
        mContext = context;
        //獲取 IWindowSession 的代理類
        mWindowSession = WindowManagerGlobal.getWindowSession();
        mDisplay = display;
        mThread = Thread.currentThread(); //主線程
        mWindow = new W(this);
        mChoreographer = Choreographer.getInstance();
        ...
    }
}
WindowManagerGlobal.java:
public static IWindowSession getWindowSession() {
    synchronized (WindowManagerGlobal.class) {
        if (sWindowSession == null) {
            try {
                //獲取 IMS 的代理類
                InputMethodManager imm = InputMethodManager.getInstance();
                //獲取 WMS 的代理類
                IWindowManager windowManager = getWindowManagerService();
                //經(jīng)過 Binder 調用,最終調用 WMS
                sWindowSession = windowManager.openSession(
                        new IWindowSessionCallback.Stub() {...},
                        imm.getClient(), imm.getInputContext());
            } catch (RemoteException e) {
                ...
            }
        }
        return sWindowSession
    }
}
WindowManagerService.openSession:
public IWindowSession openSession(IWindowSessionCallback callback, IInputMethodClient client, IInputContext inputContext) {
    //創(chuàng)建 Session 對象
    Session session = new Session(this, callback, client, inputContext);
    return session;
}
再次經(jīng)過 Binder 將數(shù)據(jù)寫回 app 進程,則獲取的便是 Session 的代理對象 IWindowSession。
創(chuàng)建完 ViewRootImpl 對象后,接下來調用該對象的 setView() 方法。
ViewRootImpl:
public void setView(View view, WindowManager.LayoutParams attrs, View panelParentView) {
  synchronized (this) {

    requestLayout(); //詳見下面分析
    ...
    //通過 Binder調用,進入 system 進程的 Session
    res = mWindowSession.addToDisplay(mWindow, mSeq, mWindowAttributes,
          getHostVisibility(), mDisplay.getDisplayId(),
          mAttachInfo.mContentInsets, mAttachInfo.mStableInsets,
          mAttachInfo.mOutsets, mInputChannel);
    ...
  }
}
final class Session extends IWindowSession.Stub implements IBinder.DeathRecipient {

    public int addToDisplay(IWindow window, int seq, WindowManager.LayoutParams attrs, int viewVisibility, int displayId, Rect outContentInsets, Rect outStableInsets, Rect outOutsets, InputChannel outInputChannel) {
        //調用 WMS.addWindow
        return mService.addWindow(this, window, seq, attrs, viewVisibility, displayId,
                outContentInsets, outStableInsets, outOutsets, outInputChannel);
    }
}
WindowManagerService.java:
public int addWindow(Session session, IWindow client, int seq, WindowManager.LayoutParams attrs, int viewVisibility, int displayId, Rect outContentInsets, Rect outStableInsets, Rect outOutsets, InputChannel outInputChannel) {
    ...
    WindowToken token = mTokenMap.get(attrs.token);
    //創(chuàng)建 WindowState
    WindowState win = new WindowState(this, session, client, token,
                attachedWindow, appOp[0], seq, attrs, viewVisibility, displayContent);
    ...
    //調整 WindowManager 的 LayoutParams 參數(shù)
    mPolicy.adjustWindowParamsLw(win.mAttrs);
    res = mPolicy.prepareAddWindowLw(win, attrs);
    addWindowToListInOrderLocked(win, true);
    // 設置 input
    mInputManager.registerInputChannel(win.mInputChannel, win.mInputWindowHandle);
    //詳見下面分析
    win.attach();
    mWindowMap.put(client.asBinder(), win);

    if (win.canReceiveKeys()) {
        //當該窗口能接收按鍵事件,則更新聚焦窗口
        focusChanged = updateFocusedWindowLocked(UPDATE_FOCUS_WILL_ASSIGN_LAYERS,
                false /*updateInputWindows*/);
    }
    assignLayersLocked(displayContent.getWindowList());
    ...
}

//WindowState.java
void attach() {
    mSession.windowAddedLocked();
}
創(chuàng)建 SurfaceSession 對象,并將當前 Session 添加到 WMS.mSessions 成員變量。
Session.java:
void windowAddedLocked() {
    if (mSurfaceSession == null) {
        mSurfaceSession = new SurfaceSession();
        mService.mSessions.add(this);
        if (mLastReportedAnimatorScale != mService.getCurrentAnimatorScale()) {
            mService.dispatchNewAnimatorScaleLocked(this);
        }
    }
    mNumWindow++;
}
SurfaceSession 的創(chuàng)建會調用 JNI,在 JNI 調用 nativeCreate()。
android_view_SurfaceSession.cpp:
static jlong nativeCreate(JNIEnv* env, jclass clazz) {
    SurfaceComposerClient* client = new SurfaceComposerClient();
    client->incStrong((void*)nativeCreate);
    return reinterpret_cast<jlong>(client);
}
創(chuàng)建 SurfaceComposerClient 對象, 作為跟 SurfaceFlinger 通信的代理對象。
SurfaceComposerClient::SurfaceComposerClient() {
    //getComposerService() 將返回 SF 的 Binder 代理端的 BpSurfaceFlinger 對象
    sp<ISurfaceComposer> sm(getComposerService());

    //先調用 SF 的 createConnection(),再調用_init
    _init(sm, sm->createConnection());
    if(mClient != 0) {
       Mutex::Autolock _l(gLock);

       //gActiveConnections 是全局變量,把剛才創(chuàng)建的 client 保存到這個 map 中去
       gActiveConnections.add(mClient->asBinder(), this);
    }
}
SurfaceFlinger.cpp:
sp<ISurfaceFlingerClient>SurfaceFlinger::createConnection() {
    Mutex::Autolock _l(mStateLock);
    uint32_t token = mTokens.acquire();

    //先創(chuàng)建一個Client
    sp<Client> client = new Client(token, this);

    //把這個Client對象保存到mClientsMap中,token是它的標識。
    status_t err = mClientsMap.add(token, client);

    /*
    創(chuàng)建一個用于 Binder 通信的 BClient,BClient 派生于 ISurfaceFlingerClient,
    它的作用是接受客戶端的請求,然后把處理提交給 SF,注意,并不是提交給 Client。
    Client 會創(chuàng)建一塊共享內存,該內存由 getControlBlockMemory 函數(shù)返回。
    */
    sp<BClient> bclient = new BClient(this, token,client->getControlBlockMemory());
    return bclient;
}


Client::Client(ClientID clientID, constsp<SurfaceFlinger>& flinger):ctrlblk(0), cid(clientID), mPid(0), mBitmap(0), mFlinger(flinger) {
const int pgsize = getpagesize();
    //下面這個操作會使 cblksize 為頁的大小,目前是4096字節(jié)
    constint cblksize = ((sizeof(SharedClient)+(pgsize-1))&~(pgsize-1));
    mCblkHeap = new MemoryHeapBase(cblksize, 0, "SurfaceFlinger Clientcontrol-block");

    ctrlblk = static_cast<SharedClient *>(mCblkHeap->getBase());
    if(ctrlblk) {
       new(ctrlblk) SharedClient;//原來 Surface 的 CB 對象就是在共享內存中創(chuàng)建的這個 SharedClient 對象
    }
}
SharedClient:
class SharedClient {

public:
   SharedClient();
   ~SharedClient();
   status_t validate(size_t token) const;
   uint32_t getIdentity(size_t token) const;

private:
    Mutexlock;
    Condition cv; //支持跨進程的同步對象

    //NUM_LAYERS_MAX 為 31,SharedBufferStack 是什么?
    SharedBufferStack surfaces[ NUM_LAYERS_MAX ];

};

//SharedClient的構造函數(shù),沒什么新意,不如Audio的CB對象復雜
SharedClient::SharedClient():lock(Mutex::SHARED), cv(Condition::SHARED) {
}
一個 Client 最多支持 31 個顯示層。每一個顯示層的生產(chǎn)/消費步調都由會對應的 SharedBufferStack 來控制。而它內部就用了幾個成員變量來控制讀寫位置。
SharedBufferStack.h:
class  SharedBufferStack{
     ......
    //Buffer 是按塊使用的,每個 Buffer 都有自己的編號,其實就是數(shù)組中的索引號。
    volatile int32_t head;     //FrontBuffer 的編號
    volatile int32_t available; //空閑 Buffer 的個數(shù)
    volatile int32_t queued;  //臟 Buffer 的個數(shù),臟 Buffer 表示有新數(shù)據(jù)的 Buffer
    volatile int32_t inUse; //SF 當前正在使用的 Buffer 的編號
    volatilestatus_t status; //狀態(tài)碼
     ......
  }
SF 的一個 Client 分配一個跨進程共享的 SharedClient 對象。這個對象有31個 SharedBufferStack 元素,每一個 SharedBufferStack 對應于一個顯示層。
一個顯示層將創(chuàng)建兩個 Buffer,后續(xù)的 PageFlipping 就是基于這兩個 Buffer 展開的。
接著看 SurfaceComposerClient 中這個_init函數(shù):
void SurfaceComposerClient::_init(
       const sp<ISurfaceComposer>& sm, constsp<ISurfaceFlingerClient>& conn) {
    mPrebuiltLayerState = 0;
    mTransactionOpen = 0;
    mStatus = NO_ERROR;
    mControl = 0;

    mClient = conn;// mClient 就是 BClient 的客戶端
    mControlMemory =mClient->getControlBlock();
    mSignalServer = sm;// mSignalServer 就是 BpSurfaceFlinger
    //mControl 就是那個創(chuàng)建于共享內存之中的 SharedClient
    mControl = static_cast<SharedClient*>(mControlMemory->getBase());
}
創(chuàng)建完 ViewRootImpl 對象后,接下來調用該對象的 setView() 方法。在 setView() 中調用了 requestLayout() 方法我們來看下這個方法:
public void requestLayout() {
   checkThread();
   mLayoutRequested = true;
   scheduleTraversals();
}

public void scheduleTraversals() {
    if(!mTraversalScheduled) {
       mTraversalScheduled = true;
       sendEmptyMessage(DO_TRAVERSAL); //發(fā)送 DO_TRAVERSAL 消息
    }
}

public void handleMessage(Message msg) {
   switch (msg.what) {
    ......
    case DO_TRAVERSAL:
        ......
        performTraversals();//調用 performTraversals()
        ......
        break;
    ......
    }
}

private void performTraversals() {
    finalView host = mView;//還記得這mView嗎?它就是 DecorView
    booleaninitialized = false;
    booleancontentInsetsChanged = false;
    booleanvisibleInsetsChanged;

    try {
        relayoutResult= // 1. 關鍵函數(shù)relayoutWindow
        relayoutWindow(params, viewVisibility,insetsPending);
    }
    ......
    draw(fullRedrawNeeded);// 2. 開始繪制
    ......
}

private int relayoutWindow(WindowManager.LayoutParams params, int viewVisibility, boolean insetsPending)throws RemoteException {
       //原來是調用 IWindowSession 的 relayout(),暫且記住這個調用
       int relayoutResult = sWindowSession.relayout(mWindow, params, (int) (mView.mMeasuredWidth * appScale + 0.5f),  (int) (mView.mMeasuredHeight * appScale + 0.5f), viewVisibility, insetsPending, mWinFrame, mPendingContentInsets, mPendingVisibleInsets, mPendingConfiguration, mSurface); //mSurface 做為參數(shù)傳進去了。
       }
   ......
}

private void draw(boolean fullRedrawNeeded) {
    Surface surface = mSurface;//mSurface 是 ViewRoot 的成員變量
    ......
    Canvascanvas;

    try {
       int left = dirty.left;
       int top = dirty.top;
       int right = dirty.right;
       int bottom = dirty.bottom;

       //從 mSurface 中 lock 一塊 Canvas
       canvas = surface.lockCanvas(dirty);
       ......
       mView.draw(canvas);//調用 DecorView 的 draw 函數(shù),canvas 就是畫布
       ......
       //unlock 畫布,屏幕上馬上就能看到 View 的樣子了
       surface.unlockCanvasAndPost(canvas);
    }
    ......
}
在 ViewRoot 構造時,會創(chuàng)建一個 Surface,它使用無參構造函數(shù),代碼如下所示:
final Surface mSurface = new Surface();
1
此時創(chuàng)建完的 Surface 是空的,什么都沒有。接著繼續(xù)分析 relayoutWindow(),在 relayoutWindow() 中會調用 IWindowSession 的 relayout(),這是一個跨進程方法會調用到 WMS 中的 Session.relayout(),最后調用到 WindowManagerService.relayoutWindow()。
public int relayoutWindow(Session session,IWindow client,
           WindowManager.LayoutParams attrs, int requestedWidth,
           int requestedHeight, int viewVisibility, boolean insetsPending,
           Rect outFrame, Rect outContentInsets, Rect outVisibleInsets,
            Configuration outConfig, SurfaceoutSurface){
        .....

    try {
         //win 就是 WinState,這里將創(chuàng)建一個本地的 Surface 對象
        Surfacesurface = win.createSurfaceLocked();
        if(surface != null) {
            //先創(chuàng)建一個本地 surface,然后在 outSurface 的對象上調用 copyFrom
            //將本地 Surface 的信息拷貝到 outSurface 中,為什么要這么麻煩呢?
            outSurface.copyFrom(surface);
        ......
}
WindowManagerService.java::WindowState:
Surface createSurfaceLocked() {
    ......
    try {
        //mSurfaceSession 就是在 Session 上創(chuàng)建的 SurfaceSession 對象
        //這里,以它為參數(shù),構造一個新的 Surface 對象
        mSurface = new Surface(mSession.mSurfaceSession, mSession.mPid, mAttrs.getTitle().toString(), 0, w, h, mAttrs.format, flags);
    }
    Surface.openTransaction();//打開一個事務處理
    ......
    Surface.closeTransaction();//關閉一個事務處理
    ......
}
構造 Surface 對象:
 public Surface(SurfaceSession s,//傳入一個SurfaceSession對象
    int pid, String name, int display, int w, int h, int format, int flags) throws OutOfResourcesException {
        ......
        mCanvas = new CompatibleCanvas();
        //又一個 native 函數(shù)
        init(s,pid,name,display,w,h,format,flags);
        mName = name;
    }
static void Surface_init(JNIEnv*env, jobject clazz, jobject session, jint pid, jstring jname, jint dpy, jint w, jint h, jint format, jintflags) {

    //從 SurfaceSession 對象中取出之前創(chuàng)建的那個 SurfaceComposerClient 對象
    SurfaceComposerClient* client = (SurfaceComposerClient*)env->GetIntField(session, sso.client);
    sp<SurfaceControl> surface;//注意它的類型是 SurfaceControl
    if (jname == NULL) {
        //調用 SurfaceComposerClient 的 createSurface 函數(shù),返回的 surface 是一個 SurfaceControl 類型
        surface = client->createSurface(pid, dpy, w, h, format, flags);
    } else{
        ......
    }

   //把這個 surfaceControl 對象設置到 Java 層的 Surface 對象中
   setSurfaceControl(env, clazz, surface);
}
在 createSurface 內部會使用 Binder 通信將請求發(fā)給 SurfaceFlinger:
sp<ISurface>SurfaceFlinger::createSurface(ClientID clientId, int pid, const String8& name, ISurfaceFlingerClient::surface_data_t* params, DisplayID d, uint32_t w, uint32_t h, PixelFormat format, uint32_t flags) {
    sp<LayerBaseClient> layer;//LayerBaseClient 是 Layer 家族的基類
    //這里又冒出一個 LayerBaseClient 的內部類,它也叫Surface
    sp<LayerBaseClient::Surface> surfaceHandle;
    Mutex::Autolock _l(mStateLock);

    //根據(jù) clientId 找到 createConnection 時加入的那個 Client 對象
    sp<Client> client = mClientsMap.valueFor(clientId);
    ......
    //注意這個 id,它的值表示 Client 創(chuàng)建的是第幾個顯示層
    //同時也表示將使用 SharedBufferStatck 數(shù)組的第 id 個元素
    int32_t id = client->generateId(pid);

    //一個 Client 不能創(chuàng)建多于 NUM_LAYERS_MAX 個的Layer
    if(uint32_t(id) >= NUM_LAYERS_MAX) {
       return surfaceHandle;
    }

    //根據(jù) flags 參數(shù)來創(chuàng)建不同類型的顯示層
    switch(flags & eFXSurfaceMask) {
        case eFXSurfaceNormal:
           if (UNLIKELY(flags & ePushBuffers)) {
             //創(chuàng)建 PushBuffer 類型的顯示層
            layer = createPushBuffersSurfaceLocked(client, d, id, w, h, flags);
            } else {
               //創(chuàng)建 Normal 類型的顯示層
               layer = createNormalSurfaceLocked(client, d, id, w, h, flags, format);
           }
           break;
        case eFXSurfaceBlur:
            //創(chuàng)建 Blur 類型的顯示層
           layer = createBlurSurfaceLocked(client, d, id, w, h, flags);
           break;
        case eFXSurfaceDim:
            //創(chuàng)建 Dim 類型的顯示層
           layer = createDimSurfaceLocked(client, d, id, w, h, flags);
           break;
    }

    if(layer != 0) {
        layer->setName(name);
        setTransactionFlags(eTransactionNeeded);
        //從顯示層對象中取出一個 ISurface 對象賦值給 SurfaceHandle
        surfaceHandle = layer->getSurface();
        if(surfaceHandle != 0) {
           params->token = surfaceHandle->getToken();
           params->identity = surfaceHandle->getIdentity();
           params->width = w;
           params->height = h;
           params->format = format;
        }
    }
    return surfaceHandle;//ISurface 的 Bn 端就是這個對象
}
sp<LayerBaseClient>SurfaceFlinger::createNormalSurfaceLocked(const sp<Client>& client, DisplayID display, int32_t id, uint32_t w, uint32_t h, uint32_t flags, PixelFormat& format) {
    switch(format) { //一些圖像方面的參數(shù)設置,可以不去管它
    case PIXEL_FORMAT_TRANSPARENT:
    case PIXEL_FORMAT_TRANSLUCENT:
       format = PIXEL_FORMAT_RGBA_8888;
       break;
    case PIXEL_FORMAT_OPAQUE:
       format = PIXEL_FORMAT_RGB_565;
       break;
    }

    //創(chuàng)建一個 Layer 類型的對象
    sp<Layer> layer = new Layer(this, display,client, id);

    //設置 Buffer
    status_t err = layer->setBuffers(w, h, format, flags);
    if (LIKELY(err == NO_ERROR)) {
        //初始化這個新 layer 的一些狀態(tài)
        layer->initStates(w, h, flags);
        //下面這個函數(shù)把這個 layer 加入到 Z 軸集合中
        addLayer_l(layer);
    }
......
    return layer;
}
createNormalSurfaceLocked 函數(shù)有三個關鍵點,它們是:
構造一個Layer對象。
調用Layer對象的setBuffers函數(shù)。
調用SF的addLayer_l函數(shù)。
當跨進程的 createSurface() 執(zhí)行完返回一個 ISurface 對象,接下來會創(chuàng)建 SurfaceControl 對象:
SurfaceControl::SurfaceControl(
       const sp<SurfaceComposerClient>& client,
       const sp<ISurface>& surface,
       const ISurfaceFlingerClient::surface_data_t& data,
       uint32_t w, uint32_t h, PixelFormat format, uint32_t flags)
    //mClient 為 SurfaceComposerClient,而 mSurface 指向跨進程 createSurface() 調用返回的 ISurface 對象
    :mClient(client), mSurface(surface),
     mToken(data.token), mIdentity(data.identity),
     mWidth(data.width), mHeight(data.height), mFormat(data.format),
     mFlags(flags){
     ......
}
SurfaceControl 類可以看作是一個 wrapper 類,它封裝了一些函數(shù),通過這些函數(shù)可以方便地調用 mClient 或 ISurface 提供的函數(shù)。
最后會執(zhí)行 copyFrom() 返回給 App 客戶端:
static void Surface_copyFrom(JNIEnv* env,jobject clazz, jobject other) {
    //根據(jù)JNI函數(shù)的規(guī)則,clazz 是 copyFrom 的調用對象,而 other 是 copyFrom 的參數(shù)。
    //目標對象此時還沒有設置 SurfaceControl,而源對象在前面已經(jīng)創(chuàng)建了 SurfaceControl
    constsp<SurfaceControl>& surface = getSurfaceControl(env, clazz);
    constsp<SurfaceControl>& rhs = getSurfaceControl(env, other);
    if (!SurfaceControl::isSameSurface(surface, rhs)) {
        //把源 SurfaceControl 對象設置到目標 Surface 中
        setSurfaceControl(env, clazz, rhs);
    }
}
copyFrom 期間一共有三個關鍵對象,它們分別是:
SurfaceComposerClient
SurfaceControl
Surface,這個 Surface 對象屬于 Native 層,和 Java 層的 Surface 相對應
其中轉移到 ViewRoot 成員變量 mSurface 中的,就是最后這個 Surface 對象了。
在 SurfaceFlinger 進程中,Client 的一個 Layer 將使用 SharedBufferStack 數(shù)組中的一個成員,并通過 SharedBufferServer 結構來控制這個成員,我們知道 SurfaceFlinger 是消費者,所以可由 SharedBufferServer 來控制數(shù)據(jù)的讀取。
與之相對應,客戶端的進程也會有一個對象來使用這個 SharedBufferStack,可它是通過另外一個叫 SharedBufferClient 的結構來控制的。客戶端為 SurfaceFlinger 提供數(shù)據(jù),所以可由 SharedBufferClient 控制數(shù)據(jù)的寫入。
三、Surface 顯示過程
如圖所示,在 App 進程中創(chuàng)建 PhoneWindow 后會創(chuàng)建 ViewRoot。ViewRoot 的創(chuàng)建會創(chuàng)建一個 Surface,這個 Surface 其實是空的,通過與 WindowManagerService 通信 copyFrom() 一個 NativeSurface。在與 SurfaceFlinger 通信時,會創(chuàng)建 SharedClient 一段共享內存,里面存放的是 SharedBufferStack 對應 SurfaceFlinger 中的 SurfaceLayer 每個 Layer 其實是一個 FrameBuffer,每個 FrameBuffer 中有兩個 GraphicBuffer 記作 FrontBuffer 和 BackBuffer。
在 SurfaceFlinger 中 SharedBufferServer 來管理 FrameBuffer。同時在 App 端 copyFrom() 出來 NativeSurface 時會創(chuàng)建一個 SharedBufferClient 與 SharedClient 這塊共享內存關聯(lián)。當客戶端 addView() 或者需要更新 View 時,會通過 SharedBufferClient 寫入數(shù)據(jù)到 ShareClient 中,SurfaceFlinger 中的 SharedBufferServer 接收到通知會將 FrameBuffer 中的數(shù)據(jù)傳輸?shù)狡聊簧稀?/p>
HWComposer 是基于硬件來產(chǎn)生 VSync 信號的,來通知 SurfaceFlinger 重繪控制顯示的幀率。
原文鏈接:https://blog.csdn.net/freekiteyu/article/details/79483406
友情推薦:
至此,本篇已結束。轉載網(wǎng)絡的文章,小編覺得很優(yōu)秀,歡迎點擊閱讀原文,支持原創(chuàng)作者,如有侵權,懇請聯(lián)系小編刪除,歡迎您的建議與指正。同時期待您的關注,感謝您的閱讀,謝謝!
點個在看,方便您使用時快速查找!