
【統(tǒng)計學(xué)習(xí)方法】 第2章 感知機代碼實現(xiàn)(二)
點擊上方“公眾號”可訂閱哦!
”只要你相信我,閉上眼就能到“
感知機的代碼搞了一天才搞明白,做一個總結(jié),我要堅持下去……
1
●
小標(biāo)題
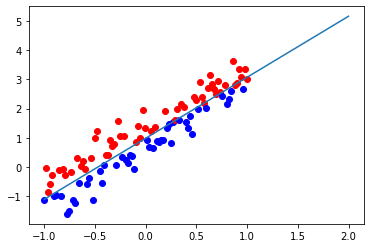
首先準(zhǔn)備一條直線,在直線周圍添加噪聲,生成原始數(shù)據(jù)集,
import numpy as npimport randomimport matplotlib.pyplot as plt# 定義一個函數(shù)def random_point_nearby_line(weight , bias , size = 10):x_point = np.linspace(-1, 1, size)[:,np.newaxis]noise = np.random.normal(0, 0.5, x_point.shape)y_point = weight * x_point + bias + noiseinput_arr = np.hstack((x_point, y_point))return input_arr
# 直線的真正參數(shù)real_weight = 2real_bias = 1size = 100
# 生成輸入的數(shù)據(jù)input_point = random_point_nearby_line(real_weight, real_bias, size)# 給數(shù)據(jù)打標(biāo)簽,在直線之上還是直線之下,above=1,below=-1label = np.sign(input_point[:,1] - (input_point[:,0] * real_weight + real_bias)).reshape((size, 1))
接下來是初始化參數(shù),
#?初始化參數(shù)weight = [0, 0]bias = 0learning_rate?=?0.1train_num = 1000
train_data = list(zip(input_point, label))訓(xùn)練
for i in range(train_num):train = random.choice(train_data)[x1,x2],y_label = train;y_predict = np.sign(weight[0]*x1 + weight[1]*x2 + bias)# print("train data:x:(%d, %d) y:%d ==>y_predict:%d" %(x1,x2,y_label,y_predict))if y_label*y_predict<=0:weight[0] = weight[0] + learning_rate*y_label*x1weight[1] = weight[1] + learning_rate*y_label*x2bias = bias + learning_rate*y_labelprint("update weight and bias:")print(weight[0], weight[1], bias)print("stop training :")print(weight[0], weight[1], bias)
輸出:
stop training :[-1.28282828] [0.61316304] [-0.6]
可視化
for i in range(len(input_point)):if label[i] == 1:plt.plot(input_point[i][0], input_point[i][1], 'ro')else:plt.plot(input_point[i][0], input_point[i][1], 'bo')#plt.plot()x_1 = []x_2 = []for i in range(-1,3):x_1.append(i)x_2.append((-weight[0]*i-bias)/weight[1])plt.plot(x_1,x_2)plt.show()
?END
掃碼關(guān)注
微信號|sdxx_rmbj
評論
圖片
表情