
Python自動化辦公-自動錄入表單數(shù)據(jù)
先來看一個動圖:
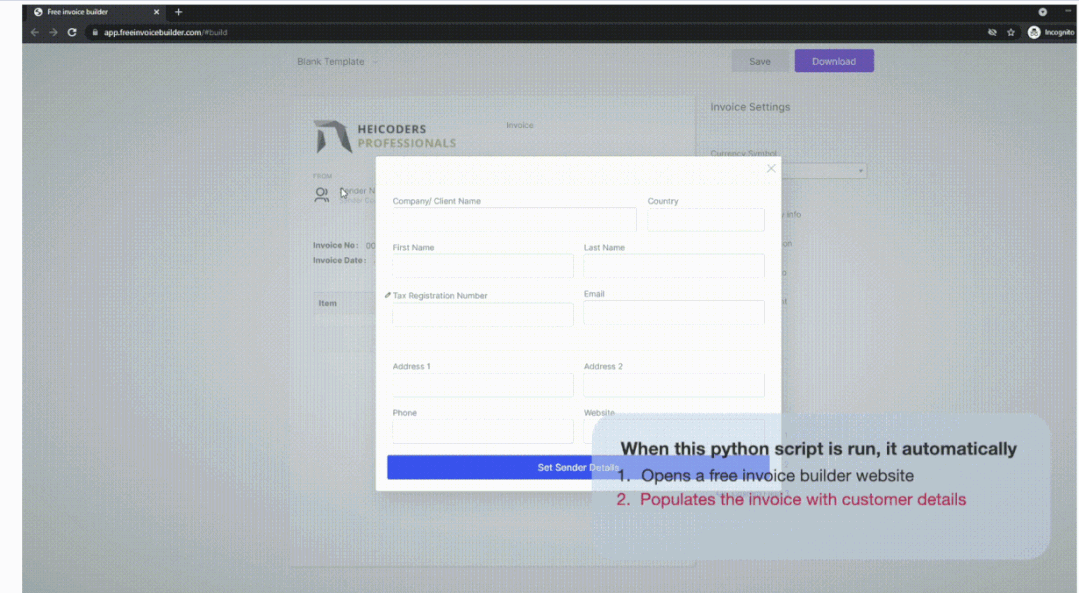
圖片展示的是如何用 Python 將銷售交易數(shù)據(jù)填充到在線發(fā)票生成器中,可以自動生成并下載所有客戶的發(fā)票。
再來看一段視頻
視頻展示的是如何用 Python 來玩 Flash 游戲 Sushi Go Round。源代碼[1]。
是不是很酷炫呢?
它們都是借助 PyAutoGUI 來實現(xiàn)的。
有經(jīng)驗的朋友可能會說,selenium 或 playwright 等瀏覽器自動化工具就可以實現(xiàn)這樣的需求,這有什么酷炫的,你說的沒錯,如果是瀏覽器是的確可以使用 selenium 或 playwright,前提還得要懂 html、css、瀏覽器等相關(guān)知識。如果錄入操作不是在瀏覽器上進行,而是客戶端的應(yīng)用程序上錄入,那么 selenium 或 playwright 將無法使用。
如果你也想實現(xiàn)上述展示的效果,不妨繼續(xù)向下看。
PyAutoGUI 簡介
今天要介紹的工具就是 PyAutoGUI,看到這個名字,就能猜到它的作用,無非用 Python 自動處理圖形界面的操作,的確是這樣,你可以使用編程的方式來控制電腦的鼠標和鍵盤。
它有兩個優(yōu)點:
跨平臺,支持 Python2 和 Python3,支持 Windows,MacOS,Linux。 易使用,接口簡單不需要太多知識就可以學會,會操作鼠標和鍵盤就可以。
一個缺點:
需要定位鼠標,有時候不太方便,可移植性不強,換臺電腦可能因為尺寸不同就報錯了。
PyAutoGUI 安裝
PyAutoGUI 支持 pip 進行安裝
pip install pyautogui
如果是 Windows 不需要再安裝其他依賴。
如果是 Mac 還要安裝 pyobjc:
pip3 install pyobjc-core
pip3 install pyobjc
如果是 Linux 還需要安裝下這些:
sudo apt-get scrot
sudo apt-get install python-tk
sudo apt-get install python3-dev
無論哪一個操作系統(tǒng)都要確保 Pillow 已經(jīng)安裝。如果是 Linux,你還需要安裝額外的庫來確保 Pillow 中的 PNG/JPEG 模塊正常工作。具體可以參考:
https://stackoverflow.com/questions/7648200/pip-install-pil-e-tickets-1-no-jpeg-png-support

http://ubuntuforums.org/showthread.php?t=1751455
使用舉例
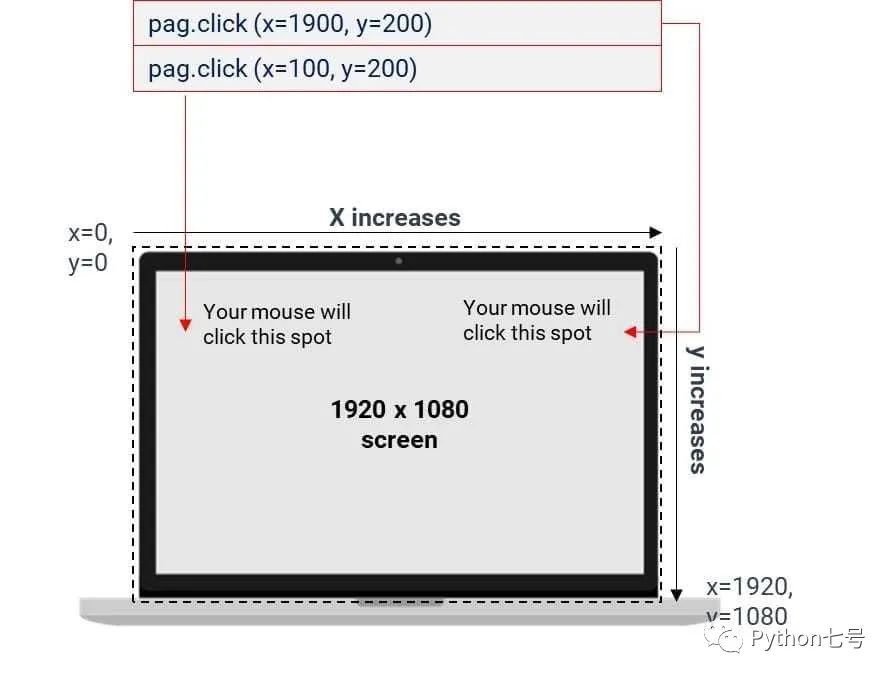
使用前需要先了解屏幕坐標的設(shè)定,X 坐標從左側(cè)的 0 開始,向右增加,Y 坐標從頂部的 0 開始,向下增加。如下圖所示:
目前,PyAutoGUI 僅適用于主顯示器。PyAutoGUI 對于第二臺顯示器的屏幕不可靠(鼠標功能可能會或可能不會在多顯示器設(shè)置上工作,具體取決于您的操作系統(tǒng)和版本)。
PyAutoGUI 按下的所有鍵盤都會發(fā)送到當前具有焦點的窗口,就像您按下了物理鍵盤鍵一樣。
鼠標和鍵盤控制
鼠標控制:
#1、鼠標移動
pyautogui.moveTo(100, 150)  #絕對位置
pyautogui.moveRel(None, 10) #相對位置
pyautogui.moveTo(500, 500, duration=2, tween=pyautogui.easeInOutQuad)  # 2秒帶動畫移動到500,500

#2、鼠標點擊
pyautogui.click()  單擊
pyautogui.click(x=100, y=200) #
pyautogui.doubleClick()  雙擊
pyautogui.rightClick()  單擊鼠標右鍵
pyautogui.middleClick() 單擊鼠標中鍵
pyautogui.click(button='right', clicks=3, interval=0.25)
#3、鼠標拖動
pyautogui.dragTo(x,y[,duration=t)
pyautogui.dragRel(x,y, duration=0.5)  #按住左鍵移動
#4、鼠標滾動
pyautogui.scroll(10)  / -10  # 正數(shù)向上/下滾動
pyautogui.hscroll(10)  / -10 #  向右/左滾動
鍵盤操作:
pyautogui.typewrite('Hello world!', interval=0.25) #模擬輸入
typewrite(['enter'])
pyautogui.typewrite(['a','b','left','left','X','Y']) # XYab
pyautogui.press('esc')
pyautogui.keyDown('shift')
pyautogui.press(['left', 'left', 'left', 'left', 'left', 'left']) 連續(xù)按鍵left
pyautogui.keyUp('shift')
pyautogui.hotkey('ctrl', 'c')   # 組合鍵
消息彈窗提醒
程序運行的過程中,還可以彈窗讓你干預(yù)自動執(zhí)行的流程:
>>> import pyautogui
>>> pyautogui.alert('This is an alert box.')
'OK'
>>> pyautogui.confirm('Shall I proceed?')
'Cancel'
>>> pyautogui.confirm('Enter option.', buttons=['A', 'B', 'C'])
'B'
>>> pyautogui.prompt('What is your name?')
'Al'
>>> pyautogui.password('Enter password (text will be hidden)')
'swordfish'
屏幕操作
## 0 截取整個屏幕
import pyautogui
im1 = pyautogui.screenshot()
im1.save('my_screenshot.png')
im2 = pyautogui.screenshot('my_screenshot2.png')

## 1、截取部分屏幕
im = pyautogui.screenshot(r'C:\screenshot.png',region=(0, 0, 300, 400)) # 截屏并設(shè)置保存圖片的位置和名稱

## 2、 匹配屏幕所有與目標圖片的對象,可以用for循環(huán)和list()輸出
pyautogui.locateAllOnScreen(r'C:\region_screenshot.png')
for pos in pyautogui.locateAllOnScreen(r'C:\\region_screenshot.png'):
    print(pos)

## 3、獲取屏幕點色彩屬性值
pix = pyautogui.screenshot().getpixel((x, y))  #0,1,2=rgb

## 4、灰度值匹配
pyautogui.pixelMatchesColor(100, 200, (205, 255, 245), tolerance=10)
定位操作
# 1、獲取屏幕寬高
screenWidth, screenHeight = pyautogui.size()
# 屏幕左上開始為(0,0)
# 2、獲取當前鼠標位置
currentMouseX, currentMouseY = pyautogui.position()
# 3、根據(jù)圖片定位在圖片在屏幕上的中點
x, y = pyautogui.locateCenterOnScreen(r'C:\screenshot.png')
打開瀏覽器,自動錄入一個表單
注意不同的電腦瀏覽器的位置可能不一樣,需要自己定位好輸入框的位置 x,y。
import time
import pyautogui as pag
import webbrowser

webbrowser.open_new("https://formsmarts.com/html-form-example")

#Let the web browser finish loading before clicking (sleep for 2 seconds)
time.sleep(2)

pag.scroll(100)

#Click on the input field
pag.click(x=700, y=970)

#Type some data into the input field. We pass in an optional parameter of interval so it doesn't type too fast
pag.write('David Tan', interval=0.2)
工作原理
Windows、macOS 和 Linux 各有不同的方式來以編程方式控制鼠標和鍵盤。這通常會涉及晦澀和深入的技術(shù)細節(jié)。PyAutoGUI 的工作是將所有這些復(fù)雜性隱藏在一個簡單的 API 后面。
在 Windows 上,PyAutoGUI 通過內(nèi)置 ctypes 模塊訪問 Windows API(也稱為 WinAPI 或 win32 API)。https://github.com/asweigart/nicewin[2] 上的 nicewin 模塊演示了如何通過 Python 進行 Windows API 調(diào)用。
在 macOS 上,PyAutoGUI 使用 rubicon-objc 模塊訪問 Cocoa API。
在 Linux 上,PyAutoGUI 使用該 Xlib 模塊訪問 X11 或 X Window 系統(tǒng)。
使用場景
一些輔助錄入工具,比如一些涉及自動錄入表單的場景 玩游戲工具,比如 GitHub 上有不少用這個實現(xiàn)自動玩跳一跳小游戲 執(zhí)行自動化用戶界面測試 一些電腦上重復(fù)的機械化操作 GitHub 上的案例[3]
總之你可以發(fā)揮想象力,你的程序都能控制鼠標和電腦了,還有什么不可以完成的呢?
最后的話
你可以利用 PyAutoGUI 庫開發(fā) Python 腳本,控制鼠標和鍵盤來自動執(zhí)行應(yīng)用程序的交互。
都看到這兒了,你還沒關(guān)注我嘛?如果有收獲,請點在看支持,再不濟點個贊總行了吧,感謝老鐵支持。
參考資料
源代碼: https://github.com/asweigart/sushigoroundbot
[2]https://github.com/asweigart/nicewin: https://github.com/asweigart/nicewin
[3]GitHub 上的案例: https://github.com/search?q=pyautogui